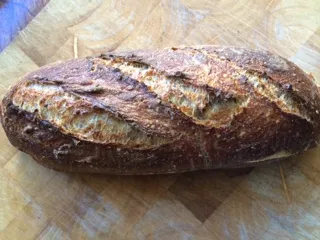
The Fresh Loaf

A Community of Amateur Bakers and Artisan Bread Enthusiasts.

Blogs

HokeyPokey's picture
HokeyPokey

Now, this is a first for me - a golden Christmas pudding - golden almonds, golden fruit and actual edible GOLD!!!

Full review and pictures here

breadbakingbassplayer's picture
breadbakingbass...

Recent bakes:


11/27/13 - 100% Whole Spelt Pandoro-Like Thing

This is a continuation of the 100% spelt brioche that I made last week or so…  I wanted to see what more butter, eggs, and sugar would do using spelt flour...


11/24/13

Rye SD

100g - Water

50g - Organic whole rye flour (Arrowhead MIlls)

48g - Rye SD (100% hydration)


190g - Total SD weight


1:00pm - Mix rye SD, cover and let rest.


11/25/13

11:40pm - Add 100g rye flour to SD, mix, cover and let rest.


11/26/13

Decide to attempt making pandoro with 100% spelt flour (Arrowhead mills).

Sweet SD Starter

200g - Whole spelt flour

100g  - Rye SD from above

58g - Egg (1 xl egg)

17g - Water

38g - Sucanat


396g - Total sweet starter weight


8:30pm - Mix sweet starter, place in covered container, let rest…

11:45pm - Place starter in refrigerator.


11/27/13

8:01am - Take starter out of fridge.

9:30am - Place starter in microwave with a cup of hot water, just to keep starter warm.  My kitchen was cold.

6:50pm - Place starter back in refrigerator…


Final Dough

250g - Whole spelt flour

292g - Eggs (5 xl eggs)

188g - Unsalted butter

150g - Sucanat

10g - Honey

6g - Salt

2g - Instant dry yeast (½ tsp)

396g - Sweet SD starter


1306g - Total dough weight


10:00pm - Weigh out all ingredients.  When butter is slightly softened at room temp, whip with whisk with a little of the succanat, set aside.  Cut up sweet SD starter into small pieces.  In large mixing bowl, place eggs, honey, salt, yeast, sweet SD starter, and spelt flour.  Mix well with wooden spoon until smooth and lump free.  When you can feel some resistance and gluten development, then start adding the succanat.  When all the sucanat is is combined, then mix in the whipped butter.  This process takes about 1 hour by hand…


11:00pm - Place dough in lightly oiled covered container, place in fridge.


12:00pm - Lightly spray 5 ¼” diameter x 3 ¾” tall paper pannetone molds with spray olive oil or you can butter lightly if you like.  Divide dough into 2 equal portions, and place into molds.  Spray lightly the top of the dough with olive oils spray, place on pan and cover with saran wrap and proof overnight…  The dough is very wet and I think I overhydrated so I was unable to shape the dough into a ball…


11/28/13

10:40am - Preheat oven to 380F.


11:30am - When dough reaches approx ¾” from top of mold, bake in oven for 40 minutes or until internal temp reaches 190F…

Ugh…  This recipe was inspired by the Bruno Bakery’s Pandoro recipe from Maggie Glezer’s Artisan Baking Across America…  This was a lot of work especially when you don’t have an electric mixer, and a lot of time.  Not sure if it was worth it, but at least it didn’t taste bad.  The texture wasn’t what I was after, the shreddy crumb of a pandoro made from high gluten wheat flour…  It was more cakey…  It tastes quite good toasted…


At the same time, I made another spelt bread using a spelt/rye starter, and all spelt for the final dough…  I’ll just say that it didn’t turn out well probably due to not bulk fermenting long enough…  I think I’ll wait awhile before I try a 100% spelt bread using only spelt flour, water, sourdough and salt…  I just didn’t like the taste…


Now on to the next thing…  Limppu and Ruisreikäleipä from Nordic Breads in NYC…  So I have been baking a lot with rye flour lately and remember an article from New York Magazine: Rye’s Rise: Loaves That are More Than a Vehicle for Pastrami: http://www.grubstreet.com/2013/09/new-rye-breads.html


I am fortunate enough to live in NYC and was able to find Nordic Bread’s rye bread Ruisreikäleipä at Dean & Deluca.  I got it just to try and see what it was like.  It’s 100% locally grown organic rye flour.  It’s quite soft, light textured, and sour.


So here is my attempt at Limppu, which simply means loaf in Finnish…  


The recipes that I referenced are as follows. more so the 2nd one:

http://flourandleaven.wordpress.com/2013/08/17/limpuu/

http://tofufortwo.net/2009/06/08/finnish-rye-bread-2/


For technique, I saw this video on YouTube: http://www.youtube.com/watch?v=thaVEPbcT_w


I just think the word “limppu” sounds funny…  On a more serious note, I think that limppu is basically a 100% rye bread that is 75% hydration.  The sourdough starter is a rather liquidy batter in which approx 35% of the total flour is pre-fermented in in most of the total liquid...  Anyway, here’s what happened:


11/28/13

Rye SD - Freshening

50g - Rye flour

50g - Water

Whatever rye SD I had leftover, probably about 50g.


6:30pm - Mix SD, cover and let rest.


11/29/13

Rye SD

364g - Rye flour

700g - Water

50g - Rye SD from above

16g - Toasted spelt bread crumbs from the failed loaf…


1130g - Total SD weight


9:45pm - Mix, cover and let rest.


Final Dough

636g - Rye flour

50g - Water

20g - Salt

1130g - Rye SD from above


1836g - Total dough weight


6:30pm - Mix all ingredients with a wooden spoon, place in covered container and let ferment for 3 hours.


10:00pm - Flour work surface well with rye flour, shape dough into a cone, place on parchment paper, cover with towel, let rest for 2 hours, or until surface is cracked.


11:00pm - Place baking stone on middle rack in oven along with steaming device, preheat oven to 500F.


12:00am - Bake for 10 minutes at 500F, then 80 minutes at 400F, then 10 minutes in off oven.  Internal temp should be approx 210F, and loaf should weigh approximately 15% less than pre-baked weight.  Cover in aluminum foil, then in kitchen towels and let rest for at least 24 hours.  I let mine rest for 2 days before cutting.


Notes:  I think it turned out well, but it was not as sour as I had heard that this type of bread could be.  The rye bread from Nordic Breads is more sour than my limppu…  Also, maybe I left the loaf in foil for too long as there were some strange spots on the loaf that I ended up just cutting out with a knife…  


I think the texture is good, but I think I could have let the loaf proof for longer so it flattened out more and developed more cracks and possible had a lighter crumb…  Anyway, I am relatively pleased with this attempt…


Until the next loaf…


Tim


aptk's picture
aptk

I'm still working on my challenge to provide before and after pictures of all the breads I posted in a collage. This is not the pizza in the collage, but it's the only pizza pic I have that somewhat shows the crumb of my pizza dough. And all my pizzas are the same basic dough, so here's to substitutions!

Pizza is such a customizable dish that it's difficult to produce an exact recipe. My basic rule of thumb is to use a crust recipe you like, the sauce of your choice and the toppings that you prefer. You can cook it on a stone, in a pan or a dish. In the oven, on the grill or over a campfire. Make it small, medium, large. Thin crust, hand tossed, thick or stuffed crust, deep dish.

The one I have shown is a deep dish version, Alredo Sauce, chicken, broccoli, and all the other goodies we like. The only thing I'm going to include here is my recipe for the crust.

Pizza Crust

SIZE            WATER               YEAST               OIL              SALT               FLOUR

Small            1/2 cup                 1/2 tsp             1 tbs              1/2 tsp             1 1/2 cups

Med              3/4 cup                 3/4 tsp             1 1/2 tbs        3/4 tsp             2 1/4 cups

Large             1 cup                   1 tsp                 2 tbs              1 tsp               3 cups


The water should be warm. Pour water into bowl, sprinkle with yeast and allow to bloom. Add salt, oil and half the flour. Beat with a fork until smooth. Knead in the rest of the flour and knead until dough is smooth and elastic. Oil dough, cover lightly, and put in a warm place until doubled in size.

Punch down and allow to rest for 10 minutes. Shape dough to fit your needs and you can let it rest again and even rise again, or you can add your toppings and put it in the oven. I bake mine at 425F until it's as done as I like it.

Now the conditions in your kitchen are probably different from the conditions in my kitchen, and I don't know what kind of yeast, oils and flours you use, so amounts my differ according to your needs, tastes and preferences. I tend to use all purpose flour, Red Star dry active yeast, either vegetable or olive oil, and regular table salt.

Explore your options with this one, I've never had anyone turn down pizza hot out of the oven. Enjoy!


HokeyPokey's picture
HokeyPokey

I am starting to feel the effect of all this tastings - six down, another dozen (at least) to go.

And it seemed like such a good idea - full reviews here

Song Of The Baker's picture
Song Of The Baker

I have been on a higher % rye kick for a while now and decided to bake up a few to stock me up for December.  When I say higher %, I know these aren't quite high, but for me, I haven't really tried anything higher then 40% prior to this.  Maybe a Danish Rye qualifies as higher than 40%...

I baked up a Swedish Seed Rye using my Swedish Rye formula and simply adjusted it by using dark rye instead of medium rye.  Also added some sprouted organic spelt flour in lieu of my typical spelt flour.  Even though it will still be a day or two until the flavour develops properly, I can already taste the dark rye coming through loud and clear.

Starting out as a 40% Rye, the other 2 loaves I baked up turned into a 50% Rye inadvertently.  I realized during the mixing process that I added too much water.  I had to off set this hydration with more flour.  I ended up using an extra 95 grams of dark rye flour.  The loaves came out decent but with little oven spring.  I noticed that the bread tastes quite sour so I have a feeling I over fermented both the sour and the bulk.  The extra bran in the dark rye was probably the culprit in the over fermenting.  Still came out decent enough for a slice of cheddar or knob of liver pate.

John


aptk's picture
aptk

You just have to improvise and salvage what you can!

These were really good buttery rolls. They should have been croissants!

I was trying to make croissants, but had a major butter blowout while working my dough. Such a blowout that it was not going to work as croissants at all! So I folded my dough up, cut it into 6 pieces, sort of tucked the corners under to form a ball and then went at each ball with my apple corer.

Some times you just have to do what you can to save what you can!

aptk's picture
aptk

Continuing on my quest to enhance the collage I posted, this is what I call Cherry Pecano Bread. And I know that I said I would include either recipes, or links to recipes, but this one is a work in progress, so the recipe is not really ready yet. I will though, explain what I did so that you can try it too!

We eat a lot of salad at my house, and I've recently started using these little packets to kind of dress them up when one day it occurred to me that this stuff would be good in bread.

To my favorite basic sweet bread dough, I added vanilla, cinnamon and the packet of salad toppings, which in this case was Salad Pizazz's Cherry Cranberry Pecano. It has cherry flavored cranberries and honey toasted pecans.

I baked this loaf in a springform pan, and think that I should have let it proof a little longer. I did a horrible job on the scoring, I did use an egg was and sprinkled it with turbinado sugar.

It was a good bread, especially sliced and toasted with a little melted butter.

I've tried several different Salad Pizazz flavors. Each packet I've used so far has almost a cup of ingredients, maybe like 7/8 of a cup. Try it! I think you'll like the results.

aptk's picture
aptk

And the recipe for this one is here:

http://www.thefreshloaf.com/node/35064/sopapillas

bakingbadly's picture
bakingbadly

Long time no read. :)

For the last month I've been busy testing new sourdough formulas, adapting them, testing them---repeatedly. So much so that I was confident enough to launch a taste-testing party. Why? Because I intend to open my own bakery, here in Cambodia, Southeast Asia.


Two days ago was the BIG day. And prior to the BIG day was three weeks of planning and preparation by my German friend / business partner (Michael) and I. This entailed inviting strangers who were raised or lived in central Europe for several years, primarily Germany, Austria, and Switzerland. Reason being, I'm attempting to specialize in central European breads or breads reminiscent of them.


The taste-testing party was held at our house. Yes, Michael and I share a two-story house. We often joke and say this is a perfect arrangement. Formerly a chef and F&B manager at restaurants and hotels, he can cook for me, while I can bake for him (and his wife).

We also borrowed tables, wine and beer glasses, plates, cutlery, and other equipment from restaurant owners. Further, by my request, Michael prepared pork roast (cooked for 7 hours in a drum barrel), beer can chicken, and ratatouille (vegetable stew). My duty was to bake a "European-style sourdough" and "German-style pretzels". 


I opted to bake a coconut cashew sourdough. Yes, I know, that's nowhere near to "European-style". However, I have been working on this formula for nearly a month, conducting many, many failed trials.

Ingredients: Sourdough culture, Unbleached white wheat flour, Whole durum wheat flour, Natural mineral water, Toasted cashews, Sea salt, Toasted coconut.

Note: I accidentally discovered that toasted coconut, in small amounts (i.e., 1% in baker's percentage) keeps the bread moist for days, without compromising the flavours of the bread. It's truly amazing.


Sadly, this is not a laugenbrezel (lye pretzel). Food-grade lye does not exist in Cambodia and I cannot in good conscience use drain cleaners as part of food preparation. Are food-grade lyes and drain cleaners one and the same? I don't know, maybe. But for now I'm going to play it safe.

The best alternative was baked soda, a.k.a. sodium carbonate. It gets the pretzels nice and dark, but the taste isn't exactly on the dot. Remember, my goal is to prepare German-style pretzels.

But I should mention: Despite my goal I've added my own twist to the pretzels (did you catch my joke?... Twist, get it?) My pretzels are made with sourdough and contains freshly ground spices: caraway, fennel, coriander, and Kampot black pepper. 

Kampot black pepper is grown only in Cambodia. It is highly revered by many chefs around the world because of its unique flavour properties. Not only does it have heat, but it has a floral aroma, a hint of sweetness, and pairs well with many foods.


Locally produced Italian cold cuts, assorted cheeses and crackers. *Drools.* If you look closely, you can see my sourdough in the right hand corner.

Surprisingly, Cambodia has a superb variety of cheeses and wines, considering it's a "third world country". Our guests (friends, acquaintances, and strangers) brought their own cheeses, which included the following: Danish blue cheese, Camembert, Brie, Cream cheese, Roquefort, Gouda, Parmigianno-Regianno, Feta, and Irish cheddar.


Only a few hours into the "bake". (The drum barrel behaves similarly to an oven.) You cannot smell it through your screen but believe me when I say it's divine.

In the end, the beer can chicken was tender, juicy, and succulent. I still think about it now, in fact. However, the pork roast was good but not at its optimal quality. This was due to a number of factors that we couldn't control.


Here we are performing critical analysis of the pork roast. Michael is on the left, I'm in the middle, and our Swiss-German friend to the right. You can see it on our faces. We know our pork roast and we weren't totally satisfied.

I also want to point out that my (custom) chef coat was a gift from Michael. The taste-testing party occurred on the day after my actual birthday. Thus, the taste-testing party was also treated as a belated birthday party. Now that's called being efficient. :)


So what's the verdict on the pretzels? And the coconut cashew sourdough? Was it reminiscent to central European breads?

Well, according to a handful of German and Swiss natives (couldn't find any willing Austrians) and ex-residents of Germany, YES! The visuals, aroma, texture, and taste of my breads reminded them of breads of their (former) homeland. And they enjoyed it---a few of them, ecstatically. 


So what's next? First, I need to eat all these delicious leftovers. Second, I will continue to improve my existing formulas and recipes. 

Hopefully sometime this month I'll cross the borders into Thailand and find the right contacts. We need higher quality flour and food-grade lye. And yes, a suitable oven and mixer. 

I'll keep you updated with my progress. In the meanwhile, I won't be as active on TFL but I'll lurk around. :)

Have a wonderful day / night, fellow bakers. 

Zita

aptk's picture
aptk

This is a follow up to the flauta blog from yesterday. This shows a little bit more about how they go together.

Fillings can be made of whatever you like, I generally use whatever leftover meat I have on hand be it chicken, pork, beef, or even moose. Next I add a spicy type sauce or chile that I also usually have on hand, but even sriacha sauce will work. The third component is always some kind of shredded cheese.

In this picture I'm using chicken and a red chili salsa, Mix it all up together and spread a row of the filling mix on a rolled out tortilla. I have been making tortillas for over 50 years and still cannot roll out a perfectly round one, but it doesn't really matter in this case.

Then you roll them up. What keeps them closed? Some flour and water paste! Let it dry a little bit before you fry them.

I roll all mine up and then let them dry while the oil for frying is warming up. Drain on paper towels.

Pages

Subscribe to RSS - blogs