The Fresh Loaf

A Community of Amateur Bakers and Artisan Bread Enthusiasts.

Blogs

dabrownman's picture
dabrownman

The other day CeciC posted some fantastic looking crackers made without any leavening at all here

http://www.thefreshloaf.com/node/35589/whey-seeds-crackers


As soon as I saw them I new Lucy and I would have to give them a go since we have wanted to make crackers for just about forever.


We followed the recipe except we cut it in half and added 1/4 C if Yeast water levain made for these crackers.  We also used yogurt whey instead of kefir whey.


The first batch was the sesame and flax version made whole wheat.  The 2nd batch was part semolina, spelt and farina with fresh rosemary, pecorino and parmesan ....and a few sesame and flax seeds that were left ver in teh bowl of the food processor because Lucy was too lazy to clean it.


Both versions were very tasty so……thanks CeciC we love these crackers.  They are so easy to make and  the possible varieties are - endless.  No more buying crackers!

 We love hamburgers once a month but the home made tamales are killer too - This one was a smoked pork carnitas with red sauce, habanero jack cheese and sour cream.

dabrownman's picture
dabrownman

The last bread we are making for Thanksgiving is Mini’s Rye Bread at 100% hydration sans Chia seeds but adding a Munich Dopplebock, some soaker water, flax seed and yeast water to the mix and deleting the gargantuan pine nuts she found in Chili.  Her bake is found here:


Mini's 100% Dark Rye & Chia Recipe ...Love at 104% hydration


Her times were much faster than mine when it came to development and final proof and I added an hour to each of them and it probably could have been more.  My beer and soaker water was 38 F. The one procedure change was to retard the levain for more than 24 hours in the fridge after the 3rd feeding and then letting it come to room temperature.


We used a regular loaf pan for this bread since we don’t have one thin tall and long like Mini does.  No worries we just have a wide short not nearly as long loaf in the end.  Our baking time was 1 hour and 15 minutes instead of an hour.  Our mini oven only goes in 25 degree increments so we had to bake at 350 F instead of 365 F like she did.  We baked it to 202 F on the inside.


The bread browned up OK and the crust was very hard when it came out of the oven.  !8 hours later, being wrapped on plastic wrap after it cooled the crust has gone softer but still substantial and we ho[e it goes even ,more soft over the next 24 – 30 hours before we slice it.   So have to wait on the crumb shot another day.


This loaf smelled great baking with the aromatic seeds predominating.  We are finishing up making some red and white malt using rye and barley and hope to get around making some SD crackers using rye for one and whole wheat for the other.

White Chicken Green Chili and a smoked pork and cheddar melt sandwich with this bread for lunch.

The crumb came out moist and open or a bread of this kind.   The crumb did soften as the moisture redistributed but was still not nearly as soft as a pumpernickel.  Baking this to 202 F might have bee too high but it still sliced well.  The walnut taste came though well which was an unusual taste for a bread like this.  Perfect for the holidays and putting cheese and meat snacks on.

Formula

The Double T - Grilled Tuna and Talapia


Build 1

Build 2

 Build 3

Total

%

RyeSD Starter

15

0

0

15

3.24%

Yeast Water

30

0

0

30

6.49%

Whole Rye

15

25

32

72

15.57%

Water

0

25

17

42

9.08%

Total

60

50

49

159

27.89%


RyeSD Levain


%


Whole Rye

80

17.19%


Water

80

17.19%


Hydration

100.00%


Levain % of Total

14.72%


Dough Flour


%


Whole Rye

383

82.81%


Dough Flour

383

82.81%


Salt

10

2.16%


Soaker 210 & Dopplebock 173

383

82.81%


Dough Hydration

100.00%


Total Flour

463

100.00%


Soaker 210 & Dopplebock 173, Water 80

463

100.00%

80 g of Water


T. Dough Hydration

100.00%


% Whole Grain

100.00%


Total Weight

1,080


Add - Ins


%


Ground Flax, Sesame Seed

15

3.24%


Bread Spice

10

2.16%


Walnuts

50

10.81%


Pumpkin & Sunflower Seeds

70

15.14%


Total

145

31.35%


The kind of fall we get in Gilbert, AZ - red and green leat lettuce!


CAphyl's picture
CAphyl

I tried something different with this one in that I used a starter that I fed with rye flour.  It really took off and improved the "lift" for my starter.  I had used all AP flour previously and was not getting much rise lately. It's getting colder as well, so that doesn't help.  The dough was a bit wetter than usual, and the shaping was much more difficult than I anticipated. I had to knead in a bit more flour, but finally got it to where I wanted it.

I love the La Cloche as the crust is so wonderful every time. The bread tasted great.  We just had sandwiches for lunch, and the bread was still warm and very crusty.  I want to try one of the three day multi-grain recipes next!

dosco's picture
dosco

Another day, another loaf. Same concept here, use the "My Daily Bread" recipe as a basis for modification. In this case it is also a basis for education.

CONCLUSION(S): I think that I have been chronically underproofing my loaves and I think the "retarding" in the fridge is really exacerbating this problem ... so in the next loaf I'll wait longer for the final rise. I also have been very loosey-goosey with my measuring, I don't like this approach (mostly because I am not sure of the final hydration) and therefore I'll 1) formulate a recipe and 2) follow it.

The bread looks OK (well, OK, it looks bad), smells nice, and I lopped a slice off an the taste is good. Crumb is a bit on the dense side but once it cools off a bit more and dries a little it should be pretty good.

Sponge:

1 cup fed starter, at peak of rise

1 cup filtered water

1 cup unbleached AP flour

1 teaspoon of Greek yogurt (for the LAB bacteria)

Mix and let sit 8 hours (or overnight) in a warm room to ferment. (I left the sponge out overnight and then didn’t use it until after I got back from work … total fermentation time = 16 hours). (The sponge rose significantly … easily 2x in volume)

Dough:

1 pound unbleached AP flour

12 ounces filtered water

Place ingredients in a mixer and mix at low speed until the flour and water are just combined. Leave in the mixing bowl, cover, and let sit at room temperature for 8 hours (or overnight) in a warm room to autolyse. (I left the dough out with the sponge, as noted previously I left the sponge out for 16 hours, so the autolyse was also 16 hours).

Final Dough:

Autolysed dough

Sponge

Pour/scrape the sponge into the dough. Attach the dough hook to the mixing machine and knead until the dough and sponge are combined (the dough was like batter). At this point I add flour until a high hydration dough is achieved, then once the flour is incorporated I let the machine knead at lowest speed for 5 minutes. (I did this before going to bed)(this is where I made my first mistake … I had not planned on a recipe or a target hydration, so I did not measure the amount of flour used … I have no idea what the hydration was).

Leave the final dough out for bulk fermentation. (The final dough was left in a warm room overnight (about 7 hours)). (the next morning the dough had risen TREMENDOUSLY … it had easily doubled in volume).

Add salt and knead for 5 minutes at lowest mixer speed using dough hook. (I realized that morning that I had forgotten to add the salt, however I had planned on kneading anyways so no problem ... I think).

Leave the dough in the mixing bowl, and cover. Let rest for 3 hours in a warm room.

Knead using mixer for 5 minutes at lowest speed using dough hook.

Leave the dough in the mixing bowl and cover.

Place dough in a cold room for 8 hours (or overnight). Remove dough from bowl and shape. (this is where I made another mistake … the dough was very loose and I tried folding it … it stayed very loose. I was thinking of shaping it into batards but I decided against it because I was worried the loaves would over proof, so I decided to place the entire dough ball into a bundt pan (I’ve used the pan previously for Portuguese sweet bread with great success). I left the dough in the warm room for about an hour and it rose very slowly. I then warmed my oven to ~90 F and put the dough in there for about an hour. The dough rose a fair amount (not doubled, though) and after the final bake I’m convinced that it should have stayed out in the warm room all day for proofing).

Bake at 530F for 15 minutes, then 480F for 15 minutes; use a baking stone and a small metal bowl with water for steam. Cook until an internal temperature of 200F is achieved (I cooked until following this protocol but the internal temp wasn’t 200F at the end of the 480F bake so it stayed in the oven for another 15 minutes at 480F until 206F was attained).

jarkkolaine's picture
jarkkolaine

Time flies: I just noticed my most recent blog post so far here on The Fresh Loaf was published almost exactly a year ago! Many times, I have thought of writing something, but the work on my magazine Bread and the requests from my kids have taken all the time. Maybe it's all about priorities, or maybe I'm just not very good at keeping too many balls in the air at once.

Anyway, today I have something to share, so I thought it's time to stop the silence and write another post.

As you may know, roughly two years ago, I started my digital magazine, Bread, with the intention of creating something useful for the baking community. It has been a great adventure: I have had the privilege of interviewing and featuring many great bakers, some of them from the community here at The Fresh Loaf, others from other parts of the baking world. I have learned a lot about bread and publishing. My readers have found inspiration and information in the magazine's articles. 

But as I always like to keep adding the pressure and improving on what I have achieved so far, I have now set up a new goal for 2014: to turn BREAD into a printed magazine.

If that sounds interesting, check out my crowdfunding / pre-sale campaign on the crowdfunding site Indiegogo

**

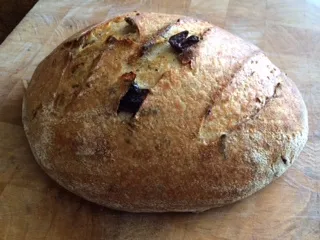
The photo for this post is from my most recent bake. It's a sourdough bread made with 50% bread flour and 50% Swiss Dark Flour from Shipton Mill -- and with a generous sprinkle of toasted and soaked walnuts. Delicious for a rainy and cold autumn day like today. 

This time, I posted the recipe on Shipton Mill's web site.

Mebake's picture
Mebake

Last week, I’ve baked my first recipe from Andrew Whitely’s  “BREAD MATTERS”: seeded rye bread. The bread was wonderfully delicious and truly addictive. However, I failed to notice that the dough weighs 650g, and cannot fill up my large terrine pan. The bread, however, was an immediate success and half of it was literally devoured while being sliced!


A few days ago, I wanted to triple the quantity (* 3.4) and make two 1.2 kg  loaves. The bulk fermentation lasted for 2 hours only, and the final proofing was 45 minutes; while the previous loaf fermented for 4 and 2 hours respectively.  I’ve considered them ready for baking when their top started to tear and sounded hollow when tapped from below.  In the oven, they puffed high and quick! i was exhilarated for a few seconds, but then all started going down hill. The loaves deflated and shrunk back, and continued to do so for the next 30 minutes.

Baked, the loaves had a wrinkly teared crown. "Umm, they may be overproofed", i said to myself. Little did i know.

Finally, I cut through the loaf. Up to this point, I was contented with the results despite not being optimal. The bread sliced well and was not crumbly. I laid down a few slices in a bread basket, brought in the butter and cream cheese, and sat for dinner. I spread butter on a slice,  and chewed my first bite. I was instantly struck by the relative blandness! OMG! I forgot the salt, that’s it.

I was disappointed. I tried butter, salted butter… nothing seemed to work at this point, not even toasting. So, out of despair, I sliced the remainder of the loaf and freezed it. I wrapped the other loaf in linen after it had cooled and left it to mature for 3 days. Last night I’ve thawed a couple of slices and decided to give it a try with salted feta cheese. It was DELICIOUS!! Freezing / thawing seemed to have salvaged the flavor of this loaf, but I’m unable to explain why. I’ll try other toppings, but what matters here is that it was not a total loss after all! Today, I plan to slice the linen wrapped loaf and observe any improvement in flavor.

On another note, we shall resume pastry classes soon. Following a pause from vocational training (due to the recent re-location of the institute), we are scheduled for a class on cold desserts tomorrow.

-Khalid


wassisname's picture
wassisname

It took  awhile, but this is my take on Karin’s Cecilienhof Ancient Grain Rye Bread challenge.  The list of ingredients involved initially had me convinced I would stay on the sidelines for this challenge.  But I had more of them than I realized on hand already and a little searching turned up the rest (ah, the power of the internet!).  Still, I haven’t had to think this hard about a bread in a long time.                                                           


I wanted to stay as close to the original as I could, particularly with respect to the order of ingredients. Out of personal preference I omitted the fat, the yeast and the vital wheat gluten and out of necessity replaced the rolled barley with coarse barley meal because I couldn’t find any rolled barley.  They used a spelt starter and I used a rye starter to get the fermentation going.  Other than that I think I got everything else in the loaf.  To the right are the weights in grams.

As mentioned by others, if you assume that the ingredients are listed in order of weight then the water becomes a problem.  The only way I could think to get the dough up to a reasonable hydration was to turn this into essentially a sunflower seed rye with a very little bit of a lot of other stuff thrown in.


It still wasn’t going to be enough water, but then I found the answer!  I happened to check the ingredients on a package of rye crackers:  Whole rye flour, yeast, salt... but no water… how can there not have been any water?  There must have been water in the dough, even if it all cooked out during baking… AH HA!  I get it!  They listed the ingredients by their weight in the finished product, not the dough!  And since the crackers are bone dry when they are finished, they don’t need to list water at all!!!!  Obviously this loaf isn’t going to be that dry, but it will dry out enough that I can pretty much add as much water as I want and still stay true to the original.  Thank goodness!


I kept the process as simple as I could.  Rye meal only in the preferment.  All the other large or hard bits in a hot soaker.  Then everything together and into a Pullman pan. 

This loaf is mostly made up of meal rather than flour.  Everything labelled “meal” in the formula was ground from whole grains in a burr coffee grinder.  There is some dust-fine flour produced along with the meal.  I sifted some, but not all, of it out so there is a bit more “flour” in this loaf than indicated in the formula.  I’ll be tinkering with this aspect of the process down the road.

Long, slow, covered baking is something I started working on last winter.  I never got a result I was really happy with before summer came along and put the experimentation on hold.  This seemed like a perfect opportunity to start tinkering again so I went with a total of five hours in the oven.  The biggest problem I ran into with the long bake was the outside of the loaf drying out before the inside could bake through.  Even in a covered pan there was too much moisture escaping, but keeping the oven steamed for hours was never an option.  The solution:  Pour water directly on the loaf at intervals during the bake.  Simple!

And then there is the waiting.  As many before me have noted, a loaf like this really takes a couple days to fully set and for its moisture to even out.  I never wait that long for a first taste, but it is worth waiting before devouring the rest of the loaf!  This loaf came together very nicely after 48 hours.  To avoid having the crust dry out I don’t wait until the loaf is completely cool before I bag it and put it in the refrigerator – yes, the refrigerator.  This is the only style of bread I refrigerate.  If I’m planning on eating it right away I will take it out again once it has chilled and leave it on the counter.

The result: happiness!  Even the cat loves this bread (I thought that was a little odd, but a good review is a good review, right?).  The flavor is complex and satisfying and the texture is moist with just enough chew.  Now that I’ve eliminated the rock hard crust I see this style of bread becoming one of my regular bakes – at least during the cool months.  And the possibilities are endless! 

Marcus


Isand66's picture
Isand66

I love baking with Durum flour and bake with it all the time, so I figured it was time to finally make a 100% Durum bread.  I have not used the 36 hour method in a while so I incorporated it into this bake and used some KAF Durum flour in the 2 stage starter and in the final dough.  Technically there is a little bit of AP flour in the seed starter but I hope you won't hold that against me.

The technique I used for this bake creates a pretty sticky dough so it's not for the faint of heart but if you are willing to take the plunge you will be rewarded with an open and moist crumb and crispy crust.

I decided to make one large miche and used one of my Good Will finds for the banneton which left a nice pattern on the bread.

Closeup1

100%DurumSemolinaSD

Closeup2

Directions

Semolina Starter Build 1

Mix ingredients in a bowl until thoroughly combined.  Cover the bowl and let it sit at room temperature for around 8 hours.  The starter should almost double when ready to proceed.

Semolina Starter Build 2

Add to Build 1 Starter:

100 grams Durum Flour

100 grams Water at Room Temperature (80-90 degrees F.)

Mix ingredients in a bowl until thoroughly combined.  Cover the bowl and let it sit at room temperature for around  4 - 6 hours.  The starter should almost double when ready to proceed.

Main Dough Procedure

Mix the flour and the ice water together in your mixer or by hand until it just starts to come together, maybe about 1 minute.  Put the dough in a slightly covered oiled bowl and put in the refrigerator for 12 hours.

The next day add your starter and salt to the dough and mix by hand until it is thoroughly mixed and evenly distributed.  Due to the high water content in the 100% hydration starter this dough is very easy to mix by hand and is very silky and smooth.

Bulk rise at room temperature for 2-3 hours until it grows around 1/3 in volume doing stretch and folds every half hour until it has developed the correct amount of strength.

Put the dough back into the refrigerator for around 20-24 hours.  I took it out about 20 hours later.

When you take the dough out of the refrigerator you want it to have almost doubled in volume.  Mine only rose about 1/3 in volume.  Let it rise at room temperature for around 2 hours or until the dough has doubled from the night before.

Next, divide the dough and shape as desired and place them in their respective basket(s).

Cover the dough with a moist towel and let sit at room temperature for 1.5 to 2 hours.

Score the loaves as desired and prepare your oven for baking with steam.

Scored

Set your oven for 525 degrees F. at least 45 minutes before ready to bake.  When ready to bake place the loaves into your oven on your oven-stone with steam and let it bake for 10 minutes and then lower the temperature  to 450 degrees.    When the loaf is golden brown and reached an internal temperature of 210 degrees F. you can remove it from the oven.

Let the bread cool down for at least an 3 hours or so before eating as desired.

Crumb

MaxBird
Max getting in the Thanksgiving spirit with his Bird Hat
 
Floydm's picture
Floydm

I picked up the little mill attachment for my new mixer and have been experimenting with it my last couple bakes.

My first batch used 40% fresh milled flour (hard red wheat), my second about 25%.  The flavour seems really nice, though I've got a bit of the cold and thus don't have the most nuanced sense of taste right now.

I have much to learn if I decide this is something I want to pursue.  For now I'm just having fun tinkering with a new toy, and the response from everyone who can taste has been quite good.

CAphyl's picture
CAphyl

This is the second time I have made this recipe, so I am still working on it.  First time I made it, the starter was really active, and after I made the dough, I had to go out and left it too long, so it was over proofed. I brought some sourdough starter to my hometown of Milwaukee when my husband and I were in town this summer. I took it in checked baggage, used two ziplock bags over a glass container, and it worked.  I put a sticker on it with my address and said: "sourdough starter' in case the TSA folks were wondering what it was!)  I was in town again recently and just had to bake, as all of you understand. The starter was in the fridge for months and started up perfectly when I was there two weeks ago.  My sister fed it once for me during that time.  The starter was extremely active. I had apricots and nuts and thought I would make something with these ingredients for a Sunday football party.  Because I had to go out, I left it too long, and I thought the taste was too sour, and I didn't like the color. The starter I have in Milwaukee is much more active than the starter I have at home. The "baby" is better than the "parent."  For this one, my "home" starter wasn't active enough, so it took forever, and I got some wrinkling I didn't like. The braiding is kind of fun, but I didn't do the best job on this one. My husband gave it the thumps up, however; we just had it warm out of the oven and toasted.  I am trying to let the starter I have at home rest more, so it can become more active. Suggestions are certainly welcome.  I so much appreciate the encouragement, advice and outstanding baking on this site.  I have learned so much, but am always trying to get better.  Thanks to everyone!

I've attached the link to the recipe below.

http://feedingmyenthusiasms.blogspot.com/2010/04/perhaps-best-yetirish-apricot-and.html

Pages

Subscribe to RSS - blogs