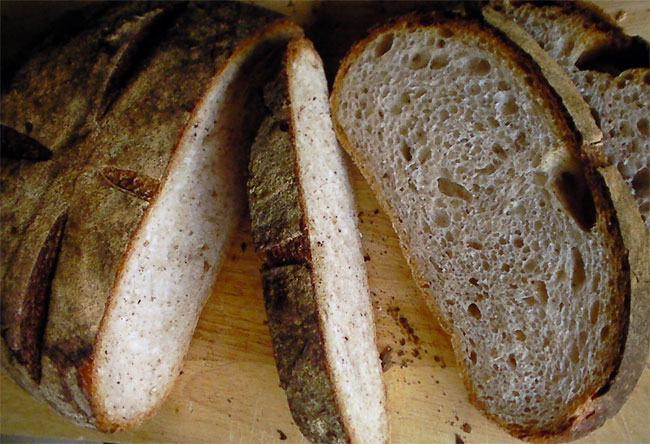
SearchUser loginBread BooksFavorite Recipes
|
Submitted by Syd on April 16, 2012 - 9:24am Josh's Super Sour SFSD
I made this loaf using Josh's process which he outlined in my previous blog post on San Francisco style sourdough. (You will need to scroll down to about the halfway mark to view the post).
Levain Build
Allow to mature for 12 hours. * Josh uses 60% levain in the build, 100% water and 100% flour of which 5% is rye. I can't use 60% starter in my levain build as it would ripen in three hours with our temperatures over here. If you plan on following this recipe, you would need to adjust the amount of starter in the levain build so that it matures in 12 hours. 20% starter works out perfectly for me at temperatures of 27C. Main dough
Refrigerate the dough immediately. Josh divides into pieces that aren't super thick and retards in lightly greased tubs. He retards at 40F. Retard for 22 hours. Remove dough and allow to come back to room temperature (one to two hours). Now shape and Josh advises to proof for 3 -5 hours but once again that was not possible for me to do because it would have been overproofed with our warm temperatures over here. I let it proof for 1 and a half hours. It was just starting to show signs of activity. Retard for another 20 hours. I retarded for a full 24 just because I only got home late Sunday afternoon. Bake loaves with steam for 15 minutes vented for 20+(200 deg internal). Josh didn't mention the oven temperature but he did say:
Taste
The crust is very chewy on the day after the bake. It had the kind of flavour in it that I would normally only associate with a loaf that had some whole grain in it. The crumb was light but consistent with the 11.4% protein flour that I used. My only quibble is that it only had the tiniest hint of sour. I don't think this is a problem with the recipe, but rather with my flour. I know if I used this process with only 15% wholegrain, I would get a very pronounced sour flavour. It just seems very difficult for me to get a really sour all-white loaf with the flour I use. I know all flours are not created equally and could it be that my flour is lacking in something that will let it get really sour? The only time I have got a really sour all-white sourdough with this flour was when I added sugar eggs and butter. I could smell the sour while it was baking in the oven. Recently, I have been experimenting with adding maltose at a rate of 5% and getting very good results with that, too. Not as sharp a sour as I got with sucrose but a very mellow sour which lingers in the mouth long after it has been swallowed.
And a crumb shot. So now I still not finished with this one, yet. It seems I still have some experimenting to do. If could marry the crust that I got with this to the sour I was getting with my previous recipe and then dial in a little more acetic acid flavour, I would be a happy camper and would file this recipe in the tried and tested tray. For the time being, it is back to the drawing board. Happily, though.:) Syd Submitted by Syd on April 3, 2012 - 6:41am San Francisco Style Sourdough
Leaven
Ferment @ 29C (84F) for 9 hrs. Sponge
Allow to sponge @ 28C (82F) for 3 hours. Main Dough
Autolyse for 20 mins. Now add:
Knead until gluten moderately to well developed. You need to have the gluten fairly well developed because the bulk ferment is very short. One hour bulk with folds at 20 and 40 mins respectively. Pre-shape. Rest 5. Shape. Place in cloth-lined banneton. Three-quarter proof.(About 1.5 hours). Retard in fridge for 7 - 9 hours. Remove from fridge and allow to final proof (about 1 hour). Pre-heat oven to 230C (450F). Slash. Load onto baking stone. Immediately reduce heat to 205C (400F), convection off. Bake for 20 mins with steam. Remove steaming appartatus when the top of the bread starts to show signs of colour. Reduce heat to 190C (375F), convection on. Bake a further 25- 30 mins. (You might have to experiment with baking temps/times. I baked this at a lower temp than I usually do for my regular sourdoughs. You don't want to have a deeply caramelized crust like for that of a miche, but rather a reddish-brown crust with nice blistering). Notes
Taste
Previous attempts
On my second attempt I considered using the same flour but lowering the hydration to counter some of the stickiness. Instead, I kept the hydration the same and used a higher protein flour for the main dough. The result was similar to the first attempt although the main dough wasn't as sticky. The profile was still rather low, though. For this try, I ditched the diastatic malt, reduced the autolyse to 20 mins and used a 12.4% protein level flour for both the sponge and the main dough. This resulted in the best profile but the mildest flavour of the three. I want to work on this one a little more. For my next attempt I want to keep everything the same but let it proof for only an hour in the bannetton, then give it double the time (about 16 hours) in the fridge. I am hoping this will get me where I want to be: a moderately sour, chewy loaf with a reddish-brown, blistered crust.
Finally, a different angled view of the whole boule (and a gratuitous crumb shot) for Varda, lest she again accuse me of minimalism (or was it brevity)? :) Syd Submitted by Syd on September 6, 2011 - 9:37am Arlo's Pain de Urban
I was so taken by Arlo's recent blog post of his Pain de Urban that I knew I had to make it immediately. I highly reccommend this loaf to anyone. Many thanks to Arlo for the recipe and the inspiration. :) Arlo, your original recipe now has a variation. It came about by happy accident when too much water glopped out of the container while I was measuring. Hence I have called it: Arlo's Pain de Urban (with increased hydration) Rye Sour
Mix together and leave overnight. ( I left it for 8 hours in my 30C kitchen and it was ready when I got up in the morning). Main Dough
Mixed very briefly then, out of necessity, it went into the fridge for a forced 4 hour cold autolyse. Removed from the fridge and added:
Kneaded until medium windowpane (slightly more than Arlo in his original post) and let it ferment for 2 and a half hours with folds at 50 mins and 100 mins. That was followed by a pre-shape, a 15 min rest and a final shape. It rose for an hour, got banished to the refrigerator (again out of necessity) and was taken out 3 hours later to complete its proofing. It was baked for 10 mins @ 230C with steam (fan off) and then for 40 mins without steam (fan on).
I couldn't wait for this loaf to cool down. I committed a cardinal bread sin and cut it while it was still warm. I haven't been so excited about making a loaf for quite a while. Thanks again to Arlo. :)
A close up of the crumb. I am glad I made this one immediately as it might have stayed on my 'to do' list for a long time and it is too good to be relegated to that kind of fate. Syd Submitted by Syd on August 21, 2011 - 3:17am Multigrain Boule
Here is a boule I made last weekend that is worth sharing. I had replenished my starter but didn't have enough bread flour on hand to make up my usual dough. I knew if I made a trip to the store, by the time I came back, my starter would be past its peak, so I just made up the difference with the flours I had on hand. I really liked the flavour of this loaf and it improved throughout the week. Here is the recipe:
Whisk up starter, water and diastatic malt. Add remaining flours in increments and mix until all the flour is hydrated.
Add salt and knead until medium gluten development. I don't have a mixer, so I always knead by hand. It takes about 8 to 10 minutes of quite vigorous slapping and folding.
Pre-shape, rest 20 mins, shape. Allow to rise to about three quarters of its final volume, then retard in the fridge overnight or for about 8 - 12 hours. Bake, with steam, at 230C for 10 mins, turn oven down to 200 - 210C and bake for another 40 mins. Keep and eye on it to see that it is not over browning and turn oven down, if necessary. Syd Submitted by Syd on July 19, 2011 - 10:17pm My first sourdough recipe
This recipe is from The Bread Book by Linda Collister and Anthony Blake and it was the second serious bread book I bought about 17 years ago. It was quite forward thinking for its time as all the recipes include weight measurements (metric and imperial). It is still one of my favourite bread books and it is definitely worth a buy. It has really good photographs. Starter 230g whole wheat 230g water Ferment in a bowl at room temp for 3 days. Keep bowl covered with a damp tea towel. After 3 days, it should be smelly, grey and slightly bubbly. Sponge 140g water 230g unbleached bread flour Beat (using hand) together with starter until well incorporated. Once again cover with damp tea towel and allow to ferment at room temp for 24 - 36 hours. (In practice, for me at any rate, this step only takes about 5 or 6 hours). I let it sponge until it peaks, then I make the final dough. Don't let the sponge collapse. The bread will be dense if you do. Dough 55g water 20g salt* 230g unbleached bread flour, * I find this amount of salt to be too much. It works out to be about 2.5%. I prefer using 2% so I use 13 or 14g. Mix water with sponge, Add salt. Beat well. Add enough of remaining flour to make a soft dough. Bulk ferment until almost doubled in size. *Cut off 170 - 230g piece of dough to make the next starter. Pre-shape. Rest 15 mins. Shape. Place in cloth lined banetton. Allow to final proof. Preheat oven to 220C (425F). Score. Bake (with steam) for 20 mins. Lower oven temp. to 190C (375F) and bake for another 35 - 55 mins longer. I have always found 35 mins to be sufficient. * Because this dough was removed after the salt was added, you now have salt in your starter. It has its advantages. It keeps for a long time in the fridge and slows down enzyme activity. Notes This was the only way I made sourdough until the arrival of the internet and my discovery that there were other ways of making it! Remember the second time round your starter will have salt in it, so you need to subtract that from the total amount or just add 2% of flour added. This makes a really good sourdough with a very mild (unless you retard) tang, but an excellent flavour. Syd
Submitted by Syd on June 20, 2011 - 11:16pm Multigrain Levain
I have been going through a bit of a baking drought lately, but on Friday lunch refreshed my starter so that I could bake when I got off work in the evening. I hadn't planned on anything, but when I got home and found the starter at its peak, I had to act quickly and there was no time for elaborate planning. Accordingly, I just ad libbed and this is what I did. 100g mature starter @ 100% hydration 250g water 3g diastatic malt 50g rye flour 100g re-milled fine semolina flour 100g whole wheat flour (I sifted out the coarse bits of bran) 200g bread flour (11.4% protein) 10g salt * I used less starter than usual. Normally, I would use 150g of starter for this amount of flour, but because it is just so hot over here now, I was worried that it would be too much. It turned out to be the right amount. Overall Formula water (including water in starter) 70% bread flour (including flour in starter) 50% semolina 20% whole wheat 20% rye 10% malt 0.6% salt 2% Whisk up the starter, water and malt until frothy. Add the rye, semolina, whole wheat and bread flour in increments and ensure all the flour gets wet. Autolyse for 50 mins. Add salt. Knead to medium gluten development. Bulk ferment. This dough developed fast. This is in part due to the whole grain and diastatic malt and in part due to our very high summer temps. It was ready for final shaping in an hour and a half. Pre-shape, rest 15 - 20 mins, final shape, place in banneton and retard overnight. Baked at 230C, with steam for 20 mins and without at 200C (convection on) for another 25 mins. Crack open oven door, turn oven off and allow bread to rest on baking stone for another five minutes. It has a moderately open crumb. The large holes were unintended.
I really like the flavour of this bread. It has a mild tang and it improves in flavour with time. Yesterday it tasted great with some good cheese ( a nice mature cheddar) and nothing else, not even butter. Syd
Submitted by Syd on May 16, 2011 - 5:00pm Pane con Semola Rimacinata di Grano Duro
Thanks to JoeVa for this detailed recipe. I have made it three times now. The first time my hydration was 60% as per JoeVa's recipe. I didn't stick closely to the mixing instructions and worked the dough more than JoeVa recommended. The crumb wasn't as open as I had hoped. On the second time I upped the hydration to 63% and followed JoeVa's recipe to the letter. The crumb was nice and open. On my third attempt, I once again increased the hydration: this time to 65%. There wasn't much difference between the second and third attempts. I retarded for 12 hours. It had a mild tang and it was delicious fresh on the first day. It was similar in texture to a baguette with a razor sharp crust and soft interior. I really like that contrast.
On day two it made a good BLT, although that crust was dangerously hard and sharp after being lightly fried in the bacon renderings (and, yes, I know it isn't healthy, but it is delicious :). I am wondering if that diamond crust has anything to do with the hard nature of semolina. Best, Syd Submitted by Syd on April 16, 2011 - 9:13am Squid Ink Baguette
This is my version of a local speciality: squid ink baguette. Actually, I am not even sure if this kind of bread was first made in Taiwan, or even in Asia for that matter, but nowadays you can find it in almost any bakery. It is often sold as a sandwich with a seafood filling. Locally, it is called Squid Ink French Bread and so I have always assumed that it was basically a baguette dough with the addition of squid ink. It seems that I was wrong, though. On Friday I found this recipe posted by one of my favourite local bloggers. I recently used her formula in my Asian Style Pain de Mie post. Her post includes two formulas: a Taiwanese version of squid ink baguettes and a lean version. The Taiwanese version includes sugar, butter and vital wheat gluten. Both recipes use a 70%/30% mix of bread flour/cake flour. I made this last weekend but wasn't happy with the result: my hydration was too high and I didn't include enough s&f's with the result that the baguettes flattened out. The colour wasn't dark enough either. They looked grey instead of black. I used the ink sacs from two squid and probably should have used double that amount. So I had a fresh go at it again this weekend. This time I bought a bottle of squid ink. It was quite pricey but saved me the effort of having to clean the squid myself and I can use it for future bakes or for squid ink pasta. I stuck to my same lean dough but included 妃娟 suggestion of using 1% Asian basil which she said would suppress the fishy smell from the squid ink. She recommended using 3%-5% squid ink. I used 5% because I didn't want to end up with the grey mess that I got last weekend. I also stuck with 100% all purpose flour. Overall Formula
[Hydration = 65% (squid ink is included in overall hydration)] Poolish
Allow to ferment for about 12 hours. Main dough
Bulk fermentation: 3 hours. Divide dough into three. Pre-shape. Rest 15 mins. Shape. Final proof 1 hour 15 mins on floured couche. Scoring: one single slash along the length of the baguette. Bake at 230 C on a pre-heated stone for 18 mins with steam for the first 10. Remove from oven. Allow to cool on wire rack. Dust with chilli pepper or paprika if you can't take the heat, but I really recommend the chilli as it is the perfect partner to this bread.
Be warned: squid ink is an acquired taste. It is not for the faint of heart. Best eaten as a filled sandwich. Suggestion: lettuce, crab meat, mayonnaise, squeeze of lemon, salt and pepper and fresh cilantro. Syd Submitted by Syd on April 4, 2011 - 9:25am Hot Cross Buns
This made some of the nicest hot cross buns I have ever tasted. I used the same dough as for the Asian Style Pain de Mie but added:
16 parts cinnamon I used whole spices and ground them up in a coffee grinder. I think using my own freshly ground spices made all the difference to this dough. The aroma was intoxicating. Nothing I have ever bought from a shop smells even remotely as fresh and as pungent as that. Omit this step at your own peril!
I scaled them at about 90g a piece and arranged them close to (but not touching) one another on a baking tray. This amount of dough made 24 buns. For the cross on top I made a paste of flour and water which I sweetened with some sugar and then piped it on with a piping bag.
They took about 2 and a half hours to rise. I baked at 180C (with convection on) for 18 mins. I allowed them to cool slightly for five minutes before removing from the pan and placing on a wire rack to cool.
They are pillow soft and delightfully fragrant.
I expect them to keep well, too seeing that I used the water roux method. They took three and a half days to make from start to finsih but they were well worth the effort. Syd Submitted by Syd on March 20, 2011 - 2:20am Soft, tender-crumbed, Sourdough
Glenn, inadvertently, threw down the gauntlet this week when he asked a question in his post: How to get a light and tender crumb in sourdough. I took up the challenge (even though I know Glenn didn't mean it that way) and in the process got diverted from what I had originally itended to bake this weekend. Initially, I considered adding milk and some form of shortening, but on re-reading Glenn's thread I realised he didn't want the dough to be enriched in any way. So flour salt and water it is. I am pretty happy with the result and I think the following all contributed to its success:
Water Roux 30g bread flour (11.5% protein) 150g water heated to 75 C Dump flour into water. Stir until smooth. Cover tightly with cling film. Allow to cool to room temp. Refrigerate overnight.
Sourdough Starter 30g ripe sourdough starter @ 100% hydration 50g WW flour 10g rye flour 60g water Mix until smooth and leave to ferment for about 8 hours or until just about to peak.
Main Dough 180g water roux (pass it through a sieve if there are any lumps) 150g sourdough starter @ 100% hydration 170g water 1 level tsp diastatic malt Whisk the above until well incorporated. Now add: 420g bread flour (11.5% protein) Mix to shaggy mass. Autolyse for 50 mins. Now add: 9g salt Now you have to knead until you get a really good windowpane. I don't have a stand mixer, so that meant hand mixing for a long time. I didn't time it exactly, but if I had to guess, I would say that I spent anywhere from 30 to 40 minutes kneading. If I had a stand mixer I would have developed the dough even more, but I don't and I was getting tired, so I stopped. Unfortunately, there was no one on hand to help me take a pic of that windowpane. Pity, because I can't see myself doing that again in a hurry. Of all the changes I made to my regular recipe, I think the additional kneading made the least difference. Perhaps after all that time it still wasn't developed enough. Maybe I would have noticed a bigger difference if I had used a mixer. Bulk Ferment 2 hours with S&F at 50 and 100 mins respectively Pre-shape. Rest 20 mins. Shape. Retard overnight. Usually, I three quarter prove before I retard, but it was getting late, so this one went straight into the fridge. Bake 210 C with steam for 20 mins. 190 C without steam for 25 mins. Usually, those temps would be 230 C for 20 and 200 C for 35 mins. Then I would switch the oven off and let the bread dry out with the door cracked open for another 5 mins. This time I didn't do that because I didn't want the crumb to get dry. The internal temp was 209 F.
The crust was a bit thinner than usual due to the reduced baking time and lower temperatures. The crumb is beautifully tender and moist.
This is a nice tasting bread with a mild, but surprisingly evident, wheaty flavour despite there only being 50g of WW in the recipe. Syd
|
ALSO ON |