The Fresh Loaf

A Community of Amateur Bakers and Artisan Bread Enthusiasts.

Blogs

dabrownman's picture
dabrownman

We needed some Hamburger Bun for Friday night’s monthly HB feast and have also wanted to make Mark’s rolls found here:

http://www.thefreshloaf.com/node/32954/potato-rolls-video

I’m pretty sure that these aren’t supposed to be HB Buns but they looked close enough to me to give them a try and I’m glad we did.  They turned out great – s good in fact I didn’t even get a crumb shot or a HB picture either,


We were so hungry the burgers so good - they just disappeared.  We cut the recipe by a factor of 6 to get 6 rolls instead if 36 and used a 50 g each flour, water and a pinch for yeast for a 6 hour poolish instead of a straight dough hoping to improve the flavor some. 


The attached formula is the same as Mark’s otherwise and the method the same except for out slap and folds in place of kneading and we baked the rolls in a Pyrex pan instead of on parchment which extended the bake time quite bit.


If we were going to do it again I would up the temperature to 350 F instead of 325 F in baking in Pyrex to bake them faster and improve the browning.  but it is probably better to just bake them on parchment as individual rolls like Mark does.


Regardless, these are some fine tasting rolls and I’m glad there are 3 in the freezer for next month’s Burger Night. Thanks for the recipe and video Mark!  Love your rolling bakery too.

Formula


Build 1

Build 2

 Build 3

Total

%

Pinch of ADY Yeast

0

0

0

0

0.00%

AP

75

0

0

75

25.42%

Milk

75

0

0

75

25.42%

Total

150

0

0

150

50.85%


Multigrain Poolish


%


AP

75

25.42%


Water

75

25.42%


Hydration

100.00%


Levain % of Total

25.38%


Dough Flour


%


AP

220

74.58%


Dough Flour

220

74.58%


Salt

5

1.69%


Milk 25. Potato Water 25

50

16.95%


Dough Hydration

22.73%


Total Flour

295

100.00%


Milk 100, Potato Water 25

125

42.37%


T. Dough Hydration

42.37%


Total Weight

591


Add - Ins


%


Butter

30

10.17%


Potatoes

80

27.12%


Sugar

26

8.81%


Egg

30

10.17%


Total

166

56.27%


Hydration w/ Adds59.73%
Total Weight591
CAphyl's picture
CAphyl

I have been experimenting with different flours, different hydration, refrigerated proofing, etc. to see if I can improve my sourdough baking.  This one turned out well, using a three-day method and primarily unbleached white flour and spelt flour.  There is a touch of whole wheat as well.  I liked this try and will continue to try and refine my baking!

Isand66's picture
Isand66

For Thanksgiving we were visiting my wife's family in North Carolina as we always do and as usual we brought have our kitchen with us so we could bake for the main feast.

This year I made a double batch of my German Sourdough Pumpernickel Pretzel Rolls and another version of my Tangzhong Onion rolls.  I changed up some of the flour and also added some shredded cheese in the mix for added flavor.

Tangzhong is the technique of heating a portion of the flour and liquid in your recipe to approximately 65C to make a paste (roux).  At this temperature the flour undergoes a change and gelatinizes.  By adding this roux to your final dough it will help create a soft, fluffy, moist open crumb.  It is also supposed to help prevent the bread from going stale.

It is not very difficult to do a Tangzhong.  Use a  5 to 1 liquid to solid ratio (so 250g liquid to 50g flour) and mix it together in a pan.  Heat the pan while stirring constantly.  Initially it will remain a liquid, but as you approach 65C it will undergo a change and thicken to an almost pudding like consistency.  Take it off the heat and let it cool before using it in your recipe.  Some people will refrigerate it for a while but you can use it right away as soon as it cools.

The rolls were a big hit along with the pretzel rolls.  If you try these you won't be disappointed.

Please note I had to use my I-Phone to take the photos so they are not exactly up to my usual standards but hopefully you can stand to look at them :).

Formula

Note: Tangzhong consisted of 30 grams European Style Flour, 20 grams Durum Flour and 250 grams Cream.  I included this in the overall formula below.

Tangzhong-Onion-Cheese-Pota

Levain Directions

Mix all the levain ingredients together for about 1 minute and cover with plastic wrap.  Let it sit at room temperature for around 7-8 hours or until the starter has doubled.  I usually do this the night before.

Either use in the main dough immediately or refrigerate for up to 1 day before using.

 Main Dough Procedure

Cut up the onion into rings and sauté on low heat until nice and canalized using some olive oil or butter in your pan. Let the onions cool completely and chop into smaller pieces before using in the dough.

Prepare the Tangzhong per directions above and allow to cool to room temperature.

Mix the flours, Tangzhong and cream together in your mixer or by hand until it just starts to come together, maybe about 1 minute.  Let it rest in your work bowl covered for 20-30 minutes.  Next add the salt, potatoes and starter (cut into about 7-8 pieces), and  mix on low for a minute.   Mix for a total of 13 minutes in your mixer starting on low-speed and working your way up to speed #3 for the last 5 minutes.  When you have about one minute left to mix add the cheese to get it evenly incorporated.  I used a mixed cheese blend that was shredded.  (Note: I didn't follow my own directions and only mixed for about 6 minutes on speed #1.  If you want the rolls to be lighter it is better to mix for the total amount of time as originally indicated).  Remove the dough from your bowl and place it in a lightly oiled bowl or work surface and do several stretch and folds.  Let it rest covered for 10-15 minutes and then do another stretch and fold.  Let it rest another 10-15 minutes and do one additional stretch and fold.  After a total of 2 hours place your covered bowl in the refrigerator and let it rest for 12 to 24 hours.

When you are ready to bake remove the bowl from the refrigerator and let it set out at room temperature still covered for 1.5 to 2 hours.  Remove the dough and cut into equal size pieces and shape into rolls.  Place on a baking sheet lined with parchment paper and cover with moist tea towels or plastic wrap sprayed with cooking spray.

The dough will take 1.5 to 2 hours depending on your room temperature.  Let the dough dictate when it is read to bake not the clock.

Around 45 minutes before ready to bake, pre-heat your oven to 500 degrees F. and prepare it for steam.  I have a heavy-duty baking pan on the bottom rack of my oven with 1 baking stone on above the pan and one on the top shelf.  I pour 1 cup of boiling water in the pan right after I place the dough in the oven.

Right before you are ready to put them in the oven, using a simple egg wash brush each roll and sprinkle on your topping of choice.   Next add 1 cup of boiling water to your steam pan or follow your own steam procedure.

After 1 minute lower the temperature to 425 degrees.  Bake for 35 minutes until the crust is nice and brown.

Take the rolls out of the oven when done and let them cool on a bakers rack before for at least 2 hours before eating.

CrumbShot

sharonk's picture
sharonk

I had been looking for bakers to bake my bread in bulk for me but never seemed to find the right one.  There were various reasons why each baker wasn't right and why I wasn't the right situation for them. Last Spring, before giving up the whole idea of selling my breads commercially, I gave it one last shot: could I develop a Gluten-Free Sourdough Bread Mix?

It took me 2 months to develop a user-friendly, genuine, sourdough bread mix. The mix takes about 24 hours to complete, less time than making gluten-free sourdough bread from scratch, about 3-4 days.

When I had initially looked at commercial spaces to bake bread, all I saw were dollar signs and enormous investments for space, utilities and equipment. When I ran the numbers, It looked like I needed a quarter of a million dollars for the first year.

Manufacturing a bread mix, however, does not need ovens!!

I found a relatively inexpensive office suite in an old mill building in my town and was able to work closely with the town officials to turn it into a small commercial kitchen. It took 5 months from start to finish not without lots of challenges. That's all behind me now and I have a wonderful work space to make and sell my bread mixes.

While I was managing the building project I was also perfecting the recipes, having people test the bread mixes, developing product labels, researching packaging and researching shipping.

When it was finally finished I scheduled my final inspection from the Board of Health. The next day, the kitchen flooded! I learned another new skill: how to use a shop vac. Thankfully, that stress is all behind me (ouch) and I did get my final inspection.

I have been making and selling my gluten-free sourdough bread mixes and gluten-free sourdough starters locally and online. The feedback is beginning to come in. People are making the mixes without trouble and enjoying the breads. Many of my customers have not been able to eat bread, let alone sourdough bread, since they were diagnosed with gluten allergy. They are so happy to be eating delicious, sourdough bread again.

Pumpernickel Flatbread, toasted and slathered with olive oil


Cinnamon Spice Bread with ice cream


Cinnamon Spice Bread sticks to be dipped in Fig Jam

I am happy and proud of what I accomplished. Now comes the next piece of work: Growing the Business!

My bread mixes and starters can be purchased from my website. www.glutenfreesourdough.com


dabrownman's picture
dabrownman

For some reason my apprentice and I had a hard time keeping the mobile Sinclair Bakery’s Potato rolls, that we were making at the same time,  out of the this week’s SD bread.


The original idea was to take the extra multigrain levain that we had built a week ago Wednesday and refrigerated for a week and add to it with another feeding to get it back up to bread rising speed for this week’s bake that we hoped would be very sour and we were going to call Big Levain Multigrain Sourdough.   


We before you know it, I had tossed the poolish and the potatoes made for the potato rolls into the dry mix for the SD bread.  Once in there and mixing for a minute it is pretty hard to get the mistake out of the mix.


Needless to say, Lucy was nearly beside herself and sticking to her ‘we don’t need no stinking commercial yeast in our sourdough bread’ stance but, it was a little too late for that.  Since we love potatoes in SD bread, we just went along with the recipe that Lucy had concocted as if nothing had happened.


The problem was that we needed rolls for once a month dinner hamburgers and they would now be 6 hours late because the poolish was gone meaning we needed another dinner plan quickly.


Everything cooking and baking was now backwards which, around here, is our strong suit and nothing out of the ordinary.  In any event we got another poolish going for the rolls and thankfully we had enough potato and potato water left over.


The SD bread was now 6 hours early meaning our planned 12 hour retard of the shaped dough would now be 18 hours long and that was really pushing a big levain SD that also had a 6 hour old ADY poolish making over proofing a near certainty!  For sure our really sour experiment with the big 4 build week old levain was shot to smithereens.


We also needed to get this bread dough in the fridge because it was going to freeze last night and we still had to haul the entire pot garden inside for protection for this unusual cod snap that is easily 4-6 weeks early.


So we started right away on our unusually short 20 minute autolyse using fig re-hydration and potato water for the liquid holding back only the salt, which we sprinkled on top, the figs, pumpkin and sunflower seeds.


Next came the usual 3 sets of slap and folds on 8, 3.and 1 minute intervals.  Even though the recipe doesn’t appear to be wet, this felt like a 80% hydration dough because the potatoes are around 75% water and this water isn’t accounted for in the recipe.  It took the full 3 sets of slap and folds to get the dough to quit sticking to the counter.


Then 2 sets of S&F’s where done from the compass points where the held back figs and nuts were added on the first one.  Usually we would do 3 sets but since were messed up with too much levain and commercial yeast we held it back toi 2 sets where the 2nd set acted as the pre- shape.


At the last minute we decided to make a Chacon shape for the last day of Hanukkah.  We haven made a Chacon for a while but quickly decided to make (2) Franz Joseph roll shapes places at the ends of the oval baskets with some balls and short logs surrounding them.


Then the remaining dough was shaped into and oval flat disk and placed over the design in the bottom of the basket.  The basket was immediately placed in a trash can liner and put into the fridge with no counter proofing to try to compensate for too much SD levain and yeast for an 18 hour retard.


After 18 hours in the fridge the dough was fully risen so we decided to bake it cold right out of the fridge which was the right decision.  Big Old Betsy was pre- heated to 550 F and steaming lava rocks were inserted at a\that temperature.   When the steam was billow1ng the bread was un-molded and loaded onto the bottom stone


After 2 minutes the temperature was turned down to 500 F and then 2 minutes later it was turned down to 475 F when it stayed until the 15 minute mark when the steam was removed and the temperature was turned down to 425 F.  25 minutes later, the bread hit 203 F on the inside when the oven was turned off and when the bread hit 205 F irt was removed to the cooling rack..


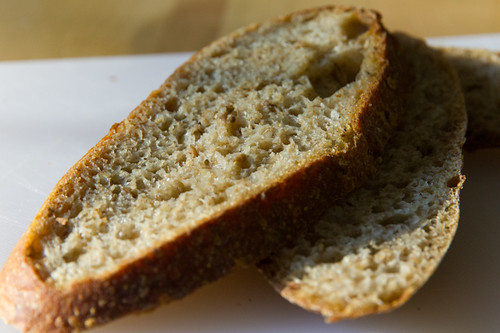
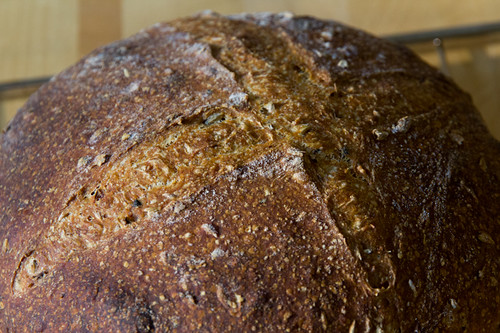
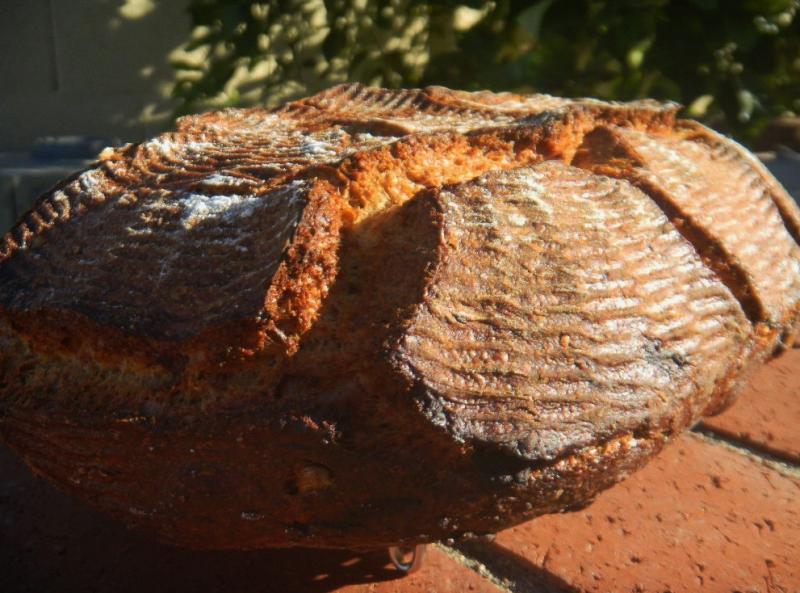
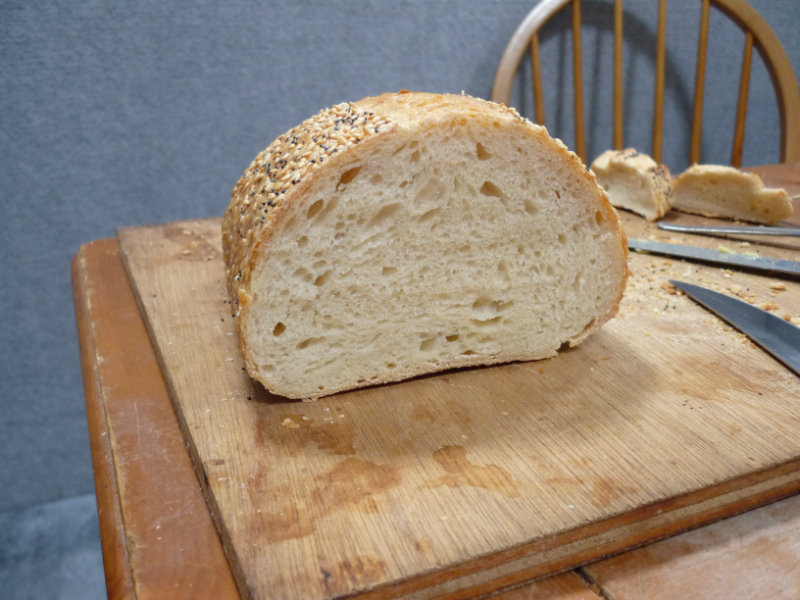
The dough bloomed well where expected and cracked according to the design.  It didn’t spring much but did spread a little pointing out that the dough was 100% proofed.  The bread browned very well and the exterior came out very handsome as a result.  


Yes it is turkey Italian sausage pasta!

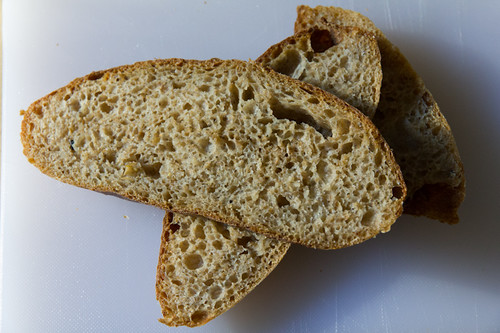
The crust stayed somewhat crunchy which we liked very much and it was especially tasty.   The crumb was not as open as we thought it would be, nor was it as sour as our normal SD breads.  Still, the taste was great, nutty seedy and figgy.  Just delicious even though I didn’t get to eat the sandwich I made for lunch with it.


My wife came home for lunch unexpectedly and commandeered that sandwich for her lunch….. with a smile on her face!   So I had a P&J with it instead and a toasted  piece to try with butter just to make sure it was as good as it looked   You can’t help but like this bread.

Yes it is turkey white, red bean & stuffing,  green chli...... chili.  The turkey is now all gone but the stuffing remains!
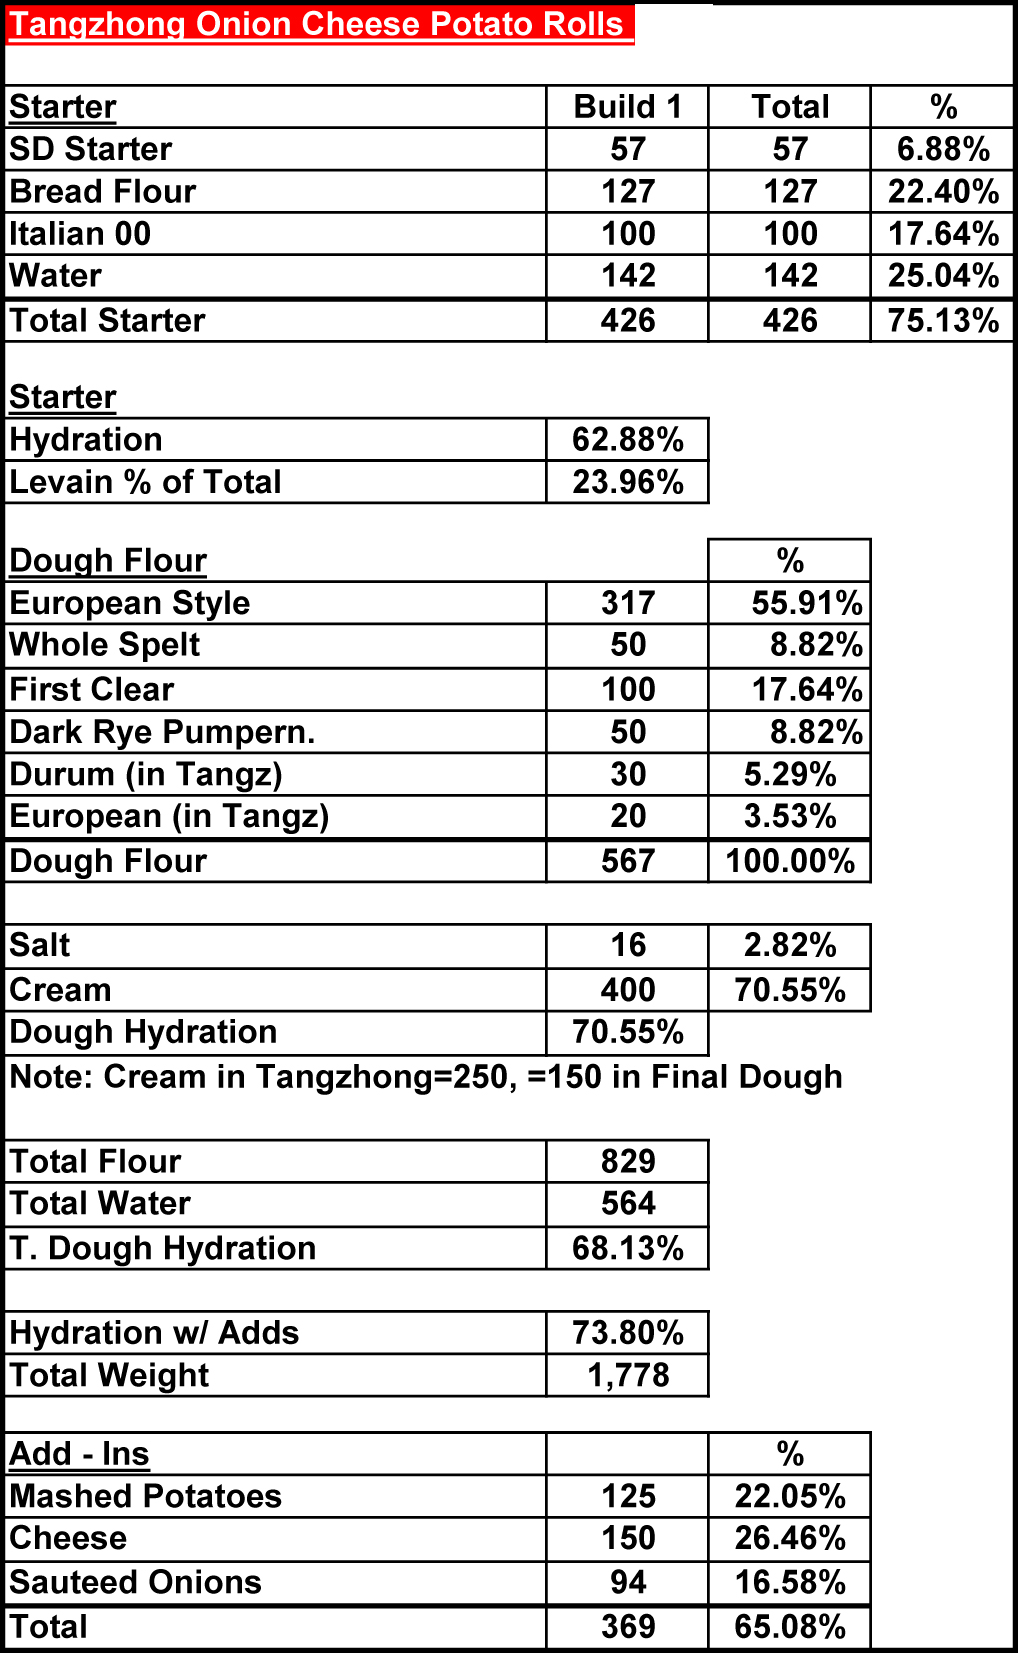
Formula


Build 1

Build 2

 Build 3

Total

%

Pinch of ADY


Multigrain SD Starter

12

0

0

12

2.11%

Whole Kamut

7

13

20

40

7.04%

Whole Wheat

7

13

20

40

7.04%

Whole Spelt

8

13

20

41

7.22%

Whole Rye

8

13

20

41

7.22%

AP

0

0

50

50

8.80%

Water

30

52

130

212

37.32%

Total

72

104

260

436

76.76%


Multigrain SD Levain


%


 Flour

218

38.38%


Water

218

38.38%


Hydration

100.00%


Levain % of Total

35.68%


Dough Flour


%


AP

350

61.62%


Dough Flour

350

61.62%


Salt

10

1.76%


Fig Water 125, Potato Water 40

165

29.05%


Dough Hydration

47.14%


Total Flour

568

100.00%


Fig Water 125, Potato Water 40, Water

383

67.43%


T. Dough Hydration

67.43%


% Whole Grain

29.58%


Total Weight

1,222


Add - Ins


%


Ground Flax, Sesame Seed

10

1.76%


Honey

5

0.88%


Red Malt

2

0.35%


White Malt

2

0.35%


Boiled Yukon Gold Potato

102

17.96%


Chia Seeds

10

1.76%


Figs

50

8.80%


Pumpkin & Sunflower Seeds

50

8.80%


Total

261

45.95%


 When it is cold outside, Lucy likes to snuggle between two pillows.

varda's picture
varda

I have been meaning to make pulla for awhile, ever since various intriguing posts on the subject.   I followed a combination of jarkkolaine (formula) and Julie J.  I only had cardamon pods, so sort of stripped them and crushed them in my coffee grinder.   Not so easy.   The cardamon makes this incredibly tasty.    I am guessing that adding either a poolish or making these sourdough would make these even better, but that could be gilding the lily.     

I tried this with infusion and sourdough today.   They look pretty similar to the above, but definitely prefer the sourdough version.   These were alarmingly delicious.   This is a simple change to Jarkko's formula and uses Julie's finishing instructions.

12/8/2013     
Cardamon buns     
 FinalStarterTotalBP 
KAAP20050250  
Milk125 12550% 
Water 333313% 
Butter45 4518% 
Sugar38 3815% 
Eggs13 135% 
Crushed Cardamon2 20.8% 
Salt2.5 2.51.0% 
67% White Starter83    
      
Butter dabs     
Egg wash     
Powdered Sugar     
      
      
Heat milk (microwave 1 minute)   
Add crushed cardamon and let sit around 20 minutes
Mix all ingredients but butter until strong  
then add chopped room temperature butter  
bit by bit until incorporated    
(I used Bosch compact for all mixing)   
Bulk Ferment around 2 hours with 1 S&F  
Shape into 6 balls     
and proof on tray with parchment around 30 minutes
Press thumb down in middle of each bun  
Put a dab of butter in the indentation   
Eggwash and then sprinkle with white sugar  
Bake for 14 minutes oven preheated to 360  
then reduced to 325    
with convection on     


yozzause's picture
yozzause

Hi Folks

i was reminded by work colleauges that i had not baked for a little while and that they were feeling deprived of some nice bread. So with that thought ringing in my ears and the thought that i hadn't baked since i had changed my feeding regime for the sourdough culture  where it now spends more time in the cool room than out, coming out for a couple of days for a few feeds and going back in the fridge for a longer stay.

I decided to come in early to work and put through a white dough 3kg flour 2 litres of water and 1 kg of culture(100%hyd) 75g salt 1x 50g egg and 150g of butter.

The dough was mixed well as i had decided that it would get no stretch and folds just a bulk fermentation which lasted for 4.5 hours so the dough was scaled and shaped after my lunch and placed on linen couches for an overnight stay in the cool room. 4 @750g 5 @ 500g 4 @ 250g 

Again i came in early and baked off the dough before my scheduled 7.45 start 

I managed to get a cut shot just before the loaf was eaten at lunch time, please disregard the cutting board with coffee stains  


I have also included a couple of pictures of bread that was made recently during a visit from fellow TFL follower Betsy Teo, im sure she is about to do her write up  about her Aussie Aventure whilst on holiday from Malaysia ( the pressure is on)


Home brew stout with torrified wheat sourdough to the left,  with cottage loaf and stick made  from black sesame white dough (No time dough)


Turmeric with Haloumi Cheese and Spring Onion Sourdough loaf inside and out.

Kind regards Derek


gmagmabaking2's picture
gmagmabaking2

The lead in picture shows that we baked Nisu plus other breads... Helen's picture leads in with her braided Nisu breads and her Alaskan Sourdough. We had a great time baking these breads and decided that we LOVE the dough from this Finnish Nisu (Nissua) bread... it will be the go to recipe for future sweet breads and cinnamon rolls... in fact, today I am going to make a raisin swirl bread with the same recipe.  

Here are our pictures of how this bread came out for us....

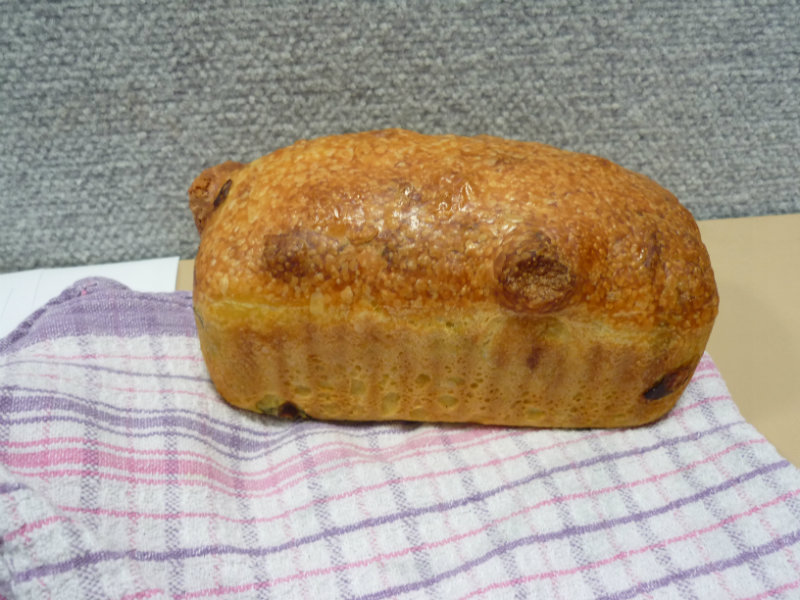
 These are Helen's braids before baking.

The next picture shows Barb's braids... beautiful... My two sisters are great at braiding bread dough... lovely.

 Barb said she was surprised and pleased by the oven spring... 

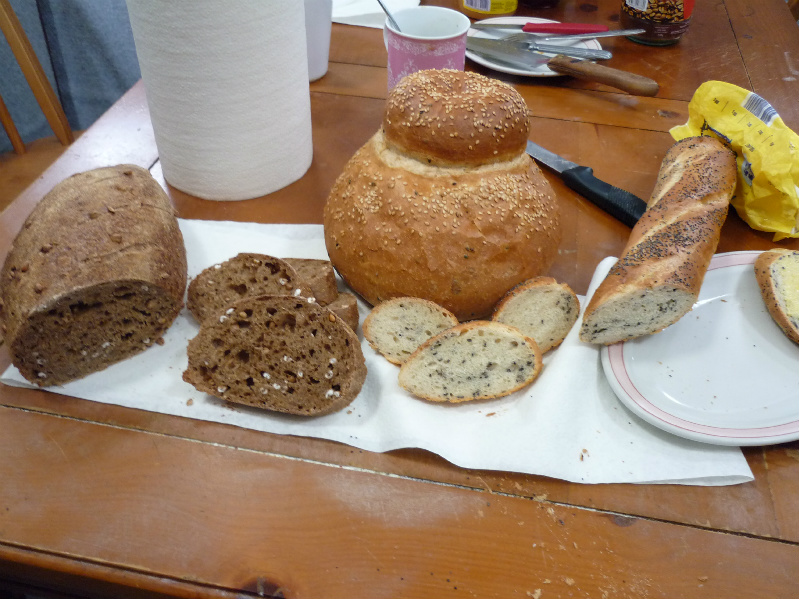
These loaves look great. Good Baking Barb!

And the crumb is nice and spring and beautiful... the bread really tastes good. We all love the taste!

\Below is my crumb, looks a lot like Barb's so I must be doing something right. 

 My bread is not sitting around like other breads I have baked ... we are feasting on it and looking for more... The recipe we used was from allrecipes.com for Finnish Nisu... check it out, you too will become addicted to this one.

 With some sprinkles, this would make a great centerpiece for the Christmas table.

Happy Baking everyone!

Barbra, Diane and Helen (3 gmas)


limmitedbaking's picture
limmitedbaking

Down to my last few weeks in Canada and am now trying to clear a bit of my remaining pantry. Still have a little of the spent grains from the previous spent grain bake which I decided to incorporate in last week's bake. And why not throw in a little beer to make it a beer bread something which I wanted to try for a long time. Recipe was adapted from Dan Lepard's barm bread.

Barm:
250g Ale (I used a home-brewed Honey Basil Ale)
50g Flour
4 Tsp Starter

Heat up Ale until 70C. Whisk in Flour. Let it cool and add the starter. Leave to ferment for about 12 hours. (While researching on the recipe, I noted that there is a wide variance to the fermentation time from 8-36 hours). I left mine for 20 hours but I felt it could go longer. I used half the batch for my 1st try but it resulted in a dense bread with little fermentation which I tossed out. To remedy the situation I added some extra sourdough starter for this batch.

Starter:
1/2 Cup Flour
1/4 Cup Water
1 Tbps Starter

Mix and ferment for 8 hours.

Final Dough:
150g Barm (About half of the prepared portion)
1.5 Cup AP Flour
1.5 Cup Whole Wheat Flour
1.5 Cup Water
2/3 Cup Spent Grains
2 Tsp Salt

Mix all together and ferment for 7 hours with 2 stretch and folds in between. Preshape and rest for 30 minutes. Shape and proof for 2.5 hours and bake at 230C for 45 minutes.

I must say that this bread really taste great and was well worth the lengthy procedure. Can you really taste the beer? Not really but the barm helps the loaf retain quite a bit of moisture, like a water roux commonly used in chinese styled bread. I would like to think it imparts lots of flavours to the bread as well! 

And the crumb was beautiful from the long fermentation time and high hydration used. It felt like a 75% dough but taking into account that wholewheat was used and the inclusion of the barm, I guess it is about 82%. Not so easy to handle and shape but turned out great. 

The spent greats lend a nice texture to the bread too providing a bit of bite and something to chew on. Just in time for lunch.

-Tim

aptk's picture
aptk

This is essentially my pizza dough recipe except that I added an extra teaspoon of yeast. I let it rise until double in size. Punched it down, divided it into fourths, formed flattened balls and placed them in a 9x9 pan. Let them rise until doubled again and baked them at 350F for 25 minutes. Sprayed them with butter flavor oil immediately as they came out of the oven, and broke them into individual buns to cool.

They had a nice crumb for burger buns and toasted easily. Tasted great!

Pages

Subscribe to RSS - blogs