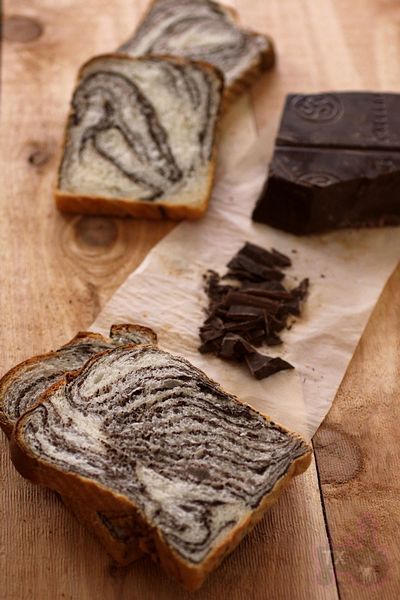
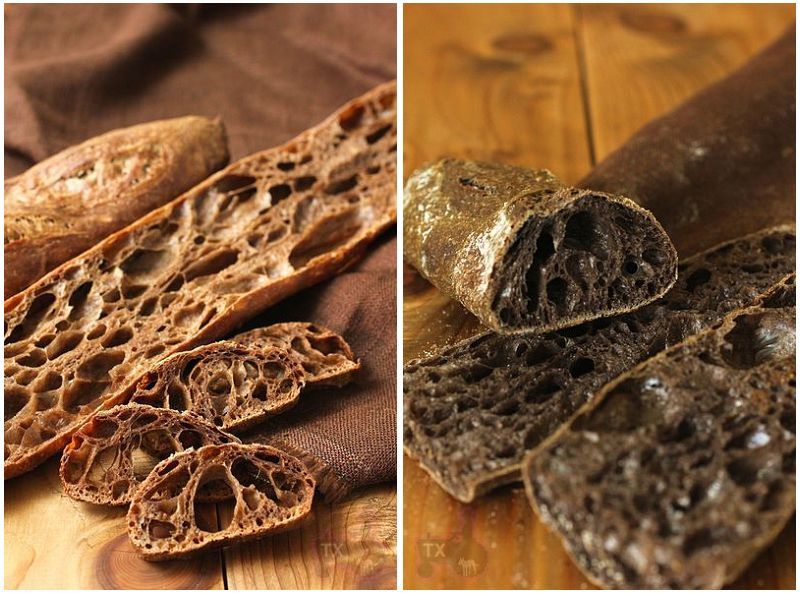
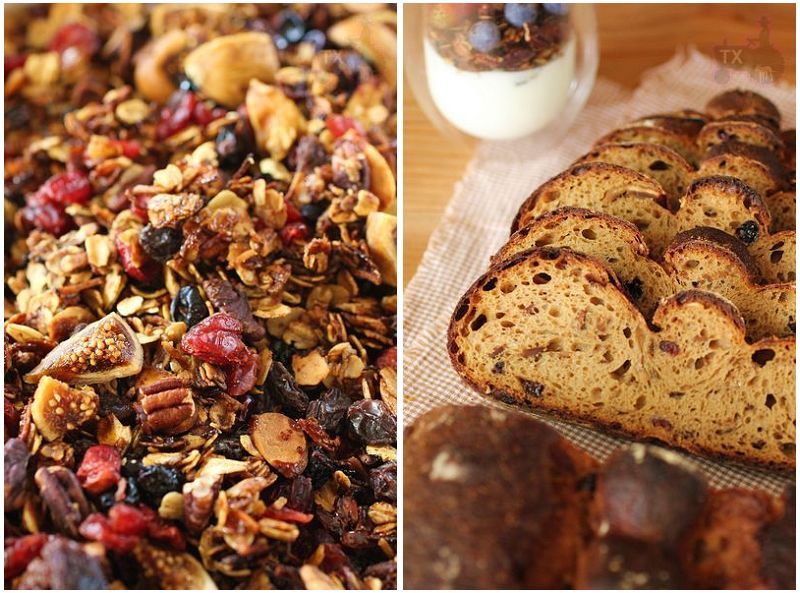
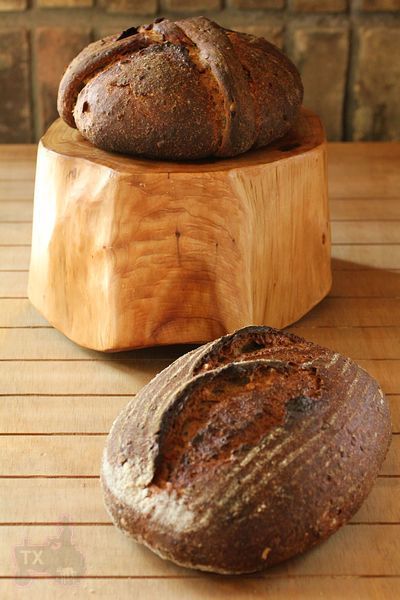
The Fresh Loaf

A Community of Amateur Bakers and Artisan Bread Enthusiasts.

txfarmer's blog

txfarmer's picture
txfarmer

Sending this to Yeastspotting.

Click here for my blog index.

In reply to my soft chocolate sandwich loaf post, lumos tossed me a bone, and I took the bait immediatly. Hey, it involves chocolate and lamination, two of my many bread related obsessions. Essesntially it's a technique popoular in Japan a while ago: a sheet of chocolate laminated into an enriched soft dough, displaying random but cool looking marble effect, and a subtle chocolate taste. You can use ANY lightly enriched dough for this, I used the classic Sourdough Hokkaido Milk Loaf, but any of the following would work as well (click for detailed formulas):

Some notes:

- It's still a soft shreddy bread, so you still have to do the intensive kneading required, no shortcuts here.

- Use the same dough/flour amount as a normal sandwich loaf. For my Chinese pullman loaf pan, I used 250g of total flour just like the Sourdough Hokkaido Milk Loaf post specifies, for a 8X4inch loaf tin, you can either increase the flour amount to 280g or leave it at 250g, depending on how tall you want the loaf to be.

- I got the chocolate sheet recipe online, but later lumos sent me a very similar one, thanks!

Sourdough Chocoate Marble Loaf

- Chocolate sheet
Dark chocolate, 50g
butter, 20g
bread flour, 20g
cocoa powder, 10g
corn starch, 5g
milk, 60g
sugar, 20g
egg white, one

1. Melt chocolate and butter seperately
2. Mix and shift bread flour/corn starch/cocoa, add milk and sugar, mix until blend
3. Add melted chocolate then melted butter, mix thoroughly
4. Put on low heat, stir constantly, until the mixture thickens and clears the side and bottom of the pot.


5. Put the mixture between two sheets of plastic, roll to a 18CMX18CM square, freeze until use.


- Sourdough Hokkaido Milk Loaf dough enough for your tin (or similar soft white enriched dough), after first rise and put in fridge overnight.

- Assembling:

1. Take the dough out of fridge, press flat, let rest at room temp for one hour.
2. Roll out to 25X25CM square, put the frozen chocolate sheet in the middle

3. Seal the chocolate sheet in, roll out again to 18X36CM, do a single book fold (i.e. fold in thirds, envelope fold, three-fold)

4. Roll out to 18X36CM and do the single book fold again (may need to rest dough for 10-20min before rolling out )
5. Roll out to 18X36CM and do the single book fold for the third time (may need to rest dough for 10-20min before rolling out )
6. Rest dough for 20min, roll out to be slightly longer and wider than the loaf tin, cut in 3 stripes with one end connected

7. Braid and put in oiled loaf tin

8. Proof and bake as the original dough formula requires, in this case it took 6.5 hours to proof, and 40min at 375min to bake.


Marble effect inside out


Do note that this is not a dessert-like sweet bread, it's a typical Asian soft loaf - slightly sweet, shreddably soft, with subtle chocolate flavors.

Oh yeah, it's A LOT easier than making croissants, the chocolate sheet is not easy to melt.

txfarmer's picture
txfarmer

Sending this to Yeastspotting.

Click here for my blog index.

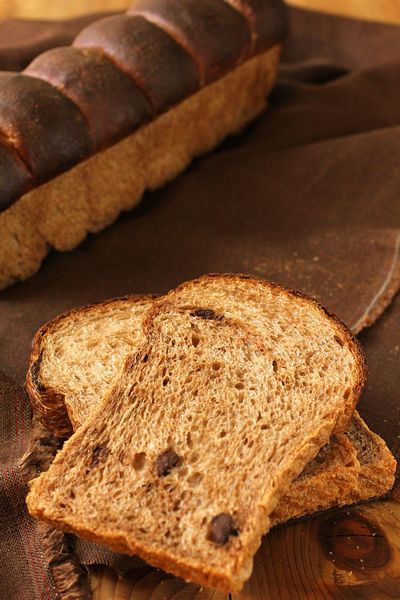
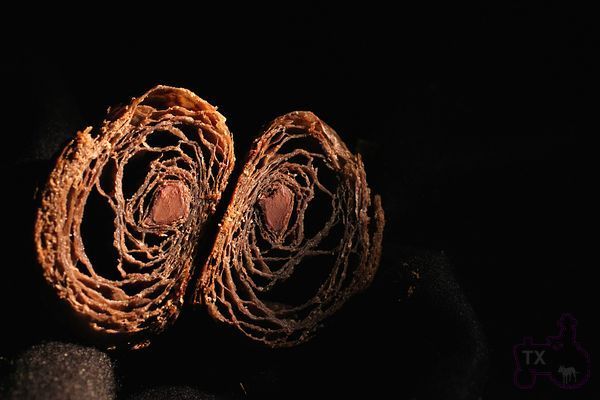
Chocolate croissants, chocolate soft sandwich loaf, now chocolate baguettes, see a trend?
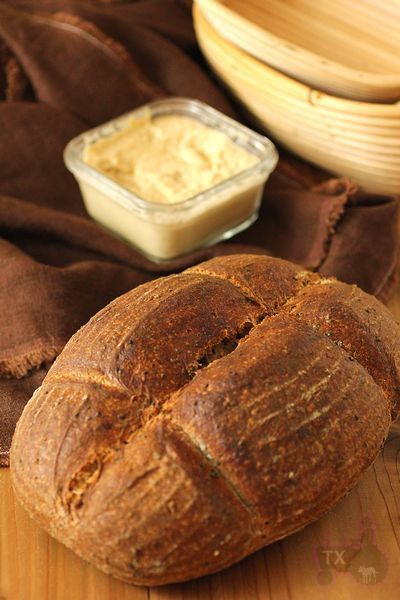
I made these baguettes using my trusted 36 hour sourdough recipe, twice - once with natural cocoa powder (on the left), once with special dark dutch processed cocoa powder (on the right). The natural ones were very hole-y but a bit flat; the dutch processed ones were rounder, with better shape, but the crumb is just so ever slightly less open. This once again proves the theory that natural cocoa powder is more acidic, which makes a more extensible bubbly dough.


AP Flour, 425g

ice water, 315g

salt, 10g

white starter (100%) 150g

cocoa powder, 20g (natural or dutch processed)

-Mix flour, ice water and autolyse for 12 hours.

-Mix in salt, starte, then follow the basic 36 hour sourdough baguette formula here.

You might notice that there isn't any sugar in the formula, that's because cocoa breads don't have to be sweet, can you say chicken mole? The slight bitterness of cocoa went perfectly with mole sauce.


Of course it CAN be sweet if that's the way you want to swing it. Here's a decadent pizza made with this dough, topping: brie cheese, LOTS of bittersweet dark chocolate pieces, and pistachio nuts. TO DIE FOR. (Add chocolate pieces for the last minute or two of baking, otherwise they burn.)


I normally don't like too much (or any) dry flour on my bread crust, but for these super dark baguettes I had to add a thin layer, just to show off the cuts.


Not your everyday baguette, but perfect if you want a dessert pizza/bread (add more chocolate), or something to go with mole dishes.

txfarmer's picture
txfarmer

Sending this to Yeastspotting.

Click here for my blog index.


Made these when I was fighting the crazy "double chocolate croissant" battle. Luckily these are not nearly as difficult, the procedure was similar to other sourdough soft sandwich breads I have posted about. Didn't even have to get dutch processed cocoa for it, the natural cocoa worked perfect, even though it did take extra time to knead the dough to full development. I bet dutch processed cocoa would work here too, if not better.

Another thing I noticed was that it proofed much faster than other similar loaves, I am guessing it's another side effect of natural cocoa powder too. Do keep an eye on it during proofing.

Sourdough Double Chocolate Soft Sandwich Loaf

Note: 19% of the flour is in levain

Note: total flour is 250g, fit my Chinese small-ish pullman pan. For 8X4 US loaf tin, I suggest to use about 270g of total flour. For KAF 13X4X4 pullman pan, I would suggest using about 430g of total flour.

- levain

starter (100%), 13g

water, 22g

bread flour, 41g

1. Mix and let fermentation at room temp (73F) for 12 hours.

- final dough

bread flour, 203g (I used half KAF bread flour and half KAF AP flour for a balance of chewiness and volume)

sugar, 38g

butter, 18g, softened

water, 137g

salt, 2g

egg, 24g

cocoa powder, 10g (natural or dutch processed)

chocolate pieces or chips, 20g


1. Mix everything but chocoate pieces/chips until stage 3 of windowpane (-30sec), see this post for details. Add in chocolate pieces, mix in using low speed or by hand.

2. Rise at room temp for 2 hours, punch down, put in fridge overnight.

3. Takeout, divide, round, rest for 1 hour. shape as instructed here for sandwich loaf.

4. rise at room temp for about 4 hours. For my pullman pan, it should be about 80% full; for US 8x4inch pan, it should be about one inch above the edge. The dough would have tripled by then, if it can't, your kneading is not enough or over.

5. for sandwich loaf, bake at 400F for 45min, brush with butter when warm. 


Soft and shreddy. The amount of chocolate chips/chunks was rather light, which is an effort to keep this still a "bread", rather than "dessert". You can certainly add more to satisfy your sweet tooth or chocolate craving.


Made another one using a different mini sandwich tin (also bought from China), which took 6X55g of dough, came out equally well


txfarmer's picture
txfarmer

Sending this to Yeastspotting.

Click here for my blog index.

Chocolate croissants, we all love them. When I saw in a Japanese baking book where they put cocoa in the dough as well, I knew I must make it. These are the bread equivalence of "a dark and mysterious stranger".

At first I thought it would be straightforward to adapt my previous croissant recipe: just add some cocoa powder and wrape in a chocolate baton right? Wrong. Nothing in croissant making has been straightforward for me. Before diving into the gory details of my 3 months struggle, you might want to check out the following two earlier entries for some tips and guildlines:

Lesson re-learned #1: Natural cocoa powder is acidic. I knew that before from caking making - you add baking soda to react with acidic cocoa powder to raise cakes, however, I didn't know it was THAT acidic. After adding cocoa powder, the dough was too weak to rise properly, they ended up like sad chocolate pancakes. I changed natural cocoa powder to dutch processed cocoa, immediately saw a difference. For the batch I am showing I used Herseys Special Dark Cocoa (hence the very dark color), which is a blend of dutch processed and natural cocoa, I imagin the volume would even be better if a pure dutch processed cocoa is used.

Lesson re-learned #2: Firm levain gives dough more strength then liquid starter/levain. Knew that one before as well, but the effect is really obvious here. I made a firm levain rather than adding 100% starter directly into the dough, the volume of croissants was further improved.

Lesson re-learned #3: Croissant dough needs to be cold. In my last croissant post, I wrote about how to make croissants in TX summer by rolling quickly and putting dough in fridge frequently. Well, since then, temperature has climed to 110F. Even at night/early morning, my kitchen (especially the counter top by the window) doesn't drop below 85. That's simply too hot, butter is melting into the dough as soon as it hits the counter top. To solve that, this is the setup I am using (a shoutout to my hubby who thought of and implemented the whole thing): frozen ice packs under a big baking tray, and a metal rolling pin which is filled with water then frozen.

The rolling pin and ice packs need to be put back into the freezer between rolling, which is a bit troublesome, but did I mention it's 110F outside?

Lesson re-learned #4: Dark chocolate can lower blood pressure. Knew that one before too, but not until my mother, who usually has high blood pressure, had two croisssants and started getting dizzy - her blood pressure was too low! We then tested with just the valrhona dark chocolate batons used for these croissants, apparently, just one was enough to lower her blood pressure to normal, any more would be too low! This is more effective (and yummier) then medicine!

Double Chocolate Croissant with Natural Starter

Note: makes 12 croissants

-Levain

100% starter, 35g

water, 59g

bread flour, 105g

1. mix and let mature for 12 hours.

-Final Dough

bread flour (KAF), 422g

dutch processed cocoa, 20g

water, 85g

milk, 128g

sugar, 73g

salt, 10g

osmotolerant instant yeast (SAF gold), 4g, 1tsp+1/4tsp

butter, 21g, softened

levain, all

roll-in butter, 287g

1. Mix everything but the roll-in butter, knead until gluten starts to form. In my KA mixer, 3min at first speed, 5 min at 3rd speed.

Then following the procedure illustrated here. Do remebmer to enclose a chocolate baton while shaping, just place it at the bottom of the triangle piece, and roll up as usual.

 Very very very delicious, it takes so much work to make, be sure to use the best chocolate to ge the maximum impact!

For this earlier batch, I rolled the dough out thinner, did more turns while shaping, to create more layers. Well, more layers alright, but I don't think it's airy enough.

Anyway, I am happy my 3 month chocolate croissant battle is near the end, still not perfect, but I think they are quite sexy!


txfarmer's picture
txfarmer

Sending this to Yeastspotting.

Index for my blog entries: http://www.thefreshloaf.com/node/24437/blog-index-will-keep-updating-and-linking-it

First the bread, then we'll talk about cakes, sinful delicious cakes...
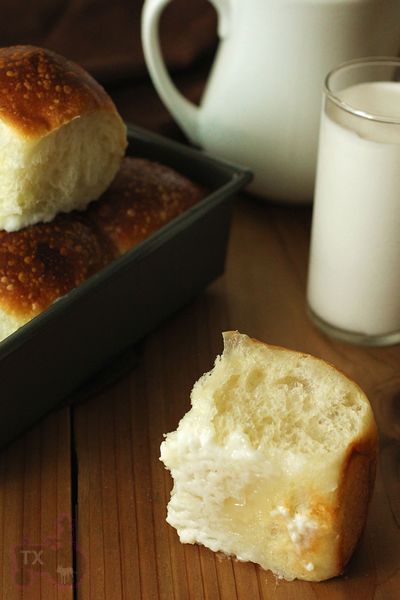
 

I love hummus, delicious, healthy and so easy to make. I don't really follow any specific recipes, but there are many good ones online - just trust me, go heavy on garlic, very heavy!


This last batch was really tasty, so I decided to make a rye sourdough with it. I want the hummus flavor to shine through, so there is a lot in the dough, along with some roasted sesame seeds to complement the flavor. The shaping method is again from this video site: http://techno.boulangerie.free.fr/09-ReussirLeCAP/03-lesFormesEnVideo/17.LeCharleston.html


Hummus Rye

- levain

whole rye, 57g

water, 45g

rye starter (100%), 6g

1. Mix and let rise 12-16hours.

- final dough

bread flour, 340g

salt, 8g

hummus, 264

water, 152g

roasted sesame, 40g

all levain

2. Mix everything except for salt & sesame seeds, autolyse for 20 to 60min, add salt, mix @ medium speed for 3-4 min until gluten starts to develope. Add sesame, mix @ slow speed until evenly distributed.

3. Bulk rise at room temp (~75F) for about 2.5hrs. S&F at 30, 60, 90min.

4. Shape as following: http://techno.boulangerie.free.fr/09-ReussirLeCAP/03-lesFormesEnVideo/17.LeCharleston.html

5. Proof bottom up in basket, put in fridge overnight right away. Take out from fridge next morning to keep proofing until it springs back slowly when pressed, about 30min for me and my July TX kitchen.

6. Bake at 450F with steam for the first 15min, lower the temperature to 430F, keep baking for 30 to 35min.


To my satisfaction, hummus flavor is very obvious, and sesame seeds make the loaf so fragrant. Oh yeah, crumb is very open for a rye bread loaded with stuff.


Didn't last long...


----------

This past Sat (7/30) was my birthday, and 6th anniversary. It's the year of "iron", I got cast iron pots as gifts, aren't they pretty?


Made a white chocolate opera cake as our celebration cake, the "chain" decoration on top was my desperate attempt to relate to the "iron" theme. :P


My recipe is loosely based on this one here: http://andreasrecipes.com/2008/05/28/the-daring-bakers-make-opera-cake/


It takes quite a few steps and components to finish, but if you divide the work into a few days, it's not so bad.


Since about a year ago I joined the Daring Bakers challenge, it's been a great journey to broaden my baking horizon. This beautiful Frasier was done in July.


Finally, some creamy desserts in case there isn't enough sugar, butter, and cream in our system.

Pumpkin Creme Brulee

Pumpkin Flan

txfarmer's picture
txfarmer

Sending this to Yeastspotting.

Index for my blog entries: http://www.thefreshloaf.com/node/24437/blog-index-will-keep-updating-and-linking-it


I saw this pani popo recipe a while ago: http://www.mykitchensnippets.com/2011/01/pani-popococonut-buns.html . What's interesting is the way the buns are baked: instead of adding coconut milk "IN" the dough, it's poured into the pan right before baking, so essentially the buns are baked "IN" coconut milk instead. I changed the formula to use my white starter, but kept the rest the same.

Sourdough Pani Popo (adapted from My Kitchen Snippets)

Note: 19% of the flour is in levain

Note: total flour is 250g, fit a 8X8 square tin.


- levain

starter (100%), 13g

milk, 22g

bread flour, 41g

1. Mix and let fermentation at room temp (73F) for 12 hours.

- final dough

bread flour, 203g (I used half KAF bread flour and half KAF AP flour for a balance of chewiness and volume)

sugar, 5g

butter, 18g, softened

salt, 3g

milk, 155g

levain, all

- for soaking

coconut milk, 125g

sugar, 38g


1. mix together everything in final dough, knead until stage 3 of windowpane (-30sec), see this post for details.

2. rise at room temp for 2 hours, punch down, put in fridge overnight.

3. takeout, divide into 9 parts, round, rest for 1 hour. shape into rolls, and put in 8inch squre pan.

4. rise at room temp (78F) for about 6 hours. they should be almost fully proofed, i.e. barely spring back when pressed.

5. Mix together coconut milk and sugar, pour into pan, bake at 375F for 30min.


Exceedingly soft and fluffy due to intensive kneading and proper fermentation


The coconut milk at the bottom became thick gooey sweet sauce during baking, adding great flavor to the enriched soft buns. My batch was only slightly tangy, but that might just be my starter. Next time I might try adding coconut milk and shredded coconut filling in the buns as well to maximize the coconut flavor, however, they were delicious and quickly gone as is.


txfarmer's picture
txfarmer

My favorite 36 hours Sourdough baguette and its many variations:


Other baguettes:


Sourdough breads can be very soft and fluffy:

100% whole wheat breads can be very soft and fluffy too, SD or not:


My obsession for laminated dough:


Other stuff made with starters:


Other non-sourdough stuff:

txfarmer's picture
txfarmer

There are things I just refuse to buy from store, one of them is granola. I mean it's SO EASY to make granola at home, with ingredients that I like, at a much cheaper price. I have made granola so many times that I don't really follow a recipe anymore, just wing it with whatever I have on hand. However, if you have never made it before, a good guideline to follow is this one: http://smittenkitchen.com/2007/10/pumpkin-butter-and-pepita-granola/ . Mostly because I like her oil/honey ratio, granola ends up clumpy, but not too clumpy.


Usually I eat them straight, or with greek yourt/cold soymilk, always throw in some fresh fruit of course.


This time, I used some of those granola to make a light rye bread. My formula here is very loosely based on what wildyeast used here: http://www.wildyeastblog.com/2008/04/10/granola-bread/ (hers was in turn adapted from King Arthur Flour). The major difference is that I used rye starter instead of yeast: 15% rye, all in levain, with rising schedule changed accordingly. The shaping method is from here: http://techno.boulangerie.free.fr/09-ReussirLeCAP/03-lesFormesEnVideo/22.LeChapelet.html

Light Rye With Granola

- levain

whole rye, 57g

water, 45g

rye starter (100%), 6g

1. Mix and let rise 12-16hours.

- final dough

bread flour, 340g

salt, 8g

granola, 160g

milk powder, 48g

mashed potato, 124g

water, 240g

all levain

2. Mix everything except for salt & granola, autolyse for 20 to 60min, add salt, mix @ medium speed for 3-4 min until gluten starts to develope. Add granola, mix @ slow speed until evenly distributed.

3. Bulk rise at room temp (~75F) for about 2.5hrs. S&F at 30, 60, 90min.

4. Take out a small portion of dough (about 100g), round both dough, rest for 20min, shape as instructed here: http://techno.boulangerie.free.fr/09-ReussirLeCAP/03-lesFormesEnVideo/22.LeChapelet.html .

5. Proof face up on parchment paper or in basket until the dough spings back slowly when pressed, about 90min in my case.

6. Bake at 450F with steam for the first 15min, lower the temperature to 430F, keep baking for 30 to 35min.


Milk powder and mashed potato soften the crumb a little, which complements the large amount of granola well.


A very flavorful fruit/nuts bread, makes a good breakfast or snack.

Sending this to Yeastspotting.

txfarmer's picture
txfarmer

Another classic from "Bread". As always, I eliminated commercial yeast and extended rising time accordingly. So fragrant and delicious. Original recipe makes a lot of bread, which is a good thing, because they disppeared really fast. Of course I increased hydration, because my whole rye flour is very thirsty - and because I am a sucker for wet dough. My rye starter is way fast, especially in this weather, and this bread has a very high levain ratio, which means that it's a pretty fast bread to make.

Shaping method for the round loaf can be found at: http://techno.boulangerie.free.fr/09-ReussirLeCAP/03-lesFormesEnVideo/20.LeCordon.html

Five-Grain Sourdough with Rye Sourdough (adapted from "Bread")

Note: makes 3X730g loaves

- Levain

whole rye flour, 226g

water, 190g

rye starter (100%), 11g

1. mix and let rise for 12 to 16 hours.

- Soaker

flaxseeds, 82g

rolled rye, 82g

sunflower seeds, 68g

oats, 68g

salt, 20g

water, 374g

2. mix and cover, leave overnight

- Final dough

bread flour, 680g

water, 340g

honey, 14g

leavain, 417g

soaker, all

3. mix everything and autolyse for 30min.

4. knead until low-medium gluten development. rise at room temp (74F) for 2 hours, S&F @ 30 and 60min.

5. divide, preshape, let rest for 20min.

6. shape and proof for about 70min.

7. bake @450F with steam for 15 min. lower to 430F, let go of steam, keep baking for another 30 to 35min.


Wrapped up and ready to be eaten.


How can it NOT be delicious with this many seeds and grains?


Crumb is pretty open for a bread with 25% whole rye, and this much seeds.


Sending this to Yeastspotting.

txfarmer's picture
txfarmer

Recipe is from KAF(http://www.kingarthurflour.com/recipes/parmesan-batter-bread-recipe), I used instant yeast rather than active dry, which means I could skip the "warm milk to proof" bit, and make the whole thing even easier. Also skipped the cream cheese on surface, since I didn't have any. Very delicious though, a good base for all kinds of add-ins, next time I will try green onion and bacon.


I highly recommend using a cast iron pan to make this, the crust is perfection


And a fluffy soft delicious crumb


Sending this to Yeastspotting.

Pages

Subscribe to RSS - txfarmer's blog