The Fresh Loaf

A Community of Amateur Bakers and Artisan Bread Enthusiasts.

txfarmer's blog

txfarmer's picture
txfarmer

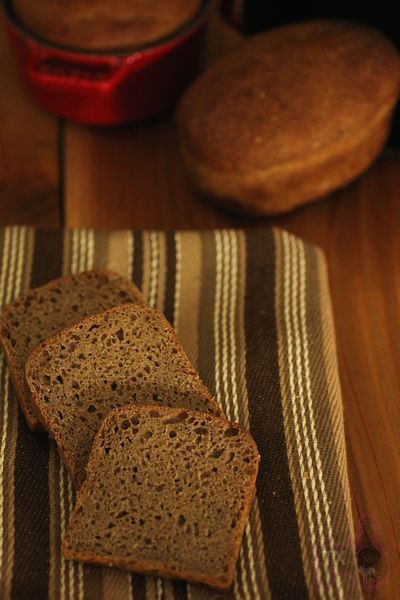
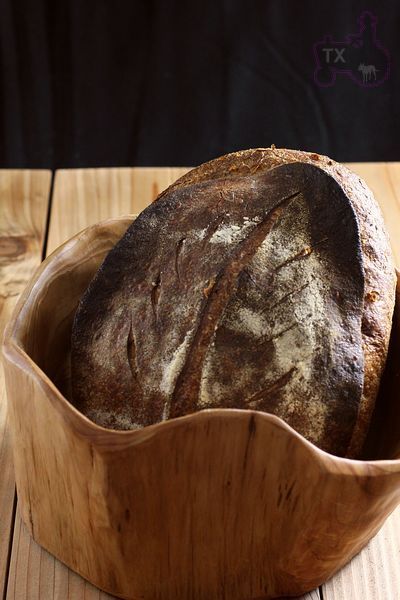
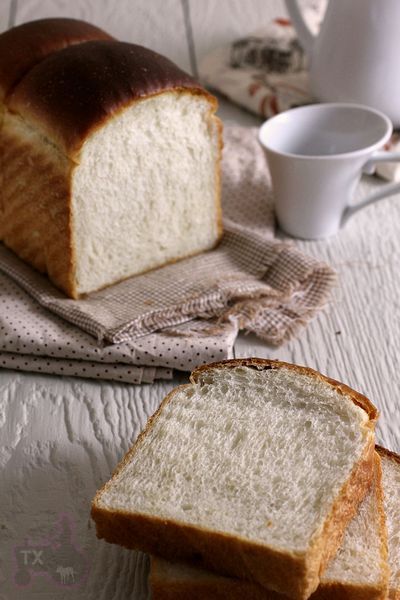
I have been making mini's favorite rye (posted here) several times now , this last batch was my best so far with good volume, somewhat even distribution of small air pockets, and of course great flavor and moist mouth feel.


Baked in 3 mini moulds: one mini pan de mie pan (from China), two mini (0.25 quart) cast iron pots. Very cute and gave me an opportunity to test out different shapes.


While I am mostly happy, there are still imperfections and questions:

1) Since rye doesn't have gluten, everything I read says 100% rye dough doesn't need any bulk rise. However, mini's formula not only has a bulk rise, but a 3 hour long one, followed by a proof (mine was only 80min long). I have made high percentage rye with no bulk rise before, I think mini's method gives me better crumb results. Why? What does this bulk rise do? Are the bulk rise and proof in fact just a very long rise, interrupted by shaping and redistribution of air pockets? Which then leads to a more even crumb?

2) I steamed the breads by covering the moulds with another mould/pot

I baked them at 460F for 10min, removed the lids, gradually lowered the baking temperature until done. When the lids were first removed, I noticed that all three doughs rose very high, well above the moulds. However, after that, as they got baked more, they shrank somewhat. In the end, the bread still domed well and had decent volume, but I am wondering what caused the shrinking? And what can I do to prevent it? Is it because rye dough has no gluten to trap all the air gas? Should I have removed the lids later/earlier? Or maybe higher/lower heat?

3)While crumb was mostly even, but the following picture does show that the bottom layer was a bit denser than the top. How can I fix the bottom? Longer/shorter proof? Higher/lower temp? More/less steam?


Anyhow, you may think I am nitpicking, but in fact I am super happy with the breads, just want to make them even better. The crumb shot in mini's post is my dream goal!


Sending this to Yeastspotting.

txfarmer's picture
txfarmer


My Christmas sourdough Panettone (blogged here) baking tired me so much that I thought I wouldn't be brave enough to deal with another sweet starter holiday bread for at least a year. Well, apparently 4 months are enough for me to forget the pain. Made two SD Colomba Pasquale over the weekend, both went to Italian friends who marveled over how authentic it looked and tasted.


There are many recipes, I mostly based mine on this one (thank you Google Translate!) It was very detailed, even had shaping diagrams, however, I did have two challenges:

1, I am not sure what kind of starter he used in the dough. I converted my 100% starter into Italian sweet starter and fed it every 4 hours 4 times (kept at 85F) before mixing the first dough. At which point I realized that the 50% sweet starter may be drier than what's used in the formula (doesn't sound like he used Italian sweet starter). In the end I adjusted the water amount to get a very liquid silk dough similiar to the SD panettone and pandoro dough I made before. I also noticed that the butter ratio in the formula is on the lower side, so I increasted just a little bit to about 35%.

2, The dove case I got (from here) had a recipe attached online, which says to use 250g of flour (about 680g of dough) per case. I had a feeling it was too much, after shaping, the case was already a bit less than 1/2 filled. I know from experience that a well kneaded broiche dough like this is capable of expanding to 4, even 5 times of original size. I put some extra dough in mini panettone paper moulds, only filling 1/4 full. After 2 hours of proofing, the dove case is already full, while the mini panettone ones took 3 hours to get to near the edge. In the end I baked the doves an hour before panettones, which means they are a tad underproofed, had "too much" ovenspring, looks like the birds are trying to soar away from the case! Even the mini panettone ones had great ovensping, ended up with a significant dome top. Both are very light, but the doves are just a bit less airy comparing to the mini panettones, which are lighter than air! Next time I will put only 500g of dough in the dove case, which will probably take 3 hours to get to the top and have an even airier texture.


SD Colomba Pasquale (very adapted from here)

-First Dough

Italian Sweet Starter (50%, fed 4 times and kept at 85F), 135g

bread flour, 390g

butter, 135g, softened

sugar, 105g

egg yolk, 3

150g+105g water

1. Mix sugar and 150g of water, heat until sugar completely disolves. Cool.

2. Mix starter with yolks, add in flour, sugar syrup, butter, knead with paddle attachement until becomes a wet smooth dough

3. Add the remaining 105g of water little by little, until completely absorbed. The dough is very wet, but smooth and can leave the bottom of the mixer bowl when mixed with the paddle attachement.

4. Leave at 75F for 12 hours, amazing how much it grew during that time, probably 4 times of the original size.


- Final Dough

first dough,

bread flour, 85g

honey, 15g

salt, 4g

sugar, 30g

yolk, 3

butter, 60g, softened

vanilla, 1tbsp

orang zest, 1 orange

candied orange peel, 160g

1. Mix together first dough, flour, honey, salt, yolks, vanilla, and orange zest, knead with paddle attachement until gluten develops

2. Slowly add sugar, knead until the dough is smooth and leaves the side of the bowl

3. Add butter bit by bit, knead until the dough is very smooth and elastic, passing windowpane test with a strong and thin window

4. Add in candied orange peel (soaked in rum and hot water overnight, drain before using), mix at low speed until combined.

5. Bulk rise at 75F for an hour

6. Divide and shape as shown here. I put about 680g of dough in each dove case, too much, 500g would be better. The case should only be 1/4 to 1/3 filled. Used 80g of dough for my mini panettone moulds.

7. Proof at 85F for about 3 hours. The original formula says 4, but my Italian sweet starter is faster. In reality, the dough for the dove cases only got 2 hours of proof before it completely filled the case and had no where to go, the dough for panettone cases got the full 3 hours, by which time, it filled the case 90%+.

8. Apply Glaze (about 100g of sugar mixed with enough egg whites to make it spreadable), spread on finely chopped nuts (30g of toasted and skin removed hazelnuts, 10g of toasted pine nuts, 55g of toasted almonds), decorated with toasted whole blanced almonds. Spread on sugar pearl, then a lot of powerded sugar.

9. Baked at 360F until golden and done, 50min for the 680g doves, 20min for the 80g mini panettones, estimating 40min for 500g dough.


The bird grew and grew in the oven, almost fell over the edge of the mould. They wanted to fly away! :P


The mini panettone was not so mini, can't believe 80g of dough filled up the whole mould and created such a dome. I think these are properly sized, which leads to proper proofing time and oven spring.


The panettones were incredibly shreddy and light, lighter than air. One recipient of the dove cut it while I was there, while the crumb was also very light and shreddy(my Italian friend and her family said it was perfect), I felt it could be improved slightly if properly portioned, probably only because I just had the mini panetonnes to compare right beforehand.The taste is lighter than the panettone I made during Christmas since there are less add-ins, but the candied orange peel, icing, and almonds on top were perfect together. I think its flavor is in between of panettone (lots of add-ins) and pandoro (no add-ins). The proofing time was much shorter than the SD pandoro and panettone I made before, probably because there's way less sugar in the dough, and a tad less butter. With all the icing and candied peel, I don't miss the sugar though.


Submitting to Yeastspotting.


txfarmer's picture
txfarmer


Ron's post about these crackers is as thorough as they come, so please get the recipe there if you are interested. I added 20% of cheddar cheese to the dough, turned out perfect, so much better than store bought. And easy to make too!


What a great way to use those "discard starters", I am sure I will make them often, with all kinds of flavors. Thanks Ron!


Submitting to Yeastspotting.

txfarmer's picture
txfarmer


This is a formula from “Bread” by Jeffrey Hamelman, a lot of people have made it with good results. I won't duplicate the formula here, see this link for a scaled down version, or better yet, get the book. A few notes:

1 I made the full recipe, got 2 huge 1.5lb breads;

2. I tried out a fun new shape, see shaping video here;

3. Kept the dough at 68% as specified in the formula, it was a dream to dough to handle

4. Did overnight cold proof, then about 80min of warming up at room temp (78F, that's TX spring for ya)


One dough shaped and scored as a batard, the other one with the fun shape, both came out very pretty


Give it a bold bake, look at the crackling singing crust! It was messy to cut.


Crumb for batard


I thought the extra rolling and shaping would make the crumb tighter, but not really, the following is crumb shot for the fun shape loaf:


Both have crumb that's very open for a 68% dough. My white starter is very not sour, my rye starter is a bit more sour but with a deep rye flavor, I think using both does adds complexity to the flavor.


Submitting to Yeastspotting.

txfarmer's picture
txfarmer


Dude, where's my bread?! Quite a few people have asked me whether my 36 hour soudough baguette dough can be used for other breads, of coure! The most natural vaiation is of course ciabatta, another hole-y bread. I again used a mixture of rye starter and white starter (something about this combo makes the flavor better), and raised the hydration to 85% (10% rye in the dough, so it's probably similar to a 82% hydration white dough).

AP flour, 425g

ice water, 350g

rye starter (100%), 100g

white starter (100%), 50g

salt, 10g

- to make the dough and do bulk rise follow the basic 36 hour sourdough baguette formula here

- at the end of bulk rise, dump the dough on counter, divide in half, and let rise on parchment paper for about 70 min(about 73F), until very bubbly. I actually used half of the dough to make this ciabatta, the other half to make two (insanely wet and hard to handle) baguettes. The baguette doughs got 40min rest, then 30min proof after shaping, which means they can be baked with the ciabatta dough at the same time.

- before baking, flip the ciabatta upside down and score baguettes if you are making them (nearly impossible since the dough is very wet and full of air bubbles)

- baguettes were baked for  25min at 460F, ciabatta got 30min, followed by 10min rest in a turned off oven (with the door slightly cracked)


Deep dark big holes that one can get lost in


The baguettes were similiarly hole-y, however, I wouldn't recommend making baguette with such a wet dough, just a night mare to shape and score


I had some ciabatta after my weekly long run this morning. Very flavorful, but I had to eat a lot of pieces to get full!


Submitting to Yeastspotting.

txfarmer's picture
txfarmer


I have posted about how to make very soft, very fluffy, yet still bouncy sandwich breads with lots of flavor(see here). The key isn't any gimmick or special ingredient, it's intensive kneading, a full long bulk rise, and proper shaping. I have posted the windowpane picture in the earlier post, but still got some questions about it. Here I will try to describle how the dough would progress during intensive kneading:

1. Dough starts to come together, but if you pull a piece, the dough would easily tear, won't form windowpane.

2. Keep kneading, the windowpane gradually starts to form, but it's thick, and won't extend very far. If you poke and get a hole, the edge is rough.

3. keep kneading, the windowpane becomes very extensible. The windowpane is thin but very very tough to break. If you poke a hole (I actually have to use my nail), the edge is smooth.

4. Keep kneading, the windowpane becomes even thinner, more transparent, but it becomes more delicate, easier to poke holes. The edge of the hole is still smooth.

5. Keep kneading, the dough starts to break down into a puddle of mud.


Stage 3 is the "golden point" for creating sandwiches with the best texture, and highest volume. 4 is a little over, your bread will still be high and nice, bu the texture would be a bit rough.  Of course it will take a few trail and error to get to that point reliably. In addition, if you are making a sourdough version like I do here, the bulk rise would take a lot longer than the dry yeast version. During this time, the dough is still getting stronger, which means, we need to knead the dough a tiny bit less than stage 3. This time I stopped kneading probably 30secs before it reaches stage 3, and the bread I got is the softest, most shreddable, bounciest I have ever gotten.


Sourdough Incredibly soft white bread

Note: 19% of the flour is in levain

Note: total flour is 250g, fit my Chinese small-ish pullman pan. For 8X4 US loaf tin, I suggest to use about 270g of total flour. For KAF 13X4X4 pullman pan, I would suggest using about 430g of total flour.

- levain

starter (100%), 13g

milk, 22g

bread flour, 41g

1. Mix and let fermentation at room temp (73F) for 12 hours.

- final dough

bread flour, 203g (I used half KAF bread flour and half KAF AP flour for a balance of chewiness and volume)

sugar, 25g

butter, 25g, softened

egg whites, 60g

salt, 3g

milk, 102g


1. mix until stage 3 of windowpane (-30sec:P)

2. rise at room temp for 2 hours, punch down, put in fridge overnight.

3. takeout, divide, round, rest for 1 hour. shape as instructed here.

4. rise at room temp for about 6 hours. For my pullman pan, it should be about 80% full; for US 8x4inch pan, it should be about one inch above the edge. The dough would have tripled by then, if it can't, your kneading is not enough or over.

5. bake at 350F for 45min. brush with butter when warm.


Crumb shots from different parts of the bread, all very velvety soft, with no pores.


So soft that it's hard to cut, much easier to tear off pieces


Amazingly soft and flavorful


Sending this to Yeastspotting.

txfarmer's picture
txfarmer


I first learnt about Pain Pailasse from Don's post here, have been intrigued by the unique shape ever since. Since the original version is likely made with a wet white dough using levain, I thought it'd be appropriate to recreate it using my 36 hour sourdough baguette dough. Loving whole grain flavor in my baguetts, I just can't make an all white dough, so I used some rye starter to bring out extra flavor, the total rye ratio is 10%. Don kept his dough at 75% hydration, I used 78% to account for extra water absorbed by the rye flour.

AP flour, 425g

ice water, 315g

rye starter (100%), 100g

white starter (100%), 50g

salt, 10g

- follow the basic 36 hour sourdough baguette formula here, but twisted two of the shaped baguettes to create Pain Pailasse, while keeping the other two as normal baguettes.


The "normal" baguettes were open, light, and moist as expected


The Pain Pailasse ones had good shape and crust


Seemed to have relatively open crumb, but not very evenly distributed


However, a side by side comparison shows that the crumb of Pain Pailasses(on the right) is much tighter than the regular baguettes(on the left)


I think lack of scoring was the main reason for tighter crumb, but otherwise, the loaves were still very flavorful and tasty. And looked unique as well. (the cross section pieces were from regular baguette.)

Submitting to Yeastspotting.

txfarmer's picture
txfarmer


This recipe is from "Advanced Bread and Pastry". Using white and whole wheat flour, wheat germ, and cracked wheat (aka. bulgur, my new favorite bread ingredient), the bread is super fragrant and packful of flavors. I wanted to convert the formula to use sourdough, but was busy preparing for and running a half marathon last weekend, so stuck to the poolish version in the book.


In my last post, I tried some interesting shapes for baguette, this time, I tried another shaping method from the same site, you can find the video here.


Pain Meunier (adapted from "AB&P")

note: makes 2 lb loaves

-- poolish

bread flour, 241g

water, 156g

salt, 3.5g

yeast, 1/4tsp

1. mix and leave at room temp for one hour, put in fridge overnight

-- soaker

cracked wheat (bulgur), 57g

water, 57g

2. soak for at least 2 hours, I did overnight

-- final dough

bread flour, 202g

ww flour,21g

wheat germ, 11g

water, 153g

salt, 3.5g

all poolish

all soaker

3. mix together everything but soaker, autolyse for 30min, mix at low speed for 1 min, midium speed for 3min. Add soaker, mix at low speed until blended in.

4. bulk rise for 1.5hours (25C) until double, S&F at 40min.

5. divide into two parts, preshape into oval, rest for 20min, shape according to instruction here

6. proof seam down on parchment paper for 50min (25C)

7. flip the bread so it's seam side up, and bake @ 450F for 40min, with steam for the first 15min.


Really like how the shape turned out


Thought all the rolling and twisting would affect the crumb, but what a pleasant surprise, full of holes and very open for a 66% hydration dough (not counting water in the soaker).


Flavor is out of this world, I REALLY like the combo of ww and cracked wheat. For my sandwich loaf, I soaked crack wheat in hot water(about 2 hours), this time in cold water (overnight), I can't really tell the difference. Both method soften the grain without turning them into mush.


Plan to make this one again very soon, probably a sourdough version. Oh yeah, the half marathon went well too. I finished in 1:45, crossing the finish line with my running partner, very good race.


Submitting to Yeastspotting.

txfarmer's picture
txfarmer


Had a little fun playing with shapes when making my weekly baguettes. The flower shape was introduced by Wally and Eric, and shaping video is here. The official version should have 6 petals, but I divided and shaped my baguette as usual, which are much shorter than full size baguettes (limited by my baking stone and oven size), went with 5 petals instead. The other shape was "dragon tail" introduced by wild yeast here.


They look pretty on the outside, AND within. The following is made with my 36 hour SD baguettes with rye starter (recipe here, the 3rd variation). Nice open crumb, with great flavor.


The next two pictures are from a batch made with my 36 hour SD baguettes with 45% whole grain (recipe here, the last variation)


The fancy shape may have made the crumb a bit less open, but not too much, pretty happy with the results.


Submitting to Yeastspotting.

txfarmer's picture
txfarmer


Castella cake is a famouse Japanese dessert, it's essentially a sponge cake, raised solely by egg foam, with no butter or oil. It's soft yet slightly spongy texture, subtle sweet tastes appeals greatly to Chinese people, so this cake is very popular in China. Like everything in Japanese cooking, they have elevated this cake into an art form. The crumb is so even and delicate that it's pore-less, the bottom and top are flat with not a ripple, the taste is a delicate balance between honey, milk, and Aji Mirin(Japanese sweet rice wine, you can find it easily in any Asian market, if not, you can replace it with brandy or other liquor.). I make this cake often at home, using a traditional wood frame. Wood deducts heat slowly, which helps to bake the cake evenly, however, it can also be made in a metal or glass tin. Unlike most cakes, this cake is made with bread flour, not cake or AP flour, to obtain that "spongy" texture. For backgaround and a good recipe for this cake, please refer to this wonderful blog post, my recipe is different form hers, however, I did learn some critical techniques there.

The key to a successful castella cake is in the beating of the eggs, if you have made genoise before, the process is quite similar. If not, refer to this wonderful recipe, Rose has outlined exactly what needs to be done for a good genoise sponge cake, the same lesson can be applied here. Other than the egg beating, you might also need to experiment with tin size, and baking time to get the cake perfect, however, the effort is well worthwhile. I thought this is a fitting homeage to Japan and its people, given what they have been going through.


Castella (adapted from various sources)

Note: my wood frame is 14cm×24cm×8cm, it's made entirely with wood with no metal nails. A similar sized metal tin would work just fine, however the baking time will be MUCH shorter.


egg, 4

sugar, 110g

bread flour, 100g

honey, 2tbsp

milk, 2tbsp

Aji Mirin(Japanese sweet rice wine), 1tbsp


1. If you do use a wood frame, it needs to be pre-processed: wash then soak in water overnight, dry, bake in oven at 350F for 30min. This step would eliminate odor from the wood. To use the wood frame, put it on a baking sheet lined with aluminium sheet (the wood frame has no bottom), then line the inside with parchment paper. if using other tins, also line with parchment paper.


2. shift the flour 3 times. Yes, I know shifting is a lot of work, and do it 3 times is a hassel, but it makes a wold of difference in the crumb of the cake, so just do it! In fact the same thing can be said for pound cakes and sponge cakes, I didn't shift before, now I am a believer.

3.mix honey and milk, boil, mix until honey completely dissolves, set aside. (the bottle in the picture below shows the sweet rice wine)


4. Mix eggs and sugar, hold it over a pot of boiling water (bottom not touching the water), while mixing by hand, for one minute. This step is to warm up the eggs, to ensure a stable foam later on. Now remove from the boiling water pot, use wire attachment on a KA mixer, beat at high speed for 5 minutes, by the end, the mixture is thick, triple by volume, and very pale. Droplets should not disappear into the mixtured for at least 10 seconds when dropped from the beater. Yes, beat teh full 5 minutes, it may look ready and thick enough at the 3rd minutes, but it's infact not, you MUST mix at the highest setting for the full 5 minutes! Drop to medium speed and beat for another 2minutes, this is to stablize the foam structure. (note, if you don't have a stand mixer, you can beat the eggs with a handheld mixture for MUCH LONGER, something like 10min at the hightest speed. If you beat by hand, well, I hope you have good arm strength!)

5. Add the honey/milk mixture, beat at medium speed until blended in. Add sweet rice wine, beat at medium speed until blended.

6. Add flour in 3 batches, mix by hand to ensure no dry spots. Then mix at medium speed for about 3 minutes. This is unusual for caking making, usually we try not to overmix after adding flour, however, this cake requires a lightly spongy texture, that's why we use bread flour and mix quite a bit to develop some gluten. This is also why we really need a well developed and stable egg foam, otherwise after flour addition and mixing, a lot of foam would be destroyed.

7. Pour into tin, about 75% full, use a chopstick or toothpick to draw "Z" several time to eliminate any big bubbles.

8. Bake at 340F for 70min, if the top gets too dark, cover with foil. Note that due to the wood frame, my cake bakes for a long time, if you use a metal tin, it will be ready at around 50 min. The cake would slowly rise to the top, then slightly dom over during the baking process. When the top feels firm and the cake just starts to shrink back, it's ready (this is exactly like a genoise cake). The cake MUST be fully baked, otherwise it will shrink and collapse out of the oven.

9. Take out, brush with some melted honey, cover the top with plastic, flip over (so it's upside down), slip the whole thing into a sealed bag, and fridge immediately. It needs to be sealed and fridge while warm to retain moisture. It needs to be cooled upside down to avoid uneven (denser) layer at the bottom.

10. After 8 hours, take out, flip again so the top is up. The cake should be even height with the wood frame, no sinking, no shrinking. There will be some wrinkles on the side due to the parchmentpaper, this is normal.

11. To server, use a sharp thin blade knife to cut off the sides, then cut into thick slices.


A good castella cake should be smooth, delicate, yet have a bit of bounce.


Sweet and subtle, perfect with some green tea.


Pages

Subscribe to RSS - txfarmer's blog