The Fresh Loaf

A Community of Amateur Bakers and Artisan Bread Enthusiasts.

txfarmer's blog

txfarmer's picture
txfarmer

I am part of the wildly popular monthly "Daring Bakers" challenge. Joined this past April, since then, we've done some very interesting pastry recipes(I post my "official" DB post at my Chinese blog site). This month I did my first "yeast-y" challenge with them, so I want to shared it with TFL. The theme of Oct is doughnuts, so I picked the yeast doughnut recipe by Alton Brown (his recipe always works), and added my own Autumn twist by adding pumpkin puree and spices, as well as maple glaze and maple creme filling. Oh, also added a bit of my sourdough starter just for the extra flavor.

Pumpkin Sourdough doughnuts (adapted from AB's recipe)

Makes 12 to 13 doughnuts

AP flour, 280g

milk, 146g'

starter (55%), 71g

salt, 6g

instant yeast, 7g

egg, 1

butter, 35g

sugar, 25g

pumpkin puree, 82g

cinnamon,1.5tsp

clove, 1/8tsp

ginger, 1/2tsp

nutmeg, 1/4tsp


1. Mix everything but salt and yeast, autolyse 30min, add salt and yeast, mix/knead until the dough is smooth and strong. It's a very very very wet sticky dough, try not to add flour. I mixed until it pass the window pane test. Very strong gluten structure. However you'll still get soft doughnuts if you knead less, crumb would just be slightly less open.

2. Cover and rise for one hour (~73F), there's a lot of yeast in the dough, it rises fast. The dough needs the extra yeast to expand properly in the short fry process. 

3. Punch down, cover and put in fridge so that we can fry them next morning and have fresh doughnuts for breakfast!

4. Next morning, pat out dough into 0.8inch thickness and cut out any shapes you like. At this time, you can fill them with maple cream (put in between two rounds and seal), or you can fill them after frying.

5. Let rise for 30 to 40 min until puffy, fry in 375F oil for 30 to 60 seconds until golden.

6. Fill with maple cream if you wish, then roll in cinnamon sugar or maple glaze.

The incredibly open, soft, rich crumb is brioche-like, due to the enriched dough, as welll as a lot of kneading.

Maple glaze and cream went perfectly with pumpkin spice, classic.

Maple cream:

cream cheese, 113g

butter, 28g

powdered sugar, 50g

maple syrup, 1tbsp

- Beat until smooth


Maple Glaze:

powdered sugar, 100g

maple syrup, 80g

vanilla: 1tsp

- Beat until smooth


I particularly liked these doughnut holes, went down a little too easy. :P

--------------The Asian Twist -----------------

Since I had all that oil left, I decided to make 油条 - a popular traditional Chinese deep fried pastry. I grew up having it for breakfast, they are sold during morning rush hour by street vendors, wrapped in cheap plastic bags. Similar to doughnuts, they are deep fried, delicious, cheap, popular, and utterly void of nutritional value. :P  Yet, this is one of the comfort foods that I dream of often.

There are various ways to make 油条, in a home setting, we don't need those extra stuff to make it extra fluffy (less dough, more volume, hence more profit), so it can be made easily with a process similar to doughnuts, the difference is that the dough is plain without any fat or sugar.

油条

AP flour, 258g

milk, 180g+15g

starter (55%), 65g

salt, 5g

instant yeast, 6g

baking soda, 1/4tsp

1. Mix flour, starter, 180g of milk, autolyse 30min. Add salt and yeast, mix until smooth and pass windowpane.

2. Let rise until double, about one hour. Mix baking soda with 15g ofmilk, knead into the dough. Cover and fridge.

3. Next morning, roll out dough into rectangle, let rise for 40min

4. cut into 1.5inch wide stripes

Lay one stripe on top of another, use chopstick to press an indentation in the middle

Stretch them longer (no longer than the size of your pot though)

5. 375F hot oil, deep fry until golden, flip as necessary.

They are the most delicious fresh. There are many way of eating them. My family used to dip them in "salted fermentated tofu"(sounds strange? very yummy!). A popular way is to eat them with (or soaked in) warm sweet soy milk. In fact they are good with most dipping and sauces.

A popular street food combo is to wrap it with an egg crepe, finished with sweet sauce. Yum, just like my memory from Shanghai.

The leftover can even be cooked into dishes. I stirfried some with Chinese squash and meatballs.


I am very happy about this challenge. This is my first time to deep fry anything, I got to eat fresh doughnuts, AND relive some of my favorite food memories from Shanghai.


txfarmer's picture
txfarmer

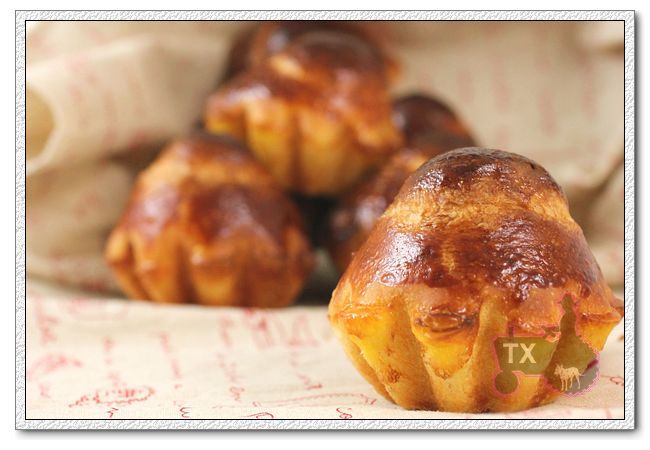
When I buy new cloths/shoes, I tend to always wear them in the begining. Same thing with baking books, I am still on the Tartine Bread Book wagon, so here's another one: olive oil brioche. I always thought brioche is all about showcasing the flavor of butter, but apparently it can be made with olive oil (no butter) and it's a traditional bread from south of France.

I broke out my best olive oil for this one - A TON OF it too, looking that the half empty bottle, i was hoping the result would be worthwile, and it was! Very frangrant, flavorful, and soft, different from the butter ones I made before, but has its own unique charm.

The mixing process was a tad scary. Oil was added after most of the gluten was developed (just like butter broiche recipes), but the dough was literally swimming in a huge puddle of oil at first, didn't seem possible for it to completely absorb the oil. Just be patient, it took quite a few minutes, but all of a suddent, the dough absorbed it all and became silky smooth. Yes, it's still wet and sticky, just like a brioche dough should be, but very smooth. Other than that, the process is straightforward: levain and poolish were added to the final dough for flavor; extra dry yeast was also added so it's a fairly quick bread to make; the dough can also be frozen for up to a week (defrose in fridge overnight before shaping) which also makes it flexible.


I combined this formula with another brioche formula in the same book - removed a pound of the dough aftter mixing and added toasted hazelnut, prosciutto, thyme, and pepper, utterly delicious!

I kneaded the dough very well, hence the airy soft rich crumb for both variations.

The full recipe makes a lot of dough, I halved it, still got 1500g of dough. Other than the small brioche tete, also made a big one (500g) using my brand new ceramic mold. Went a little overboard with the egg wash (3 layers!), so it's kinda dark on top, but it's not burned. Just super fragrant and flavorful.

The formula can be found in the book, or the preview link at amazon.com.

Sending this to Yeastspotting.

txfarmer's picture
txfarmer

I swear I am not taking a cut from Chad Robertson (:P), I guess the formulas in the book just really works for me, so I keep going back for more. As I have mentioned before, it's not a cover-all bread book like "BBA" or "Bread", it only has a handful of base formulas (4 for lean breads to be exact), then some variations. Since I have posted about the Basic Country Bread and WW Country Bread, I am not going to post formula for this Semonlina loaf just to be fair to the author(s). if you like the breads, I think it's a book worth buying.


The procedure is similar to the other two breads, at 80%+ hydration, I am not suprised about the open crumb, but I was pleasantly surprised by the flavor combo - fennel seeds and black seame, both in the dough and on the crust, so frangrant! Both of those two seeds have such strong aroma on their own, I never thought they would mingle so well together! I was toasting them together before mixing into the dough, such heavenly smel! I knew it would be a winner then.


Open and colorful crumb, and trust me, it's an explosion of flavors in the mouth.


Recently bought a triangle proofing basket from here, I like the result. BTW, the basket is small, enough for 1lb dough probably. However, I did half the recipe this time since DH is out of town, so I had two 1lb loaves, one triangle and one oval, rather than the usual 2X 2lb loaves. I think it's actually better to shape into smaller loaves for two reasons:

1. High hydration dough tend to spread a bit on baking stone (Chad recommend to bake in a cast-iron pot thingy that I don't have), but it's much less noticable with smaller loaves;

2. The seeds on the crust came out just right after 35min in the oven, any longer, they would get burned a little, which happened to my bigger loaves before.


Last time, Sylvia wanted to see how my bastkets are floured, here's a picture of the oval one after being dusted with AP+rice flour - see the little bit of flour gathered in the left? I dumped those out after.


Needless to say, I will make this again, maybe try the other flavor variation in the book to combine fennel and raisin with semolina.

Sending this to Yeastspotting.

txfarmer's picture
txfarmer

I am so glad that some of you tried and liked the 36 hour sourdough baguette formula. I am still making it every week - it's our Friday "treat". Of course, I just can't help messing with a good thing, so I modify the original formula a little bit each time, some turned out really well, the following 3 are my recent favorites:

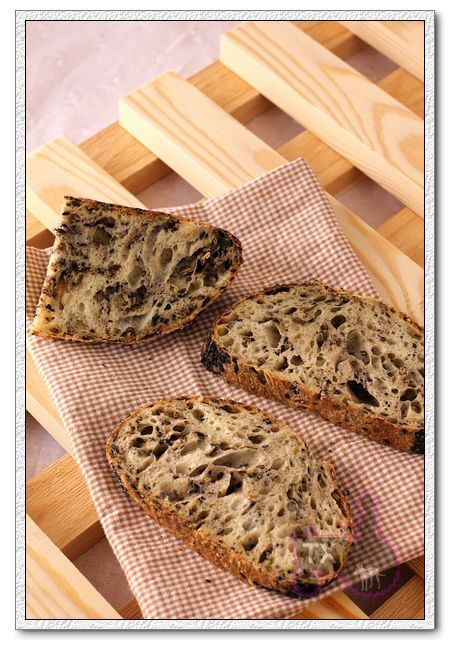
1) Pumpkin baguette - a.k.a. I don't care it's still nearly 90F out, it's FALL!
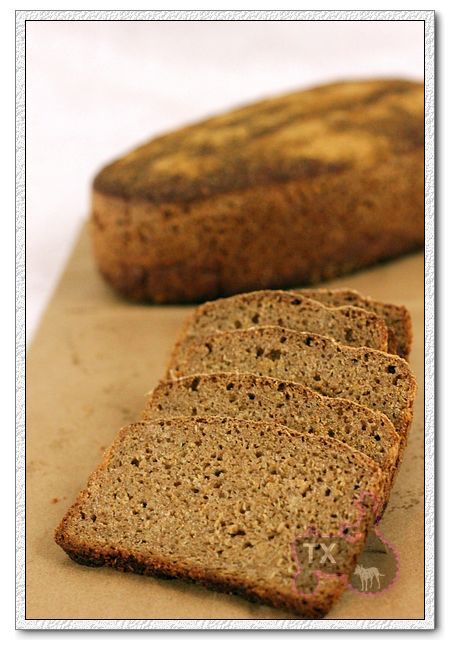
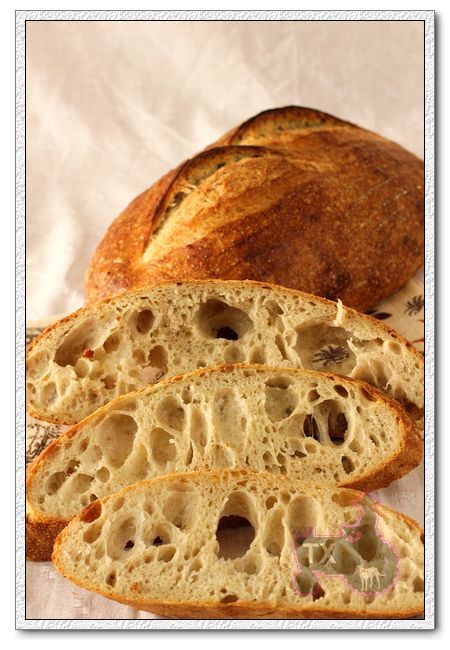
The idea came from this blog post, but I used pumpkin instead of butternut squash, toasted pumpkin seeds instead of sunflower seeds, and my basic 36 hour sourdough baguette formula.

AP Flour, 425g

pumpkin puree (I used canned), 165g

ice water, 223g

salt, 10g

starter (100%) 150g

pumpkin seeds, 50g, toasted and crushed a little

-Mix flour, pumpkin puree, ice water and autolyse for 12 hours.

-Mix in salt, starter, and seeds, then follow the basic 36 hour sourdough baguette formula here.


I find pumpkin puree generally makes bread moist but "sticky", which does make the crumb of these baguettes less open than the basic formula, but I think the brilliant golden color makes up for it, how very autumn-like.

Pumpkin seeds are bigger than sunflower seeds, so I crushed them a little before adding into the dough, they still "blocked" some holes, but the crunch and flavor they add to the bread was great.

I counted 50% of the pumpkin puree weight is water, which turned out to be a good assumption. The dough felt similar to my usual 75% baguette dough, and I think I am getting better at scoring this wet baby.

2) Wheatgerm baguette

This is inspired by a formula we did at the SFBI baguette workshop. I love baking with wheatgerm, even my hands smell nice after touch the dough.I noticed at the workshop that wheatgerm tends to absorb extra water and make the dough a little dry, so I added extra water to compensate. The hydration ended up being 78%.

AP Flour, 425g

ice water, 315g

salt, 10g,

starter (100%), 150g

toasted wheat germ, 11g

- Mix water, flour and wheat germ, autolyse for 12 hours. Then follow the basic 36 hour sourdough baguette formula here.


The increased hydration worked, I got very open crumb AND fragrant wheat germ flavor.


If you really look, you can see the wheat germ grains on the wall of those big holes

After making, and photographing so many baguettes, I was excited to find a new way to present it - in a paper bag!

I was in love with the flavor, and thought it ahs become my favorite variation, until I made the next one...

3) Rye starter baguette - MY FAVORITE SO FAR!

I have been wanting to add rye or other whole grain flour in the 36 hour baguette for a while now. In order to keep the open crumb, and the classic baguette mouth feel, I know I can't add too much. However, I do want to add enough to really taste the whole grain taste I love. This past weekend, I had a thought: instead of adding rye in the main dough, why don't I "add" it in the starter? Why not just use my rye starter instead of the white one? Since the formula has 30% of starter, which means the dough would have 15% of rye. The result is fantanstic, rye starter reallly adds noticable flavor even though rye ratio is low, at the same time, the crumb remains open, and crust is still thin and crisp.It's now my official favorite variation of 36 sourdough baguette, I am very happy that this experiment turned out so well!

Note that I did increase the hydration to 80%, mostly because I have been making breads from Tartine Bread Book, and its ww and semolina dough are both 80%+ hydration. Only that I forgot baguettes are a lot more tricky to shape than boules, oh, don't forget the minor details of scoring. I can now tell you first hand that scoring 80% wet baguettes is punishingly challenging. Crazy. Both I and the damn dough!:P


AP flour, 425g

ice water, 325g

rye starter (100%), 150g

salt, 10g

- follow the basic 36 hour sourdough baguette formula here.

Such open crumb

One can get lost in these holes. Can't you just see the rye? YOu can taste it too! From the wall of the holes, yu can really see how moist the crumb is.

But the scoring left much to be desired, no matter, I know I will have plenty of opportunities to practice!

We usually eat these baguette as is, or simply with some butter or cheese, but I actually "loosely" followed a recipe from Tartine Bread Book and made a sandwich out of these rye baguettes. Tuna confit, roasted sweet pepper, fresh spinach, Yum!

Submitting to Yeastspotting.

txfarmer's picture
txfarmer

Right after I made and posted about lye pretzels last time, arlo brought this article to my attention - ah ha! Who knew lye pretzels are "in fasion" again, does that make up for my 10 year old jeans? :P Still having that whole big jar of lye to use up, I made pretzels again, but the recipe is a combo of the NY Time recipe and Nancy Silverton's Sourdough pretzel recipe, then at the very end, I added my own "TXFarmer spin". I had some cooked red bean left from making mooncakes, so I filled a few of those prezels with sweetened coarsely mashed red bean paste. Delicious! I do apologize if it offends any German TFLers though. :P


Sourdough Pretzel (NYTimes+Nancy Silverton+my own craziness)

-makes 12 pretzels, each about 110g

water, 218g

starter (100%), 207

bread flour, 567g

barley malt syrup, 21g

salt, 2tsp

lard, 23g (Yes lard! Butter would work but lard gives a better/more authentic flavor, as well as whiter crumb. I have a big container of lard in my fridge at all times, embrace pig fat!)

1. Mix and knead very well. This is a dry dough, similar to bagel, but do knead well. I kneaded by hand since my mixer was doing other more important things like whipping 12 eggs, it' took some elbow grease but could be done.

2. No bulk rise, divide dough into 12 portions, round, and rest for 45min.

3. Shape into pretzels, do keep middle portion fat, and two ends pointy.

To add filling, first shape the dough into a batard, then roll into a long oval, add filling (not too much though!), roll up, seal well, roll out to desired length

4. Rise at room temp for 1 hour, the dough would've visibly expanded, then put in fridge for 12 to 24 hours.

5. mix 30g of lye into 1000g of water, wait for 10 min for it to completely dissolve, the water would become warm. Dip each pretzel in lye water for 30 sec, put back on baking sheet, score at the "fat belly" (if you have filling inside, score at an angle so the filling won't leak out), spread coarse sea salt on top (not for my red bean paste ones).

6. Bake for 20 to 25min at 400F.


Tight even crumb, just what I like. I didn't wait for the lye water to dry before scoring, so if you look closely, the edges of the cuts are yellow, need to improve on that.


The ones with filling are REALLY good, this way I don't have to dip the pretzel in other stuff. There are many other filling possibilities, PB&J? Nutella? Pumpkin pie? Maple cream? BBQ pork? Curry chicken? Endless.

----------------------------Completely unrelated-------------------------------

Here's a great coconut cupcake recipe I made a few days ago for my running friends,


I highly recommend this epicurious recipe, I did use cake flour rather than AP flour in the recipe, and used a cream cheese icing rather than the original one, both the taste and texture are really good.

The key of the recipe is "reduced coconut milk", I have some leftover, and I will be dunking everything in it! Even if you don't make the cake, make this!

Submitting to Yeastspotting

txfarmer's picture
txfarmer

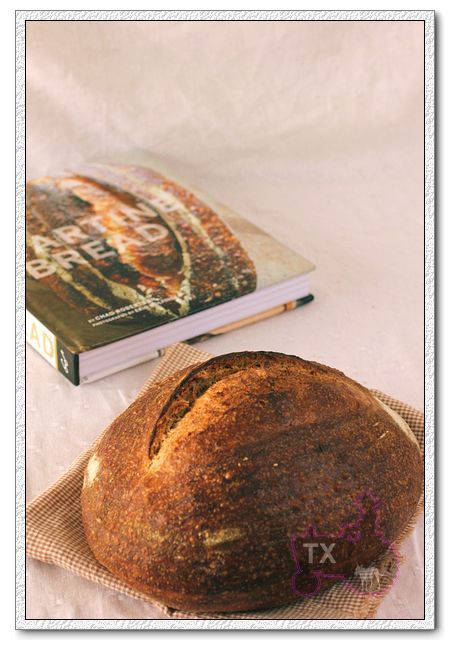
This is the WW loaf from the new "Tartine" Book, the procedure is very similar to the basic country loaf (which I posted about here), just with more WW flour(~70%) , even more water(80%+),  and slightly lower mixing temperature since whole grain flour fermentate faster.


One thing that bothers me about the book is his math - when he calculate baker's percentage for ingredients, he doesn't count flour in the levain. He doesn't use a lot of levain, so in reality it probably doesn't matter, but it bothers my engineering brain. That's why I adjusted the formula, so the ww amount is really 70%, both in levain and final dough. Phew, feel a lot better after that.

-Levain:

100% sourdough starter, 1/2 tbsp (I used 8g)

WW flour, 140g

white flour, 60g

water(78F), 200g

1. Mix and put in a cool place until it grows by 20%. If you pinch a bit of levain and put it in water, it should float. About overnight at 65F.


-Final dough

200g levain

700g ww flour

300g bread flour (book says AP flour but I used BF for the extra lift)

water(75F), 800g (I used a bit more, probably 20g)

salt, 20g

2. Mix levain, flour, 750g of water. Autolyse for 40 to 60min. Add the rest of water and salt, mix to combine.

3. Bulk rise around 80F for about 3 hours until it increase about 30% in volume. S&F every 30min in the first 2 hours, after that S&F according to what the dough needs. If mix with cooler water and let rise in cooler temp, the bulk rise time can be adjusted.

4. Divide and round, bench rest for 20min

5. Shape and proof upside down in floured brotform. I retarded my shaped dough in the fridge (40F) overnight, then warm up for another 30min before baking. The dough can also be proofed right after shaping for 3 to 4 hours at 75F to 80F.

6. Bake with steam for 45min at 450F.


Awesome oven spring, crackling thin crust that sang loudly. Since it's a very soft high hydration dough, at the begining of the bake, it tends to spread a bit, so I kept the oven temp at 500F for the first 5min, then dropped to 450F after that. The finished loaves are quite round and tall.


Quite an open crumb for so much ww


It's not quite as "hole-y" as the basic country loaf. Chad Robertson says whole grain hearth bread can indeed have open crumb, even though it might depend on many things including the type of the flour. I might increase the hydration even more to see how much I can push it.


Just like the basic country loaf, this bread is not noticably sour, but very sweet, very fragrant with whole grain flavor. Next up, I want to try the semolina formula.

Sending this to Yeastspotting.


txfarmer's picture
txfarmer

This is a 100% sourdough rye from the book "Bread Matter". that book is an excellent read but for some reason, this is the first recipe I made from it. Well, second actually, but that Russian Rye was a total disaster. I think there's a printing error in the formula, it just has too much water. Yes, I know pure rye breads should have very wet dough, clay like in fact, but that one was in the porridge territory. Anyhow, back to this Borodinsky - opposite of that Russian Rye, it's perfect. The formula is right on for everything. My husband is still just getting used to the taste of heavy rye, even he immediately liked it.


I did make one major change -- I know, I know, I seem to be incapable of sticking to instructions, but this time it's not my fault! Sort of. After I mixed the clay like dough, I discovered that I don't have a loaf tin that's the right size for this amount of dough. I don't want something that's too big since I want the bread to have some height, in a pinch, I used an oval Japanse cheese cake tin I got from China, it's pefect! about 60% full going in:

Almot to the top at the end of fermentation

And a little domed over after it's done:

- levain

rye starter (100%), 20g

rye, 90g

water, 190g


1. Mix and leave at room temperature for 12 to 24 hours. Mine was left for 20hours, very bubbly and sour.


- main dough

levain, 270g

rye, 230g

salg, 5g

coarsely grounded coriander seeds, 5g, plus more for topping

molasses, 20g

barley malt syrup, 15g

water, 90g


2. Mix everything, and dump into an oiled tin, smooth the top if necessary but try not to press it down, otherwise the dough mighth get into crease and make it hard to demold.

3. Rise for 2 to 5 hours, if the dough is a little over half of the tin going in, at the end of the rise, it should be just below the top. Mine was left at 23C for 2.5 hours, my rye starter is lightening fast.

4. Brush water on top and spread a layer of coarsely grounded coriander seeds

5. Bake at 430F for 10min, then 400F for 40min. Maybe my cake tin doesn't conduct heat well, but at that point I took it out and the bread is not nearly done. I put it back and baked at 400F for another 20min, perfect. Wrapped for 36 hours before cutting in.


Nice even crumb, still a bit bottom heavy but getting there. I think I prefer a "not so warm" rise for my sourdough rye, as supposed to the "very warm temp" what most books suggests. It's moist but not sticky, very flavorful. I decide that I really like coriander in my breads.


I was complaining about not being able to find rye flour in local grocery stores, Eric pointed me to fresh ground Rye from Country Creations (flourgirl51), I got two huge bags, and that''s what I use in my rye breads these days. Very flavorful and great price/service.

Completely unrelated, here's a Chocolate-Almond torte I whipped up to use up some egg whites, very good.


The recipe is from "Pure Dessert", but can be found here. The recipe asked for a 9inch pan, I used an 8 inch, worked out wel.


Easy to make and VERY VERY VERY delicious, especially if you like dark chocolate. Perfect with a little whipped cream.

Sending to Yeastspotting.

txfarmer's picture
txfarmer

I received my copy of the new "Tartine Bread Book" last week, flipping through the book, I was struck by two things: 1. I want Chad Robertson's life (especially the part about living in the French hills with artisan bakers/cheese makers/farmers, living and doing what he loves along the coastline of beautiful Northern CA, oh yeah, let's not forget the part where he and his friend surf in the morning and bake in the afternoon!); 2. I have been making those 36 hour sourdough baguettes with high hydration, no kneading but S&F, long fermentation, and Chad Roberton's method is very similar in these aspects.

I made his basic country loaf this past weekend with great result. The formula and procedure have been well documented in detail here, and the following are my "study notes":

1. He is after a bread with balanced flavor without too much sourness (I guess his French study is showing), so he ues a levain (a.k.a.  sourdough preferment, sourdough poolish) that's very young. In fact, he says to use it when it has JUST started to float in water, only expanded 20% in volume. He accomplishes that by adding a lot of water and flour to a very small amount of starter (100%), and leave it overnight at a very cool temperature (65F). This is dfferent from the usual practice of using the levain when it has reached the peak volume.

2. He use a very small amount of levain in the main dough: 200g of levain at 100% in 1000g of flour, which means only 9.1% of the total flour is in the levain.

3. He uses relatively warm water to mix the main dough, and the bulk rise temp is pretty warm too (78F to 82F), which counter-balance point 1 and 2 above, to speed up the bulk rise somewhat

4. At the end of bulk rise, he only aims for a 20% to 30% volume increase in his main dough. That takes 3 to 4 hours at the warm-ish temp he describled in the basic flow, but can also be modified according to preference. For instance, lower the water temp to 65F, and keep the dough at 60F, the bulk rise could take 10 to 12 hours, a convenient overnight schedule. (Food for thought: I often wonder how much bulk rise a dough really needs. I know it needs some to build up basic strength and falvor, but I have seen and tried a variety of fermentation schedules, some put more time in bulk rise less in proofing, some do the opposite. Of couse each can be successful, IF it satsify some basic rules, and each would produce breads with different flavors. My conclusion so far is that different style of breads would prefer different fermentation schedule. For instance, the book mentions an example where a pan bread that would have support thoughout proofing and baking could have a very short bulk rise since the dough needs less strength, while a free form loaf may require longer bulk rise. In addition, I think a fuller bulk rise would change the crumb structure too.)

5. The dough is very wet. He says the basic formula is 75% hydration, but he's not counting the 100% levain, it's actually 77%+, wetter than my usual baguette dough. I used all the water (two addition, the last 50g is added after autolyse), the dough felt silky and easy to handle - yes, it's wet and sticky, but I have been making very wet baguettes every week, so I am used to the "wet glob" kind of dough. The "let time and fermentation do their job" method works well here again, don't be freaked out by the initial puddle of mess, give it a couple of hours and some S&F, you will see how it will turn into a beautiful silky cohensive "puddle".

6. After I posted about the 36 hour baguettes, some have asked me about how to S&F such a wet dough. As I mentioned in that thread, I simply take the dough out, hold it in my hands, left hand strentching out, then fold back. Repeat with right hand. Put back in the container. The key is to have the container and hands well oiled. When I do that with my baguette dough, it was easy, and quick, and efficient. However, when I tried to do that with this dough, I immediately realized that it's not the best way - because the dough is much larger. My baguette dough has 500g of flour, this one has 1100g, and I have small hands. If I try to do the same thing with this dough, it would try to slip off, so I had to dig my fingers into the dough a bit to grab on, which hurts the dough. So I changed to Chad's method describled in the book: folding the dough in the container. My point is that it's not important to known how exactly a S&F is done, it's important to know the principle. YOu need to stretch out and fold the dough back GENTLY. Once - in a way that's most convenient for you.

7. With such a wet dough, it's the best to make simple shapes. I made a boule and a batard, both have very open crumb, but the boule has more and larger holes, because it was handled less during shaping. (Who's up for shaping this dough into baguettes? I can't get the thought out of my head, there's something wrong with me! The funny thing is that Chad's baguette formula has LESS water than this country loaf.)

8. I retarded the shaped dough overnight at 40F, put them at room temp for another hour the 2nd morning to finish proofing, then baked. The book says I can proof and bake on the same day of bulk rise, but I never seem to have that much time in one day, and I like the flavor better after a long proof.

9. The crumb is VERY open, to the point that it's hard to slice. Especially the boule, which has a large crosssection and the crispy crust is thin, I think I need an electric slicer to cut through those airholes cleanly, now I know why hole-y baguettes are shaped long and thin, so there's more crust support and easier to cut!

10. The book ueses a cast iron dutch oven set to bake the bread in, I don't have such things, so I baked them on my stone with steam. I can see how they spreaded out a bit on the stone in the first few minutes, but then quickly sprung up beautifully to give great volume. However, I can see how a vessel with limited space can contain the shape even better to give a higher/rounder shape. Next time I may try a higher baking temp for the first few minutes.

11. The flavor is sensational. Very moist, cool crumb, matched well with crackling thin crust. What struck me the most is the sweetness. Even after a night of retarding, there's barely any sourness, but the sweetness of the wheat is very apparent. My husband and I both loved it.

Next up: I want to try the WW loaf in the book, even MORE water!


Submitting this to Yeastspotting.


txfarmer's picture
txfarmer

Another winning recipe from Nancy's Silverton's "Breads from the LA Brea Bakery", I adapted it slightly to use my 100% starter, and changed the fermentation schedule a little too. The best part about this walnut bread is ... the walnuts, A LOT OF walnuts. The original recipe asked for 14oz, which is a lot to start with, I tend to go overboard with nuts and dried fruits in breads,  ended up dumping in all the walnuts in the jar, a little less than a pound. I don't regret one bit. So fragrant, rich, and crunchy, walnuts are a great match for the ww and rye flour in the dough.


Walnut Levain

*makes 2 big loaves, each a little over 2lbs

- sourdough sponge

water,430g
mature starter (100%),139g
milk,30g
barley malt syrup,21g
ww flour,227g
rye flour,99g
salt,0.25tsp

1. Mix, cover, leave at room temp for 5 hours until there are visible bubbles on the surface, put in fridge for 8 to 12 hours.

- main dough

water,170g (I added a bit more to make the dough softer, didn't measure how much more though, I tend to like softer/wetter dough)

sugar, 1tsp

bread flour,624g

salt,3.25tsp

walnut oil,2tbsp

sponge

walnut halves, 14oz (I used almost 450g)

2. Mix water, sugar, flour, sponge, autolyse for 20min. The books says: add salt, mix until medium strength, mixer at medium speed for about 5min. Add oil, mix until well absorbed, another 2 min. Knead in walnuts. I mixed for much less time since my dough is softer and I intend to S&F.

3. Original recipe says to store the dough in the fridge right away for overnight bulk rise. I know from experience that it wouldn't be enough time, and I don't have a lot of time the next day to finish the bulk rise, so after mixing, I let the dough rise at room temp for 1 hour then put the dough in the fridge. Since my dough is softer than the original version, I did 2 S&F during that hour too.

4. The next day, take the dough let it continue to rise at room temp to double of original size if it hasn't so far. Mine needed another hour. Divide into two portions. Round, rest, shape into whatever shape you like. Rise upside down in brotform. Mine only needed 1.5 hrs, even though the book says 2 to 2.5.

5. Bake with steam for 45 min at 450F.


I really like this scoring pattern.

It bakes pretty dark, and that's the way I like it. The fully caramelized crackling crust matches perfectly with crunchy walnuts. And it sings!

There are so many walnuts, they are peaking out everywhere

This is a bread perfect for toasting. The recipe yields a lot of bread, I at first considered to only make half, luckily I didn't. It's so delicious and fragrant that we can't seem to stop eating it!

From all the breads I've made, and there have been a lot, this is definitely one of our top 10! And it's not hard to make at all.


Sending this bread to Wild Yeast's YeastSpotting event.

txfarmer's picture
txfarmer


This is Ruby. Whenever people ask me what kind of dog he is (yes, he's a boy, with a girl's name, what? he is man enough to be OK with it! :P), my answer is "a yellow running dog". While we have no idea what breeds are mixed in his blood (probably a lot),  it doesn't take long for anyone to notice that Ruby loves to run. He is always ready to take off running, any time, any place, any weather. I am a marathon runner, and he is my running partner - 45 to 55 miles a week, but that's merely a trotting warm-up for him, he really lives for the trips to the dog park, where he can be unleashed and just SPRINT forever. So far he's can run faster and longer than any other dogs we know, and even some slower cars. :P


There's one thing he loves ALMOST as much as running - eating. Ever since we adopted him 5 years ago, he has always INHALED his kibbles in minutes. Sometimes I don't even think the kibbles actually hit the bowl, I think he intercepts them midair and just swallow. He also eats anything that resemble, or don't resemble food - the most memorable one was half of a Gatorade bottle lid, which then scratched his inside and caused bloody diarrhea, even that didn't affect his appetite. Whenver my friends tell me about their dogs that don't eat, I simply don't undersand, what a foreign concept - until 10 days ago.

We had just picked him up from doggie daycare (I know I know, we are the worst kind of spoiling doggie parents, but he loves to run and it's a all day play kinda place...), stopped on the way to pick up a new bag of dog food (Iams minichunk in green bag, the same kind he has eaten for all 8 years of his life). Got home in time for dinner, opened the bag, poured kibbles to his bowl, he sniffed and WALKED AWAY! We were stunned, was he having a heat stroke? Sometime wrong with his teeth? Did he eat something bad in the daycare? For the next 3 days, he simply refused to eat his food during the day, before bed, he would slowly chew a few kibbles and walk away again. He would take some treats we gave him, but we don't usually give him people food, just some plain bread slices. With so little food, he was not as energetic as usual, still wanted to run in the morning, but slower and slower. During the day, he would just lay there and look weak. We were seriously concerned.

Finall got in a vet appoinment, the exam and blood test showed no problems - until we mentioned about the food. My vet said Iams had switched production facility and ingredient formula 3 months ago, ever since then there have been a lot of problems. Many of the foods are being recalled, the ones are not recalled (including the one Ruby was eating) also have some bad feedbacks. A lot of dogs would not eat the food, even though they have been eating the same brand/formula for their entire life. Some would get seriously sick after eating, a few older/smaller/weaker ones even have to be put down. We returned the Iams food immediately and got Hills Science dog food instead, Ruby immediately started eating - really immediately because we opened the bag right outside of the store and he started inhaling the kibbles on the sidewalk! Even since then, we have been feeding him part homecooked food (bland rice + chicken), part new dog food, by yesterday, he is eating all dog food, and doing very well. We ran 10 miles this morning, let's just say he's not the one that slowed us down. :P


I am beyond livid about Iams, how can they change ingredients without warning the customers? And what poisonous ingredients are they putting in the food that makes Ruby refuse to even get close?! What about those dogs that got seriously ill or even died? Who's going to take responsibility for them? So here's the PSA: if your dogs/cats are eating Iams, be very careful about feeding them food that's bought after July, if they eat less or get sick, it's very likely the food! In the mean time, check out this link: http://www.aspca.org/blog/pet-food-recall-iams.html , especially the comments.


Anyway, now that the scary episide is behind us, I made these sourdough biscuits this past weekend for the poor little guy to make up for what he had to go through. They are full of human grade nutritious ingredients, as well as added benefit of sourdough. I adapted the formula from Nancy Silverton's "Breads from LA BREA Bakery", but Wild yeast has a similar adaption here. I did add one extra egg in the dough since Ruby runs a lot and needs the extra protein. The dough is very easy to handle, and the process is straightforward. It's a great way to use up extra starter!

I made sure to bake them long enough so they remain crispy for a long time. The recipe does yield a whole of cookies, so I froze a lot of them.

Ruby LOVES these, look, he's practically cross-eye-ed.

Pleeeeeeeeeeease...

Pages

Subscribe to RSS - txfarmer's blog