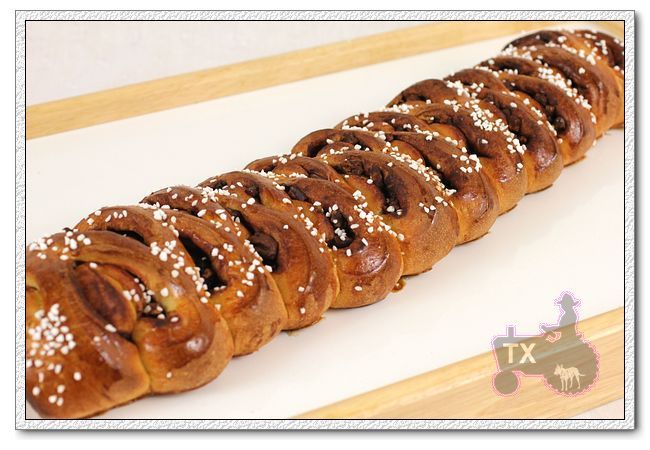
The Fresh Loaf

A Community of Amateur Bakers and Artisan Bread Enthusiasts.

txfarmer's blog

txfarmer's picture
txfarmer


I am gearing up for the holiday baking season, stollen, panettone, coffee cakes, cookies are flowing out of my oven. This particular coffee cake came from two sources: the dough recipe is by Maggie Glezer (can be found here), it has sour cream and mashed potato, in addition to quite a bit of butter, which means the dough is incredibly soft and delicate, perfect for a sweet bread. Furthurmore, it can be stored in the fridge for up to 4 days, convenient for busy holiday season.


The shape and filling came from Carole Walter's "Great Coffee Cakes, Sticky Buns, Muffins & More", what I like the most is that the chocolate sauce is not overly sweet, and it looks very unique and pretty. A crowd pleaser.

Scalloped chocolate pecan strip("Great Coffee Cakes, Sticky Buns, Muffins & More")

water, 60g

sugar, 20g

espresso powder, 2g

bittersweet chocolate, 71g, chopped

lemon juice, 1/4tsp

vanilla, 1/4tsp

butter, 14g, softened

pecan, 60g, chapped coarsely

sweet dough, 1lb (either from above or any other dough you prefer)

1.Mix together water, sugar, espresso powder, chocolate, lemon juice, vanilla, heat with low heat, until chcolate melts, and big bubbles start to form. Takeoff from stovetop, stir in butter. Cool completely until thickened, it would be like thin fudge.

2.After fully fermentated, roll out the dough into 14X9inch square, with 14inch side facing you. Spread choclate mixture on the dough, leaving borders empty, spread pecans on top, press down slightly.


3. Roll up from the long side, seal well, put on a baking tray lined with baking paper, seam side down. Press down lightly to flatten. Use scissors to make cuts on one side of the dough log, 1inch apart, 3/4 of the way deep. Do the same on the other side, but space the cuts so they interweave with the cuts on the first side. Turn the cut parts upward to expose filling.

4. Proof until double, about 1 hour, brush with egg wash, decoreate with pearl sugar, bake at 350F for 30min until golden.


The original formula also include a sugar glaze on top, I didn't think it was necessary, but if you like it sweeter, certainly use one.


Submitting to Yeastspotting.

txfarmer's picture
txfarmer

Used the recipe by harrygermany in this thread, comparing to the BBA version last year, this one is richer, denser, and more dilicious in my opinion.
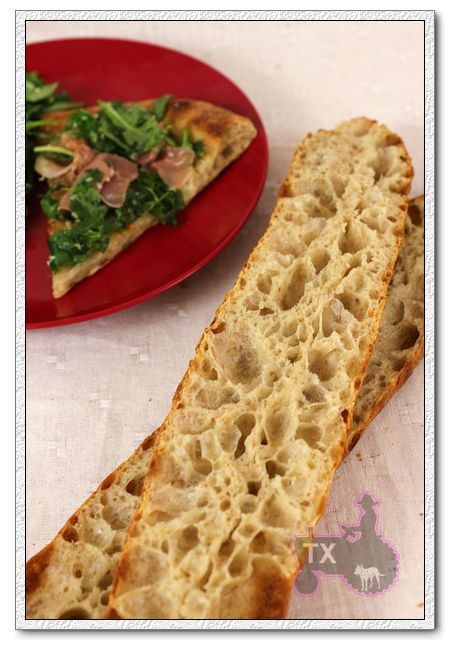
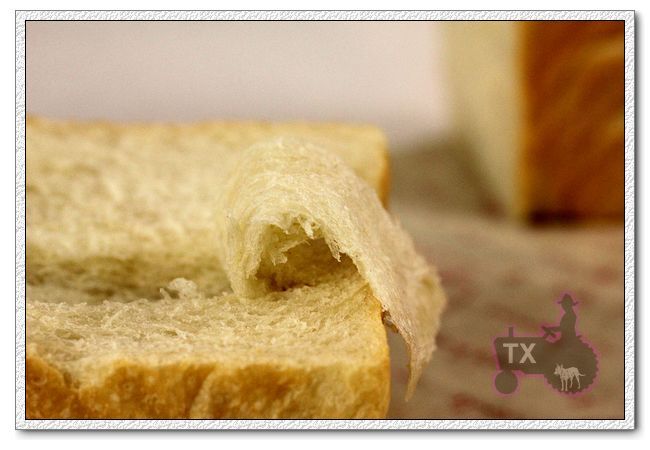
 

Used osmotolerant SAF Gold yeast (24g) instead of the 84g of fresh yeast, the dough rose well and had great ovenspring - a little too much oven spring actually, I think a bit of proofing time wouldn't hurt. But the formula works great as is.


I waited for over a week before cutting open the first one, the other two are wrapped and frozen. Will cut another one around Christmas, the third one sometime next year to see how flavor develope. The generous amount of butter brushed on the finished loaves is really the key for great flavor, even after only "aging" for one week, I am impressed by how rich the taste is. The texture of the loaf is like a rich pound cake, or even a shortbread cookie! I prefer this one over the BBA version.


Submitting to Yeastspotting.

txfarmer's picture
txfarmer

I finished my 5th marathon today, Dallas White Rock Marathon, 26.2 miles, 3:51 finish time. It's not my fastest time, that would be 3:43. However, this one has special meaning since for the past 3 years, I had been plagued by multiple stress fractures. I would gear up to train for one, then get hurt somewhere. The last attempt was at New Orleans, I had to stop at 13.1 due to unbearable heel pain, which turned out to be another stress fracture. A lot of doc visits later, it was determined that I was seriously lacking Vitamin D, which affected my bone health.
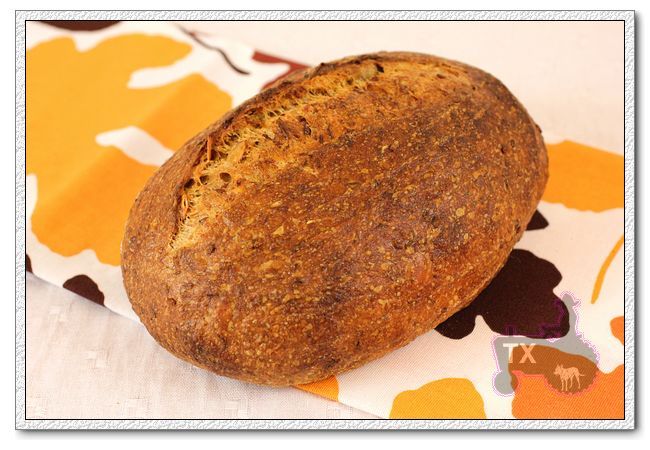
 After that, it was a slow comeback, and finally today, I stood at the start line, healthy and injury free! However, life always throws curve balls. right before the race, my GPS watch "froze", not even the clock was working, my husband also didn't bring his watch, so I had to run the race with no time piece at all! I was getting a little frustrated, but a guy beside me all of sudden had really bad nose bleed, it got so bad that his wife and he had to both pull out of the race. This changed my perspective - watch or no watch, it's a blessing to be able to do what I love at all!


With no watch to track my pace, and I am a little rusty to "feel the pace" after not racing for years, I ended up taking it too easy - could've easily squeeze out a few more minutes. However, the plus side is that I was free to pay attention to the course, the scenary, the spectators, it was actually my most enjoyable marathons to date! Finished with a big smile, I would call it a success despite the finish time. Now that I remembered how FUN marathon races are, I am confident that there will more, and faster ones in my future!


------- Back to baguettes ----------

Since I make my 36 hour baguettes (original recipe here, and 3 earlier variations here) nearly every week, I often tweak things, and these 3 are the recent ones that I really like.

1) Sesame Baguette

It was actually my pre-race carbo loading dinner last night. Words can't express how fragrant it is. I used rye starter, with 7% toasted sesame.

AP Flour, 425g

ice water, 325g

black sesame, 35g, toasted

salt, 10g

rye starter (100%) 150g

-Mix flour, sesame, ice water and autolyse for 12 hours.

-Mix in salt, starte, then follow the basic 36 hour sourdough baguette formula here.

Rich Sesame taste in every bite

Also made smoked salmon pizza with some of the same dough

2. carrots baguette

Remember that 10lb bag of carrots, yeah, some of those went into baguettes.

AP Flour, 425g

ice water, 315g

shredded carrots, 100g

salt, 10g

rye starter (100%) 150g

-Mix flour, carrots, ice water and autolyse for 12 hours.

-Mix in salt, starte, then follow the basic 36 hour sourdough baguette formula here.


Nice open crumb with a subtle sweetness from shredded carrots, not to mention extra moisture.

Don't forget the shrimp pesto pizza made from the same dough

 3) baguette with old dough

Inspired by Wildyeast's experiment with bread crumb sourdough, I did the same to my baguettes:


AP Flour, 425g

ice water, 315g

old bread crumb, 50g

salt, 10g

white starter (100%) 150g

-Mix flour, bread crumb, ice water and autolyse for 12 hours.

-Mix in salt, starte, then follow the basic 36 hour sourdough baguette formula here.


I used white starter for that batch, would try rye starter next time for more flavor. The old bread were rye baguettes from previous time. There's a special fragrant from the bread crumb, but very subtle.


However, the keeping quality was noticably longer.

breakfast egg pizza from the same dough

Submitting to Yeastspotting.

txfarmer's picture
txfarmer

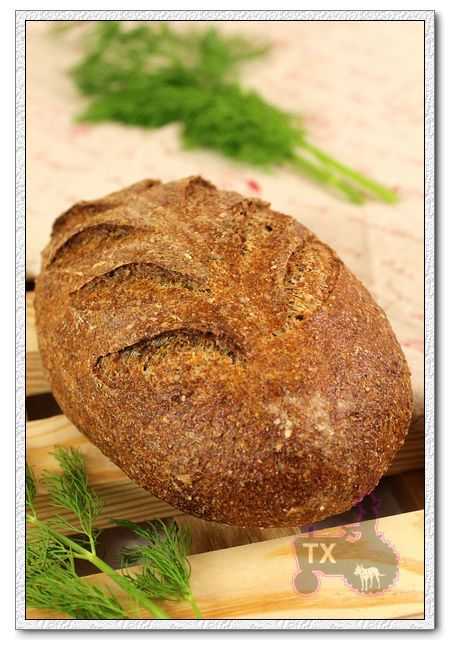
Went to Seattle to visit my parents for Thanksgiving, made cookies, muffins, 3 different kinds of breads, with no evidence since I forgot to bring my camera. Oh well, they tasted good though! Came home on Sunday and need some bread for this week's lunch, but my starters are sound asleep in the fridge. Made this quick 40% rye from Dan Lepard's "A handmade loaf" using dry yeast. The liquid in the formula is dill pickle juice, boosted by some extra fresh dill, the loaf was very flavorful.
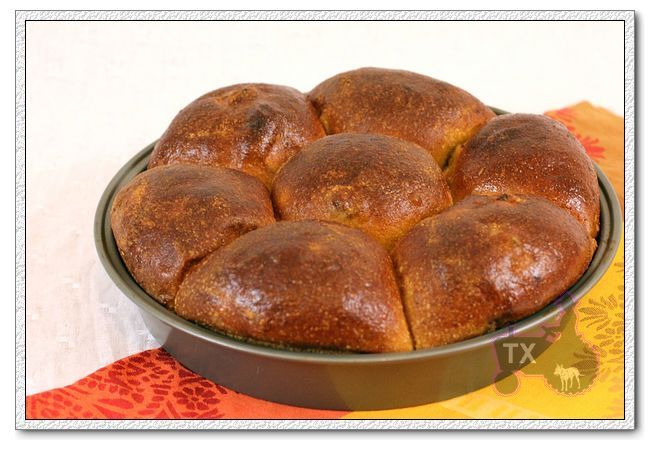
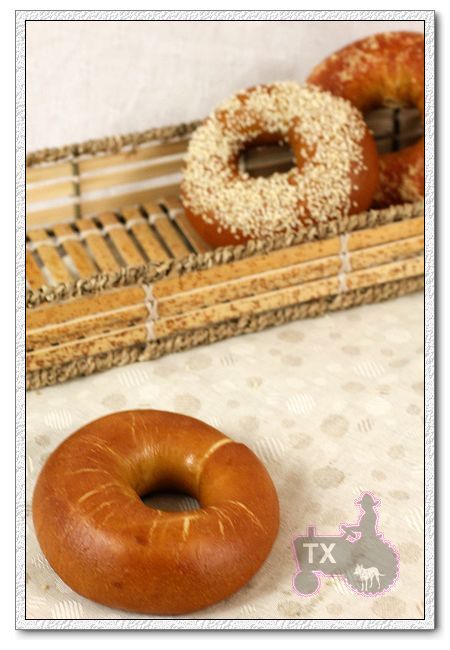
 

Cucumber Pickle Juice Rye (adapted from "A handmade loaf")

bread flour, 300g

rye flour, 200g (toasted at 400F for 15min)

fresh dill, 10g

instant yeast, 3g

salt, 8g

dill pickle juice 350g (I used 390g)

1. mix flour, dill and juice, autolyse for 40min

2. add yeast and salt, knead briefly

3. bulk rise for 2 hours, s&F at 30, 60, 90min.

4. divide into 2, shape each into batard, proof for 1 hour, didn't double, probably grew 50% at most

5. bake at 430F for 10min, 410F for 35min


It's a compact loaf, some discussion on Dan's forum seems to show the same result, but the oven spring was good, as shown by the scoring marks and nice "ears"

Tight crumb, which I expected with a quick 40% rye loaf, the flavor was nice and intense though

The book has a mistake in the amount of fresh yeast used - it should be 1.5%, rather than 1%, which means 7.5g fresh yeast, about 3g of instant yeast. However I wonder whether even more should be used, since the rise was slow and the breads are pretty small.

Following the book's advice, I made a rye flour glaze (2.5tbsp of rye mixed with 150g of water, heat until boiled while mixing continuously, brush the loaf with this paste 15 mins before the end of bake), It does make the loaf extra smooth and shiny, but the crust became a bit too chewy for my taste.

Sending this to Yeastspotting.

txfarmer's picture
txfarmer

The formula is very loosely inspired by a bread in Beth Hensperger's "Bread for All Seasons", but I made so many changes, it no longer resemble the original.


The formula has both bread and ww flour, as well as some cornmeal. I planned to soak the cornmeal overnight but totally forgot, luckily, my fermentation schedule is very long (nearly 20 hours), and the dough was plenty wet, so cornmeal had enough time to soak in water, the buns were tender and soft anyway, no need for pre-soaking. Pumpkin adds lovely color and moisture, along with red cranberries and fragrant pecans, it's a bread screaming "Thanksgiving".

Thanksgiving pumpkin buns (my own)

Note: total flour is 263g, 15% is ww, the rest Bread Flour

Note: cornmeal is 18% of total flour (I don't count cornmeal toward total flour amount)

Note: 19% of total flour in levain


- levain

100% starter, 14g

flour, 43g

water, 23g

1. Mix and let mature at room temp for 12 hours.

- final dough

bread flour, 173g

ww flour, 39g

cornmeal, 47g

butter, 26g (softened)

honey, 39g

salt, 5g

pumpkin puree, 47g

milk, 89g

water, 59g

dried cranberries, 39g

toasted chopped pecans, 39g

levain, all

2. Mix everything but salt , butter, cranberries, and pecans, autolyse for 40 to 60min.

3. Add salt, knead until gluten starts to form, add butter, until pass windowpane test. See this post for how well the dough should be kneaded, with cormeal and ww flour, the windowpane is slightly weaker, but I still could pull a very large transparent windowpane dotted by grains. Add cranberries and pecans, knead by hand until evenly distributed.

4. Rise and room temp for 2 hours, fold once and refridgrate immediately overnight.

5. Take out dough and divide into 7 pieces, round and rest for one hour. Shape into rolls and put in a 9inch pie/cake pan.

6. Rise and room temp until more than doubled, (do finger test and it barely springs back), about 6hours for me at 75F.(Dallas was so warm recently)

7. Brush with egg wash, bake at 375F for 30 to 35min.

I kneaded more dough than the formula above indicates, so make a mini sandwich loaf with the extra dough, nice volume. This shows that even with whole grains added to the dough, you can still make soft and tall sandwich loaves.

15%ww, 18%cornmeal, the texture is still "shreddably" soft.

Pumpkin, cornmeal, honey, along with cranberries and pecans, this bread has most of the Thanksgiving staple foods in it.

With some turkey meat, a Thanksgiving feast all in itself!

Sending this to Yeastspotting.


txfarmer's picture
txfarmer

After posting about some soft Asian style breads, I have gotten more than a few private messages regarding how to make very soft sandwich loaves. I was a little suprised since my impression was that most TFL-ers here prefer a good crusty lean hearth loaf, and soft "wonder breads" are being looked down to. I guess there IS always a need for soft breads: elders and kids who don't have strong teeth, spreaded with a little jam for delicate tea sandwiches , or just because you like the taste and texture. Soft breads are not equal to tasteless wonder breads either, they can be flavorful, "bouncy", and full of body.


Pan de Mie is a slightly enriched bread, just like most soft sandwich breads. That little bit of sugar, butter (you can replace with oil), and milk powder (you can replace with milk, and take out water accordingly of course), only 5% each, are enough to make the crumb very soft. For even softer results, you can increase these ratios to 10% or even 15%, or/and add other enriching ingredients such as cream, cream cheese, buttermilk, cottage cheese, etc.  However, adding too much, you are getting into broche territory though. This verion is raised purely with sourdough stater, but you can get good results using commercial yeast as long as the ingredient ratio is reasonable, and you do a good job at kneading/fermentation/shaping. However, since pan de mie has a very subtle taste, that bit of sourdough tang really enhance the flavor, I would highly recommend using it.


Sourdough Pan de Mie (my own)

Note: 19% of the flour is in levain

Note: total hydration is 65%

Note: total flour is 280g, fit a 8X4 loaf pan. For my Chinese small-ish pullman pan, I used 260g total flour. For KAF 13X4X4 pullman pan, I would suggest using about 450g of total flour.

- levain

starter (100%), 15g

milk, 24g

bread flour, 46g

1. Mix and let fermentation at room temp (73F) for 12 hours.

- final dough

bread flour, 227g (I used half KAF bread flour and half KAF AP flour for a balance of chewiness and volume)

sugar, 14g

butter, 14g, softened

milk powder, 14g

salt, 5g

water, 150g

2. Mix together levain, flour, milk powdr, sugar, and water, autolyse for 30min. Add salt, mix until gluten is developed, add softened butter, and knead until the gluten is very developed. This intensive kneading s the key to a soft crumb, and proper volume. We've all heard of windowpane test, but what's important is how STRONG the said "windowpane" is, which is a measurement of how strong the dough is, and how uniformed the gluten structure is. The following the a picture of my windowpane test on this dough, notice that it's thin, but so strong that it doesn't tear even when I wear it as a glove and my finger is poking at it.

When I finally poke through, the edge of the hole needs to be very smooth.

Yes, it can be done by hand. I have regularly kneaded dough to this stage by hand, it just requires a bit of patience and practice. Of course it's easier with a mixer. In my KA pro6, this dough took 13 to 15 min of mixing at speed 3 or 4 (I know, I know, it violates the KA mixer manual. If you are worried, don't do it, just mix at speed 2, it will take (quite a bit) longer. I have been using this "illegal" method for 2 years now, the mixer has not complained.), doughs with more fat would take longer, different dough size would also affect the time. Do note that it's very possible to over-knead, especially with a mixer, even a couple more minutes after the stage above, the dough would deterioate quickly, it takes a few trial and error to get it perfect. I would suggest to touch and feel the dough every few minutes even you do use a mixer, so you get a good sense of how the dough changes. This intensive kneading technique is quite useful, not just for soft sandwiches, but also for brioche, or other enriched breads. However, for lean hearth loaves, I don't knead at all, I stretch and fold, to get the open crumb. I think different breads demands different techinques.

3. Bulk rise at room temp (73F) for 2 hours, the dough would have expanded noticably, but not too much. Fold, and put in fridge overnight. I find the crumb would be more even and soft if dough gets a full bulk rise - that is true even when I use dry yeast with this dough.

4. Divid, rest for one hour, then Shape into sandwich loaves, the goal here is to get rid of all air bubles in the dough, and shape them very tightly and uniformly, this way the crumb of final breads would be even and velvety, with no unsightly holes.

For the 8X4loaf pan, I first roll out the dough into pretty thin, getting rid of bubbles in the mean time. Fold two sides to middle (see picture below), then roll up like a jelly roll, and put in the pan seam side down.


However, I much prefer the pullman pan method. First divide the dough into 3 or 4 pieces depending on pan size, roll each piece into oval, and roll up. After resting for 10min, roll out each piece into long oval again(along the seam), and roll up again, tighter than the first time. Put the pieces seam side down in the pan. By rolling twice, the crumb will be more even and "pore-less".

5. Cover and rise for about 6 hours at 73F. For pullman pan, the dough should be 70%full

For 8X4loaf pan, the dough should be about one inch over the edge

6.  Bake at 375 for 45min. Immediately take the bread out of pans, and cool.

Looking at the crumb shots below, you can see the difference between two shaping methods, the "double roll" really make the crumb more even and pore-less:

Of course, the "pore-less" crumb is more about aesthetic, with either shaping method, the bread would be shreddably soft.

Makes a great grilled cheese:

Or as I tend to do, just tear pieces off and snack on


Sending this to Yeastspotting.

txfarmer's picture
txfarmer

I'm still tackling that big bag of Costco carrots. This formula is inspired from this blog post, which in turn is adapted from 《Brot backen: Mit Rezepten & Ernährungstipps vom Bio-Bäcker》(No, I have no idea what it means, until Google Translate came to help). It is supposed to be "vitalbrot", a bread that's often seen in Austria. The trouble is that I know little about Austrain bread, even less about this particular kind. After making some "slight" modifications to the original formula, I really have no idea how authentic this is comparing to the original version. However, I do know that it's fragrant, moist, delicious with layers of deep flavors. My adaption involves: 

- halved the recipe

- used sourdough only, no commerical yeast

- retarded overnight after shaping

- no oil in the dough


Even without the oil, the dough is plenty wet at 79% hydration. I think shredded carrots released water, while seeds absorbed extra, they kinda balanced out. Two significant things I noticed about this dough:

1. It's needs a lot of S&F to develope enough strength. I mixed with my hands after autolyse for a while, then S&F every half an hour during teh 3 hour fermentation. Wet carrots, seeds, and rye all may have contributed to the lack of gluten of the dough, but at the end of bulk rise, all is well, the dough expanded for about 50%, and gained enough strength. Still a wet and sticky glob, but a strong glob.

2. It fermentate so very fast. It might just be my rye stater, which has a history of rising dough with lightening speed. The bulk rise took barely 3 hours, and the house was on the cool side (70F, cool for Texas, or at least this Texas girl!). After retarding, the dough was ready to be baked straight from the fridge! Doughs with similar hydration usually would require some further proofing at room temp, but not this one. After sending them into the oven, I was second guessing myself and worried about underproofing, but in the end, the breads showed that I caught it at the right time. Any more proofing, they will be flat.


Nice open crumb studded with carrots and seeds, deliciously fragrant, and very moist

Made two loaves, each about 1 lb. I think with such wet and relatively weak dough, it's better to bake smaller loaves, that way they don't spread as much on the stone. Happy with their volume this time around.

Baked them long enough to ensure a crisp singing crust

My formula (adapted from 《Brot backen: Mit Rezepten & Ernährungstipps vom Bio-Bäcker》)

Note: makes 2 loaves, each 1 lb


- Soaker

Flaxseeds, 40g

pumpkin seeds, 40g

hot water, 75g

1. Mix and put aside for overnight


- Final Dough

Bread Flour, 325g

water, 165g

salt, 8g

carrots, 100g, shredded

rye starter (100%), 150g

all of the soaker

2. Mix everything but salt, autolyse for 30min, mix with hand until dough comes together, a few minuts.

3. Bulk rise at 70F for 3 hours, S&F every 30min.

4. Divide into 2 parts, preshape, rest, shape into loaves.Put in brotforms smooth side down, cover wiht pastic, and put in fridge (40F) overnight.

5. If needed proof more at room temp the 2nd morning (I didn't need that), bake on stone at 450F for 35min, the first 12min with steam.


Delicious flavor, great texture for both crumb and crust. Yes, it's also healthy, but even if it's not, I would devour it in a heartbeat. Now, only if someone can tell me whether it's anywhere close to the real Austrian Vitalbrot?


Sending this to Yeastspotting.

txfarmer's picture
txfarmer

I am training for a marathon, the Dallas White Rock Marathon to be exact. It ain't my first time, I have run 4 marathons before, but it never gets any easier, or less exciting/challenging. Race day is a month from now, which means my mileage is getting up to 55 miles per week, with 2 20 miler runs already under my belt. In the mean time, I am foever hungry, especially craving carbs. At the smell, sight, or mere mention of food, my ears perk up, my nose starts twitching: FOOD?! Is there food? Can I have some? Actually can I have ALL OF IT? - in another word, I am turning into my dog.


There are in fact more crazy people like me, and we crazies get up at the butt crack of dawn on perfectly nice and lazy Sundays to run for 3 hours together. Afterwards, we hang out, chat, pick on/encourag each other, and compare injuries and accidents, all the while eating nonstop of course. For these fun (and somewhat smelly) occassions I often bring bagels. These lovely sourdough lye bagels were from this past weekend. (recipe see my previous blog).

They are different from the ones I made before in two ways: First I boiled them in lye solution rather than baking soda. The ratio I used was 2tsp of lye in 2 quarts of water. I liked how the bagels had deeper color, crispier crust, and better flavor.Second, I put yummy fillings in them so it's easier for us to grab and eat. The following are filled with sweetened cream cheese:

Don't use cream cheees directly, it will be too runny during baking, I used cream cheese filling leftover from carrot rolls:

cream cheese, 113g

corn starch, 19g

sugar, 40g

vanilla essence, 2g


Some of them prefer to eat something savory after a long run, these were filled with a mixture of pancetta, cheddar, and yellow mustard.

Bagels with fillings inside, why aren't they more popular? So easy to eat and so delicious. We met at a guy's house for the group run, so we toasted these whole (without spliting, less work, yay) in his toaster oven, perfect post run fuel. To shape them, first roll out each piece of dough into long oval

Then roll up and seal well, and connect the ends, do make sure the seam is down on the bottom, otherwise filling will ooz out during baking.


These chocolate ones are for me, and me only. Added cocoa powder and dark chocolate in the dough, this is dessert shamelessly pretending to be breadfast.


Sending this to Yeastspotting.


txfarmer's picture
txfarmer

I had a big bag of carrots (I just should not go to Costco unsupervised), a 3lb block of cream cheese (did I mention I was at Costco?), and a life time supply of raisins and pecans (they seem so reasonablely portioned at the store!). No more costco trips for me! Well, until probably next week. :P

To consume all that ingredients, first, there's this sourdough carrot cake I have been wanting to make for a while. Recipe is from KAF.

When putting together the ingredients, I discovered that I only had one egg (of all things I bought at Costco, I forgot to buy eggs, ugh), so I only made one third of the recipe, in a 6X6 squre tin. Used raisins and pecans instead of pineapple and walnuts. Very moist and delicious cake.

The extra nuts in the icing was delicious. I did cut down the sugar, used only 1/2 of what's called in the recipe, I think I can use even less next time.

A good way to use up leftover starter, as well as any impulse buys at Costco. :P

---------------------Then there comes bread--------------------

Having thoroughly enjoyed the carrot cake, I decided to make a sourdough bread, using the same ingredients as the cake. There will be LOTS of shredded carrots in the dough, with a cream cheese filling. I want the bread to be soft and airy, like a good roll, or an Asian style soft sandwich bread, so raisins and pecans would be added to the filling, not the dough, in order to keep the smooth soft texture. For a total out of no where experiment, they turned out great!

Made 7 rolls as above, as well as a mini sandwich bread

Both the sandwich bread and rolls had perfectly soft texture

The bread part is slightly sweet from LOTS OF shredded carrots, matched perfectly with the filling. Not too sweet, just enough to make this a nice breakfast roll or a snack. Sourdough brings a slight tanginess, which we love, especially in a sweet, relatively rich bread. The golden color is just lovely, and it's so "shreddy" soft.

Carrot Cake Sourdough (my crazy creation)

Note: The following recipe as written has 200g flour in total (including what's in the starter), enough for 6 to 7 3.5inch rolls. I actually made more dough than what the recipe specified, for the mini sandwich loaf, I used mini loaf pans (5-3/4" x 3-1/4" x 2-1/4"), each would need 90g of total flour(in addition to the 200g in the recipe). If you use a standard 8X4 sandwich loaf pan, I think you need about 270g of flour for each pan.

-levain

milk, 17g

bread flour, 33g

starter (100%), 11g

1. Mix everything into a dough, leave for 12 hours at room temp.

-final dough

levain, from above

bread flour, 162g

butter, 20g, softened

sugar, 20g

salt, 3g

milk, 77g

shredded carrots, 100g

-filling

cream cheese, 113g

corn starch, 19g

sugar, 40g

vanilla essence, 2g

chopped pecan

raisins


2. mix together every except for butter and salt, autolyse for 30min, add salt, knead until dough pull away from the mixer bowl, add butter, mix until passing window pane. Note that with all that carrots, the dough is VERY sticky and wet, so it took a while for it to come together, don't give up, keep kneading. I got  a very strong dough at the end: (Note that I am aiming for a very fine, soft, and even crumb here, which is why I did such intensive kneading. This is the same technique I use for soft Asian style sandwich breads, and enriched breads like brioche. However for lean hearth breads, i don't knead, I S&F. I think different style of breads requires different techniques, depending on what kind of crumb you are after.)

3. Round into a smooth ball and rise at room temp (22C) for 2 hours, S&F at the end, then immediately put in fridge for overnight. By the time I pulled it out of the fridge, it has doubled.Note: there were questions regarding why dough would always be stuck to the bowl during bulk rise, no matter how well the container is oiled. I think it has something to do with how well you round the dough before putting in in the container. if the surface is taunt and smooth, even for such a sticky and wet dough, it would not get stuck. Flipped right out.

4. Roll out into a 9X9inch squre, spread cream cheese filling(beat together cream cheese, corn starch, sugar, and vanilla until smooth), then spinkle raisins and pecans.

5. Rolled up like a jelly roll, but into 6 to 7 rolls, each about 1.5inch thick. Here I put them in some 3.5inch paper molds, but you can certainly bake them directly in a pan.

6. Leave to rise until double(when I lightly press it, it barely springs back), being pure sourdough, it took 6.5 hours at 22C. Which was perfect, since I needed to be away for that time, came back in time to bake them! Note that I usually proof rolls longer than sandwich breads since too much ovenspring would destroy the shape, if you make filled sandwich bread with this dough, you might want to proof less.

7. Bake at 350F for 25 to 30min until golden. The mini loaves took 35min. I am guessing a standard loaf would take 45 to 50min. It's a very moist dough, needs to be baked longer.

This truely a pretty and delicious bread, even if you don't have sourdough, you can easily convert the recipe to use dry yeast. The result would be slightly less flavorful than the sourdough version, but still yummy.

Still have a lot of carrots left, I am considering to make a German style rye bread with seeds and carrots, like this one. Anyone here have a favorite recipe to recommend?

Sending this to Yeastspotting.


txfarmer's picture
txfarmer

Yet another variation on my 36 hour sourdough baguette dough, only this time, it's not baguette at all, it's pizza! Of couse it's nothing new to make high hydration baguette dough into pizza, but I didn't realize how convenient it is to combine the two. Same dough, but pizza doesn't need to proof, it bakes at the highest oven temp (which is the same temp I preheat my oven for baguettes), it bakes for only 8 minutes (way shorter than the proofing time for baguette dough) - all this means I can use a part of the dough to make and bake pizza while the rest are made into baguette and being proofed. The pizza is made and mostly consumed before baguettes are scored and sent into the oven. How convenient, that's what I call stream-lined baking!


The basic 36 hour baguette formula can be found here, and the rye starter variation I used for this dough can be found at the end of this post. I will breifly outline the process again:

AP flour, 425g

ice water, 325g

rye starter (100%), 150g

salt, 10g

- Follow the basic 36 hour sourdough baguette formula here until dividing the dough into 4 parts, each around 230g.

- Preshape one piece of dough into round for pizza, the rest into cylindar for baguettes

- After relaxing for 40min, stretch the pizza dough into a 11inch round, put on parchment. I find that it's hard to stretch the dough into desired size in one shot, so I stretch as far as I can, then let it rest on parchment. In the mean time, I go ahead and shape the other 3 pieces into baguettes and and it proof on parchment. By the time I get back to the pizza dough, it's easy to stretch.

- Add topping. This time I first drizzle olive oil, then added fresh mozzarella, and grated cheddar. Send the pie into oven to bake at 550F (the highest temp my oven would go) for about 8min. When taken out, the cheese is still bubbling, put on a layer of prosciutto, then a layer arugula (which was tossed with some olive oil and grated cheddar first). Prosciutto tend to get tough went it's baked too long, so it's added afterward, the residual heat is enough to blend all the flavors.

- Score and bake the other baguette doughs as usual when it's finished proofing.


I really like the slight bitterness of arugula, a perfect match for prosciutto, and the cheese. The cheddar cheese I used was pretty salty, so I didn't add more salt.


That, is what I call a good crust!


The baguettes weren't half bad either, did I meantion how much I like the rye starter variation? The flavor is outstanding.


I even got some "ears"! Getting a bit more confident with scoring the 80% dough.

Who knew baguette and pizza are so similar?


The process worked out so smoothly that I think I will always use one piece for pizza from now on - it would mean faster dinner and more room on baking stone for the baguettes.

Sending this to Yeastspotting.

Pages

Subscribe to RSS - txfarmer's blog