The Fresh Loaf

A Community of Amateur Bakers and Artisan Bread Enthusiasts.

Blogs

baybakin's picture
baybakin

I know what you're thinking. "A bagel on the west coast? and in Oakland? never!"

But wait, and hear me out here: you can get a decent, nay, great bagel in Oakland.  You just need to know where to look.  There's been an article here and there about how Oakland is the Brooklyn of the bay area, including a food renaissance leaking over from SF.  This may be for many reasons, and in no small part because rents are getting more and more expensive on that side of the bay.  Oakland is becoming the hipper, edgier (and sketchier), side of the bay.

And suddenly, all at once, a few artisan bagel places popped up, one after another, or sometimes all at the same time.  One of these I had the pleasure and honor of working for as a baker.  I learned many things, especially as this was my first job in the industry.  One of which I posted earlier (the buttermilk muffins), and this time I'll dive right into the meat of the subject: an Oakland Bagel.

I should start by saying that the recipe/method that I'm posting today isn't quite what we used in the bakeshop, I have changed the recipe around to better suit the home-baker, as well as converting it all to sourdough (we used yeast along with the stiff sourdough starter in the shop) to suit my own taste.  Anywho, in we go, and hope you enjoy.

An Oakland Bagel

  • 200g mature sourdough starter (50% hydration)
  • 210g water
  • 18g malt syrup
  • 18g sugar
  • 415g unbleached high gluten flour
  • 8g salt

Method:

  1. Dissolve malt and sugar into water in large bowl
  2. Tear starter into pieces, mix with water
  3. Mix flour and salt into mixture until shaggy, dry dough is formed
  4. Rest for 20 mins
  5. Move contents of bowl to counter top, kneed by hand until texture of a bike tire
  6. Rest for 1-2 hours in a warm place
  7. Divide dough into 6-8 pieces (6 will produce the commercial size bagels)
  8. Shape bagels, place on sheet pan, cover, place in fridge for 12-24 hours
  9. Boil bagels in honey/water solution (2TBS per gallon of water) for 90 seconds total, flipping once
  10. add seeds as desired when bagels are still damp and tacky.
  11. Bake in pre-heated 450F oven for 12-15 mins, flipping or rotating as necessary to insure even baking.
  12. Cool on rack
  13. Eat!

Tips: Highest gluten flour available to the average consumer is King Arthur's Bread flour, which works very well in this recipe.  Careful if using a stand mixer, this dough is very stiff (you may think you did something wrong, you probably didn't), and may stress out your mixer. 

dosco's picture
dosco

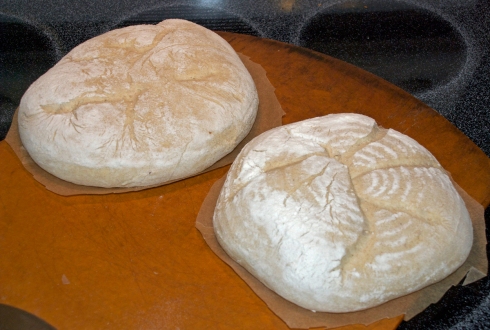
My wife asked me to bake a loaf of bread for some neighbors who recently had a new baby. She made meatballs.

It was sort of last-minute and I had just picked up some el-cheapo store brand AP flour (we haven't yet made our St. Patty's day soda bread and I was planning on using AP like I always do) so I took out some ripe starter (that I had refreshed after my last bake 2 weeks earlier) and decided to try a different recipe ... Reinhart's Pain de Campagne.

So I followed the recipe and really focused on obtaining a good windowpane since I was not using quality bread flour. Let ferment overnight in the fridge and baked the next morning. Baked at 550dF for 15 minutes with steam, then about 15 more minutes at 475dF.

Oven spring was pretty lame but I did get a bit of an ear which was a total shock. I didn't cut it since we were giving it away ... but our neighbor was just over giving us a thank you note and made a point of telling us that they all really enjoyed the bread. Nice!

Warm Regards-

Dave


WoodenSpoon's picture
WoodenSpoon

  • 527g BF 37%
  • 385g AP 27%
  • 200g Rye 14%
  • 142g T85 10%
  • 350g Levain (12% flour 12% water)
  • 1022g Water 72%
  • 28g Salt 2%

1 hr autolyse

2 min slap and fold

15 min rest

1 min slap and fold

3 hr bulk ferment with a set of stretch and folds every half hour for the first hour and a half

scale/preshape/shape 2+ hr proof

bake at 550 then 475

mmmmm


I'm midway through moving cross country and having a brief stop over at my folks house so I figured I may as well get the ole chef back in shape and make some bread for my family/old friends. it turns out I'd gotten pretty darn comfortable with the temperature of my old house so figuring out the right times to make a relatively big batch in one day was less predictable then I'd expected, I feel like they came out pretty ok non the less though. As always I'm a huge fan of low percentage rye sourdoughs, that smell is like not much else!

dabrownman's picture
dabrownman

Lucy finally got back to her bread and butter with a high percent whole grain multi-grain bread.   It has been a while but this one may prove she hasn’t lost her touch - if she ever had one.


I'm always amazed how much the acid in the levain leaches out the color becoming almost white compared to the autolyse which has exactly the same grain in the same proportions at nearly the same hydration..

 The whole grains were a mix of rye, spelt, buckwheat, oat, farro, wheat, Kamut and barley with a hydration of 95%.  The add ins were red and white malt, honey, Toadies, almond meal and VWG.  The non aromatic seeds included: sesame, flax, poppy and chia.  The aromatic seeds included: fennel, anise, caraway and coriander.


The levain was built our usual 3 stage way using our 66% hydration rye starter that has been refrigerated weeks.   The levain doubled after the 2nd 4 hour build but we  only did a 16 hour retard after the levain had risen 25% after the 3rd feeding.


When we got the levain out of the fridge the next day to finish its 3rd stage doubling, we started the 3 hour autolyse of the dough flour and water, (including all the add ns except the aromatic seeds) with the salt sprinkled on top so we didn’t forget it.


Once the levain was mixed into the autolyse we did 3 sets of slap and folds of 7, 2 and 1 minute on 20 minute intervals followed by 3 sets of stretch and folds, stretching from the 4 cardinal compass points, on 20 minute intervals where the aromatic seeds were added on the first set.


Once the S&F’s were done we immediately pre-shaped and then shaped the dough into a boule and placed it into a rice floured basket, bagged it and placed it in the fridge for a 10 hour retard.   This is about 2 hours less than put normal retard but after last weeks over proof we would try to under proof this one and bake it right out of the fridge.


We fired up Big Old Betsy to 550 F regular bake and put the Mega Steam Apparatus on the bottom rack when BOB hit 525 F.  When she got to 550 F 15 minutes later the steam was billowing and the stones were at 525 F.


How did that apple Crisp get in there?

We upended the basket onto parchment paper and a peel, slashed it quickly and slid it on the bottom stone with another stone above for 15 minutes if steam .As soon as the oven door closed we turned the oven down to 500 F and 3 minutes later down to 475 F.


This fine tasting bread made for a fine lunch.

At he 15 minute mark, the steam came out and the oven was turned down to convection 425 F and baked another 25 minutes until the bread read 203 F when the oven was shut off.  When the bread read 205 F we took it out and put it n the rack too cool. 


The bread browned well and had tiny blisters but didn’t spring or bloom much.   I think it was just too cold coming straight out of the fridge.   At the 25 minute mark, it only read 135 F about 35 F lower than normal.  Maybe it was the whole grains and high hydration that kept the dough cooler than normal and stopped the spring from really getting started.


Few things taste better than home grown cherry tomato bruschetta on toasted SD white bread.

We will see what the crumb looks like for lunch but it sure smalls great cooling in the rack.  The wait for lunch is over and the crumb came out soft, moist and fairly open for a 107% whole grain bread, but it is the taste that really stands out and why we love these breads so much.  The deep color of the crust and crumb is due mostly to the whole grains and honey as is the flavor.   The add ins on the flavor side really stand out and make this bread exceptional.

And don't forget that healthy and tasty salad!

Formula

SD Starter

Build 1

Build 2

 Build 3

Total

%

RyeSD Starter

10

0

0

10

1.85%

Whole Rye

1

2

3

6

1.29%

Whole Kamut

2

3

10

15

3.22%

Whole Buckwheat, Oat, Farro

1

2

4

7

1.50%

Whole Wheat

2

5

8

15

3.22%

Whole Barley

2

4

9

15

3.22%

Whole Spelt

1

2

3

6

1.29%

Water

10

20

40

70

15.02%

Total

30

40

80

150

32.19%


SD Levain Totals


%


Flour

75

16.09%


Water

75

16.09%


Hydration

100.00%


Levain % of Total

12.40%


Dough Flour


%


Mixed Whole Grain

466

100.00%


Salt

8

1.72%


Water

450

96.57%


Dough Hydration

96.57%


Total Flour

541


Water

525


T. Dough Hydration wih Starter

97.04%


Whole Grain %

107.02%


Hydration w/ Adds

95.20%


Total Weight

1,210


Add - Ins


%


Red Rye Malt

3

0.64%


White Rye Malt

3

0.64%


VW Gluten

15

3.22%


Poppy, Sesame, Chia & Flax

50

10.73%


Almond Meal

15

3.22%


Toadies

15

3.22%


Aromatic  Seeds

15

3.22%


Honey

20

4.29%


Total

136

29.18%


Wingnut's picture
Wingnut

Organic Sourdough


The Sainted Wife wanted Tortellini, so here you are.

A few simple additions, along with some mushrooms.

Cheers,

Wingnut

bbegley's picture
bbegley

Baking a loaf of bread for a buddy, so he can have roast beef and swiss cheese sandwiches.  I thought a beer bread would be tasty.

Here is a picture of the final proof.

Formula:

500g bread flour

350g dark beer

50g water

13g salt

1/3 tsp dry active yeast

30 min autolyze

30 min stretch and fold, 4x

1 hr bulk rise

overnight cold ferment

come to room temp 2 hrs

shape boule

proof 1 hr

bake 500 with lid on 20 min, 450 with lid off 25 min

Smelled great out of the oven.

The crumb was weird as hell.  My thoughts are that I am cooking the loaf in a pan that is to short.  When I took the lid off the top of the loaf was flat.  I think that is why the crumb is more dense in the middle.  When the bread is sliced it doesn't look as noticeable.

Texture, flavor and aroma are spot on.  I think I'm going to need to invest in a proper dutch oven, but who's got the money for that.  

Any opinions on the irregular crumb?

LevaiNation's picture
LevaiNation

This weekend I went ahead and made some Einkorn loaves by adjusting K. Forkish's 50% WW Biga bread recipe. The results were fan-tas-tico! 

My first Einkorn loaf using 100% of this ancient grain turned out very nice, yet a little dense with not so much rise. I'm gonna work my way back to that loaf and try to perfect it, but first I wanted to play around with different blends.

For this attempt I started a Biga at 6pm using 500g of white flour, 340g H2O and 1/8 tsp Yeast. Left it overnight on the kitchen counter at a temperature of around 70f. By 8am, it was bubbly and gassy and ready for more. I then added 250g Whole Wheat and 250g Einkorn, plus 3/4 tsp yeast and 22g salt. Did 3 folds in the first hour and by 10:30 AM it was ready to shape and proof. The loaves stayed in the baskets for 1 hour at room temp and 30 minutes in the fridge. Then I baked in D.O's @ 475f. 30 min with lid, 20 minutes no lid.

Voila. Gorgeous, light and golden. It still eats well three days later. Looove that sweet taste of the Einkorn. Next attempt I'm gonna try for 50% Einkorn...


Peace Y'all, 

Bryan

emkay's picture
emkay

I think my 17-day old starter is ready for prime time. I baked this San Francisco Country Sourdough using Glenn's formula.


sfsd_0324c

  • Everything was done at room temperature (approximately 73F). No retarding.
  • Autolysed for 45 minutes, then I pinched in the salt and 50 g reserved water.
  • Bulk fermented for 4 hours (S&F every 30 minutes for the first 3 hours and then untouched for 1 hour).
  • Preshaped and bench rested for 30 minutes.
  • Proofed seam side down in brotform for 2.5 hours.
  • Baked with seam side up (no scoring) in a preheated cast iron combo cooker.
  • 450F for 20 minutes with the lid on and 25 minutes with the lid off. 


sfsd_0324b

sfsd_0324d

It's the best naturally leavened bread I have baked to date. Well, that's not really saying much since this is only my 4th time baking bread using a starter. But I think it's a good start!


sfsd_0324a


:) Mary


dmsnyder's picture
dmsnyder

In my opinion, the formula for 5-Grain Levain by itself fully justifies the price of Jeffrey Hamelman's Bread. This is just one of several formulas for multigrain breads in the book. I believe I have made all the levain-based ones, and I haven't found one that wasn't scrumptious. I think my very favorite is actually the one that uses a rye sour for leavening. 

I looked it up. I first  blogged on this bread December 21, 2007. I was inspired to make it by a couple things. First, it was highly recommended by Fleur-de-Liz, a very active TFL member in those days who was an adventuresome and accomplished baker and a great photographer. When I was first learning to bake, I wanted to be her when I grew up. Unfortunately, she disappeared from TFL not long after that. The second thing was that Jeff Hamelman described this bread as "the most delectable tasting bread" he'd ever had. Considering the source, how could you not make it?

The first two times I baked the 5-Grain Levain, I found that this is a bread one really should cold retard after the loaves are formed. It makes an enormous difference in the flavor. I baked it the first time without retardation and thought it was good but nothing special. The second bake, with overnight retardation, I discovered what the fuss was about. It really is incredibly delicious.

This formula calls for a liquid (125% hydration) levain and a multi-grain soaker. The soaker is supposed to include cracked rye, but I've never had any. This time, I substituted a very coarsely milled rye flour. Otherwise, I followed Hamelman's instructions, including omitting the instant yeast. I did let the loaves warm at room temperature for about 90 minutes before baking. I've found that baking this bread right out of the fridge results in explosive oven spring and bursting cuts. I prefer it a bit more controlled.


Every time I've made this bread, the flavor surprises me. It is so good. This time, the first flavor hit was sweetness, although the bread has no sweetener, other than what is generated by amylase. The crunchy, nutty, caramel crust is fabulous.

Okay. That's enough. Time to heat the soup, dress the salad and slice more bread!

David

Isand66's picture
Isand66

   One of my good baking friends from "Brot & Bread" and The Fresh Loaf posted her version of the Plotziade challenge which is to use the same exact %'s of flour and salt to build a bread.  The kicker is you can use yeast, a starter, biga, etc. and any hydration you would like.  You can see Karin's amazing bread here,  Below is some more information I borrowed form Karin's post (I hope she won't sue me for plagiarism :))

Plötzblog is one of Germany's best bread baking blogs.  Lutz Geißler (author of "Brot backen") invited all to his blog-experiment: "Wir bauen uns ein Brot" (Let's build a bread).

Each participant has to bake a loaf, roll or small bread with these ingredients and these amounts:

  • 450 g (90%) wheat flour Typ 550 (or bread flour)
  • 50 g (10%) whole rye flour
  • 10 g (2%) salt
  • sourdough and/or yeast
  • water

And that's it: nothing else should be added.

But there are no restrictions on how to make your bread - method, level of hydration and leaven are entirely up to you.

I decided to do a pretty high percentage hydration loaf with a starter using both bread flour and rye flour.

The final loaf came out great.  It's a nice soft bread with a perfect crust and a crumb that has enough holes in it to make you wear a bib when eating a slice with just about anything!  The small amount of rye really adds a nice nutty flavor along with the moderate sour tang from the starter and overnight bulk retardation.

I built the starter up in 2 stages starting off with my AP 66% hydration mother starter.

Closeup1

Plotziade Challenge Bread (%)

Plotziade Challenge Bread (weights)

Closeup2

Levain Directions

Step 1

Mix all the levain ingredients together  for about 1 minute and cover with plastic wrap.  Let it sit at room temperature for around 7-8 hours or until the starter has doubled.  I used my proofer set at 83 degrees and it took about 4 hours.

Step 2

Mix the flour and water with all of the levain from step 1 and let it sit at room temperature again until it is doubled.  At this point you can either use it right away or put it in the refrigerator and use it the next 1 to 2 days.

 Main Dough Procedure

Mix the flours with the main dough water for about 1 minute.  Let the rough dough sit for about 20 minutes to an hour.  Next add the levain and salt and mix on low for 4 minutes and speed #2 for another 2 minutes or by hand for about 6 minutes.   You should end up with a cohesive dough that is slightly tacky but very manageable.  Remove the dough from your bowl and place it in a lightly oiled bowl or work surface and do several stretch and folds.  Let it rest covered for 10-15 minutes and then do another stretch and fold.  Let it rest another 10-15 minutes and do one additional stretch and fold.  After a total of 2 hours place your covered bowl in the refrigerator and let it rest for 12 to 24 hours.  (Since I used my proofer I only let the dough sit out for 1.5 hours before refrigerating).

When you are ready to bake remove the bowl from the refrigerator and let it set out at room temperature still covered for 1.5 to 2 hours.  Remove the dough and shape as desired.

The dough will take 1.5 to 2 hours depending on your room temperature and will only rise about 1/3 it's size at most.  Let the dough dictate when it is read to bake not the clock.

Around 45 minutes before ready to bake, pre-heat your oven to 550 degrees F. and prepare it for steam.  I have a heavy-duty baking pan on the bottom rack of my oven with 1 baking stone on above the pan and one on the top shelf.  I pour 1 cup of boiling water in the pan right after I place the dough in the oven.

Scored

Right before you are ready to put them in the oven, score as desired and then add 1 cup of boiling water to your steam pan or follow your own steam procedure.

After 5 minute lower the temperature to 450 degrees.  Bake for 35-50 minutes until the crust is nice and brown and the internal temperature of the bread is 205 degrees.

Take the bread out of the oven when done and let it cool on a bakers rack before for at least 2 hours before eating.

Crumb

CrumbCloseup


Pages

Subscribe to RSS - blogs