The Fresh Loaf

A Community of Amateur Bakers and Artisan Bread Enthusiasts.

rye

dabrownman's picture
dabrownman

My apprentice says that sane German bakers don’t usually try to do a pumpernickel style bake of; slowly reducing low temperatures over a long baking time, when baking white bread of any kind.  But, I figured that if professional bakers can call a bread with only 25% to 30% of rye flour in it a rye bread, then we should be able to DaPumperize a white bread too.  

I have to admit this is about the whitest bread we would usually make, but thankfully, only my apprentice is a German baker and she doesn't count when it comes to new and exciting things, bread wise, around here most always.  Now, if the bake goes horribly wrong, then it is all her fault - I mean she is only an apprentice.  She also looks ridiculous in that full body hair net when she bakes anyway.  So who could take what she says seriously looking like that?


We had to break the recent trend of 100% whole grain bakes or risk falling into the dark abyss.  Even though the dark side breads are fantastic and tempting, being stuck there forever is a little much if you aren’t a German bread baker,


We do like breads in the 25% - 30% whole grain range and they make fine sandwich breads.  Sandwiches, as some might know, are right up there with home made amber lager beer, as far as, my apprentice’s way of thinking goes - which admittedly isn't very far or even deep for that matter.


So, mainly out of boredom with a touch of insanity and a touch of spite, I decided to try to DaPuperize a white bread and see if the tremendous boost in flavor this technique usually provides would work with white bread too.  It was worth a shot even though a long one – otherwise you would think people would be doing it all the time as a matter of course – but they don’t.  Maybe it’s the 6 hour bake time that puts them off?
 

To give the bread a chance at being decent, we included bread spice seeds and the other usual other seeds we have recently been using, to give this bread a chance the bread at some depth and chew like our whole grain breads we DaPumperize.

Since this bake was planned to be 80% wheat we decided to use our new Not Mini’s Ancient WW starter ( a very powerful one)  to go along with a WW Yeast Water one and make separate levains.   All 25% of the whole grains are in the levains and are made up of a mix of WW, rye and spelt.

We upped the whole grains some using 100 g of wheat berries for the scald along with the Toadies and home made red and white malts.  We dropped the molasses and barley malt syrup for this bake. For much of the dough water we used the excess scald water. Aromatic seeds were the usual coriander, fennel, anise and bi-color caraway that we buzzed up a little after roasting this time.   The meaty seeds were also roasted and they included; black and white sesame seeds, cracked flax and 50 g each f pumpkin and sunflower seeds.

We followed usual routine of late by building the levains over 3 stages with the Not Mini’s Ancient WW one doubling every 3 hours from the first build on while the YW one took 4 hours. For the last build – its best showing.  We autolysed the dough flours, salt, malts and Toadies  for 3 hours before adding in the levains. 

10 minutes of Slap and folds followed when the slack dough really came around on the gluten development side.  After a 20 minute rest we stretched out the dough to do an envelope fold and dropped all the seeds and scald onto it and folded it up with a few S&F’s.   We did 2 more S&F’s on 20 minute intervals to further develop the gluten and to distribute the add in seeds thoroughly.
After a 30 minute rest we took half the dough and shaped it into a loaf and placed it into a large loaf tin, filling it less than half full and covering it with plastic.  The other half of the dough was left in the oiled and plastic covered bowl. Both were then refrigerated for 8 hours overnight.  They didn't expand much in the fridge.
In the morning, both were placed on a heating pad, covered with a cloth and allowed to warm up for 1 1/2 hours.  The bulk retarded dough was them shaped and placed into a basket for final proof on the heating pad with the tinned loaf.

After another 2 hours the tinned loaf was 1/2” under the rim.  We covered it with aluminum foil and placed it into the preheated 375 F mini oven for its 6 hour baking schedule where the bottom of the broiler pan was full of water to provide extra steam.    We didn't put any oat bran or poppy seeds on the top of the loaf because we wanted to see how dark a white DaPumpernickel could get in 6 hours.  The baking schedule follows:

375 F - 30 minutes

350 F - 30 minutes

325 F - 1 hour

300 F - 1 hour

275 F - 1 hour

250 F - 1 hour

225 F - 1 hour

For some extra thrill for my apprentice and a comparison baseline for me, we decided to bake the other half; the boule, as one would expect a loaf like this to be baked - just in case the DaPumpernickeled half was a total failure.
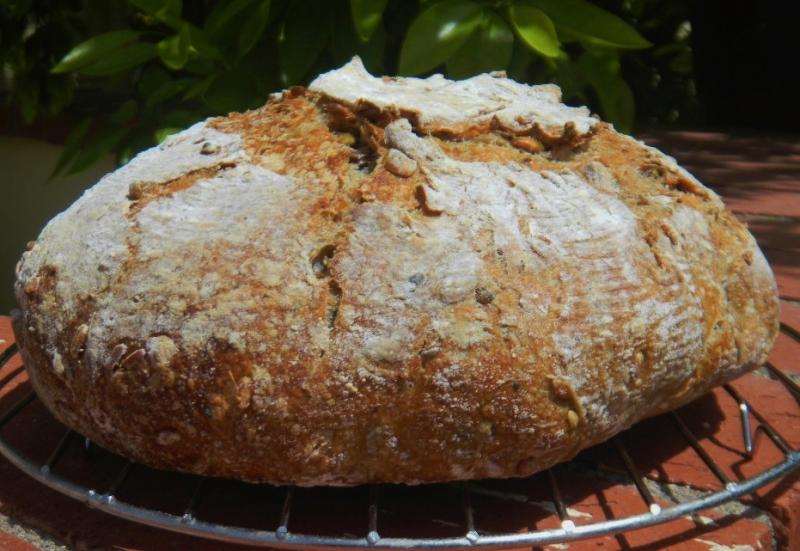
We decided to bake it in a hot DO but it took another hour and a half before we thought that it was ready for the oven.  After a poor slash job and lowering into the DO with a parchment sling, this boule was baked at 450 F for 20 minutes with the lid on and another 5 minutes with the lid off at 425 F convection before removing it from the DO and placing it on the lower stone to finish baking - another 10 minutes – 35 minutes total baking time.

We then turned the oven off and left the bread on the stone with the oven door ajar for 5 minutes to help crisp the crust.  The boule baked up nice and brown, blistered and the crust was crispy before went chewy as it cooled.  It smells terrific.

The loaf is now through with its slow and low bake and hit exactly 210 F at the end of 6 hours in the mini oven.  We will slice into this loaf after it has rested for 40 hours. Luckily we have tasted the boule and it is a fantastic loaf of bread.  The crumb is so soft and shreddable, glossy and open like it had butter, eggs and and cream in it - just delicious!   This bread cannot be sliced thin and 1/2" thick, or maybe a little more is its sweet spot. This is another bread could eat every day.  Already ate a quarter of the boule!.Can't wait for the loaf to be ready to slice thin.  It will have to go a long way to be better than the boule.

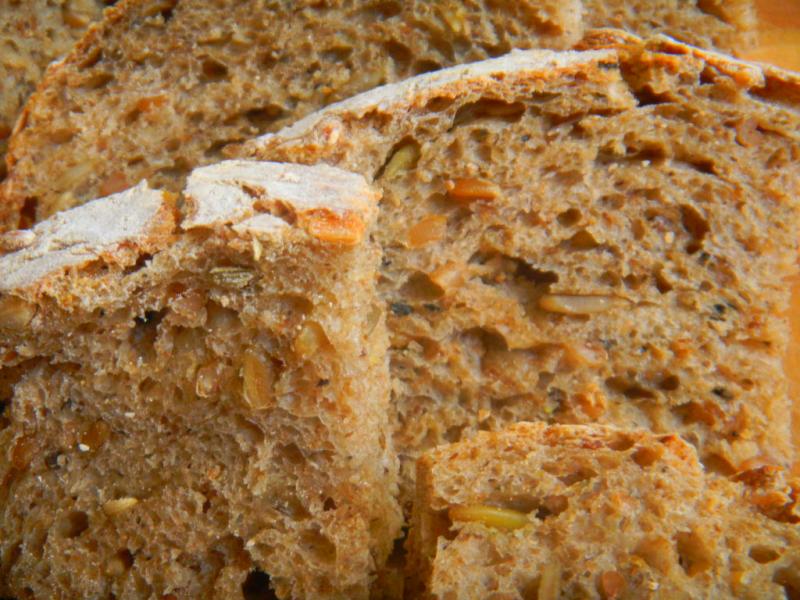
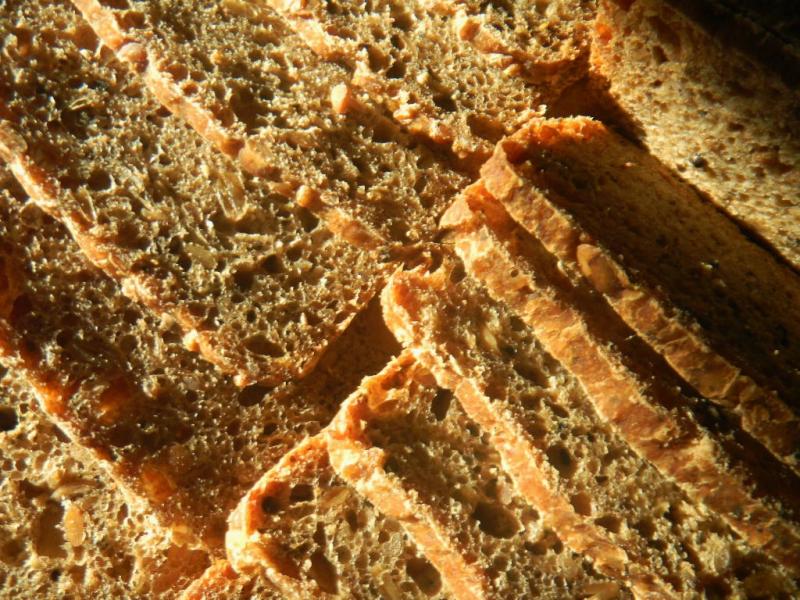
We got 33 slices oiut of the 83/4" DaPumpernickel loaf.  It wasn't as dark as a black pumpernickel about a couple of shades darker than the other part of this two way bake.  The flavor wasn't as deep or rich as a 100% whole grain pumpernickel but it tastes totally different than the regular baked boule.  This tastes like half a pumpernickel and is much more powerful a taste than the boule.  We like this bread a lot too!  For those that don't like pumpernickel but want something stronger than a rye then this loaf  might be the one for you!

Formula

YW and Rye Sour Levain

Build 1

Build 2

 Build 3

Total

%

WW SD Starter

20

0

0

20

2.47%

Dark Rye

0

25

0

25

5.00%

WW

0

0

50

50

10.00%

AP

50

0

0

50

10.00%

Water

50

50

10

110

22.00%

Spelt

0

25

0

25

5.00%

Total

120

100

60

280

56.00%


Levain Totals


%


Flour

310

62.00%


Water

230

46.00%


Hydration

74.19%


Levain % of Total

31.69%


Dough Flour


%


AP

500

100.00%


Dough Flour

500

100.00%


Salt

13

1.60%


Water

400

80.00%


Dough Hydration

80.00%


Total Flour

810


Soaker Water 300 & Water

630


T. Dough Hydration

77.78%


Whole Grain %

26.67%


Hydration w/ Adds

75.99%


Total Weight

1,704


0.40669


Add - Ins


%


White Rye Malt

3

0.60%


Red Rye Malt

3

0.60%


Toadies

20

4.00%


Bicolor; Sesame, Cracked Flax

13

2.60%


Pumpkin and Sunflower Seeds

100

20.00%


W&B Caraway, Anise, Coriander, Fennel

12

2.40%


Total

151

30.20%


Scald


%


WW Berries

100

20.00%


Total Scald

100

20.00%


Weight of scald is pre scald weight


Isand66's picture
Isand66

After returning from the first ever TFL gathering in Lexington MA last weekend I wanted to use some the rye starter that Varda gave me to make a rye bread.  Dave Snyder posted his latest bake of the above bread on The Fresh Loaf this past week and pushed me over the edge to try it myself.  You can find the recipe at his original post here.

This recipe uses a three-step build process called the Detmolder  process which by using precise temperatures for each build is supposed to optimize the development of yeast growth, lactic acid and acetic acid production.

David had described his latest bake as having an almost sweet taste without that much sour flavor.  My bake to me seemed to have a much more sour flavor than intended.  I think I might have rushed the second build a bit which could have effected the final outcome.

In any case, the crumb came out about where I think it should for such a high percentage rye bread.  The crust ended up much more thick than I think it should.

This type of dough is docked instead of scored and you only use steam for the first 5 minutes of the bake.

Before Docking Dough
Docked Dough
I used my knife tool to dock the dough. Worked fine.

I will have to try this one again and see if I get the same result.

Submitted to Yeast Spotting.

Song Of The Baker's picture
Song Of The Baker

After a short break from posting in my blog, I am back at the helm.

This weekend I thought I would try a seeded rye that, at first sight a while back, had me drooling since.  Breadsong's post of this bread inspired me to try, bake, devour.

I adjusted the formula to include organic spelt flour, as I did not have any barley flour on hand.  Also, instead of barley malt, I used 50% molasses 50% honey.  This bread may surpass my love for Danish Rye.  It has a dense texture, very pleasant, light flavour, with a touch of sweetness.  I am not usually one for any sweet hints in my bread (unless dried fruit used), especially rye, but it works nicely in this one.  Definitely a new addition to my regular bakes.

The only adjustment I would make is the total amount, as it overflowed a bit in my bread pan.  The original formula is meant to fit into a 9" pan, I only had an 8" on hand.


Marc Brik's picture
Marc Brik

I was curious (again) .... I was wondering if pepper, if baked, would hold its flavour and heat... well it holds it heat a little there is a nice tinge on the tip of the tong after a few bites. But I was supprised what a nice flavour black pepper actually has. 

The bread is light,soft with a nice crumb. So; all with all, it worked really well.

Black pepper bread

You can make this dough without the sourdough starter, remove the sourdough and increase the dried active yeast to 20gr. The sourdough just gives that nice extra flavour.

Almond ground raw                             20 gr

Black pepper corn toasted                    10 gr

Anise seed toasted                                 5 gr

12% white flour                                     850 gr

Rye meal stoneground                         50 gr

Semolina                                              100 gr

Gluten flour                                           25 gr

Water luckwarm                                  650 ml

Yeast active dried                                  10 gr

Sourdough starter 60% hydration      107 gr

Salt                                                         20 gr

a)      For a starter: mix rye, semolina, water, starter, yeast, 300 gr flour. Activate to double volume

b)      Meanwhile: dry toast pepper &  anise seed, cool and ground in spice grinder

c)       Once the starter has reached the volume, quickly mix ALL ingredients together

d)      Auto lease for 20 minutes

e)      Kneed to fine window pane test, this takes a while

f)       And yes the dough is sloppy

g)      Let it rise to double to triple the volume.

h)      Divide in 450gr portions

i)        Round up, roll out, roll up, quarter turn, roll out and roll up

j)        Place on baking tray, I use baking paper

k)      Preheat the oven to 200°C, top and bottom heat no fan

l)        Make incisions  any pattern you like, dust with rye flour

m)    Cover with a light cloth, and rest until double in volume

n)      Pre-steam the oven with a spray bottle and a little container of water in the oven for 2 minuteso)     

o)      Bake the loafs for 20 minutes

p)      Check by tapping the baked bread on the bottom, it needs to sound hollow

q)      Cool on a cooling rack

r)       Very nice with some old cheese, like mature Gouda.

s)       “Eet smakelijk” 

hearthbakedtunes's picture
hearthbakedtunes

This is a bread that I was really excited about, but in the end was a bit disappointed with the finished result. I am going to keep this post brief, so that I can dedicate my energy to the breads that are truly worth writing home about; this is not one of them.

This bread contained two different build which I found to be interesting. One was a rye sourdough build which was prepared with whole rye flour the other was a wheat build. What in German is called a Wheat pre-dough, which in international terms would be considered a biga. It was suggested to rise the dough for up to two days in the cooler, but I went with preparing it overnight, at room temperature, which in my abode mean barely 60 degrees, so not too warm. 
I woke up very early the next morning to get this bread under way. I noticed very little growth in the rye sourdough, so I was glad that a wheat pre-dough was included. I am in the process of making my rye starter much stronger. I am feeding it several times a week, but what it really needs is a warmer environment to grow in, which is hard to come by in the Wolfe Residence. It is coming along, but it is a slow and steady process. The mixing process is actually quite simple for this bread. The two builds are combined with the water, all of the other ingredients are added and the dough is mixed first of speed one for 5 minutes, and then on second speed for two minutes. There are no folds in this dough. The dough ferments for 30-45 minutes, and then it is proofed for 45 minutes. I decided to bake this bread in my brotforms. They came out very nicely, except for the way the bread opened. I did use a scoring pattern that I never use, three parallel lines. Typically, if I use a parallel pattern I use two lines, and it turned out that the extra score did not work out in my favor. It split. Actually both breads split a bit funny, but the finished product is pleasing to the eye. 
One of my major problems with this bread is that it is a bit dry. I may have left it in the oven two long. Another issue is that my home oven vents steam very early. The newer gas ovens tend to do this. I prefer the older style electric ovens for my bread baking. But you got to do, what you got to do!
The finihed product is a dough with a relatively tight crumb, a light rye flavor and a significant crust. I would have preferred a more open bread. Typically the rye breads that I bake have all of their rye flour in the build and none in the final build, I should have known better. Had I placed all of the rye in the starter, with a little extra water, I most likely would have gotten closer to what I was hoping for, but it was German, and thus It's on my last. Keep your eyes peeled for the Completely whole grain volkornbrot with tons of sunflower seeds!! 
-DW, The Bread Barron

hearthbakedtunes's picture
hearthbakedtunes

Kürbiskernbrot
WOW! I am so excited to be blogging again, I have missed it!It seems like it has been forever. Although it looks as though I have not baked for two weeks, that is simply not the case. In fact, I am excited to announce that I have made my very first Hearthbakedtunes.com sale of two very authentic German rye breads. I was lucky enough to produce a rye bread for a local silent auction which brought me my first customer. My first customer ordered one Kummelbrot and one Kürbiskernbrot. I will be posting on Kürbiskernbrot today!


I have been working on revamping my sourdough rye starer, which I have recently named "Liza-May". She is a daring and is doing very well. I figured since I devote more time to bread than any other activity, I might as well personalize the process as much as possible! I am also excited to say that I am coming off a wonderful weekend with a revitalized energy source and bright optimism and it feels good! To add to my exuberance, I will be baking bagels tomorrow!!
Although I have made breads several breads with pumpkin seeds, I have never made a 'pumpkinseed bread'. This is a typical German bread, one that is a favorite of my good friend Alexander. (Who has finally booked his tickets to meet and stay with me for two weeks in JULY!!!!) We will do some baking together, and I am sure that he will have some very thoughtful things to add. Alex is one of the most thoughtful people that I know. Anyways, I did make a few changes to the original formula, which came from the Baeko website once again.

The 100% hydrated rye sourdough starter.
I changed the sourdough rye starter build to amp up the hydration from 80% to 100%. During the past month or so, Liza May has been having trouble growing overnight, so I figured the addition of 20% water would help. I also replaced some of the sesame seeds in this bread with sunflower seeds and pumpkin seeds. As I have previsouly noted, sesame is not one of my favorite bread ingredients. However, I must admit, it is wonderful in this bread! It adds a nuttiness which could not have been achieved by the sunflower and pumpkin seeds alone. The other change that I made was toasting all of the seeds in this bread as well as toasting the rye chops that I used in this bread's soaker. The soaker actually called for rolled rye, which are made by taking rye berries and sending them through a heavy press, similar to the way oats are rolled.  I ended up using rye chops because that is what I had on hand.  I really do love these German ryes that have both a seed soaker and a starter as well. I also decided to toast the rye chops with the other seeds, I think it slightly amplified the rye flavor.
The Triple seed and rye cho soaker, my mom toasted these seeds for me, thanks Mom!
Whenever I bake breads with tons of toasted seeds, large amounts of soaker, and ample percentages of bread flour, I get excited! I feel that you really get the best of three worlds: 
First you get the wonderful taste of toasted seeds, while also softening the seeds which helps to retain gluten strength. Second, you have the wonderful texture of a crisp crust, that is not too thick, but still has a nice light taste. Lastly, you get a wonderful balance of nutrition, texture and flavor. As is my custom, I did not use the medium rye flour or the 1150 roggenmehl that was called for.  Instead, I replaced it with whole rye flour. I love whole rye. It tends to make the loaf a bit heavier, but the flavor that it incorporates, makes for a very unique bread that keeps well and tastes wonderful. I understand the place of bread flour, since wheat contains such a high amount of bran and fiber. Rye on the other hand has much less, and since it also has much less gluten, you can really get away with using more whole rye flour without changing the hydration very much. This formula did call for something called weizen Kraft, which is a trademarked Baeko product.  Personally, I had no idea what it was and could not find out, so I used whole rye in its place! It is an approach that I am becoming quite famous for. When in doubt, add more rye!Due to the high amount of soaker and the amount of seed in this bread, a relatively long mix is implemented. I mixed on first speed for seven minutes and second speed for three minutes. Had this dough contained much less bread flour, I would have used the KitchenAid Paddle attachment. I then gave this bread 45 minutes of bulk fermentation followed by an hour to proof. I used brotforms to give this bread a more symmetrical appearance. I am going to start proofing my heavier ryes, seam side down, so that they will split in the oven. This creates a very rustic and authentic appearance, that I have not been able to replicate any other way.


The next time that I bake this bread, I will toast the sesame seeds separately because they tend to cook at a different rate than the other seeds. In the future, I want to be sure that they get a stronger toast. I will also try to find roasted and salted pumpkin seeds.
This bread is a keeper, and is now one of my new favorites! I think I will add it to my frequent flyers list. Its a great bread and it is wonderful with peanut butter!
Lastly, the crumb!
Bake On-DW
hearthbakedtunes's picture
hearthbakedtunes

Before I get into this bread I would like to to thank Karin Anderson, a colleague and blogger who has been helping with my brot's over the past few months. I recommend that you take a look at her blog Brot & BreadShe is dedicated to her craft and her love of German bread comes through in her posts. This is the first formula of hers that I have used, and although I have not yet tasted the bread, it is a beauty. Although my friend Alex has been helping me with translating, Karin has the insight of actually being a German baker. Although she never baked bread while she lived in Germany, she certainly is a German who bakes German bread. Karin knows a thing or two about a thing or two (That is at least four things)!
There are several ways that this bread is different than the normal rye breads that I bake. First of all, this bread is made with a whole wheat mother starter. I did not quite have a 100% whole wheat starter, so I fed a stiff levain at 60% hydration and gave it one feeding with whole wheat flour and provided it with a 75% hydration by flour weight. The result was a stiff levain with a good amount of whole wheat flour and a wonderful amount of gluten development. In the future, I will continue to feed this stiff levain with whole wheat flour and it will eventually come very close to becoming 100% whole wheat! Starters that are made with whole grain flours such as whole wheat, whole spelt or whole rye are stronger than their white flour counterparts. Whereas I am a Registered Dietitian, I am all about the "whole-grain" approach to bread baking and all cooking for that matter.
During this post, I will pay particular attention to the attributes in this bread which differentiate it from the typical German breads that I have been baking.
As I mentioned above, this bread is leavened with a whole wheat starter, but the build is actually fed with bread flour. This helps to develop gluten in the build and thus the final dough. Even though this build was only given eleven hours to grow, you will notice excellent growth and an almost smooth finish. Looking at it, you can see the flecks from the whole wheat starter that was used. Another difference with this bread is that it used a large amount of starer. Typically, when I bake sourdough bread, I use between 7-11 grams of sourdough starter (depending on the size of the bread) This recipe called for 114g for two 650 gram loaves. That is a nearly 16 and a half times the amount that I normally use. To give you a better idea of how much starter was used in the build, check out the picture. Karin's methods for building and feeding a sourdough starter are different. By all accounts, it is just a different technique for baking bread, one that I have simply not practiced before. It required me to build my starter up more often. If the loaf tastes as good as it looks, it will be well worth it!


Secondly, this grain soaker contained both whole wheat flour and whole rye flour. Typically, my soakers are made only of rye flour. Other than one of Hamelman's breads, they do not contain rye flour but rather chopped rye or cracked rye. Another change is that all of the rye flour in this bread is contained in the soaker. Karin notes that one can replace the rye flour with spelt flour, but I chose to use the rye. How could I refuse? Another difference was that all of the rye flour was contained in the soaker. The only other bread that I do this for is my 40% rye with caraway or Kummelbrot. I probably do not practice this because the rye breads that I make are typically at least 50% rye by flour weight. To include all of the rye in the soaker would be overkill.The next major difference was the water. There is no water used in the final dough. All of the water is contained in the soaker and in the sourdough build. My normal practice is to combine the water in the final dough with the sourdough build to help to break up the sourdough so that it is more easily distributed during the mix. This was not possible, so I tore the build into eight or nine pieces so that it would distribute during the mix. During the mix I had to take the dough off of the hook several times. I know that I should be using a paddle, but that is another practice I do not do. (That is mainly because my dough hook is in the attic and it is roughly 35 degrees Fahrenheit up there).

  The fourth big change is that the sourdough build and the soaker are prepared in the morning and the final dough is mixed at night. I always prepare the soaker and build the night before and bake the following morning. The final dough contained all of the soaker and and all of the sourdough build, plus about 90 grams of whole wheat flour, 8-10 grams of honey, a little salt and a pinch of fennel and caraway. This bread is then divided in half and allowed to ferment in the fridge over night. The next morning it is shaped into boules and then proofed in bannetons, or brotforms. The bread is then baked at 475 degrees for 10 minutes and then baked at 425 for an additional ten minutes. The loaves are then rotated 180 degrees and baked for an additional 10-20 minutes. Typically, I do not rotate my breads in the oven, but I am glad that I did for these. This rotation provided a very even color to the finished bread.


All in all, this technique was new to me in several ways, and I am glad that I was able to bake this bread. Using my intuition as a baker, I made sure to guide the process along in each its stages. Although I have not yet tasted this loaf, I am certain that it will get the "hearthbakedtunes seal of approval" and I am anxious to take my first bite! Karin has given me two more formulas to try and I am looking forward to my next brot!
I just tasted this bread and it has a nice spice to it, but I think I would prefer the taste without the fennel and caraway. I think it detracts from the rye and honey in this formula! The crumb is tight, which makes sense, there is quite a bit of whole grain but the crust is simply beautiful but a bit too thick from over baking.
-Bake On
-DW, The Rye King

hearthbakedtunes's picture
hearthbakedtunes

 Oh Boy! Oh Boy! Oh Boy! This is by far the most exciting and interesting Vollkornbrot that I have ever baked, and I have baked quiet a few of them! I got this idea from the Baeko recipe database. As you might expect, I made several changes to the original formula. This bread is loaded with whole grain goodness, a high amount of fermented flour, a high amount of soaked grain and a truckload of dried fruit and toasted nuts and seeds. My approach to this bread was to simply use the fruit and nut soaker idea and throw that into Hamelman's recipe for Vollkornbrot. The result was fantastic. However, first I would like to shed some light on the process and give you an in depth discussion of the taste and texture of this bread.

This bread is made with 100% whole rye, coming in the form of whole rye flour and rye chops. The rye chops are soaked in warm water overnight, but most of the whole rye flour is located in the sourdough build. What I want to spend most of my time talking about is the dried fruit and nut soaker. This soaker was made with 100 grams of dried cranberries, 100 grams of golden raisin, 100 grams of sliced dried apricots, 100 grams of toasted walnuts and sunflower seeds and 100 grams of boiling water. I used boiling water because I knew that the heat in the water would help to extract the natural sugars and flavors found in the dried fruit. It would also help to extract some of the salty-nutty flavor from the seeds and help to spread it throughout the entire dough during the final mix and fermentation/proofing stages of this bread.

There is something about golden raisins that I love. I am not sure what it is, but they are special to me. I do recall spending an afternoon with my good fried Isaac in 2006 eating handful after handful of golden raisins in our room in Jerusalem. I will admit to regretting it later, because that was a lot of fiber, as with anything else, I had to pay the ultimate price. But lets not "go" there. I also remember eating loquats, which are my favorite fruit, in ample quantities. I like them because they are weird and hard to come by as they are grown in the Middle East and in Bermuda. This soaker makes this bread a lot of fun because it fills the crusty bread with a tenderness and a sweetness that exceeds the typical caramelization of a fully baked rye bread. And this one took close to 90 minutes to bake. This is not a bread for the faint of heart and the fruit and nuts do bring a lightness to a bread that is not typically light. All of the ingredients including the rye, seeds, and fruit brings an intense bread to a whole new level of intensity. This bread is so delicious that it scares me!

 Like any other Vollkornbrot this is a very crusty bread. It is also a very dense bread whose character changes as it is allowed to rest. Much like ourselves, it start off as child, and with the passage of time, it becomes an almost wiser version of itself. But, if you let it get too wise, you will find that it will break your jaw. If this bread is kept in a plastic bag in the fridge, it will last for close to three weeks, maybe even longer. I never have a problem with bread going bad, because it is a major staple of my diet. When a bread is as nutritious and as wholesome as this one is, you never have a guilty feeling about going back for another slice. Over the past few days I have eaten this several ways but the two ways that I have enjoyed it most are "naked" and oddly, with cold pepper jack cheese. (For those of you who are new to this blog, the "naked" refers to the bread and not me.) The spiciness of the pepper jack goes wonderfully with the sweetness of the fruit. The next time I bake this bread I am going to withhold the walnuts and simply add some toasted salted sunflower seeds in their place. I would normally leave them out of the soaker, but once again, I love the salty flavor that the seeds can bring to the crumb when they are added to a boiling water soaker.


I now realize that I did not speak much on the production of this bread. I am currently on an Amtrak train on my way to Atlantic City, and do not have access to my notes, so I will only add a few notes from memory to shed light on a little bit of the process. This dough is mixed on first speed only, and for ten minutes. Karen H Kerr, a baker whom I respect greatly, recommends using the paddle attachment. I gave it a whirl, but it did not work so well for me. Perhaps her formula for Vollkornbrot is much different than mine. After about four or five minutes, I put the hook on and I found it to be more effective. I am a traditional in that sense and cleaning thick dough such as this off the paddle was really a pain in the batinsky! But hey, ‘live and learn and die learning’, that is what I always say. After the dough has come together completely, the fruit soaker is added and allowed to mix until combined and spread evenly throughout. My attitude is: "get the fruit in the dough and don't worry". To me, when you have a dough with this much whole rye flour, the full bake is much more important than a perfect mix. This bread dough is really somewhere between a dough and very thick batter! I always start this bread in a hot oven (470 F) then after twenty minutes bring it down to 375 and bake for one more hour. I then remove the bread from the Pullman pan and let it finish directly on the stone for 15 minutes. This helps firm up the sides a bit and ensures the bread is baked fully! It will be dark, even the flour coating on the pan will have adhered to the bread and look very toasted

This is a bread for the ages! One that I hope one day I will be remembered for!!

Bake on!

-DW, The Rye King


joyfulbaker's picture

Izzy's New York Rye from Silverton's La Brea book--my first attempt

March 11, 2013 - 9:47pm -- joyfulbaker

Finally got around to posting my "Izzy's" bake.  I posted it here: 

http://www.thefreshloaf.com/node/19165/izzy039s-new-york-rye-and-bwraith039s-sourdough-bagels#comment-248967

As I said, "Beauty is but skin-deep."  Read on and see what I mean.  I think it's a general comment on the importance we place on photos of our bread.  As Peter Reinhart once wrote, the proof is in the tasting!

Joy


Pages

Subscribe to RSS - rye