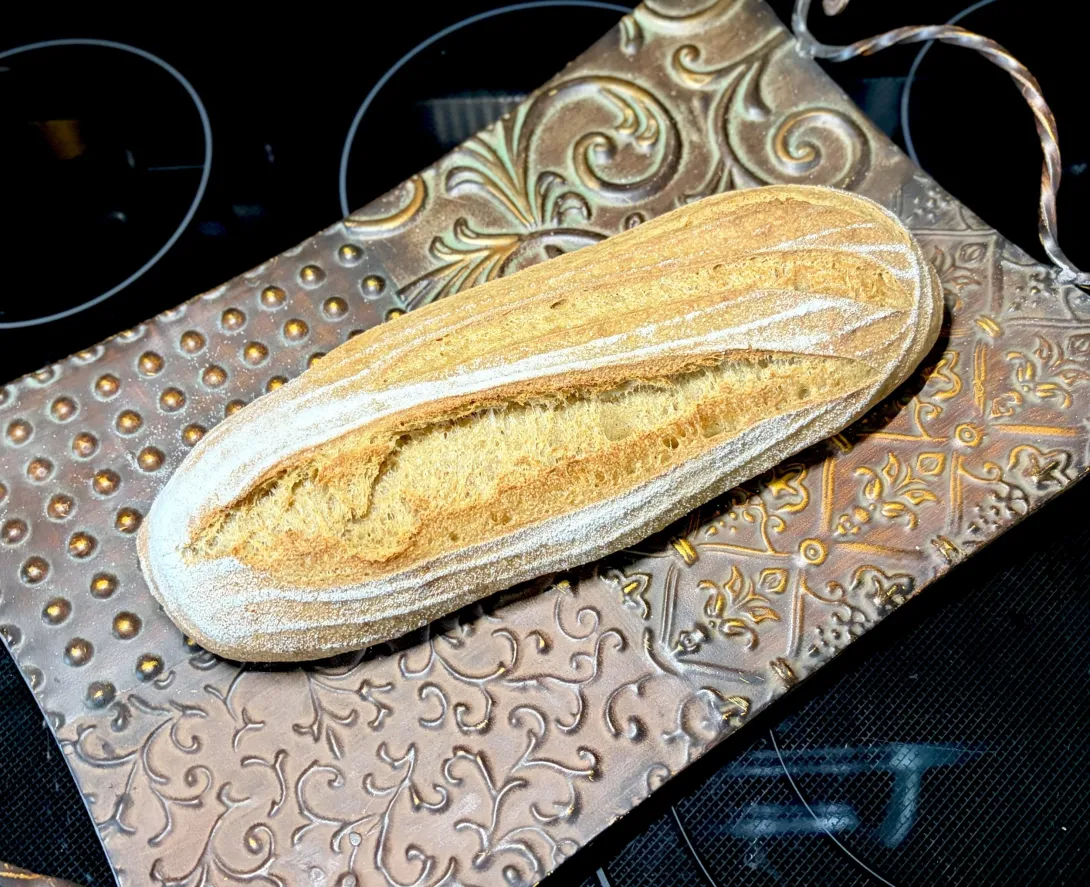
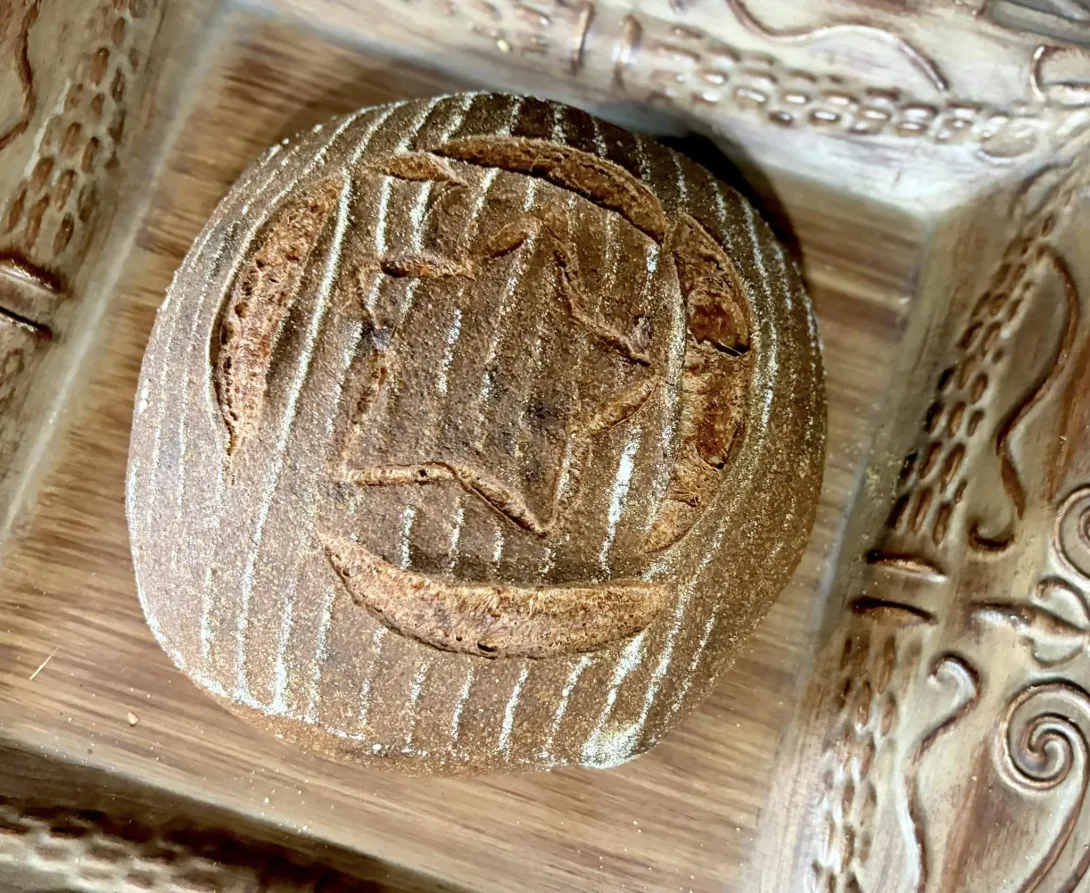
SearchUser loginBread BooksFavorite Recipes
|
Submitted by isand66 on May 20, 2012 - 6:20am Sweet Potato Spelt Flour Roasted Garlic with a Hint of Raspberry Maple Syrup Bread
I figured I would throw in some dried roasted garlic and what better than maple syrup to go with sweet potatoes. Naturally I had to be different and use some raspberry flavored maple syrup that we had picked up in Vermont a while ago. I love the nutty flavor spelt flour adds to bread along with roasted wheat germ and cracked wheat. Including the water and syrup the total hydration for this dough is 73% and it definitely a wet style dough. If you are not comfortable working with wet dough you can certainly add some additional flour or decrease the amount of water a bit. The final bread came out with a wonderful complex nutty flavor. You can taste the toasted garlic for sure, but the raspberry maple syrup is not noticeable at all. It has certainly added to the dark appearance of the bread, but the flavor is hard to notice. The sweet potatoes contribute to the rich flavor and dark color of the bread and were a great addition to the overall formula. The crust is nice and dark and crunchy with a moist and flavorful slightly chewy interior. I had a few slices with some cream cheese for breakfast a few minutes ago and it was very tasty. I'm sure this is going to make great toast and would be ideal for a steak sandwich. Starter Ingredients 227 grams AP Flour 71 grams Starter (65% Hydration White Starter) 151.5 grams Water Final Dough Ingredients 425 grams 65% Hydration Starter (All of Starter Above) 230 grams Bread Flour (I used KAF) 200 grams Spelt Flour (I used Bob's Red Mill) 70 grams Cracked Wheat 40 grams Roasted Wheat Germ 17 grams Dried Roasted Garlic (you can roast your own garlic and use that instead) 8 grams Raspberry Maple Syrup 160 grams Roasted Sweet Potatoes 400 grams Water (90 degrees F.) 18 grams Seas Salt or Table Salt Directions Starter Prepare the starter the night before and let it sit at room temperature for at least 10 hours. After 10 hours it should be doubled or more in volume. Deflate the starter and put in your refrigerator for up to 2 days or use it immediately. Final Dough Take the starter out of the refrigerator and let it warm up for about 20-30 minutes. Break it up into 5-10 pieces and put it in your stand mixer or work bowl. Add the cracked wheat to the water and let it soften for about 5 minutes. Next add the water with the cracked wheat with the starter and mix on low for 30 seconds to break up the starter. Use a wooden spoon or rubber spatula to break up the starter. Now add all of the flours, sweet potatoes (mash them slightly before adding), maple syrup and roasted garlic. Mix on low for 2 minutes. Let the dough sit for 15 to 20 minutes. Next sprinkle the salt over the dough and mix on medium for 4 minutes. The dough will still be fairly wet and loose at this point which is fine. Resist the temptation to add too much additional flour. If the dough is like soup then you should add some more flour until it starts to come together. Remove the dough to your work surface and using a dough scraper stretch and fold the wet dough for a couple of minutes and form it into a ball. Let it sit uncovered for 15 minutes. Do another stretch and fold several times and cover the dough with either a moist clean towel or a slightly oil sprayed piece of plastic wrap. Let it sit for another 15 to 20 minutes before you do another stretch and fold. The dough should start to feel more tacky than wet and sticky at this point. Let it rest again for 15 to 20 minutes and do one more stretch and fold. Form the dough into a ball again and place it in a slightly oiled container or bowl and cover it tightly. Let it sit at room temperature for 1.5 hours and then put it in your refrigerator for 24 hours or up to 3 days. When ready to bake the bread, take it out of the refrigerator and let it sit at room temperature for 1 1/2 to 2 hours. Now shape the dough as desired on a floured work surface being careful not to handle the dough too roughly so you don't de-gas it Place it in your bowl, banneton or shape into baguettes. I made 2 loaves with this recipe and shaped them into boules. Let it sit at room temperature for 2 hours covered with oiled plastic wrap or a wet cloth. Pre-heat oven with baking stone (I use one on bottom and one on top shelf of my oven), to 500 degrees F. Slash loaves as desired and place empty pan in bottom shelf of oven. Pour 1 cup of very hot water into pan and place loaves into oven. Lower oven to 450 Degrees and bake for 25 - 35 minutes until bread is golden brown and internal temperature reaches 200 degrees. Leave the loaves in your oven with the door cracked for 5 minutes longer with the oven off. After 5 minutes remove them from the oven and place on your cooling rack. Try to resist the temptation to cut into the bread until they have cooled sufficiently. Submitted by isand66 on May 15, 2012 - 5:33pm 100% Whole Wheat Desem Adapted from Phils Formula
I decided to try a different approach for building the starter from my 100% AP White Starter by doing a 3 stage build. For the first build I used 50 grams of seed starter, 125 grams Bread Flour (KAF), 75 grams Organic Whole Wheat Flour and 200 grams of water. I mixed this up and left it out at room temperature overnight for around 10 hours. I then put it in the refrigerator until that evening when I proceeded to stage 2. I added 142 grams of Whole Wheat, and 85.4 grams of Water. I left this out again overnight and put it in the refrigerator until the next evening. For the third and final build I added another 142 grams of Whole Wheat and 85 grams of water. I left this out for one more evening and refrigerated it until that evening when I prepared the final dough. I ended up making a lot more starter than I needed, but it was worth building it up to around 61% hydration as the starter was nice and fruity and ready to go to work! Please see Phil's original recipe for the formula and his original procedures here http://www.thefreshloaf.com/node/27999/honest-bread-100-wholewheat-desem-bread-and-some-country-bread. I decided to change his procedures by using my Bosche Mixer as follows: After the flour autolyes for 1 hour I added the levain and mixed on speed #1 for 1 minute and #2 for 4 minutes. I then did a stretch and fold, rested the dough uncovered for 10 minutes. I then did another stretch and fold, covered the dough and let it rest for 10 minutes. I did one more stretch and fold and put it in a lightly oiled bowl for 2 hours. I then put it in the fridge overnight. The next day I let the dough sit out at room temperature for 2 hours. After 2 hours I formed it into loaves and put them in floured bannetons and let them rise covered for 2 hours. I then baked on my oven stone with steam at 450 degrees until both loaves were golden brown and reached an internal temperature of 200 - 210 degrees F. The dough lived up to all of its good press and had a nice slightly sour/sweet taste. I have been eating it all week and it makes great toast!
Submitted by isand66 on May 10, 2012 - 5:05pm Chipolte Cheddar, Smoked Onions Potato Sourdough Bread
I've made similar bread with cheese and potatoes before, but this time I added some Durum Semolina flour to the starter and I smoked a sweet Vidalia onion and some baby red potatoes as well. I like to work with fairly high hydration doughs and this was no exception coming in at 75% hydration. The resulting bread was an irresistible bread good enough to eat by itself. I believe the corresponding photos speak for themselves. If you like a nice moist bread oozing with a slightly spicy cheese and smoked onions then I highly recommend you give this one a try! Starter 142 gms Bread Flour (KAF) 85 gms Durum Semolina (KAF) 71 gms Seed Starter (65% White Starter recently refreshed) 151.5 gms Water (90 degrees F.) Final Dough Ingredients 425 gms Starter from above (Should be all of the starter) 113 gms Whole Wheat (I use King Arthur Flour) 226 gms Bread Flour from KAF 58 gms Organic Cracked Wheat 152 gms roasted or barbecued Potatoes (I smashed them up and left the skin on for some added flavor) 80 gms Chipolte Cheddar Cheese (I cut the cheese into small cubes) 80 gms Smoked Sweet Style Onions (I smoked them on my barbecue, but feel free to roast them with some olive oil in a pan or your oven) 425 gms Luke warm water, 90 degrees Fahrenheit 18 gms Sea Salt Directions The night before, mix the starter ingredients together in a small bowl and let sit loosely covered for 9-10 hours at room temperature. The starter should be nice and bubbly and should have at least doubled in volume. Cover and place in refrigerator until ready to use for up to 2 days or use right away. When ready for the main event, take the starter out of the refrigerator and let it rest for an hour to come up to room temperature. In the bowl of your mixer break the starter up into 6-10 pieces and add the water. Mix on low for a minute or less to break up the starter. You may want to use your hand to make sure it is nice and foamy. Next add the cracked wheat and then all of the flours. Mix on low for 2 minutes and then let the dough rest for 15 to 25 minutes covered. After the autolyse add the potatoes and salt mix on speed number 2 for 3 minutes. Now add the onions which should be chopped up into small pieces and mix for 1 minute more until they are incorporated into the dough. Remove dough to your lightly floured work surface and do about 10 stretch and folds with a dough scraper or your hands but keep them oiled or wet. Form the dough into a ball and let it rest uncovered for 10 minutes. Do a stretch and fold and form into a ball again and cover with a clean moist cloth or oiled plastic wrap. Let it rest for another 10 - 15 minutes and then do another stretch and fold. The dough should start to develop some gluten at this point. Let it rest covered again. Now flatten the dough out into a rough rectangle and add the cheese and form the dough into a ball. Cover the dough ball again and let it rest. After another 10 minutes do another stretch and fold and put into a lightly oiled bowl that has enough room so the dough can double overnight. Let the dough sit at room temperature for 2 hours and then put in your refrigerator for at least 12 hours or up to 3 days. When ready to bake the bread, take it out of the refrigerator and let it sit at room temperature for 2 hours. Now shape the dough as desired on a floured work surface being careful not to handle the dough too roughly so you don't de-gas it. Place it in your bowl, banneton or shape into baguettes Let it sit at room temperature for 2 hours covered with oiled plastic wrap or a wet cloth. Pre-heat oven with baking stone (I use one on bottom and one on top shelf of my oven), to 500 degrees F. Slash loaves as desired and place empty pan in bottom shelf of oven. Pour 1 cup of boiling water into pan and place loaves into oven. Lower oven to 450 Degrees and bake for 25 - 35 minutes until bread is golden brown and internal temperature reaches 200 degrees. Leave the loaves in your oven with the door cracked for 5 minutes longer with the oven off. After 5 minutes remove them from the oven and place on your cooling rack. Try to resist the temptation to cut into the bread until they have cooled sufficiently.
Submitted by isand66 on May 5, 2012 - 1:42pm Jewish Rye from Greenstein's "Secrets of a Jewish Baker"...David Snyder AdaptationThis recipe comes courtesy of David Snyder who posted his adaptation here. I have posted about other rye breads I have tried making previously and I have to say all of them including this one have come out pretty good. The big difference in this recipe is that all of the rye flour is added into the rye sour and the dough is fairly high hydration compared to the other ones I have made. I ran out of First Clear Flour so I had to substitute 217 grams using KAF High Fiber Flour instead. I think the bread would have turned out better if I had used 100% First Clear to be honest. I also added some dried Toasted Onions which I reconstituted in the water used for the final dough which gave the rye a nice onion flavor which I love. One other point is that I followed Davids instructions for making a 100% Rye starter using Pumpernickel flour and I only ended up with 708 grams instead of 750 grams called in the recipe. I am not sure if this had that much of an effect on the final bake, but next time I will make a larger batch of starter since I would have liked to keep some for my next bake so now I have to start all over again :(. I do have to say I have made Rye starters in the past and I really like the way this one came out. You can follow Dave's excellent instructions here if you are interested in converting your starter to a Rye sour starter. Also, I did not have any leftover rye bread so I didn't add the Altus to this bake, but next time I will add it to see the difference. I have made rye breads with and without the Altus and have not made up my mind if it is necessary or not. The end result of my bake was not as open of a crumb as David achieved, but throw some pastrami and Thousand Island Dressing or mustard for you traditionalists out there and deli nirvana is at your fingertips! Also note that most Jewish Rye recipes call for the use of First Clear Flour which is taken from what remains after the millers sift the patent flour out of the straight flour. Patent flour is the purest and highest quality flour available. First clear flours come from hard wheat and has a protein content of 15.0 - 18.0% which is ideal to strengthen the lower protein content of rye flours which are normally around 6.5%. High-gluten flour can be substituted for First Clear and has a protein content of 13.5- 14.5%. White rye flour is very important in authentic Jewish style rye breads and comes from the heart of the endosperm. It contains only 6.5% protein. (I used Pumpernickel or Dark Rye in this bake) Medium rye flour is milled from the whole grain after the bran has been stripped away and is used for high-percentage rye recipes (heavier breads for sure). Dark rye flour, is what remains of the rye kernel after the white rye flour has been sifted out. As you can imagine it is very dark and strong flavored flour.
Submitted by isand66 on May 5, 2012 - 7:00am Coconut Pain Au Levain
Anyway, I was chomping at the bit to bake some bread so after refreshing my starter I decided to make a simple sourdough Pain Au Levain, but of course I needed to add something different to the formula to make it a bit more interesting. I had recently purchased some coconut flour from Whole Foods and decided to try adding some to this concoction and see what happens. I also added some wheat germ, Durum flour and pumpernickel flour along with bread flour. The levain starter was made with my standard 65% AP starter along with some whole wheat and bread flour. I also added some dried toasted onions which I rehydrated in the water used for the dough. The resulting dough turned out very interesting with a nice nutty flavor but a bit dense. The coconut flour really soaks up the water and in hindsight I should have uppped the hydration level of this bread even though it is already 71%. Starter (Levain) 71 Grams Seed Starter (65% AP Starter) 142 Grams Bread Flour 85 Grams Whole Wheat Flour 151 Grams Water (90 Degrees F.) Final Dough 458 Grams Levain from Above 260 Grams Bread Flour 65 Grams Pumpernickel Flour 75 Grams Coconut Flour 25 Grams Durum Flour 35 Grams Toasted Wheat Germ 17 Grams Sea Salt 4 Grams Toasted Dried Onions 15 Grams Walnut Oil (You can substitute your oil of choice) 336 Grams Water, 90 degrees F. (Note: If you want a more open crumb I would increase the water another 15 - 20 grams) Directions Levain Combine the ingredients for the Levain and mix by hand or in your mixer for 1-2 minutes. Place it in a covered glass or plastic bowl and let it sit for 9-10 hours at room temperature. If you are ready to bake you can use it immediately, otherwise you can refrigerate it for at least 1-2 days. Final Dough For the final dough, using your stand mixer or by hand, mix the water with the Levain to break it up. Add the toasted onions to re-hydrate them in the water and then add the flours and oil and mix on the lowest speed for 2 minutes. Let rest for 15 minutes. Now add the salt and mix for 4 minutes more on medium speed, adding more flour if necessary to produce a slightly sticky ball of dough. Remove dough to your lightly floured work surface and knead for 1 minute and form into a ball. Leave uncovered for 15 minutes. Do a stretch and fold and form into a ball again and cover with a clean moist cloth or oiled plastic wrap. After another 15 minutes do another stretch and fold and let it rest again for another 10 - 15 minutes. Do one last stretch and fold and then put it into a lightly oiled bowl that has enough room so the dough can double overnight. Let the dough sit in your bowl for 2 hours at room temperature. It should only rise slightly at this point. After the 2 hours are up put in your refrigerator for at least 12 hours or up to 3 days. When ready to bake the bread take your bowl out of the refrigerator and let it sit at room temperature for around 2 hours. After 2 hours shape the dough as desired being careful not to handle the dough too roughly so you don't de-gas it. Place it in your bowl, banneton or shape into baguettes. I used my new banneton I found in a thrift store and made one large loaf. Let it sit at room temperature for 2 hours covered with oiled plastic wrap or a moist cloth. Pre-heat oven with baking stone (I use one on bottom and one on top shelf of my oven), to 500 degrees F. Slash loaves as desired and place empty pan in bottom shelf of oven. Pour 1 cup of boiling water into pan and place loaves into oven. Lower oven to 450 Degrees and bake for 25 - 35 minutes until bread is golden brown and internal temperature reaches 200 degrees. Shut the oven off and leave the bread inside with the door slightly open for 10 minutes. This will help dry the loaves out and keep the crust crunchy. Let cool on cooling rack and enjoy! Feel free to see some of my older posts at my other blog: www.mookielovesbread.wordpress.com Submitted by isand66 on April 13, 2012 - 2:13pm Multi-grain Sourdough Act 2
In trying to calculate the bakers percentages for this recipe I included all the water from the soaker, final dough and also the water from my refreshed 65% hydration AP starter. When I calculated the water from the starter it also included the water from the seed starter which I'm not sure it that is necessary or not, but the overall hydration of this dough ended up being 86%. If you are not comfortable with wet doughs, you may not want to try this one. I do have to say that a lot of the water is absorbed by the soaker so it's not really as wet as it sounds. If you venture to try this, please let me know how your attempt comes out. Ingredients Soaker 28 Grams. Rolled Oats 57 Grams Malted Rye Berries 57 Grams Bulgar Wheat 28 Grams Oat Bran 28 Grams Cracked Wheat 359 Grams Boiling Water Final Dough 425 Grams White Starter recently refreshed 98 Grams Whole Wheat Flour 86 Grams Pumpernickel Rye Flour 28 Grams Spelt Flour 144 Grams First Clear Flour (you can substitute bread flour or High Gluten Flour) 14 Grams (2.5 Tsp) . Seas Salt or Table Salt (Note: I usually use 2.5 Tsps. of salt, but I have started to weigh the salt which ended up being 14 grams. According to my conversion program it should be 18 grams) 173 Grams Water, 90 degrees F. Directions Mix all ingredients for soaker in a bowl and add boiling water. Let it sit for 2-3 hours covered until the grains are soft. After 2-3 hours add the soaked grains along with the remaining liquid in your mixing bowl and add the flours, salt and remaining water and mix for 2 minutes. The dough should come together in a shaggy mess and should be relatively moist at this point. Let it rest for 5 minutes and mix for 4 minutes more on medium low-speed. Remove dough from mixing bowl to work surface and do a stretch and fold. You may need to wet or oil your hands and the work surface since the dough will still be very sticky at this point. Form the dough into a ball and let it rest uncovered for 10 minutes. Let the dough rest uncovered for 10 minutes. After 10 minutes do another stretch and fold and cover the dough with a moist lint free towel or plastic wrap sprayed with non-stick cooking spray. Do another stretch and fold two more times letting the dough rest 10 minutes each time. After the last stretch and fold put the dough into an oiled bowl and cover it tightly. Let the dough sit in your bowl for 2 hours at room temperature. It should only rise slightly at this point. After the 2 hours are up put in your refrigerator for at least 12 hours or up to 3 days. When ready to bake the bread take your bowl out of the refrigerator and let it sit at room temperature for around 2 hours. After 2 hours shape the dough as desired being careful not to handle the dough too roughly so you don't de-gas it. Place it in your bowl, banneton or shape into baguettes. Let it sit at room temperature for 2 hours covered with oiled plastic wrap or a moist cloth. Pre-heat oven with baking stone (I use one on bottom and one on top shelf of my oven), to 500 degrees F. Slash loaves as desired and place empty pan in bottom shelf of oven. Pour 1 cup of very hot water into pan and place loaves into oven. Lower oven to 450 Degrees and bake for 25 - 35 minutes until bread is golden brown and internal temperature reaches 200 degrees. Shut the oven off and leave the bread inside with the door slightly open for 10 minutes. This will help dry the loaves out and keep the crust crunchy. Let cool on cooling rack and enjoy! Feel free to visit my other blog to see some of my older posts at www.mookielovesbread.wordpress.com Submitted by isand66 on April 11, 2012 - 8:03pm French Style Baguettes with Quinoa Flour
The end result was a nice crispy, light and nutty flavored baguette. I still need some practice with my shaping and figuring out how long to make them so they fit on my oven stone. I could have handled the dough a little lighter to preserve some bigger holes, but overall the crumb was not bad and the crust was nice and crisp. Ingredients 300 grams KAF Bread Flour (BakersPercentage, 44%) 200 grams Italian Style Flour 00, KAF (BakersPercentage, 29%) 100 grams Organic Whole Wheat Flour, KAF (BakersPercentage, 15%) 80 grams Quinoa Flour, Bob's Red Mill (BakersPercentage, 12%) 454 grams water, 70 degrees Fahrenheit (BakersPercentage, 67%) 14 grams Sea Salt (BakersPercentage, 2%) 7 grams Instant Yeast (BakersPercentage, .01%) Directions Using your stand mixer or by hand, mix the water with the flours for 2 minutes on low. Let the dough autolyse for 30 minutes. Add the salt and mix for 2 minutes more on medium speed, adding more flour if necessary to produce a slightly sticky ball of dough. Remove dough to your lightly floured work surface and need for 1 minute and form into a ball. Leave uncovered for 10 minutes. Do a stretch and fold and form into a ball again and cover with a clean moist cloth or oiled plastic wrap. After another 10 minutes do another stretch and fold and put into a lightly oiled bowl that has enough room so the dough can double overnight. Put in your refrigerator immediately for at least 12 hours or up to 3 days. When ready to bake the bread, shape the dough as desired being careful not to handle the dough too roughly so you don't de-gas it. Place it in your bowl, banneton or shape into baguettes. Let it sit at room temperature for 2 hours covered with oiled plastic wrap or a wet cloth. Pre-heat oven with baking stone (I use one on bottom and one on top shelf of my oven), to 500 degrees F. Slash loaves as desired and place empty pan in bottom shelf of oven. Pour 1 cup of very hot water into pan and place loaves into oven. Lower oven to 450 Degrees and bake for 25 - 35 minutes until bread is golden brown and internal temperature reaches 200 degrees. Shut the oven off and crack the door with the bread still present. Let it sit for 10 minutes to continue to dry out and develope the perfect crust. Let cool on cooling rack and enjoy! This post has been submitted to the Yeast Spotting Site here: http://www.wildyeastblog.com/category/yeastspotting/. Submitted by isand66 on April 10, 2012 - 5:21pm Cherry Vanilla Sourdough Bread
I started by taking my 65% hydration AP flour starter and building enough starter for 15 ounces of levain for the finished dough. I wanted to incorporate some white rye into the starter to give it a little rye flavor so I added 22% white rye flour to the levain build along with AP flour and some water to make a 67% hydration starter. The final dough including the starter has a hydration level of 66%. I wanted to try to make this a moist and delicate crumb so I incorporated a large percentage of French Style low protein flour from KAF, along with a small percentage of white rye and durum flour. After finishing the loaf in the oven and tasting it, I have decided that I added a little too much of the Cherry Marnier and vanilla so I have adjusted the amount in the recipe below. This is a perfect bread for french toast or bread pudding or just as toast with some butter or cheese. Starter Ingredients 7 ounces All Purpose Flour (I use KAF) 2 ounces White Rye Flour 6 ounces Water (90 degrees) .75 ounces Starter, 65% Hydration (you can adjust the water to suit your current hydration level) Final Dough 15 ounces Levain from above (75% Bakers Percentage) 12.6 ounces French Style Flour (80% Bakers Percentage) 3.4 ounces White Rye Flour (10% Bakers Percentage) 4 ounces Durum Semolina Flour (10% Bakers Percentage) 9.5 oz. water (90 degrees F.) (47.5% Bakers Percentage) .5 ounce Pure Vanilla Extract (.03% Bakers Percentage) 3 ounces Cherry Marnie (15%) 2 1/2 Teaspoons, .63 ounces Sea Salt (3.2% Bakers Percentage) Bakers % Final Dough White Rye Flour 4 ounces AP Flour 7 ounces French Style 16 ounces Durum 2 ounces Total Flour 29 ounces 100% Salt .63 ounces 2.1% All Liquids 19 ounces 66% Directions Using your stand mixer or by hand, mix the water with the starter to break up the starter. Add the flours and vanilla extract and Cherry Marnier and mix on the lowest speed for 2 minutes. Let rest for 15 minutes - 20 minutes to allow the gluten to develop. Next, add the salt and mix for 4 minutes more on medium speed, adding more flour if necessary to produce a slightly sticky ball of dough. Remove dough to your lightly floured work surface and need for 1 minute and form a ball. Leave uncovered for 15 minutes. Do a stretch and fold and form into a ball again and cover with a clean moist cloth or oiled plastic wrap. Let the dough rest another 10-15 minutes and do a stretch and fold again. Let it rest for an additional 15 minutes and do 1 more stretch and fold. After this last stretch and fold cover the bowl again and let it rest at room temperature for 1.5 to 2 hours and then put it in your refrigerator overnight or up to 3 days. When ready to bake the bread, take the bowl out of your refrigerator and let it rest at room temperature for 2 hours. After 2 hours shape the dough as desired being careful not to handle the dough too roughly so you don't de-gas it. Place it in your bowl, banneton or shape into baguettes. Let it sit at room temperature for 2 hours covered with oiled plastic wrap or a wet cloth. Pre-heat oven with baking stone (I use one on bottom and one on top shelf of my oven), to 500 degrees F. Slash loaves as desired and place empty pan in bottom shelf of oven. Pour 1 cup of very hot water into pan and place loaves into oven. Lower oven to 450 Degrees and bake for 25 - 35 minutes until bread is golden brown and internal temperature reaches 200 degrees. Let cool on cooling rack and enjoy! The final dough had a nice open crumb and crispy crust. The overall dough did not rise as much as I would have liked, but the oven spring was excellent. Next time I think I would add some dried cherries and maybe some walnuts to kick it up a bit. Submitted by isand66 on April 3, 2012 - 4:55pm San Francisco Style Sourdough 4.5 adapted from Dave Synder
I tried very hard to follow his exact recipe but alas my string of good luck continued and my refrigerator decided to mimic an oven. I was forced to let the bulk ferment dough rest in my mini beer/assorted alcohol refrigerator instead of the shaped loaves. I let the dough bulk ferment over night and the next afternoon while I waited for my refrigerator to be fixed I let the dough rest at room temperature for a couple of hours. I then formed the loaves into Boules and let them rise in their bannetons inside my oven with a bowl of hot water for 3.5 hours. The dough was nice an elastic and puffed up very nicely. Unfortunately I didn't realize that the risen loaves would be too big to fit in my oven at the same time. I had to adjust the loaves while the oven was nice and hot and subsequently one of the loaves was hanging off the baking stone for a few minutes causing it to sag slightly. The final result was an excellent crust and a nice open and light crumb. I did however discover the first loaf I cut into had a mysterious hole running through a big part of the bread, almost like someone or thing was trying to dig its way to China. Overall the bread turned out excellent. I would have expected it to be slightly more sour though and I'm not sure why it was so mild. It could be due to the fairly new converted starter I used. I turned my 65% AP starter to Dave's multi flour starter at 50% so maybe it wasn't mature enough. You can find Dave's recipe here: http://www.thefreshloaf.com/node/27982/san-franciscostyle-sourdough-bread-two-ways-3252012. Thanks again Dan for an excellent recipe! Submitted by isand66 on April 1, 2012 - 7:13am Espresso Flavored Smoked Onion Sourdough Bread
The final result was a nice chewy, bread with a pretty strong onion flavor and a pronounced coffee flavor. For a time I was worried that the bread would end up a disaster since my refrigerator is not working properly. The dough almost blew the lid off of my dough rising bucket due to the higher temperature in the refrigerator, but instead of letting it sit out for 2 hours before forming it into loaves I skipped that step and the end results were excellent. Ingredients 15.5 ounces 65% Hydration Starter Refreshed (I use a AP flour starter. I refreshed the night before, left it out at 70 degrees room temperature for 8-9 hours and then put in refrigerator) 15 oz. Water 90 degrees F. 9 ounces Bread Flour (KAF) 4 ounces Pumpernickel Flour 4 ounces Durum Flour 2 ounces Whole Wheat Flour 1.5 ounces Barley Flakes 1 ounce Wheat Germ 4 ounces Smoked Onions (I smoked a whole onion on my barbecue and cut it into 1/2" pieces when it cooled) 2 1/2 Teaspoons Espresso Powder 2 1/2 Teaspoons Sea Salt 1 Tablespoon Pistachio Oil Directions Using your stand mixer or by hand, mix the water with the starter to break up the starter. Add the flours, and oil and mix on the lowest speed for 2 minutes. Let rest for 15 minutes Now add the salt and onions and mix for 4 minutes more on medium speed, adding more flour if necessary to produce a slightly sticky ball of dough. Remove dough to your lightly floured work surface and do a stretch and fold and then form a ball. Leave uncovered for 15 minutes. Do a stretch and fold and form into a ball again and cover with a clean moist cloth or oiled plastic wrap. After another 10- 15 minutes do another stretch and fold and put into a lightly oiled bowl that has enough room so the dough can double overnight. Leave the covered dough in your bowl at room temperature for 1.5 to 2 hours and then put it in your refrigerator overnight or up to 3 days. When ready to bake the bread, take the bowl out of your refrigerator and let it rest at room temperature for 2 hours. After 2 hours shape the dough as desired being careful not to handle the dough too roughly so you don't de-gas it. Place it in your bowl, banneton or shape into baguettes. Let it sit at room temperature for 2 hours covered with oiled plastic wrap or a wet cloth. Pre-heat oven with baking stone (I use one on bottom and one on top shelf of my oven), to 500 degrees F. Slash loaves as desired and place empty pan in bottom shelf of oven. Pour 1 cup of very hot water into pan and place loaves into oven. Lower oven to 450 Degrees and bake for 25 - 35 minutes until bread is golden brown and internal temperature reaches 200 degrees. Let cool on cooling rack and enjoy! Feel free to visit my other blog at www.mookielovesbread.wordpress.com for some of my older posts.
|
Advertisement |