The Fresh Loaf

A Community of Amateur Bakers and Artisan Bread Enthusiasts.

Blogs

greedybread's picture
greedybread

Fou…Fou…Fougasse….Fresh from the oven…

Carrying on my crush on lovely Richard Bertinet, I decided I really should try his Fougasse as it looks so easy!!

Very yum!!

This recipe is from his first book “Dough”.

It seems to be quite simplistic, but for people who have never baked bread before, he gives you delicious recipes, confidence and a full belly..

And before you know it, you are onto the complex buggers like Gubana or Panettone!!

“You are on your way baby…”

I like to call it the breaking in book…If I have a crappy baking week, I choose one of his recipes to give me a boost!!

Very fougasse!!

looking like the mask in Scream!!

This bread does though remind me of the mask in Scream.

Can you see it? Or am I mad?

Anyhow enough blathering…you will not believe how easy this recipe is!!

LETS GET YEASTY!!!

What will you need?

15g dried yeast

500g Strong Bakers flour

10g Salt

350 mls water..

Easy peasy dough…

Warm the water and add in the dried yeast and allow to become frothy.

Combine flour and salt and give it a mix, then add in the yeasty water and form a soft dough.

Knead for about 10 minutes until smooth and elastic.

Place in lightly oiled bowl and cover, standing for an hour.

Scream!!

ready to bake..

Preheat oven to 250 celsius.

Sprinkle semolina on the baking tray paper  or onto the baking stone but if doing on the stone, do 5 minutes before bread goes in:)

Turn dough out on floured bench/ board.

Cut into 4 pieces .

Be very gentle and roll out or use fingertips to spread out the dough as my pictures above show.

There is no right or wrong shape really.

Then slice 4-5 cuts in the dough and pull apart.

Place on baking tray. and sprinkle with a little flour or semolina.

cooling…

Open oven, give a quick mist on the walls, place the tray in the oven and shut the door.

Turn the heat to 230 celsius and bake for about 10-12 minutes or until golden brown.

Remove from oven and cool on racks.

look at it!!

ready to eat!

Someone has had a bite!!

And another…almost gone.

I will try a more complex recipe that I have, and let you know how that goes.

A wheaty one too maybe nice….maybe I could slip in the wholemeal again:)

Great bread for dips and salsa’s.

ENJOY, ENJOY, ENJOY!!

Gorgy!!

mwilson's picture
mwilson

Christmas is fast approaching and life has been quite hectic recently... 

I simply don't have time to maintain my beloved lievito 2.0. So instead with the little time I have had, I made my regular yeasted version of Pandoro.

It has a wonderful aroma thanks to the cocoa butter, vanilla, lemon, and fancy pandoro sugar. Although this version lacks the softness typical of the real thing made with natural yeast.

Well mixed dough.


Primo (30C ~4hrs)

62.0 Biga (50% hydration)
62.0 Flour
2.0 Instant yeast
4.0 Water
21.0 Sugar
48.0 Egg

Secondo (30C ~4hrs)

140.0 Flour
82.0 Sugar
96.0 Egg
14.0 Water

Terzo (24C ~12-14hrs)

140.0 Flour
62.0 Sugar
10.0 Honey
5.5 Salt
48.0 Egg
17.0 Milk
31.0 Water
228.0 Butter
16.0 Egg Yolk
23.0 Cocoa Butter
Flavouring (seeds from one vanilla pod + zest of one lemon)
1111.5

Final dough, total % ingredients:

100.0 Flour
59.5 Butter
50.1 Whole Egg
43.0 Sugar
18.2 Water
6.0 Cocoa Butter
4.4 Milk
4.2 Egg Yolk
2.6 Honey
1.4 Salt
0.5 yeast

Pandoro sugar

100 Icing sugar
70 Potato flour
6 Cocoa butter
6 Rum
- Vanilla seeds

Sorry for the rushed post... errand's to run.

Michael

Wandering Bread's picture
Wandering Bread

Hey y'all. Has anyone here ever baked with Swiss "Ruchmehl"? I just tried it for the first time and I really like it. It's somehwere between medium and whoe wheat. A lot of flavor but can still hold together gluten wise. 

I'm only here in Switzerland for another week so I figured it was time to give this a try. Now I'm wishing I had done it months ago!

It was super tasty with a full wheat flavor and a crunchy crust with a cool, soft crumb.  

I also wanted to say it's been very inspirational to read all of your posts in tribute to Eric. I wish I had been around to get to know him, he clearly had a huge impact on many of you, who have in turn had a large impact on me. I am very sorry for your loss and I am grateful for his legacy here.

-Ryan

Ruchbrot formula at Wandering Bread

Isand66's picture
Isand66

There are many things in my life that I have a passion for, with bread  being near the top.  Recently I was very saddened to learn of the sudden passing of a terrific baker and person Eric Hanner.  Eric was a frequent contributor on The Fresh Loaf website and he inspired me with his passion for baking and touched a great many people along the way.

His willingness to share his vast baking experiences and cooking expertise as well photography pointers left an unforgettable mark on all that came in contact with him.  One of Eric's favorite recipes was his Jewish Rye which goes great with his homemade pastrami.  I had a spirited conversation with Eric regarding our pastrami passion and  I couldn't wait to try his pastrami after I had baked his famous rye.

In tribute to Eric I offer my own inspired Jewish Rye (I'm Jewish...therefore it's a Jewish Rye :0).  I have not used my yeast water starter in a while so I refreshed it with some oranges due to my apples having gone bad.  I also created a rye sour converting my AP starter in 3 stages including adding sautéed onions in stage 2.  Both starters were finished by bringing them from 100% hydration to 65% hydration.

I also picked up some interesting ale at the local supermarket which was brewed with lemon peels, ginger and honey so naturally I needed to use some in this rye bread.

The final loaf ended up being by far one of the best rye breads I have  made to date.  The onions combined with the 2 starters and the ale made this a wonderfully tasty moist bread perfect for a pastrami or corned beef sandwich or a smear of cream cheese.

Procedure

Yeast Water Starter Build 1

60 grams Pumpernickel  Flour (KAF)

60 grams Yeast Water Starter

Mix the flour and Yeast Water in a bowl until thoroughly combined.  Cover the bowl and let it sit at room temperature for around 6 hours.  The starter should almost double when ready to proceed to build 2.

Build 2

Add ingredients below to starter from above and mix until incorporated.  Cover with plastic wrap and let sit at room temperature for 6 hours.

100 grams Pumpernickel Flour

100 grams Yeast Water

Build 3

Add flour to starter from above and mix until incorporated.  Cover with plastic wrap and let sit at room temperature for 4 hours or until bubbly and either use immediately or put in the refrigerator for the next day.

100 grams Pumpernickel Flour

10 grams Yeast Water

(Note: I made extra starter since I wanted to use this for another bake.  You can cut the amounts down to make the 125 grams needed in the recipe)

Rye Sour Starter Build 1

63 grams AP Starter

63 Pumpernickel Starter

75 grams Water

Mix the flour, starter and water in a bowl until thoroughly combined.  Cover the bowl and let it sit at room temperature for around 4-6 hours.  The starter should almost double when ready to proceed to build 2.

Rye Sour Starter Build 2

100 Pumpernickel Flour

100 grams Water

123 grams Sautéed Onions (sautéed in olive oil)

Mix the flour and water with the sour starter from build 1 along with the onions.  Cover and let sit at room temperature for 4-6 hours until doubled and nice and bubbly.

Rye Sour Starter Build 3

102 grams Pumpernickel Flour

Add the flour to the rye sour from build 2 and let it rest covered for 4-6 hours until bubbly and nearly doubled.

Main Dough Ingredients

300 grams Rye Starter from Above

125 grams Yeast Water Rye Starter from Above

400 grams First Clear Flour (KAF)

80 grams White Rye Flour (KAF)

50 grams Rye Chops (KAF)

30 grams Potato Flour (KAF)

357 grams Tenacious Traveler Shandy Ale

18 grams Seas Salt or Table Salt

8 grams Caraway Seeds

1 Large Egg (for egg wash only)

Procedure

Build your Yeast Water levain and rye sour starter the day before you are ready to bake.

The evening before you want to bake, mix the flours, rye chops, caraway seeds and the ale.  Mix on low-speed in your stand mixer or by hand for about 1 minute until the ingredients are combined.  Let the dough autolyse for about 20 minutes to an hour.

Next add both levains along with the salt and mix for 4 minutes on low.  The dough will come together and be slightly sticky.  Place the dough in a slightly oiled bowl and do a couple of stretch and folds.  Cover the bowl and let it rest for 10-15 minutes.  Do another stretch and fold in the bowl and let it rest another 10-15 minutes.  Do another stretch and fold and let the dough sit out in the covered bowl for another 1.5 hours.  Place the dough in the refrigerator until ready to bake the next day.

When ready to bake take the dough out and leave it covered in your bowl for 1.5 to 2 hours.  Next divide the dough into 2 loaves and either place in a banneton or from into batards and let them rest in floured couches for 1.5 - 2 hours.

About one hour before ready to bake, set your oven for 500 degrees F.and make sure you prepare it for steam.  I have a baking stone on the top shelf and the bottom and use a heavy-duty rimmed baking pan that I pour 1 cup of boiling water into right as I put the loaves into the oven.

Score the loaves as desired and brush each loaf with a simple egg wash using 1 whole egg and a couple of teaspoons of water.

When ready to bake place the loaves into your oven on  your oven stone with steam and lower the temperature immediately to 450 degrees.  It should take around 30 minutes to bake  until the rye breads  are golden brown and reached an internal temperature of 200 - 205 degrees F.

Let the loaves cool down for at least an 2 hours or so before eating as desired.


txfarmer's picture
txfarmer

Sending this to Yeastspotting.

Click here for my blog index.

A couple of years ago, after having posted quite a few blogs on thefreshloaf, I got a private message from a TFL member I never conversed with. His name was Eric, and he wanted to teach me how to improve my photography. Now, this message could've come off as insulting or arrogant, but not when it's from Eric. Eric's sense of generosity, enthusiasm, sincerity, and kindness shines through across virtual world to reach me, who in fact desperately needed exactly that: photograpy 101. (Do you know he actually did teach photography lessons on the side? Multi-talented that man was...)

From there on, he was a kind friend yet a strict teacher. He never shied away from telling me exactly what I was doing wrong, however, he also was always patient, kind, and encouraging. I know I can show him what I have done and hear  his honest opinion without sugar-coating. Without his lessons, I couldn't have had improved so quickly.

Truefully, he taught much more than what I could digest at the time. He knew that, yet he was never frustrated with me. He just smiled whenever a light bulb came on and I emailed him with all CAP letters yelling: NOW I KNOW WHAT YOU MEANT BY ...

Recently he has posted less, but we still exchange emails from time to time. Even though we've never met in person, but I feel he's one of my most repsected teachers and friends. Then the news came and I was in shock and disbelief. 

So, Eric, this one is for you. It's now my favorite too. RIP.

A few notes: Eric's original recipe is here. I have no First Clear Flour on hand, so I used a blend of WW and bread flour. 


GSnyde's picture
GSnyde

I baked five smallish loaves of the wonderful Five-Grain Levain.  Not much to add to my forum post on the subject (http://www.thefreshloaf.com/node/31273/adjusting-bake-time-and-temp-smaller-loaves), except some pictures.

Glenn


varda's picture
varda

Lately I have been baking with flour home-milled from hard red winter wheat from Upinngil Farm in Gill Massachusetts.     I have also been experimenting with sifting the milled flour to achieve different results, and after reading about bolting - see Andy's post and note below - with bolting as well.   My first attempt at bolting using a knee-high nylon didn't go well.   The less said the better.    Then I realized that cheese cloth has a fine mesh and might possibly be well suited for the task at hand.    So I have been playing around with using cheese cloth to bolt fresh milled flour, without much good baking results.   

Today, I came back to it and made another attempt.    I decided to use my regular white starter, rather than working with a whole wheat starter, which adds another layer of complexity.   And also constrained the process by determining that I would only use the Upinngil whole wheat for the final dough.   

I proceeded as follows:  

1.  Mill 514 g of wheat berries at medium setting

2.  Sift with #24 wire strainer

3.  Mill what is caught in the sieve at fine setting

4.  Sift with #30 wire strainer

This process removed 50g of bran.

5.   Place flour on top of a square of cheese cloth and form a bag by folding up corners and securing with a twist tie

6.  Shake, bounce, bump, etc. into a wooden bowl.    (Note this step takes awhile.)

At the end of this process I had 226g of golden flour with only tiny flecks of bran in it, and left in the cheese cloth was 226g of a coarse flour / semolina mix.  

I decided to make two loaves - one with the more refined flour, and one with the less refined flour.  They both came out quite breadlike.

The one with the refined flour was a bit better behaved than the other.

I would say both tasted good with the second loaf with a much more rustic, coarse crumb.

Here are the formulae:


Starter builds


12/7/2012


2:30 PM

9:30 PM

Total

Percent

Seed

29


KAAP

16

47

95

158

95%

Whole Rye

1

3

5

9

5%

Water

12

34

67

113

67%


280

9.7

12/8/2012


Final

Starter

Total

Percent


KAAP


71

71

24%


Whole Rye


4

4

1%


Bolted Upinngil Tier 1

226


226

75%


Water

149

50

199

66%


Salt

5


5

1.7%


Starter

125


25%


505


Factor

0.45


Final

Starter

Total

Percent


KAAP


71

71

22%


WR


4

4

1%


Bolted Upinngil Tier 2

226


226

69%


Med Rye

25


25

8%


Water

182

50

232

71%


Salt

7


7

2.1%


Starter

125


23%


565


Factor

0.45


I mixed the first dough for 10 minutes, and the second for 20.    It was necessary to add a bit of medium rye to the second dough to make it adhere.   I was very worried about over fermenting and proofing these loaves so I erred on the side of under-doing it.    I fermented the first loaf for 2 hours, and the second for 1.5 hours, both with two stretch and folds.   Then proofed each of them for only 45 minutes.   They were baked together at 450F with steam for 20 minutes, and without for 25.  

Note:   Bolting is an old (say 17th century) method of refining flour by passing milled wheat through successively finer and finer cloth mesh tubes.   See for instance http://www.angelfire.com/journal/millbuilder/boulting.html%C2%A0%C2%A0   So technically I have done a hybrid of metal sifting and cloth bolting, as I only have one cloth mesh size.  

[Addendum:  For those of you who think that milling, sifting, and now bolting is too messy, please note that only 13g of flour was missing in action.    I'm sure it will be all cleaned up in the fullness of time. ] 


greedybread's picture
greedybread

The Xmas bread (but also festivals) of Lake Como.

Mataloc is also offered as a dessert………with a bit of mascarpone

This is what we want!!

This bread is chocca block with goodies and not so much butter that its too rich.

Very similar to panettone but the taste is a little different.

This bread needs a serious warning!!

Seriously addictive….

So light, yet not overly sweet, so that you can munch away and OHHHHH its all gone !!

Squisiti!

What do you need? 

The willpower of Job not to eat it all……………..by yourself…………

You will need to allow time to make this…. best start at night as it needs overnight 1st proving or at least 8-10 hours to rest.

So without further ado…

LETS GET YEASTY!! VERY MUCH SO TODAY!!


Ready for first rise…

For Pre- Ferment:

2tsp of dried yeast

Half a cup of warm water

Half a cup of Strong bakers flour

For dough:

Half a tsp of yeast

1 tbsp honey

1/4 cup of warm water

1 cup castor sugar

3 large eggs

3 cups of Strong bakers flour

Pinch of salt

2 tsp fennel( or anise) seeds

Grated zest of 2 oranges

Grated zest of 2 lemons

160g butter

chopped and flour dusted fruit and nuts


Fruit/ nut mix:

1 cup hazelnuts

1 cup pecans ( i prefer but you can use walnuts)

4 dried figs chopped

1 large cup raisins

1 tbsp flour


After first rise


Stir yeast (pre ferment) into warm water and leave 15 minutes until creamy.

Add flour and mix well, cover and let stand for an hour.

Place in mixing bowl, 2nd amount of yeast, with water and honey.

Allow to stand for 10 minutes until creamy.

Stir in the sugar and eggs, then add in pre ferment.

Add in the zest, fennel, salt and flour.

Mix the butter into dough .

Knead in mixer for 5-6 minutes until smooth but sticky.

Place in a well oiled bowl and cover with gladwrap and leave at room temperature overnight to double in volume.

Ready to add fruit and nuts

Lightly turn out dough on lightly floured area and press out the dough.

Toss fruit and nuts in flour and spread 1/3 of fruit etc on the flattened dough.

Roll up dough and flatten again, repeating the above process until all fruit and nuts are incorporated in the dough.

Allow dough to rest ten minutes in between additions of fruit and nuts.

Adding the yum!!


When all fruit is incorporated, place in well oiled mould.

I use a big casserole dish (see below) I have that happens to have tall sides!!

THE BIG BLUE BEASTIE!!

But I have to say that the only disadvantage to this , is that you can’t hang the cake upside down to cool.

www.thefreshloaf.com

It is so light, you need to hang it to cool so it doesn’t collapse in, which mine did slightly……..BUT my panettone hasn’t as yet:)

Panettone moulds are good.

In fact, I could put them inside my big blue beasty as I do have paper moulds…..

But they need to be WELL GREASED!!

I will use my blue dish to make monster panettone.

Panettone papers/ moulds


Ok, back to recipe…

Cover and allow to rise for 3-4 hours until doubles in size.

Heat oven to 210 celsius and place Mataloc in the oven.

Bake for ten minutes and reduce heat to 190 celsius and cook for another 45-60 minutes.

Remove from the mould and allow to cool on rack or try the hanging method above.

Lovely and golden


As soon as you are able….

Enjoy, Enjoy, Enjoy!!

A lick of mascarpone ?

Have a wedge (or two)


Dont be shy now!!

See the zest and the plump raisins………..

Big bite!


Recipe Adapted from Carol Field’s “The Italian Baker”, 2 Ed, 2011.

loydb's picture
loydb

I'm continuing with the theme of 'corn' this week. This time, I'm starting with a 50/50 mix of Heartland Mill's organic blue and yellow corn. It took me a little time to get the mill dialed in for the coarseness I was after -- and I ended up sifting out roughly 50% of the meal, leaving me with true grits (and a bunch of corn flour for my next loaf of bread).

I had a cup or so of a mixture of onion, hot peppers and garlic left over from making tacos the other night, so I used it as the base for the polenta along with chicken stock and (at the very end) butter and shredded cheddar cheese. After 45 minutes in the oven (stirring every 10 minutes), I had a nice creamy polenta that I served with marinara sauce and sour cream. The rest of the polenta was poured into a baking tray and put in the fridge. I'll grill it up over the next few days as a side dish.

Isand66's picture
Isand66

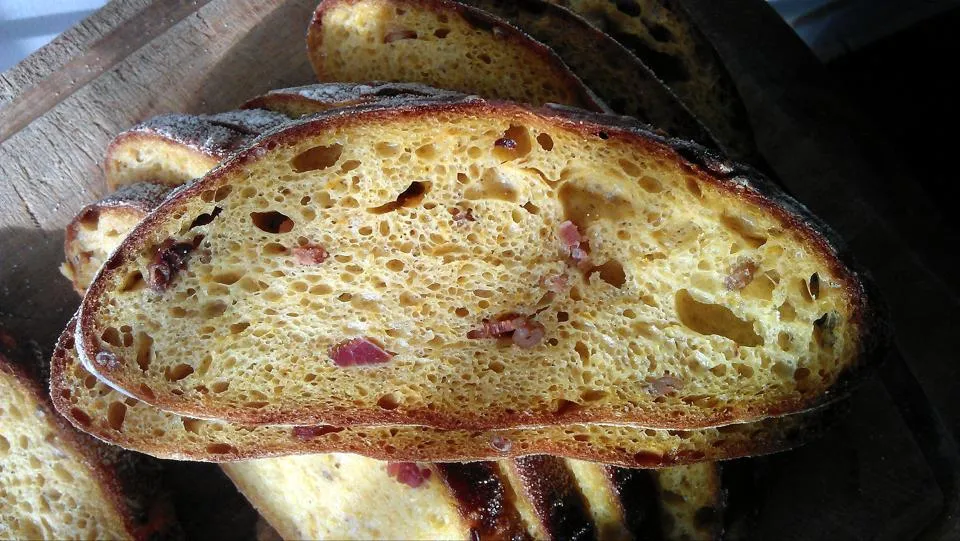
I wanted to make a bread to bring into my new office and my wife had just cooked some bacon for our grilled cheese with bacon sandwiches so naturally I needed to use the left-overs in a bread.  I started out with the Italian Country Bread from Peter Reinhart's BBA book and changed most of the ingredients while adding a few additional as well.

I used my AP starter instead of a biga and I added some maple syrup instead of sugar.  The combination of flours I used along with some cracked wheat and wheat germ turned this into a great rustic bread with a nice chewy crust and open crumb.

My only regret is I didn't double the recipe so I had an extra loaf for myself.  The new office crowd devoured it and commented that I was welcome to bring in additional bread whenever I visited.

Ingredients

453 grams 65% Hydration Starter Refreshed

84 grams First Clear Flour

84 grams Sir Lancelot High Gluten Flour (KAF)

84 grams Durum Flour

28 grams European Style Flour (KAF)

28 grams Potato Flour

24 grams Wheat Germ

16 grams Cracked Wheat

18 grams Olive Oil

18 grams Maple Syrup

226 grams Water at room temperature

11 grams Sea Salt or Table Salt

36 grams Chopped Cooked Bacon (feel free to add more if desired)

Directions

Using your stand mixer or by hand, mix the flours and cracked wheat and wheat germ together with the water and maple syrup for 1 minute just until it starts to come together.  Let the dough autolyse for 20 minutes to an hour.  This will let the flour absorb the water.

Next, add the starter by breaking it up into pieces and mix along with the salt for 3 minutes.  After 3 minutes add the bacon to incorporate it into the dough and mix for 1 more minute.  You should end up with a slightly sticky ball of dough that has started to become smooth.

Remove dough to your lightly floured work surface and need for 1 minute and form a ball.

Leave uncovered for 10 minutes.

Do a stretch and fold and form into a ball again and cover with a clean moist cloth or oiled plastic wrap.

After another 10 minutes do another stretch and fold and put into a lightly oiled bowl that has enough room so the dough can double overnight.

Leave the covered dough in your bowl at room temperature for 2 hours and then put it in your refrigerator overnight or up to 2 days.

When ready to bake the bread, take the bowl out of your refrigerator and let it rest at room temperature for 2 hours.  After 2 hours shape the dough as desired being careful not to handle the dough too roughly so you don't de-gas it.  Place it in your bowl, banneton or shape into baguettes.

Let it sit at room temperature for 2 hours covered with oiled plastic wrap or a wet cloth.

Pre-heat oven with baking stone (I use one on bottom and one on top shelf of my oven), to 500 degrees F.

Slash loaves as desired and place empty pan in bottom shelf of oven.

Pour 1 cup of very hot water into pan and place loaves into oven.

Lower oven to 450 Degrees and bake for 25 - 35 minutes until bread is golden brown and internal temperature reaches 200 degrees.

Let cool on cooling rack for at least 2 hours and enjoy!

I think I have a ghost in my house...or a hungry cat!
Crust and Crumb came out very tasty


Pages

Subscribe to RSS - blogs