The Fresh Loaf

A Community of Amateur Bakers and Artisan Bread Enthusiasts.

Blogs

loydb's picture
loydb

Saturday was pickup day for Pioneer Valley's grain CSA. I am really impressed with the variety and quality of the grains and beans we got. I'll do a more extensive post on what we got later, but here's the first cooking effort. I used the same recipe from my blue corn cornbread entry, using Red Llamas Wheat and Mandan Bride Corn.

The Bride Corn kernels were so big that my mill had a hard time 'grabbing' them and pulling them into the stone. I ended up having to mill it twice -- the first time with the outer wheel very loose to get a coarse, rough grind, and then a second pass at a finer setting. It was a pain in the butt, but it worked.

The flavor of the final product was superb, I paired the bread with a berebere-rubbed pot roast with yams and carrots.

greedybread's picture
greedybread

That’s if they make it that long.

Luckily I made these in the afternoon and they are going to be our burger buns…

Should I have said ” Oooouch man?’

I was trying to remember what Oor Wullie said….
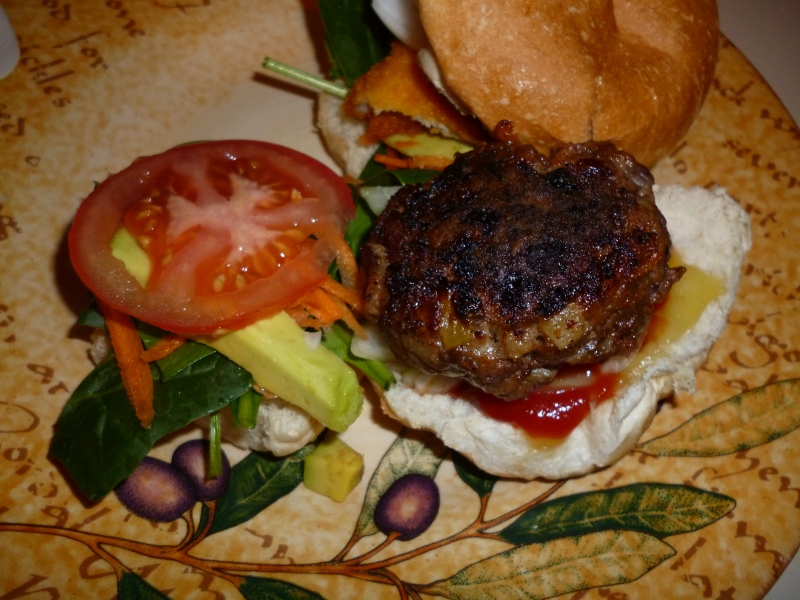
Kiwiburger…

Greedy fingers will be looking at pinching buns until dinner!! but if they do…. they will be starving at dinner…

A lovely simple recipe to make and relatively fast in the yeasty beasty world. 

You could even make the dough the night before, prove and shape them, retard it overnight and then take them out of the fridge about 3 pm (or get children to do when they get home from school).

They will be ready when you get home between 5-6 pm,  to pop straight into the oven.

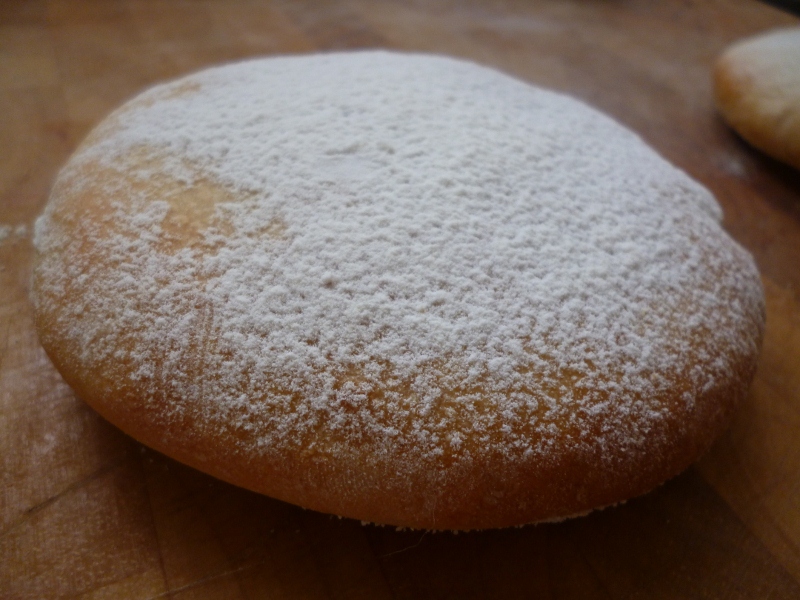
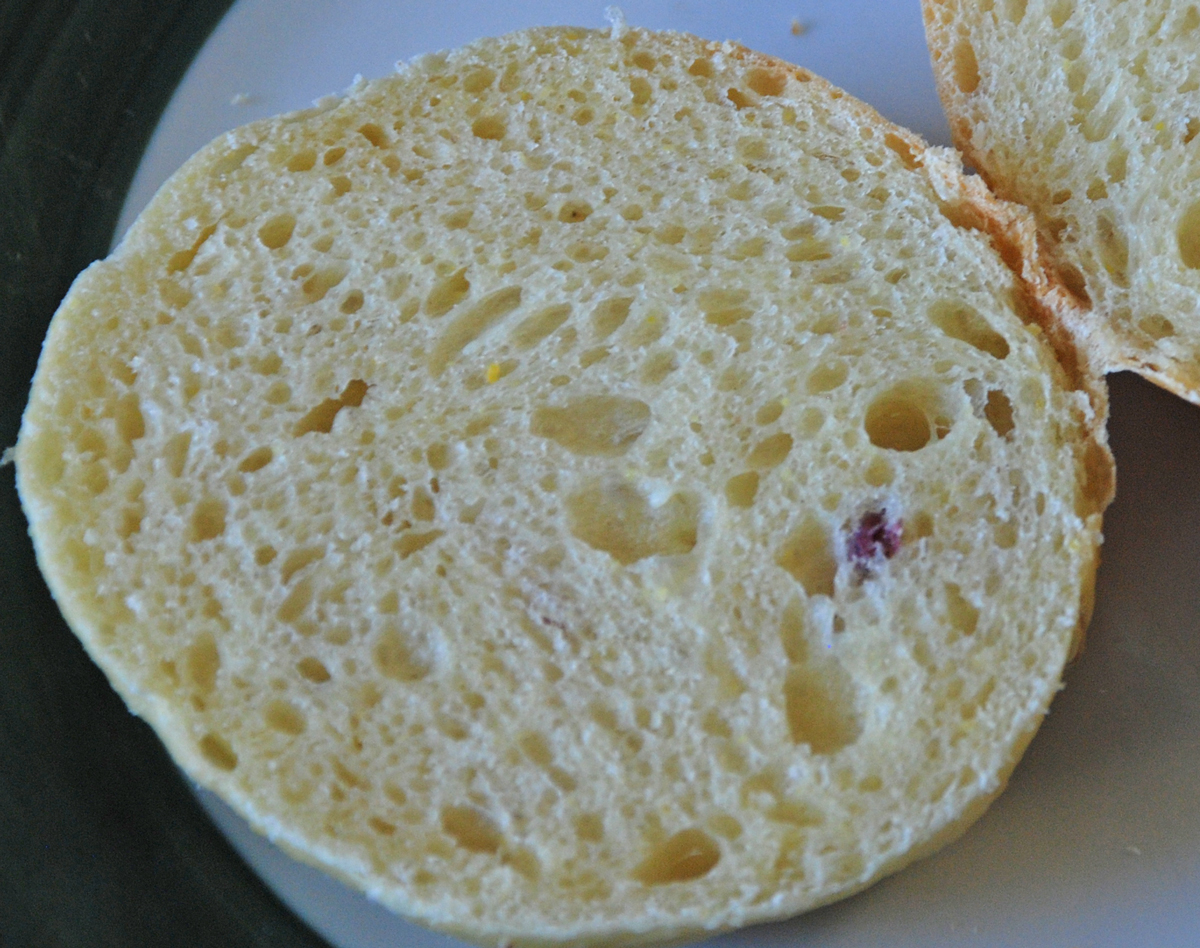
Bap fresh from the oven..

These are best eaten the day of making but still ok the next day….

But they are not called morning rolls for nothing:)

These baps are special as I could not find my pastry brush soooooo…..

I used one of my Bobbi Brown make up (never used) brushes as a pastry brush:)

No other bap can say it is so privileged.

I am sure Bobbi would cringe but would know it was all in a good cause.

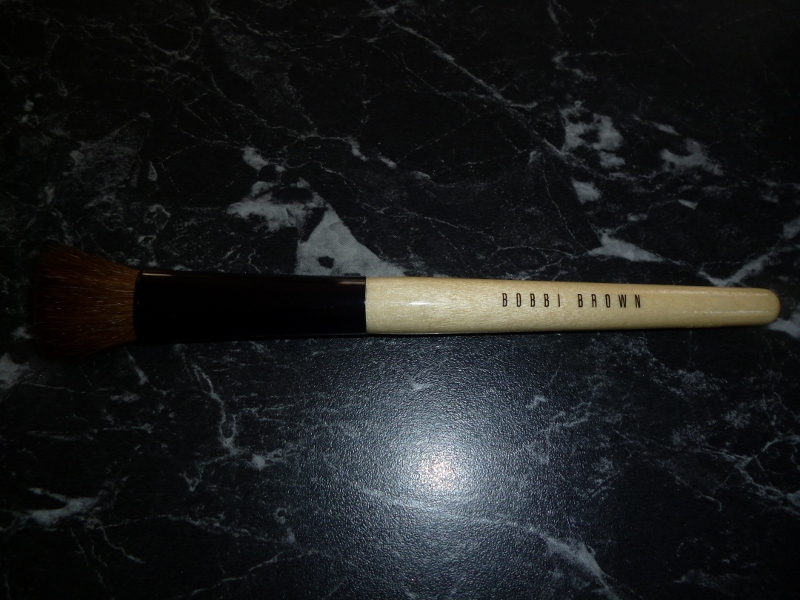
Shhh, don’t tell Bobbi!

So let’s get yeasty!!

What will you need?

3/4 cup of warm milk

3/4 cup of warm water

2 tsp sugar

4 cups of Plain flour

Pinch of Salt

17g of dried yeast

Little oil for brushing bowl

Little extra milk for brushing

Extra flour for dusting or durum semolina.

Dough ready to prove..

Warm milk and water and combine together, mix in the sugar and then the dried yeast.

Combine well and allow to become frothy, usually about 10 minutes.

Place all dry ingredients in a mixing bowl and mix through.

Add the wet yeasty mix to the dry, forming a nice dough.

Knead for about 6-8 minutes until smooth and elasticy.

Lightly oil a bowl and place dough in there, cover and allow to prove for 90-120 minutes.

Ready to roll

Turn dough out onto a floured bench/ board.

Cut dough into 10 pieces and roll into balls.

Allow balls to sit for 15 minutes and then roll out into ovals.

Resting

Place ovals on a well floured baking tray, i also used baking paper.

Allow to rise, covered, for 45 minutes.

Pre heat oven to 210 Celsius.

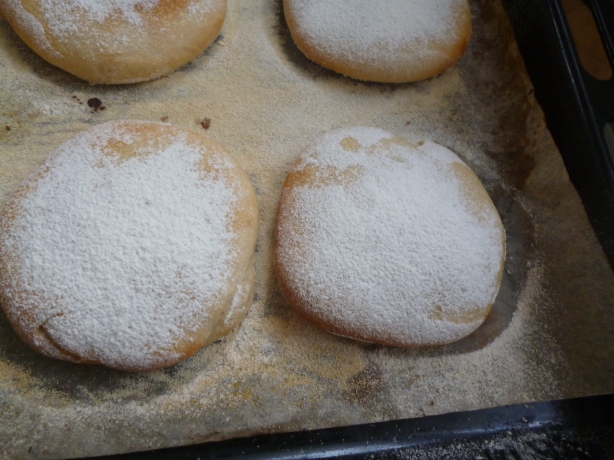
Brush baps with milk and then dust with flour or as I did with 2 of them , durum semolina.

Ovals before proving

After proving and dusted

Place in oven and bake for 20 minutes.

Do not over bake as you want them to remain soft.
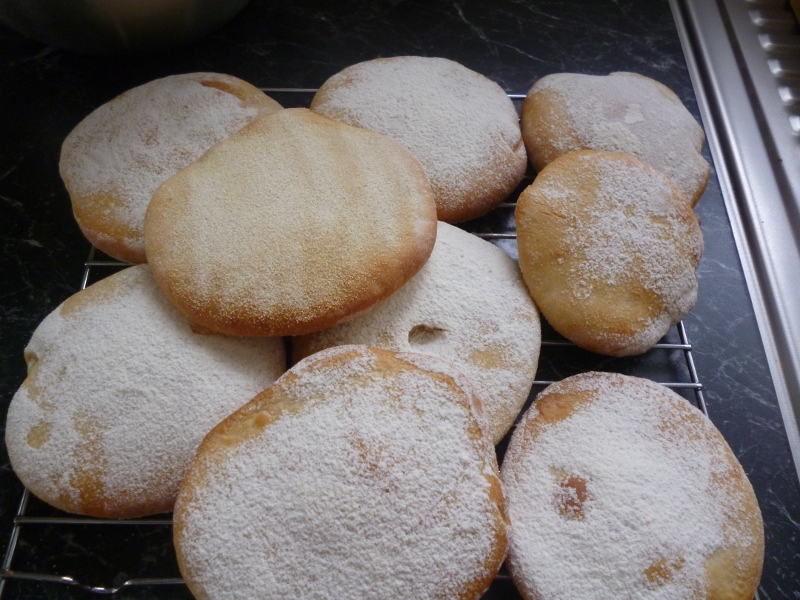
Cooling…

Remove from the oven and allow to cool on racks.

When cool, slice and enjoy stuffing them with bacon, egg, cheese and avocado!!

very nice!!

Or coleslaw, pork, bit of apple and cheese..

Roast beef, gravy, onion and cheese…

Hmm bit of a cheese thing going on here..

Just cheese alone with bit of pickle or chutney…

Or with sausage, onion, tomato sauce???


Ready to fill

Few baby baps there!!

ENJOY, ENJOY, ENJOY!!!

My only quibble with the lovely recipe is it says Britsih baps...

Baps have through out time, always been attributed to the Scots.

HA AH HA..Most Scottish people would lynch the Author for that one....

HA ha ha, bake him in a Haggis!!

Scotland is part of the British Isles but they are SCOTTISH...hence so is their baking:)

Yumminess adapted from recipe from http://www.seriouseats.com/recipes/2012/10/traditional-british-baps-recipe.html

fatheralexisp's picture
fatheralexisp

I put my mostly risen bread in the refrigertor for 23 hours to let it ferment and develop sourness.  But to no avail.  My bread was bland and not sour at all.  I have tasted my starter 12 hours and 24 hours after feeding and it has a complex and sour taste.  I don't know why this didn't transfer over to my bread.

Franko's picture
Franko

It's around this time of year that I tend to make rye bread of some kind more often than not. For me the flavour and texture of a hearty rye bread helps to dispel at least some of the cold and damp days we have and will continue to have for the next few months here on Vancouver Island.


This latest rye bread started out to be Dan Leader's Light Silesian Rye from his book “Local Breads” which he discovered on a visit to the Czech Republic. After entering his formula into my spreadsheet format to have a better look at it I began tinkering around with it a bit... and then a little bit more...

Well I tinkered so much that in the end I wound up with something quite different from Leader's original formula. My initial intention was to make just a few minor adjustments to it by slightly increasing the rye content, adjusting the salt, and hydration levels, but the more I played with the formula the higher the percentage of rye became. It seems that what I really had in mind was the type of rye bread that has a smooth, and very even cell structure to the crumb, reminiscent of one I had in Prague two summers ago.

That bread was almost certainly a mass produced commercial product which I probably wouldn't find as tasty today as I remember it being then, but in fact the texture of it was what I enjoyed more than anything. The bread was what a street vendor used to stack thick slices of smoky ham on top of, glorious huge hams that had been cooked over the wood fire right next to the stand, then sliced from the bone to order. The bread did such a good job of holding the ham, mustard, pickles and fried onions together in a coherent package as we wandered around Old Town Square, it was really the perfect medium for a big juicy sandwich like that.

 Leader's formula comes in at roughly 18% rye content, and confident this wouldn't give me the texture I wanted it was eventually increased to 68%. With the higher percentage of rye some extra water would be needed to achieve the smooth even crumb I was hoping for so the hydration was bumped to 76% over the original formula's 67%. The commercial yeast included in Leader's formula was turfed in favour of an all rye sour leaven and an addition of non-diastatic malt powder was added for flavour and colour. Since I like seeds in my rye bread, toasted pumpkin seeds were added to the mix along with wee bit of ground caraway to round things out. For a high ratio rye bread like this the procedure would need to change as well, primarily with the bulk ferment and final proof times and temps being warmer and shorter respectively than those for a lighter ratio rye bread. Mixing time went from 10-12 minutes down to 5-6, ample time to develop the gluten in the 32% ratio of bread flour used. Not even close to Mr Leader's formula any more, but I do have him to thank for the inspiration, and for reminding me of the bread and the wonderful sandwich I enjoyed with it that afternoon in Prague.

Although I didn't manage to get exactly the type of smooth and even crumb I'd hoped for, it came fairly close. The flavour is mildly sour, with a pleasant after taste accented by the toasted seeds and hint of caraway. I can't say for sure how much influence the malt had on the flavour but tend to think it contributed to the overall balance of it.

I'm kicking myself now for not putting a ham in the smoker to have with this loaf but I'll make do with some smoked ham from the deli and make a note to self for next time.

Link to spreadsheet *here*

Link to procedure *here*

Cheers,

Franko


pmccool's picture
pmccool

While there has been some baking going on here, most of it has been very pedestrian; basic stuff like sandwich breads and pain au levain.  With our kids and their kids coming home for the Thanksgiving weekend, an opportunity arose to inject some variety.  On the day before Thanksgiving, I made 2 dozen oat-wheat pan rolls.  On the morning of Thanksgiving, I made cloverleaf rolls.  

The treat there was that my just-turning-4-years-old granddaughter, who is very much interested in helping in the kitchen, asked to be involved in the process.  So, Grandpa got some help from Miss Carmen.  She helped with the early stages of mixing.  Later, she assisted with the "smushing" (aka: kneading) of the dough.  Then she helped with shaping the rolls.  The pictures, regretably, have vanished.

It wasn't long before rolling simple balls of dough for the cloverleafs became boring.  So she switched to making carrots.  Although a bit blunt and rather crooked, they did indeed look like rather stumpy carrots.  She was quite pleased with the effect.  The photographer, sadly, did not record this variation; she was probably distracted by Younger Brother.  Grandmas tend to be easily distracted by grandchildren, especially by 2-year-olds with huge brown eyes.  Carmen was delighted with the outcome and made sure to ask for a carrot roll with her meal.

Grandpa is still bemused by the way that much help resulted in more work to be done.  Even so, it was lots of fun.

Paul

greedybread's picture
greedybread

Time for some of the FAMOUS Irish soda bread!!

I have been meaning to make it for ever but keep finding other things to distract me...

All equally delicious and I can't say no!!

This is a fruity one, given my pennant for fruity breads:) but you could easily make it plain .

Irish Soda bread

There is as you can imagine, hundreds of recipes and variations...

Now we could argue semantics and say this is not bread as it has no yeast in it .

However we all know that there are many breads with no raising agents in it...not even baking powder...

Plus I am NOT going to argue with hundreds of years of tradition:)

Cooling....

So without further ado...You will need.....

3 & 1/2 cups of Pure flour

1 tbsp salt

2 tbsp baking powder

1 tsp baking soda

50 g melted butter

1 & 1/2 cups of raisins

2 tsp of carraway seeds

1 cup sugar

2 eggs

2 cups of buttermilk

Brush with BUTTER and bake!!

What do you do?

Pre heat oven to 175 Celsius.

If you have a big high sided frypan (skillet) then grease it well.

If you have a good, well used  & heavy skillet/frypan, you won't need to paper it.

I used a charlotte tin, greased and lined with baking paper.

Slice while still warm

Combine flour, salt, caraway seeds, baking powder, sugar and baking soda.

In a separate bowl, beat eggs and add in buttermilk.

Combine altogether, don't over mix this!!

Melt butter and leave a little aside to brush on the top of the batter at the end.

Put raisins and melted butter in the batter and quickly mix through.

Place batter in the tin/ skillet , gently brush the top and place in the oven.

Bake for 50-60 minutes and remove from oven.

It will be quite a deep brown.

Allow to cool in the tin for ten minutes and then place on a rack.

Mmmm, nice alone or with apple and cheese
yummmmm, pint of beer and piece of soda bread..
bit of cheese and apple...
Take a bite...
tasty....
have a piece or slice...

Recipe of gorgeousness adapted from Smitten Kitchen recipe.

http://smittenkitchen.com/blog/2007/03/blasphemous-bread/

P.S. I also made it with my current getting the grain in kick, with one cup of flour omitted and a cup of wholemeal put in....

Just as scrummy and barely noticeable...

A darker color and a slight tangy taste .

Both versions gorgeous with the apple and cheese as suggested!!

HMMMMMM maybe i need to make a beer bread....

dmsnyder's picture
dmsnyder

The latest Baker's Catalogue from King Arthur Flour has a recipe for “Swedish Tea Ring.” I usually just scan these recipes and go on looking for new toys, but this one caught my eye. The sub-caption described it as a “decadent cinnamon roll in the shape of a ring,” but the formula seemed the least “decadent” of any pastry I could recall – 3 1/2 cups of flour, 1/4 cup sugar, 1 egg, no shortening! Of course the filling had butter, but still … I thought maybe this was an editing error. I did a quick internet search for other Swedish Tea Ring recipes. They all had butter or oil or lard. I checked the KAF web site and found the recipe there to be just like in the Baker's Catalogue. The dough is a very simple enriched yeast dough, without any of the commonly added flavorings (citrus extract, vanilla, cardamom, etc.). That was another point in its favor, since my wife doesn't like cardamom much at all.

Well, the boys and girls at KAF generally know what they are doing, at least in the bakery. So, I figured I had to know if this was any good. If it was, I would have a (relatively) low-calorie sweet dough in my repertoire and less reluctance to bake breakfast sweet rolls, which both my wife and I do enjoy having.

The recipe for “Swedish Tea Ring” can be found here with versions for volume, English and metric ingredient measurements: Swedish Tea Ring

There were some luke warm reviews of the recipe on the KAF site, noting that the amount of filling was not sufficient and that the pastry was dry. Other reviews were more positive. I experienced a spousal veto of doubling the filling, but decided to watch the pastry carefully while it was baking and shorten the bake time, if the ring looked like it was done sooner than the recipe specified. In short, I followed the KAF recipe, except I omitted the optional glazing and ended up baking for just 22 rather than 25 minutes.


We tasted the tea ring for desert after dinner, and it is very good. The dough is sweet but not too sweet and is tender. We did not find it dry, but note that I did reduce the baking time. The filling did seem sparse when I spread it. I will increase it by 50% when I make this again. But the overall flavor balance of dough and filling was very nice. Susan had seconds.

As an added bonus, this dough is the closest I have found yet to the taste and texture of the cheese pockets from Karsh's Bakery I grew up loving and have always wanted to be able to duplicate.

I'm looking forward to making this tea ring again and to using the dough recipe for other pastries. I recommend it … even if you are already skinny.

David

Sumitted to YeastSpotting

Isand66's picture
Isand66

Sorry for the delay in posting but it's been a crazy past couple of weeks.  First we were away for the entire week of Thanksgiving and then as soon as we got home the Monday after I had to drive to PA to start my new job.  I just got home last night after basically being away for 2 weeks so it's nice to sleep in my own bed and see my kitties and my wife of course.

Anyway, below is the post I was writing in North Carolina but never posted since I lost my internet connection.

We made our annual pilgrimage to North Carolina the Saturday before the big day and once we arrived we began the baking preparations.

While my wife was busy making assorted pies and cheesecake plus guacamole I made two different types of rolls.   The first one I baked was a version of my recent Cream Cheese Sourdough bread with some slight modifications including the addition of roasted sweet potatoes.

The end result was a tasty fluffy roll that went perfect with the fried and baked turkeys, mashed potatoes, and other assorted delicious side dishes.

Even though these require a little extra effort with the egg whites, they are worth it and I guarantee you will gobble these up with or without Mr. Turkey!

I have to say the end result was exactly what I was hoping for and more.  The crust is perfect with a nice airy open crumb and the taste is nice and nutty but light.  The malted wheat flakes add a nice element in the crumb as well.

This is a perfect bread for just about anything so I hope you give it a try.

I used my standard 65% AP starter for this recipe.

Directions

AP Starter

227 grams AP Flour

71 grams AP Seed Starter

151 grams Water at Room Temperature (80-90 degrees F.)

Mix ingredients in a bowl until thoroughly combined.  Cover the bowl and let it sit at room temperature for around 8 hours.  The starter should almost double when ready to proceed.  You can either mix in final dough or put in refrigerator for at most 1 day before using.  If your kitchen is warmer than mine which is usually about 70-72 degrees with my air-conditioning you can proceed sooner.

Main Dough Ingredients

425 grams Refreshed AP Starter (65% hydration) from above

150 grams European Style Flour (KAF, you can substitute bread flour with a little whole wheat mixed in)

50 grams Wheat Germ

200 grams French Style Flour (KAF, you can substitute AP flour if necessary)

50 grams Oat Flour (KAF)

50 grams White Rye Flour (KAF)

65 grams Potato Flour

40 grams Malted Wheat Flakes

224 grams Softened Cream Cheese (1 Package)

132 grams Egg Whites (4 large eggs)

25 grams Raspberry Balsamic Vinegar

16 grams Seas Salt or Table Salt

343 grams Water at Room Temperature

Procedure

In the bowl of your mixer using your beater attachment whip the egg whites on the highest speed until stiff peaks are formed.  Set aside while you mix the main dough below.

Mix the flours, and malted wheat flakes and wheat germ with the water in your mixer or by hand for 1 minute.   Next fold in the egg whites by hand and let it rest covered in your bowl for 20-30  minutes.   Next cut the starter into small pieces and add to the flour mixture in the bowl and also add the oil, salt, cream cheese and vinegar.  Mix for 4 minute to incorporate all the ingredients.

Next take the dough out of the bowl and place it in an oiled bowl or container.  Do a stretch and fold and rest the dough uncovered for 20 minutes.  After the rest do another stretch and fold and cover the dough and let it rest for 10 minutes.  Do one more stretch and fold and put the dough into a lightly oiled bowl and let it sit at room temperature covered for 2 hours (if it is already in a bowl just make sure to cover it).   (Note: since this dough is very wet, I did 2 extra stretch and folds in the bowl and one additional one right before putting it in the refrigerator).  After 2 hours you can put the dough into the refrigerator for 24 hours or up to 2 days before baking.    I baked the bread about 24 hours later.

The next day (or when ready to bake) let the dough sit out at room temperature for 2  hours.

Next, form the dough into rolls and put them on a baking sheet and let them rise covered for 2 hours or until they pass the poke test.  Just make sure to not let them over-rise.

When read to bake prepare an egg-wash by beating 1 egg with some water and brush on the rolls.

Set your oven for 500 degrees F. at least 45 minutes before ready to bake.  When ready to bake place the loaves into your on  your oven stone with steam and lower the temperature immediately to 450 degrees.    When the rolls are nice and brown and reached an internal temperature of 200 degrees F. you can remove them from the oven. It should take about 25 minutes for the rolls to finish.

Let the rolls cool down for at least an hour or  so before eating as desired.

greedybread's picture
greedybread

For some reason, I always think of that song when I think of Venice:)

It is one of the most requested songs for Gondaliers to sing ......

Mmmm Veneziana

Yet it is a Neapolitan song.

But this lovely beauty is all Venetian!! It's a Veneziana.

A Venetian version of Pandoro perhaps or a Panettone, as the dough is similar but without the fruits.

Definitely a festival bread and it does take a little effort but WELL worth it.

So shall we get yeasty??

The full story....

You will need!!

STAGE 1:

4 tsps of dried yeast

1/4 cup of sugar

3/4 c warm water

3 egg yolks

2 cups of Strong bakers flour

75 g of softened butter.

Stir the sugar into the warm water and then stir in yeast until dissolved.

Allow to stand for 10 minutes until frothy.

Add in the egg yolks and combine well.

Add in the flour and this should form a soft dough.

Lastly add in butter and combine through the dough well.

Place in a bowl and over tightly and leave for 2 hours.

Lovely top of the Veneziana

STAGE 2:

 1 Tbsp of honey

3 tbsp of warm water

1/2 cup of sugar

3 egg yolks

1 cup plain flour

1 cup Bakers flour

 120g of butter

2 tsp of Vanilla essence

Grated zest of 2 Oranges

Grated zest of 1 lemon

Pinch of Salt.

Stir honey into warmed water, stir in the sugar and egg yolks.

Add this mix to the spongey mix and mix until smooth.

Stir in flour, 1 cup at a time until a soft dough forms.

Stir in the vanilla, zests, butter and salt.

Knead for about 8 minutes or use dough hook for 8 minutes on slow.

The dough should be soft but slightly sticky.

Place dough in lightly oiled bowl, cover and leave to rise for 2 hours.

Veneziana dough...1st rise

Stage 3:

Remove dough from bowl and place on lightly floured surface.

Punch it down and knead lightly for a few minutes.

Cut into half or leave as one monster dough as mine is above.

Place each ball (or single) in a well-greased high sided round cake tin.

Cover and leave for 3 hours.

Preparing the topping for the Veneziana

Stage 4:

For the topping you need:

1/4 cup of almond meal or ground almonds.

12 whole almonds

3/4 cup of granulated sugar

2 egg whites

icing sugar

1/2 cup of coffee crystals(or the Italian sugar pellets if you have them!!)

Pre heat oven to 200 Celsius.

Mix the almond meal and sugar together.

Beat the egg whites until frothy and lightly fold in the almond/ sugar mix.

Spread this on top of the dough (as above)

Place the 12 almonds over the top of the dough.

Sprinkle the coffee crystals and then lightly sift 1/4 of a cup over the top of this.

Topping all on....

Please note, my topping does not have the whole almonds on it as that would have been pushing my luck.

Almond meal, I can sneak in, but those beady eyed boys would not tolerate the whole almonds ...

Place in the oven and bake for 15 minutes and then lower the heat to 175 Celsius and bake for a further 40 minutes.

Possibly less time, 25-30  if you have two smaller loaves.

Remove from oven when golden brown and cool for ten minutes.

Carefully remove from the mold and allow to cool fully before eating.

When it is FINALLY cool, slice a piece and ENJOY, ENJOY , ENJOY!!

http://greedybread.wordpress.com/2012/09/29/who-doesnt-love-o-sole-mio/

Cooling on the rack....
Have a slice or three..

Recipe adapted from the ever wonderful Carol Field's "The Italian Baker" 2ed, 2011.

Wandering Bread's picture
Wandering Bread

Well I started off trying to recreate this great looking white spelt bread from "Tartine Bread Experiment" but I took some twists and turns on the way. It ended up pretty darn good considering there was a whole lot of improvising going on.

Read my hopefully somewhat amusing breakdown at Wandering Bread.

Pages

Subscribe to RSS - blogs