The Fresh Loaf

A Community of Amateur Bakers and Artisan Bread Enthusiasts.

Recent Blog Entries

ehanner's picture
ehanner

Recently we have had a few posts on people having issues getting the No Knead Bread to turn out a wonderful as it should. Jim Lahey has just published a new book called "My Bread" that I thought might be fun to take a look at. It isn't an expensive book at $16.60 and has many variations on his original recipe as well as many popular variations of offerings at the Sullivan Street Bakery.

I thought I would start with the basic formula which is all Bread Flour. It almost came to pass but at the last minute I swapped out 5% of white for rye. I love what a small amount of rye does to a simple white flavor. All of Lahey's formulas call for 400 grams of flour and 300 grams of water and 2% salt. The variable is the yeast which runs from 1-3 grams depending on the additions. The resultant hydration is 75%.

One concern about the KNB process is that the chance of mixing a smooth silky dough with no lumps is diminished by minimal mixing and no kneading. After my initial mix, I went to check the dough after an hour and found many clumps of partially hydrated dough. I know that these clumps will result in inconsistency in the crumb. So, I deviated from the script and did a frissage, (squishing the dough with the heel of your hand while sliding it across the counter) which broke up the clumps. Now I have a smooth cool dough that will set at room temperature for at least 12 hours.

Somewhere along the way, the NKB process took a turn towards what I would call normal breads in that Lahey now wants us to do a second fermentation after a brief shaping. The book calls for flouring a towel and setting the bread in a bowl to "proof". I used a linen lined basket and let it proof for 2 hours.

Interestingly, the procedure calls for the final ferment (proof) to be done seams down and baked seams up. No slashing is called for so the bread expands on the weakness of the bottom seams from shaping. It worked pretty well on the two loaves I have done although I would have liked a better spring.

I baked the loaf in the Lodge Combo Cooker, 15 minutes covered and 15 open at 460F. The internal was just over 203F. I didn't get the wildly open crumb structure that is shown in the book image but it's very appropriate for the bread, and delicious.

There are several very interesting recipes in Chapter Three "Specialties of the House" that are on my to-do list. The Italian Stecca with tomatoes and garlic pressed in the top of a stick. Then the Beyond water section, there are several interesting selections. The carrot bread looks like it would be fun and tasty. It uses home made juice extracted from carrots for hydration. So here is my first crack at the new "My Bread".

Eric

Just a little course corn meal prevents scorching on the bottom.


dmsnyder's picture
dmsnyder

Basic Country Bread from Tartine Bread

Basic Country Bread from Tartine Bread crumb

I made this following the recipe in the book. The whole wheat flour was freshly milled. The bread was delicious.

I always end up with a couple hundred grams of extra levain when I make the Basic Country Bread. I hate throwing it away, so, this week, I made a batch of baguettes with it. The 70% hydration dough was hand mixed and fermented for 2 hours with stretch and folds in the bowl every 30 minutes, then fermented for another 90 minutes with stretch and folds on the board at 45 and 90 minutes. I retarded the dough in bulk overnight. This afternoon, I divided the dough, pre-shaped it and let it rest for an hour. Then, the baguettes were shaped, rolled on wet paper towels then in mixed seeds and proofed en couche for 45 minutes before baking at 450ºF for 20 minutes.

Seeded baguettes

Seeded baguette crumb

The flavor was very much like the Tartine Basic Country Bread except more sour. Very nice.

David

rolls's picture
rolls

Hi everyone, these were incredibly easy to make! I picked up a trick by accident, which lead to a better result in the end. The pan was too big (or so i thought) for the cut rolls when i placed them for their short final prove. I felt the space was too large between each bun. but actually they 'poofed' up so much, it was better that it turned out like that :)

 sorry trying to upload some pics but its not working, will keep trying :)

 okay im trying but the upload keeps failing, apparently its too large, the size, can anyone help me out with this? thanks

GSnyde's picture
GSnyde

Mixed Flowers and Mixed Flours

IMG_2250

Our plum tree blossoms  are gone and it’s leafing out (background of challah pic below).  And Daylight Savings Time stole an hour today.  So it must be Spring (despite the drizzle outdoors).   The baking this weekend followed the dinners.  Roast Chicken calls for Challah.  Fresh Pasta and Lamb Ragu calls for Sourdough.

The Challah bake was just the usual. No experiments.  Maggie Glezer’s recipe is perfect enough.  Always reliable and always delicious.

IMG_2234

IMG_2238

The Sourdough bake involved some tinkering with my “San Francisco Country Sourdough” formula.  It had been a couple months since I’d last played with this part-whole-grain pain au levain.   I upped the percentage of whole wheat to 11%.   I used Central Milling Organic Artisan Baker’s Craft (enriched) white flour.  I baked it into a large batard (one kilo) and two mini-baguettes.

IMG_2244]

IMG_2239

I think the evenness of the crust color on the baguettes may be due, in part to the malted barley flour in the Central Milling Organic Artisan Baker’s Craft flour, and in part to the thorough pre-heating of my oven and stone.   The darker edge of the grigne on the batard shows I forgot to turn the oven down after the loaf went in until I removed Sylvia’s Magic Towel set-up (d’Oh!).

The crumb texture is very nice, moist and medium airy, just as I like it.  It has a good sour flavor.  I let the liquid levain ripen for 16 hours and the dough retarded for about 16 hours.  My sourdough-lovin’ spouse describes her ideal sourdough simply as “fairly- but not super-sour, moist and chewy inside, crispy outside”.  She says this one hit the mark.  One baguette gone already.

IMG_2246

IMG_2251

Here’s the tweaked formula:

San Francisco Country Sourdough (Sourdough Pain de Campagne) version 3-13-11

Yield: Two 750g  Loaves; or Three Mini-Baguettes (235g each) and one 800g Loaf; or One 1000g loaf and two 250g baguettes; or…   

Ingredients

LIQUID-LEVAIN BUILD

100 grams   AP flour

24 grams  Whole Wheat flour

12 grams  Whole rye flour

170 grams   Water, luke warm

28     Mature culture (75% hydration)

FINAL DOUGH (67% hydration, including levain)

640 grams   All-Purpose flour (83%)*

85 grams  Whole wheat flour (11%)**

45 grams   Whole rye flour (6%)

435 grams   Water at room temperature (56%)

17 grams   Salt (2%)

306     Liquid levain  (48%)   

* 3-13 used CM Artisan Baker’s Craft (malted)

** 3-13 used CM Organic Hi-protein fine whole wheat

Directions

1. LIQUID LEVAIN:  Make the final build 12 to 16 hours before the final mix, and let stand in a covered container at about 70°F

2. MIXING: Add all the ingredients to the mixing bowl, including the levain, but not the salt. Mix just until the ingredients are incorporated into a shaggy mass. Correct the hydration as necessary.  Cover the bowl with plastic and let stand for an autolyse phase of 30 to 60 minutes. At the end of the autolyse, sprinkle the salt over the surface of the dough, and finish mixing 5 minutes. The dough should have a medium consistency. 

3. BULK FERMENTATION WITH S&F:  3 hours. Stretch and fold the dough in the bowl twice 30-strokes at 45-minute intervals.  Place dough ball in lightly oiled bowl, and stretch and fold on lightly floured board at 45 minutes.  If the dough has not increased in size by 75% or so, let it go a bit longer.

4. RETARDED BULK FERMENTATION (optional):  After second S&F on board, form dough into ball and then place again in lightly oiled bowl.  Refrigerate 8-20 hours, depending on sourness desired and scheduling convenience.

5. DIVIDING AND SHAPING: [Note: if bulk retarded, let dough come to room temperature for 30-90 minutes before pre-shaping.]  Divide the dough into pieces and pre-shape.  Let sit on board for 30-45 minutes, and then shape into boules or batards or baguettes.

6. PROOFING: Approximately 1.5 to 2.5 hours at 72° F. Ready when poke test dictates.  Pre-heat oven to 500 with steam apparatus in place.

7. BAKING: Slash loaves.  Bake with steam, on stone.  Turn oven to 460 °F after it hits 500F after loading loaves.  Remove steaming apparatus after 12 minutes (10 for baguettes). Bake for 35 to 40 minutes total (for 750g loaves; less for smaller loaves).   Rotate loaves for evenness as necessary.  When done (205 F internal temp), leave loaves on stone with oven door ajar 10 minutes.

Happy Spring!

Glenn


EdY MI's picture
EdY MI

Having some light buckwheat flour in the refrigerator and stone-ground wholemeal rye in the freezer, it was impossible to resist baking a loaf of Karin's buckwheat rye bread. For this first attempt, the spices were omitted. After an overnight fermentation in the refrigerator, a 750 g section of dough was proofed in an oblong banneton and then baked in a preheated Romertopf clay baker. The result did not disappoint.

Light Buckwheat Rye

Crumb

Karin's recipe, even without the inclusion of spices, produced a unique and delicious bread. Many thanks to Karin for her excellent and inspiring post.

Ed

txfarmer's picture
txfarmer


In the past 1.5 months, this is what I have been doing in the kitchen, once, or even two batches every week. I have occasionally made croissants before, however, this time I really want to get the techinques down. My idea of a perfect croissant: golden flaky high on the outside, crisp layers and honeycomb like crumb inside, and of course, buttery rich taste. Using European style butter (Plugra), in TX warm weather, with no professional equipment (no sheeter here!), it's a process that requires patience, thorough understanding for each step, a lot of attention to details, and insane amount of practice. I am nowhere near "perfect" yet, but heading in the right direction, here are some lessons learned in the process.


First, the following are resources that helped me a great deal, many thanks!

1)"Advanced Bread and Pastry". This book has a whole chapter on viennoiserie, the formula I am used is adapted from it. However, the formula and procedures require quite a bit of changes in a home kitchen.

2)Hamelman's formula from here. while I didn't use his ingredient ratios, but his procedure is much more suitable for a home kitchen, comparing to what's in AB&P.

3)Ralph from this thread. The whole thread is helpful, but Ralph's input was extra enlightening to me. I emailed him asking for the formula he uses in the shop. Since his posting was from over a year ago, I really didn't expect a reply, but he did write back! I really appreciate his insight and generosity.

4)Many enlightening posts from TFL, especially andy's post here.


Since I made many mistakes along the way, and learned a lot form each of them, I am writing them all down below. Warning, it's long. I mean looooooooong.


Poolish Croissant (Adapted from AB&P)

*I get about 12 standard sized croissants from each batch, with some small rolls from scraps.


- Poolish

AP flour (KAF AP), 160g

water, 160g

instant yeast, 1/8tsp


1. mix and ferment 12 to 16 hours.

- Final Dough

AP flour (KAF AP), 362g

milk, 135g

sugar, 67g

salt, 10g

osmotolerant instant yeast (SAF gold), 3.55g, 1tsp+1/8tsp

malt, 3.55g (I used a tsp of barley malt syrup)

butter, 22g, softened

poolish, all

roll-in butter, 287g

NOTE 1, there are two poolish croissant formulas from AB&P, one for hand rolling, one for sheeter. The sheeter one has less liquid and less rest time between folding and rolling, the hand rolling one has much more liquid and more rest time. I find drier dough would give a more well defined cleaner crumb structur, but it's harder to rol out; wetter dough would be easier to roll out, but the crumb would be more sticky and less layered. What I try to do is to adjust the liquid amount so that it's dry, but still possible to roll out without messing up the layers. In the end, this amoutn is closer to the sheeter formula (the hand rolling one is way too wet for me), but with a tad more liquid.

NOTE 2, the original formula uses bread flour. As Andy mentions in his post, contrary to conventional belief, croissants need a strong dough to rise well and create layer in the end. Since the formula was meant for machine rolling, it can afford to use BF, however, 10 years of marathon running gave me strong legs, not arms, I had to change it to AP flour, otherwise butter would melt and leak when I struggle with the strong dough. Note that Hamelman's formula I quoted above is meant for home bakers, and it uses AP; while Ralph's formula (which he emailed to me) uses BF, but it's meant for shop production. I have seen recipes that uses mostly, even all, cake flour. It never ends well. The final product is usally small and bread like, with less rise. The crumb structure is not layered. IMO, those recipes are sacraficing the crumb structure for the ease of handling


NOTE3, this is probably the most important lesson in terms of ingredients. The industry standard for rolling in butter is apparently 25% of the dough weight, which comes out to be about 45%of flour weight. Andy says it's about the same over the pond. However, I have found that in a home environment, when the rolling is less even and efficient, more rolling-in butter is needs for a well defined crumb. The less butter to use, the thinner the butter layers are, which means easier for the butter to melt into the dough or leak out. I have increased the roll-in butter ratio to 55% of the flour weight, about 30% of dough weight, which gives me much more consistent good results. I know many have said more butter would cause butter to leak out during final proof or baking - it's simply not true. Butter leakage during proofing is caused by proofing temp being too hight, and butter leakage during baking is caused by under-proofing, neither is related to the amount of roll-in butter. With 55% of roll-in butter, zero butter is leaked during proofing for me, minimal leaks during baking - sometimes none at all.

NOTE4, I use  Plugra European style butter for most of my croissants. Have also used Kerry Gold occasionally. Both taste great. I would suggest to stick to a good European butter, different brand handls a bit differently. My Chinese baking friends can buy "butter sheets" which are 100% butter with high melting point. Those are much easier to handle, but I have not found any here in US, if anyone knows a resouce pelase let me know. In fact if anyone knows why we don't have such a thing here, I am curious to know as well. Those are made in New Zealand and Europe.


1. Mix everything but the rolling butter, knead until gluten starts to form. In my KA mixer, 3min at first speed, 3 min at 3rd speed. The dough is not very smooth, but not sticky. Pat flat and put in fridge for at least 2 hours, or overnight.

NOTE5, some recipes ask for a thorough kneaded dough, some ask for no kneading at all. I think the objective is to have a strong dough with well developed gluten structure AT THE END. All the rolling, folding, even relaxing in the fridge would strengthen gluten, so it's not a good idea to knead the dough too well in the beginning. It will make rolling near impossible (if you don't have a sheeter).


NOTE6, some recipe would ask for some bulk rise time at room temperature. I think it's not suitable for home bakers. Bulk fermentations strengthen the dough, which means one would need to play with knead time, and rolling technique to accomodate the added dough strength. Furthurmore, there are a lot of resting in my procedure because the dough would get too tight or too warm. With a bulk rise, I am risking over fermentating, which would cause the final proof and oven spring to be weak.

2. Cut the roll-in butter into pieces, put between two sheets of plastic or wax paper. Use a rolling pin to tap the butter until it's soft enough to roll, roll between the two sheets until it's a 7.5X7.5inch square. Put in fridge.

NOTE7, this is a good time to learn how your butter behave. How long does it take for it to get soft? How long until it's melty? That's the guideline for later.

3. Roll the dough out until it's double size of the butter sheet, 11X11inch in this case. Tap butter until it's roll-able, and the texture is similar to the dough. put the butter in the middle of the dough as following, fold up dough and seal the butter. Pay attention to corners and edges, you don't want spots where there's no butter.


4. Roll out into a 8X24inch rectangle, do your first fold as following:
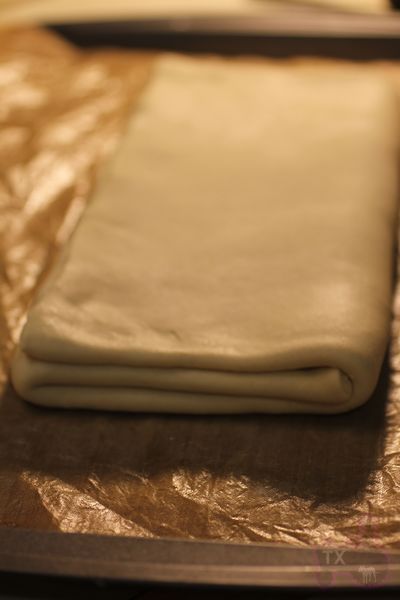
NOTE8, as Ralph emphasized in his posting: don't trap the dough! Before folding, cut the edge off to expose the layers before folding that side into the crease of the dough, that way there's no "extra trapped dough".

NOTE9, even though at this stage, it doesn't seem important to roll the dough out into specified sizes, but you will get better results if you do. The reason is simple: if your dough piece is smaller at this step, you will have to do more rolling in the later steps. Later steps would have more layers of butter, which means it will be harder to roll out evenly. Roll out the dough to the size now.

NOTE10, pay attention to corners and edges. Every imperfection would be magnified 27 times because you are folding 3 times.


5 Put in fridge and rest for 1 hour. Take out dough and repeat the rolling and folding 2 mroe times, which gives 3 folds in total.

NOTE11, I had the misconception that the more folds, the more layers, the flakier it will be. Wrong. With too many folds, butter layers would be thinner and thinner, and it will be more likely for the butter to melt and leak. Even with perfect rolling, too may layers would mean smaller honeycomb "holes" in the crumb. With no sheeter and TX weather, I find 3 folds sufficient, any more it's risky.

NOTE12, 1 hour is "MINIMAL" resting time. I often have rested longer since I was doing something else. There's no harm in resting a bit longer. During final fold, I sometimes have to rest it in the middle in order to roll out to the desired size. Sometimes when it's way too warm (the curse of TX, at one point I was rolling out croissant while hubby was eating watermelon in a tshirt), I would also rest in the middle to avoid butter melting. It's always better to be overly cautious. Allow you self more time than your expect.


6. Put in fridge and rest for at least 90min.Roll out to 9X36inch, 1/8inch thickness.
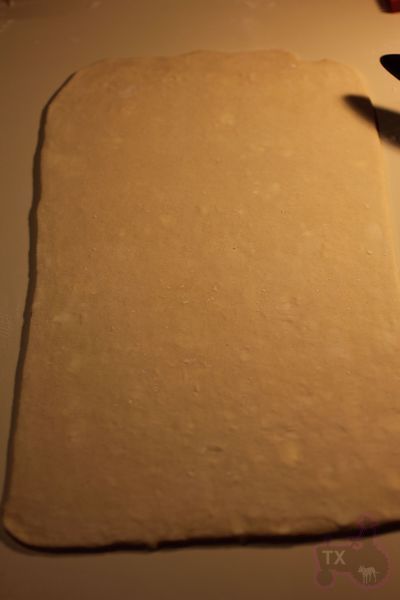
NOTE13, I don't have such a big counter space, niether do I have such a big fridge, so I cut the dough in half, which means I have 2 pieces, each one is 9X18inch.

NOTE14, Rest often. Rest when there's any indication of butter getting too warm, or the dough getting too elasticy. There's no harm in resting too much.

NOTE15, Use enough flour so the dough don't stick.


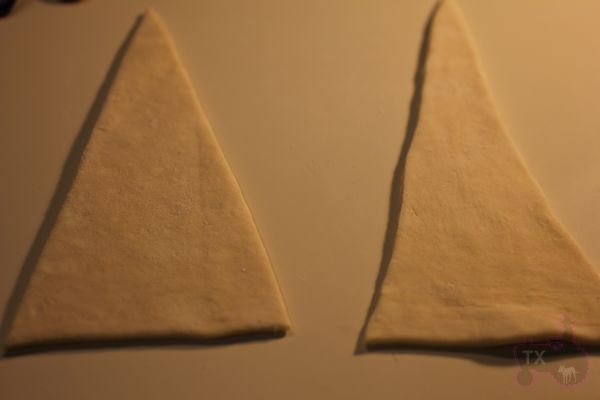
7. Cut into triangles, 4.5inch wide at the base, 9inches tall(the one on the left). Don't hesitate to cut off inperfect edges if you want a pefect crumb. Fridge and rest the triangle pieces, then strech them into 10inch high(the one on the right), this will creat more layers.
 

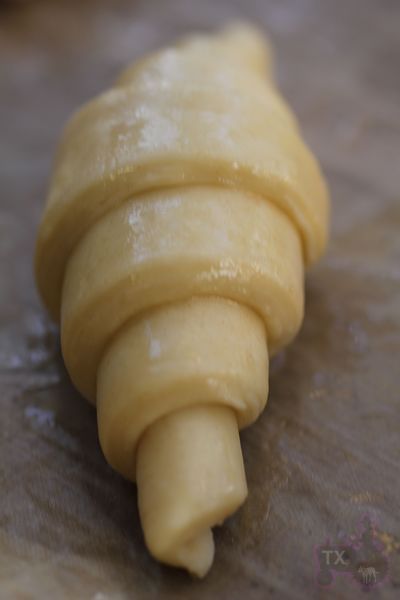
8. Roll up fairly tight, stretch out the tip with one hand when you roll the bottom with the other hand. You should get 3 rolls, and 7 little steps, wich the tip underneath.
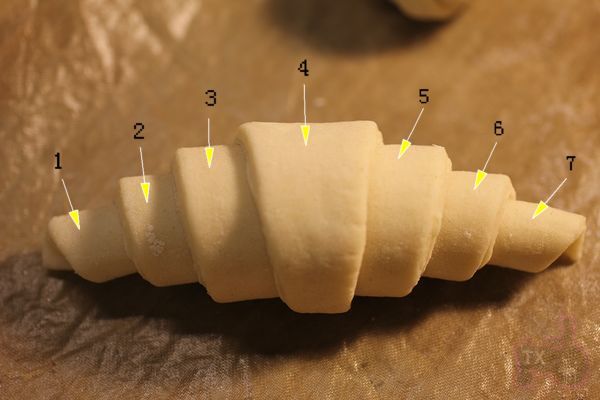
NOTE16, this is the straight shape, if you want a curved shape, you will need to cut a slit in the base before rolling, and roll to the outside as you start from the base. See Hamelman's formual link.


9. At this point, you can proof right away, fridge overnight and proof next day, or freeze (defrost overnight in fridge before proofing). Brush with egg wash (1 egg beaten with 1 TBSP of water), then proof @ about 80F until very soft and jiggly. About 3 hours for me. Brush another layer of egg wash after proofing.
NOTE17, don't proof warmer than 80F, the butter might leak otherwise.

NOTE18, don't under proof, otherwise butter will leak during baking. I have yet to overproof these. They have to be REALLY soft and jiggly. The layers will be very obvious at the end.

NOTE19, the egg wash before proofing would reduce the requirement on proofing humidity.

NOTE20, I have a madeshift proofing box made from foam box, a temperature sensor and control from pet shop, and a light bulb, works great.


10. Bake at 425F for 10min, 375 for 15min.


Honeycomb enough? Not really, but getting there.They should be more well defined, and the wall of each cell should be thinner.
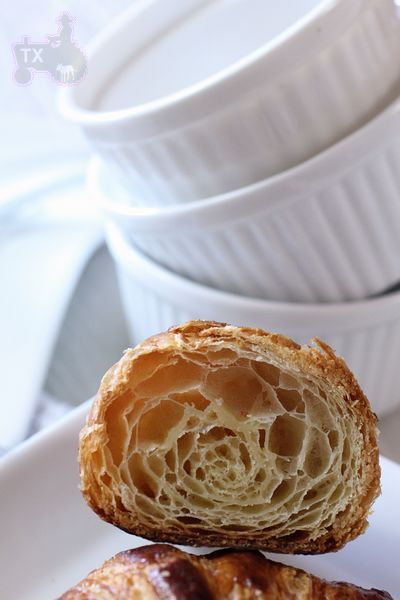
 

For this one, I didn't cut off the imperfect edge before rolling up , which made the center too doughy.


I don't even know whether a "perfect" croissant can be achieved in a home kitchen, especially a warm TX home kitchen, but I will keep trying. In the mean time, my family, friends, and coworkers are loving me for feeding them such delicious breads.


Sending this to Yeastspotting.

Ryan Sandler's picture
Ryan Sandler

Really?  Week 24?  Something like that, anyway.

Ahem.

Yesterday I made yet another batch of Hamelman's Baguettes with Poolish, continuing my baguette quest.  For those of you who have been following along, two weeks ago I made a batch which I didn't get around to blogging about, and last week I was busy on Saturday and forgot to make a poolish for Sunday.  In past weeks, I've gotten good results in crust, crumb and flavor, and decent to excellent grigne, but my scores keep bursting in the oven.  This week I was influenced by the video BelleAZ posted of Cyril Hitz slashing baguettes.  Hitz says in the video that the scores should overlap by a full third of their length, something I don't think I was doing very well, or at least not very consciously.

Ahem.  To the breads!

Exterior

Crumb

Y'know, I think I could be pretty happy with this. It's not perfect.  There's still some bursting, especially on the baguette on the bottom.  But that one just wasn't scored very well in general.  No bulging in between scores like some past weeks. Flavor and mouthfeel were quite good, as they've been for several weeks.  Crust was a little chewy, although I think this has more to do with the fact that the baguettes came out of the oven at noon, rather than later in the after noon.  Longer sitting seems to correlate to chewier crust.  No biggie.

I'm going to stick with this formula a few more weeks (I'd like to try it as two mini-batards or one large batard, just for yucks), but I think this quest is nearing completion.

Happy baking, everyone.

-Ryan

louie brown's picture
louie brown

It seems as if there is no end to the riches of this website. I'm learning things about German breads that will keep me busy for years. Who knew?

Still looking to use up the buckwheat flour I've had around for a while, Karin's loaf looked and sounded awfully good. I made a couple of changes to suit my taste and method, but this is Karin's bread and it is one of the tastiest I've ever baked. The buckwheat and rye, balanced with a little sweetness and spice, is just unbeatable. Recipients gobbled it up right in front of me, not even waiting to take it home.

I eliminated the yeast, only because I am stubborn. To compensate, I increased fermentation and proofing times a little. I used dark rye flour because that's what I had. I used barley malt syrup instead of honey because I'm not crazy for honey in my bread. I cut the anise down to a smidgen, added some ground fennel along with the cardamom. This spice mixture stays nicely in the background, where it is a real contributor without being distinguishable on its own.

I baked it as one loaf about a kilo pre baked weight, with every kind of steam I could think of. It took 35 minutes to finish after 15 minutes of steam.

Not just a keeper, but one to work into the more regular rotation. Thanks, Karin, for the beautiful example, the inspiration, and the lesson.


cranbo's picture
cranbo

Sometimes two + two = five, and you roll with it.

Reading a thread earlier today got me looking at the book "Bread Builders", including a section about about L. sanfranciscensis and dental plaque. Very weird. This got me thinking about some travel show I saw (Bourdain? Zimmern?) I saw a while back, where the host drank chicha somewhere in South America.

Sure, starters get going in all kinds of ways: wholegrain flours, whole fruit, pineapple juice. Now I've been reading with interest about fruit waters lately. 

This got me thinking: what would the outcome be of a chicha-inspired starter?

So goes my experiment:

  • 25g whole wheat flour
  • 25g rye flour
  • 25g spring water

Mix all ingredients until it's a firm dough (50% hydration seemed right). 

Tear off small quail egg sized pieces of starter. Chew each piece for 30-60 seconds...yep. Really was not unpleasant, kinda gummy, but becoming slightly sweeter as I chewed. Place each chewed piece in a small container. 

I let it rest for 2 hours, then added 25g more water and mix to make a 100% starter. Seems to me that 100% hydration starters are more conducive to certain bacterial growth, so this should be interesting. 

Gross? Yes. Interesting? Absolutely.

Day 1: It's been probably 12 hours or so. Not much activity yet. I wonder how different this will be from my usual starter, which was built about 2 years ago using the Silverton organic grape method.

Will the chewing have an effect? As a control, I'm going to do one using the same feeding, the same schedule, but without the chewing. We'll see what happens. 


Pages

Subscribe to Recent Blog Entries