The Fresh Loaf

A Community of Amateur Bakers and Artisan Bread Enthusiasts.

Recent Blog Entries

Mebake's picture
Mebake

I promised my self to give Karin's Spelt Walnut Bread a Try, recipe here, and i finally did yesterday, and i was very satisfied.

i milled My German organic Spelt berries, so iam sure this added extra flavor. As butter milk is hard to come by in Dubai, i replaced Buttermilk in the soaker with yogurt. Next day, the dough come together nicely, was soft extensible and lively. Having learned from other TFL members that Spelt's Gluten is fragile, i mixed briefly, only up to the point where the surface of the dough is smooth and tight.

The Whole spelt also ferments 40% faster than regular whole wheat, so i had to keep an eagle's eye on it. It recieved 40 minutes bulk fermentation, and 35 minutes Final proofing.

It did not spring noticeably in the oven, but slashes opened up quite well. It was in the oven for 15 minutes with steam, and 35 minutes without at 350F.

When i cut into it this morning, it was very soft and aromatic. There was a sweet spicy aroma filling the house even afetr 12 hours of switching the oven off.

I tasted it.. and Boy was i impressed. This is one of thise breads that tastes, looks, and smells heavenly. I thank Karin so much for her recipe, and for her well balanced use of Spices..!

Now, Spelt will never sleep comfortably in my Fridge..

Khalid

GSnyde's picture
GSnyde

A drizzly weekend seemed like a good time to fill the house with the aroma of spices.   It started out with the need to replenish our supply of Cinnamon-Raisin-Walnut Bread, my Number One Bread Fan’s favorite.  Then, I wanted to bake something really special to take to our friends’ new house for a pre-dinner snack and cocktail.   I settled on making a second attempt at the Cheese-Curry-Onion Bread from The Cheese Board Collective’s cookbook.

Cinnamon

IMG_2222

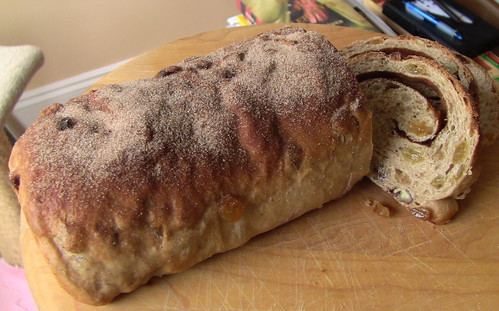
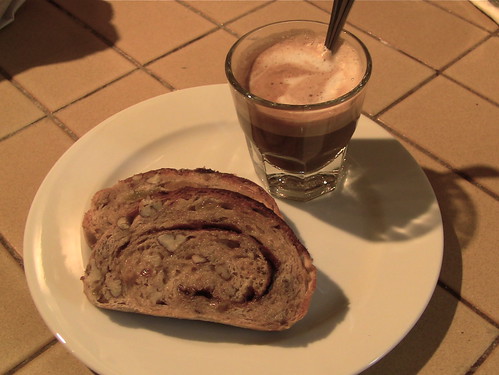
Peter Reinhart’s Cinnamon-Raisin-Walnut Bread may be the bread I’ve baked more times than any other.  It’s a real treat every time.  I usually use a mix of walnuts and pecans, and use butter in place of shortening.  And this time I decided to try it with 25% whole wheat flour, since we’ve been enjoying the flavor of whole grains lately.  Besides, we have declared that whole wheat makes this a health food, so we can eat it even more often without sugar-guilt.

IMG_2223

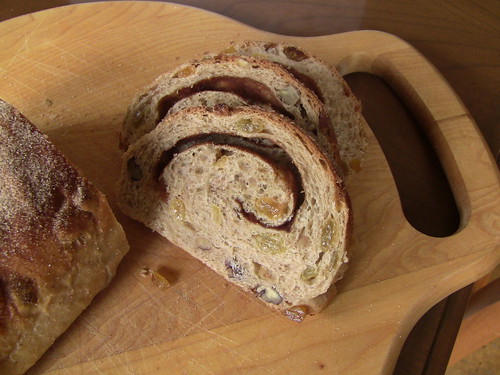
A well-balanced breakfast.

IMG_2232


Curry

IMG_2230

At the beginning of my baking education, I started on sourdough.  The first straight dough bread I made was the Cheese-Onion-Curry Bread from Berkeley’s Cheese Board Collective.  As I reported back in September, it is a bread with very special memories of my gradual school days in the ‘70s.  So when my wife--as if reading my mind-- gave me The Cheese Board Collective Works as a birthday present, I immediately tried to bake a batch of taste memory.  We loved it, and now six months later, I can’t believe I haven’t baked it since.  It was time.

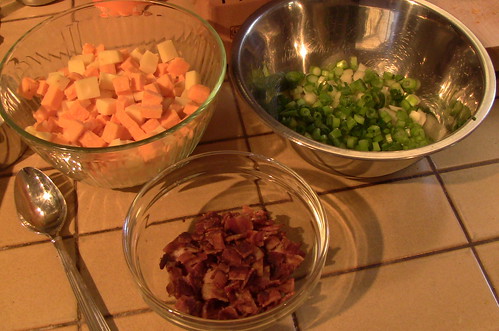
In the interim, I’ve read a lot of recipes here at TFL and elsewhere that use cheese, onions and bacon in various combinations.  They usually make me drool.  I decided to vary the Cheese Board’s recipe a bit.  I used a combination of yellow onions and scallions, and I added some fried bacon (in our house, we call it Vitamin B), since almost everything with cheese and onions is better with bacon.

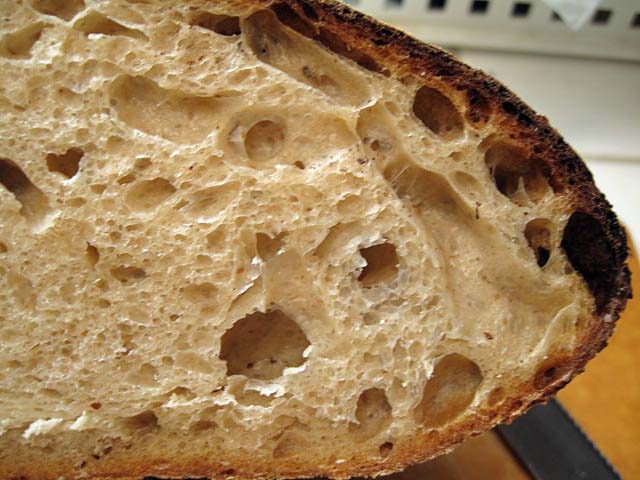
This bread is a complete meal.   You start with a simple yeast bread dough with curry powder and pepper.  Then add onions/scallions, chopped bacon and a full pound of cubed cheese.  I used a combination of Sharp Cheddar, Jarslberg and Gruyere. 

IMG_2214

IMG_2215

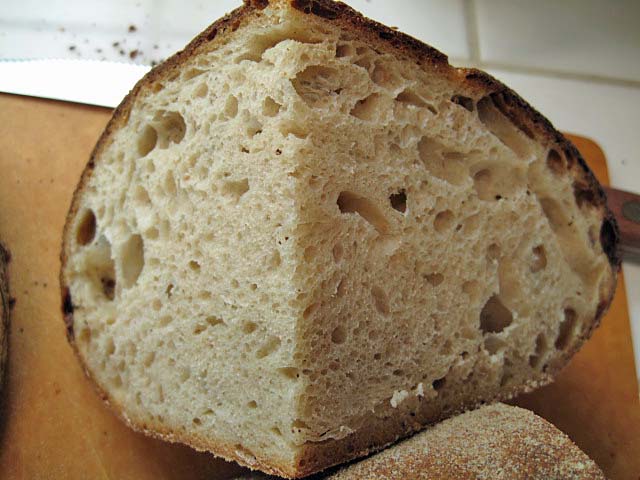
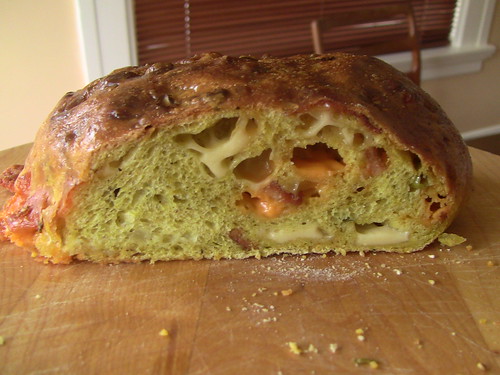
The amount of chunky stuff in the dough makes it impossible to form a smooth-skinned boule, so the loaf flattens out some in baking, but holds together with some luck.  It's not a real pretty bread, but my, my, what flavor!

IMG_2231

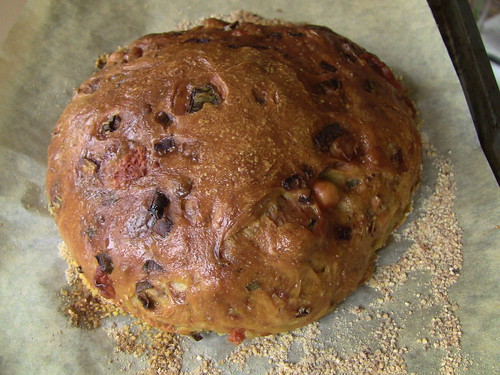
The best part is the pockets of molten cheese interspersed with the strongly cheese and curry flavored moist and tender crumb.  I think the bacon flavor is barely noticeable, but my wife tells me it's there and it's good.  She suggests dialing back the curry a bit so the bacon flavor comes through more.  I may try that.

This is a recipe worth trying if you’re looking for a hearty meal in a loaf.  I highly recommend The Cheese Board Collective Works (http://www.amazon.com/gp/search?index=books&linkCode=qs&keywords=1580084192). It's got lots of recipes for breads and morning baked goods, too.

Here’s my variation on the recipe:

Cheese Scallion Bacon Curry Bread

(adapted from Cheese Onion Curry Bread in The Cheese Board Collective Works)

Ingredients

4 cups  Bread Flour  570g

1 ½ tsp Instant Yeast 5g

1 ½ tsp Black Pepper 3g

1 ½ Tbsp Curry Powder 4g

2 tsp Kosher Salt 12g

1 ¾ cups Lukewarm Water 400 g

6-8 slices Bacon, cooked and chopped

½ yellow onion plus  6 Scallions, chopped

1 pound Mixed Cheeses*, cut into ½ inch cubes 

Medium yellow cornmeal (for sprinkling)

1 Egg, beaten (for glaze)

-------------------

* Any firm flavorful cheeses will do.  I used a combination of sharp cheddar, Jarslberg and Gruyere.  If you don’t want molten pockets of cheese in the bread, you could grate the cheese.


Procedure

In a mixing bowl, combine flour, yeast, pepper, curry powder and salt.  Add water and mix until ingredients well combined.

Transfer to lightly floured board and knead until smooth and silky (10-12 minutes)

In a small bowl, toss onions and scallions with 1/2 Tbsp of flour and mix.

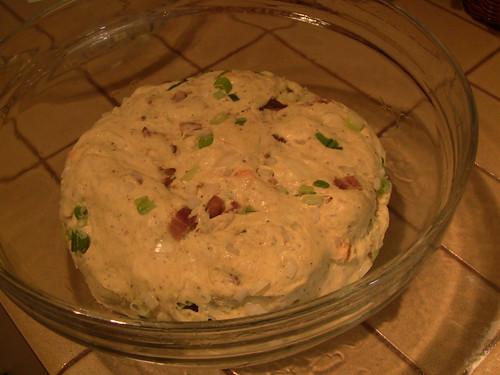
Flatten the dough to a one-inch thick disk and add scallions and bacon to the center.  Gather the dough around the scallions and bacon and knead to incorporate (2-3 minutes).

Again flatten the dough and add cheese in center.  Gather up the dough around the cheese and knead to incorporate.

Form the dough into a ball and place in an oiled bowl large enough for dough to double.  Turn the dough to coat with oil.  Cover the bowl with plastic wrap or a damp cloth.  Let the dough rise until doubled (about 60-90 minutes at room temperature).

Sprinkle cornmeal on two baking pans.

When dough has doubled, place it on a lightly floured board and divide into three equal pieces.  Shape each as a loose boule, cover with a floured dish towel and let rest for 10 minutes. (Note: with the chunks of cheese, there’s no way to get a smooth taut sheath on the loaf.  Don’t sweat it).

Shape each ball into a boule and place on baking pans dusted with corn meal (I used parchment between the pan and the cornmeal).  Cover the loaves with a floured dish towel and let rise until increased in size about 50% (or use poke test).  This takes about 60-75 minutes at room temperature.

Pre-heat oven to 450F.

When loaves are proofed, brush with beaten egg and bake (Note: no need to slash and no need for steam).

After 10 minutes at 450F, lower temperature to 400F.  Rotate baking pans as necessary to achieve even browning.

Bake a total of 35 – 40 minutes or until crust is golden brown and loaf sounds hollow when tapped on the bottom.

Remove loaves to cooling rack.  Eat when not quite cool (45 minutes).

Enjoy!

Glenn


Submitting to Yeastspotting.
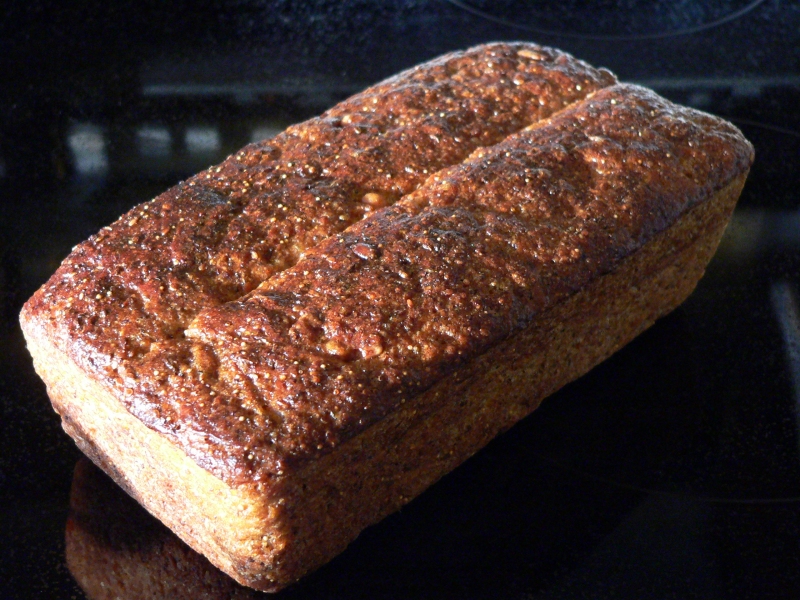
hanseata's picture
hanseata

Dark Buckwheat Rye

During my pregnancy with my son Per, I was very health conscious, studying all kinds of parenting books and magazines on how to provide my firstborn with an optimum of nutrition. As a result I ate buckwheat "porridge" for breakfast every day, for buckwheat is not only high in minerals, like iron and potassium, and full of antioxidants, it's also a good source of protein, and, not only that, it has more Vitamin B than wheat!

It took me a while to get used to its strong and distinctive taste, but after a while I found that I liked my buckwheat cereal, especially since I "softened" it with generous amounts of cream and honey. Seeing buckwheat flour in the supermarket, I remembered my positive experience, and thought that buckwheat might add an interesting flavor to bread. Leafing through my German bread baking books I found a recipe for buckwheat bread, and started experimenting with it.

I tried it with biga, than with sourdough, but the result was never really satisfying. Something was missing, the taste not balanced, "too healthy", or downright sour (with the starter), so I put the recipe away, to work on it another time.

But buckwheat grows right here in Maine, and when I tasted my first Ployes (French Acadian buckwheat pancakes) at the American Folk Festival in Bangor, I decided to revive my quest for a good buckwheat bread.

And this time, adding some spices and a little bit of honey, my buckwheat bread turned out as tasty as I had hoped. "Buckwheat Rye" can be made with white buckwheat flour (Ployes), whole buckwheat, or a combination of both, depending on your preference for a milder or more assertive buckwheat taste.

Light Buckwheat Rye - with 100% light buckwheat flour (ployes) - the other end of the spectrum.

2/3 Light Buckwheat Rye (2/3 light buckwheat + 1/3 dark buckwheat flour)

Medium Buckwheat Rye (half light/half dark buckwheat flour). Only the slashes show a different color from the 2/3 light buckwheat. BUCKWHEAT RYE - BUCHWEIZEN-ROGGENBROT

SOAKER
100 g whole rye flour
200 g buckwheat flour (either all light, or all dark flour, or a combination of white and whole buckwheat flours)
4 g salt
225 g water

FINAL DOUGH
175 g water (lukewarm)
6 g instant yeast
all soaker
295 g bread flour
4 g salt
16 g honey
1 tsp. coriander, ground
½ tsp. anise seeds, ground


DAY 1

In the morning, stir together soaker ingredients, until well hydrated. Cover, and let sit at room temperature.

In the evening, stir together water and instant yeast. Add to other ingredient for final dough, and mix (with paddle attachment) on lowest speed for 1 minute (or by hand). Let dough sit for 5 minutes.

With dough hook (or by hand), knead on medium-low speed, for 2 min. Dough should be very supple and sticky. Continue to mix for 4 min. more. Dough will still be sticky (feels like rye dough)

Transfer dough to floured work surface, and, with wet or oiled hands, stretch and fold dough. Let rest for 10 min, and repeat S & F 3 more times (total time 40 minutes). Gather dough into a ball, place in a lightly oiled bowl, cover, and refrigerate overnight.


DAY 2

Remove dough from refrigerator 2 hrs. before using.

Preheat oven to 475 F/250 C, including steam pan. Divide dough in 2 equal pieces. Shape 2 boules, and proof in bannetons (seam side up) or on parchment lined baking sheet (seam side down), for ca. 45 - 60 minutes, or until grown to 1 1/2 times their original size. (I proofed it on the baking sheet and sprinkled it with flour, so that the cross slashing would really show).

Score breads crosswise. Bake at 400 F/200 C, steaming with 1 cup of boiling water. After for 15 minutes, rotate loaves 180 degrees, remove steam pan and continue baking for another 15 minutes (internal temperature at least 200 F/93 C, and bread should sound hollow when thumped on bottom).

Let breads cool on wire rack.                                                                     
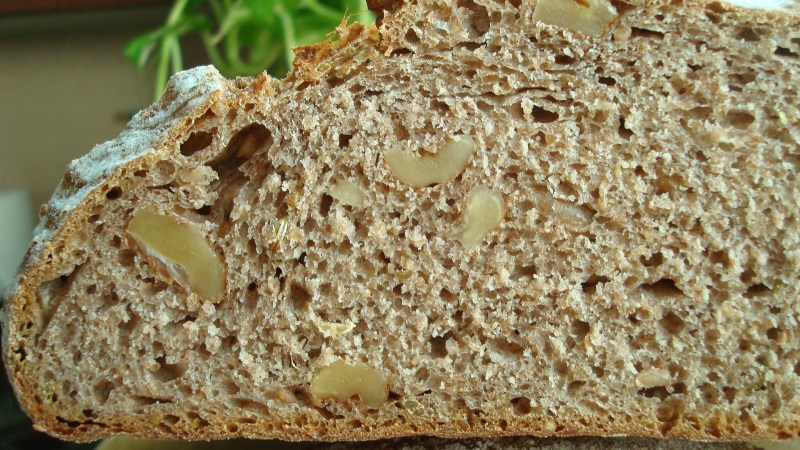
Light Buckwheat Rye, made with all light buckwheat flour (Ployes) is much airier than the darker breads.2/3 Light Buckwheat Rye has still a rather open crumb.Medium Buckwheat Rye Crumb (1/2 dark and 1/2 white buckwheat flour) looks nearly as dark as Dark Buckwheat Rye.
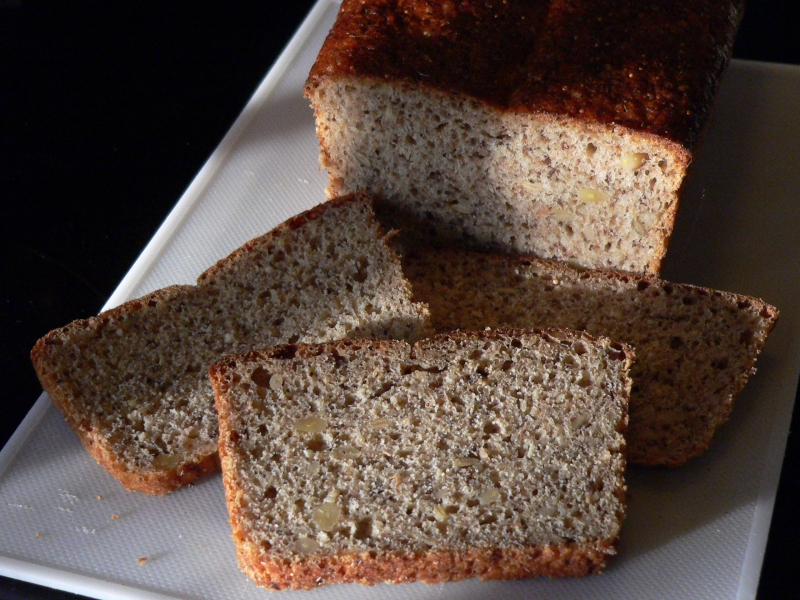
Dark Buckwheat Rye crumb.(Updated 8/4/11
RonRay's picture
RonRay

No-Knead Multigrain Seed and Nut Loaf

A previous blog:

http://www.thefreshloaf.com/node/20460/banana-saga-%E9%95%B7%E7%AF%87%E6%95%85%E4%BA%8B

Last December a posting by Jaydot caught my interest http://www.thefreshloaf.com/node/21186/huge-amount-seeds-and-sugar
Her sister in law had brought a recipe back from South Africa, which seem a bit strange.

Mini Oven suggested it might be South African Seed Bread, while PmcCool suggested it could be a variation on the Cape Seed Loaf.

After I spent some time seeing what Google had to offer on these subjects I concluded the two things they all had in common was a lot of seeds and no sourdough in sight. It seemed like a fun formula to play with, so I set out trying to come up with a reasonable sourdough version of a seed loaf.

By the end of February, I had a reasonably satisfactory loaf - on my fifth try. When I compared notes with Jaydot, I found that she had independently gotten a loaf that her sister in law found acceptable as well.

I picked up her use of caraway seed and maple syrup as something I wanted to try. So, I dropped the Chia seed and brown sugar I had used, and added her idea of maple syrup and caraway seed. Both proved their worth in the eating of my version number 6.

Number Six had nine (9) types of seed, two (2) types of nuts; six (6) types of flour plus maple syrup and toasted sesame seed oil. I was afraid to calculate the calorie count, but I am certain a person could gain weight on a diet of this bread and water, alone.

The loaf was 718 grams going into the oven and 665 grams at the time it came out of the oven. The instant internal temperature reading was 209ºF (98ºC).

The crumb was as nice, if not better, than the previous version 5 and both v-5 and v-6 were by far the best of the six loaves tested thus far. Texture wise, I feel the better crumb is due to the minimal kneading. The first 4 test loaves were all kneaded gently, but in a rather normal letter fold method common to most of my loaves. I felt that the extremely high nut and seed content did more damage to the gluten during kneading than could be offset by any benefits gained. So, in both v-5 and v-6, I basically switched to a no-knead method, and it seems to have made a major improvement in the openness of the crumb.


All six versions had excellent keeping properties, when kept at room temperature in a simple a bread box.

The sourdough was a 3 build levain using KAF AP flour, and was a baker's 94.2%.


The final rise for this loaf was 7 hours in a proof box at 82ºF( 27.8ºC). By that point it was pressing tightly against the FSFilm. I removed the FSFilm, scored top with 1 whole length center scoring. Bread pan place in a Turkey Pan. The bread pan was elevated from direct bottom contact by two SS knives.

The oven stones were removed from the cold oven. One cup of water was brought to a boil and the boiling water then poured into bottom of the turkey pan and the lid placed on at once, and the turkey pan and its contents were all placed in the cold oven on the lowest rack position. The oven was set to 450ºF (232º C).

With this fabricated "Dutch Oven" - formed from the turkey pan - resting at the lowest position, the constant heat of the electric oven's lower element, while raising the oven's internal heat to its highest setting, maintains the bottom of the "Dutch Oven" well above boiling temperature for 15 to 18 minutes. Steam visibly issues from the oven vent from about 3 minutes into the baking until about 18 minutes.

At 20 minutes, the Dutch Oven's lid was removed, oven heat set to 400ºF (204º C) for the balance of the baking, and the oven door held open by about 1/2" (12 mm) to vent any steam during the remaining 25 minutes of the baking. At the end of the total 45 minute baking, the oven was turned off and the loaf removed from both oven and bread pan. The loaf was placed on wire to cool for two hours. Then it was placed in a bread box at room temperature overnight, before being cut.

At this point, I have no ideas on what I may do different when I bake version 7. In fact, I might just repeat making this same formula, before trying any other possible improvements. Perhaps, that will change
but, for the moment, I am satisfied. ;-)

=====Update: March 18, 2011

Version 7 Seed Loaf has a few changes and , to my taste, is even better. A PDF with full details and photos can be seen at this link:

https://docs.google.com/viewer?a=v&pid=explorer&chrome=true&srcid=0B_MScoZfDZkwZDNlNzk3ZjktYmQ3NC00YWZjLWI1MTgtOTg1MmMxNTM1NGZk&hl=en

=====


110307 Next blog:

http://www.thefreshloaf.com/node/22562/sourdough-crackers


Syd's picture
Syd

This is a super soft, highly enriched, labour intensive, Asian-Style Pain de Mie. It involves the 湯種 (tang zhong or water roux) method and took 3 days from beginning to completion.  The original recipe and instructions can be found here.  The recipe makes 2kg of dough.  It filled one, 1kg pullman pan and two 500g pans.  I baked without the lids on because I prefer the rounded tops and I also like a bit of colour on my loaves.  They always look slightly anemic when they come out of those pullman pans. 

Day 1

Water Roux

milk 70g

butter 30g

sugar 3g

salt 1/8 tsp

bread flour 70g

Heat milk, butter, salt and sugar in a saucepan.  Bring to the boil.  Remove from heat.  Dump in flour and stir to a smooth paste.  (A bit like making choux pastry). Cover tightly, allow to cool to room temp and refrigerate for 16 hours.

16 hours later

Tear into small pieces and add:

bread flour 700g

instant yeast 2g

milk 430g

sugar 20g

Knead until it comes together, cover tightly and refrigerate for at least 36 hours but not more than 72 hours.  (I retarded for 48 hours).


Baking Day

Tear it into pieces again and add:


bread flour 300g

Salt 12g

sugar 120g

nstant yeast 5g

milk 100g

whole egg 140g

It will turn into a sloppy mess and if you have a stand mixer it will be better.  I don't, so I just have to make do with slap and fold (a la Bertinet).  It actually comes together pretty quickly. When it has come together add:

butter 100g

Now knead it until your arms cramp up or until you get a windowpane as clear as a gossamer wing (whichever comes first).  Again, a stand mixer would be of great benefit here.  Bench rest 15 - 20 mins.  Shape and place into pans. 

Allow to rise until about 8/10ths full then cover (if you want) and bake.  I baked at 180 C (convection) for 40 mins.  The original author gives temps for an oven that can control both top and bottom thermostats.  My oven isn't that fancy so I just went somewhere in the middle and it worked.  Next time I will bake for 35 mins.  I think my crust was a little on the thick side this time.


Heavenly with marmalade and a cup of Earl Grey.  It tastes good on its own, too.

Syd


dstroy's picture
dstroy

So, it's time for my bi-annual decorated birthday-cake post! Our son turned 9 last weekend and as is our tradition, I made his birthday cake in the theme he selected.

This year, he was super into Greek gods and mythology after having just finished a 5-book series called Percy Jackson and the Olympians. He wanted his cake to have a labyrinth, water and a Trident (because the main character in the series is supposed to be the son of the sea-god Poseidon), the Greek god Pan, a black pegasus, a cyclops, Percy's sword, and a "blue triangle that glows and opens the secret doorway to the labyrinth when pressed by a half-bloods hand. 

Well, that's a tall order! Here then, is the cake that he got:

I used marzepan for the sculptures, some gel icing which I dyed blue for the water, and the rest was the cream cheese icing which we've all become so fond of. The cake was two layer - Devils Food chocolate for the bottom layer, and the top layer was the delicious white cake recipe I used for his sister's rainbow cake with swirls of blue in it because there's stuff in the book series about blue food.

The labyrinth walls were made of fudge icing, and the rocks were chocolate rocks that I found at a cake decorating shop.


The boy was particularly pleased with the detail of skulls and bones scattered in the labyrinth. ;)


I learned that making a horse shape out of Marzepan is really super hard. The flower thingies were there to add stability.


ahahahah... OK I know, I know... Looks like Pan has really been letting himself go lately.

I had no idea how to make a Pan - but doesn't he look pleased with himself?

There ya go - glowing triangle. Age 9 gave us the perfect number of candles to make it happen too.

And there's the birthday boy, with sticky hair, blowing out his candles. (His hair is all funny like that because this year's party was a pie-fight in the back yard. Yes, that's right, a pie fight! Floyd bought 14 pounds of pudding and four super-sized cans of non-dairy whipped cream at the Cash and Carry and the kids made "pies" with the pudding which they ladeled onto kid-hand sized paper plates, adding some whipped cream and sprinkles on top. Then they had fun lobbing them at each other. I think the parents had as much fun watching as the kids did throwing the pies, and then we were blessed with several days of rain afterwards which helped clean up the mess on our lawn - it was a ton of fun!)

dmsnyder's picture
dmsnyder

This weekend, I returned to my roots, tweaked a new favorite and baked a new bread.

When I started baking bread again after a 25 year hiatus, my motive was to make two favorite breads I was unable to obtain locally – Jewish Sour Rye and San Francisco-style Sourdough. My initial achievement of these goals was with the Sour Rye formula from George Greenstein's Secrets of a Jewish Baker and with Peter Reinhart's Sourdough Bread from Crust & Crumb. These remain among my favorite breads.

Yesterday, I baked Greenstein's Jewish Sour Rye. The “authentic” NY-style deli bread is made with a white rye sour and first clear flour. As my taste for heartier rye breads developed, I began using whole rye flour rather than white rye and found I preferred it. For this bake, I used KAF Medium Rye though, and found it a very good.

Greenstein's recipes all use volume measurements. Some time back, I converted a couple of my favorites from his book to weights. (See Sour Rye Bread from George Greenstein's “Secrets of a Jewish Baker”) Although I'm a firm believer in weighing ingredients and do so even when feeding my stock sourdough starter, I have to confess I feed my rye sour by feel. The sour I built for this bake must have been firmer than usual or the medium rye thirstier than the BRM dark rye flour I've been using, because the dough ended up drier than usual. The effect was the cuts opened up much more than they usually do. The loaves were also under-proofed, and they had major bursting.

The flavor of this bread is wonderful. When tasted right after cooling, it was intensely sour. It was less sour on the second day. I believe I'll stick with medium rye for this bread for a while.


The miche we baked during the SFBI Artisan II workshop (This miche is a hit!)  is a new favorite. I've made it four times now, I think, each time with a different flour mix. Today, I picked up on brother Glenn's bakes using half Central Milling's “Organic Type 85” flour and half one of CM's baguette flours. I used CM “Organic Tye 85” flour to build the levain and KAF AP flour for the final dough. This results in 13% high-extraction flour and 87% white flour in the total dough. I scaled the miche to 2 kg for this bake.

I was inspired by Breadsong's scoring of her Teff miche (SFBI Teff Miche - 1.5kg) and attempted to do something similar. I bow to her superior artistry, but I'm not unhappy with my result.

SFBI Miche crumb

SFBI Miche crumb

I left the miche wrapped in baker's linen overnight before slicing. The crust remained crunchy. The crumb was moist. The aroma was quite wheaty. The flavor of the crust was dark and sweet. The crumb was moderately sour but with a complex wheaty, sweet flavor. 

Recall that all the high-extraction flour in this bread was pre-fermented. I really like the effect. The higher ash content results in more active fermentation and acid production, both of which I appreciate. The impact of the Type 85 flour on the flavor profile was greater than one might expect from its 13% presence in the total flour. In the original SFBI formula, the whole wheat flour is also in the levain, and constitutes only 3.33% of the total flour. This bread was very good made entirely with high-extraction flour, but, at least at the moment, I believe I like it best using the original formula. It's a hard call, because all the flour mixes I've used have made delicious breads.


The new bread I baked was the “Vienna Bread” with Dutch Crunch from BBA. The TFL members' bakes of this bread (Latest Bake: Dutch Crunch) really inspired me, especially the rolls, since we planned on making hamburgers for dinner.

Vienna Bread with Dutch Crunch Bâtard

Vienna Bread with Dutch Crunch Rolls

Reinhart's Vienna Bread formula makes a lovely dough, and the Dutch Crunch topping is visually striking on both larger loaves and rolls. I really had no idea how thick to apply the topping, so I “laid it on thick.” From the results, I think I got it about right.

Vienna Bread with Dutch Crunch at start of proofing

Vienna Bread with Dutch Crunch at finish of proofing

Vienna Bread crumb

As advertised, the crust is crunch and slightly sweet. The crumb is very light, delicate and tender with a lovely balanced flavor. The flavor is like brioche but much more subtle. Words like "delicate," and "finesse" come to mind. I anticipate that this will make outstanding toast and French toast. Actually, I think I could just sit down right now and eat the whole loaf as is.

So, would "delicate" and "subtle" bread be your choice for a hamburger bun? No?

Caramelized red onion with balsamic vinegar and roasted New Mexico Green Chile hamburger on Vienna Dutch Crunch roll

David


jombay's picture
jombay

Hey all,

Made my first brioche today and I haven't posted in a while so here it goes.


The formula is from Advanced Bread & Pastry by Suas.

Sponge:

Bread Flour                       100.00%

Water                                65.00%

Instant Yeast                       0.10%

Mix and ferment 12-16 hours at RT.


Final Dough:

Bread Flour                        100.00%

Milk                                      7.00%

Eggs                                   72.00%

Osmotolerant Instant Yeast     1.60% *I used instant yeast but added 30% more

Salt                                       2.60%

Sugar                                   22.00%

Butter                                   65.00%

Sponge                                 54.00%

Mix all except butter until well developed. Add butter gradually until fully mixed.

First fermentation 1 hour

Preshape, rest 30 mins in fridge.

Shape, proof 1.5 hours.

Bake 400f ~15mins.

Very light and tender. Think I'll try txfarmer's 100% butter brioche next time.


Matt

sam's picture
sam

Hello!

As a newbie, I've begun paying a lot more attention to my starter + preferment ripeness levels, timings, keeping a log, etc.  Today I baked a big (for me) single loaf of 3lbs (68% overall hydration, 1/3 of the flour pre-fermented, all white KAF Bread Flour).   Yesterday, I caught both my starter and subsequent levain at just their peak of ripeness, mixed the final dough, and bulk fermented at 50F for about 14 hours.  I intentionally under-mixed the dough in my stand mixer (I did appx 770 revolutions of the dough hook, normally would do mid-900 revolutions), because I wanted to see if the extended time spent in the chiller would complete the development by itself.  After the 14 hours in the chiller, the dough was plenty extensible, but not so much elastic.  I did a couple S&Fs, which brought some elasticity (strength?) to the dough, but I think it was still a little under-developed.  I went ahead with it anyway to see what would happen.  I took the entire 3lb dough and shaped it into a large log / roll, let it rest for 15 mins, scored one long slice, then baked it on my oven baking stone, with 8 seconds of steam, vented after 20 mins.  I initially had the oven at 500F but backed off to 460F and further to 425F, about 45 mins total baking time.  Bread temp was 206F after coming out of the oven, maybe a little low.  I've never baked a single loaf this large before.

The entire downstairs of the house filled with a wonderful aroma of baking sourdough bread.  I think I got a pretty good oven spring, but the crumb isn't the most open in the world.  I only cut it once vertically for the picture -- not going to cut it horizontally to check the crumb because I'm keeping this for eating.  It has a nice sourdough flavor, and good chewing texture.  Will make a perfect dinner bread.  :-)


Next time I will mix a little bit longer, my normal ~950 revolutions.


Anonymous baker's picture
Anonymous baker (not verified)

I just made the best loaf of bread that I've ever made in my whole life! 

For so long now, I've wanted to be able to make bread, and feel happy with what came out of the oven, and in the past I was easily dissuaded.

This loaf is about the 4th one I've made - and only about the 7th one I've ever made in my life, and it - is - gorgeous!

I made a bit of a mistake - I was busy - and it got a bit overdone - but I took (I think Daisy_A's) advice and brushed it with "butter" (margerine) and covered it whilst it was cooling - I was expecting it to be like a rock, but no, it's got a beautiful dark crust that crisps and melts, and the inside is so beautifully soft, I can't believe it. 


Am I getting too carried away by bread? haha I don't care, I love it!

It was a very simple recipe (if I can remember it - I just make it up, I don't weigh anything);

strong flour

milk

1 egg

small amount of olive oil 

demerera sugar 

salt

dried yeast

small amount of honey


I just mixed some warm milk and oil and honey in a pan, and poured it in to a bowl with the yeast, salt and sugar - I left it to bubble - took a while though.

I then mixed more flour in it, and left it alone again 'cos it didn't seem to be working, but apparently I was being impatient. 

It rose nicely, I then mixed in more flour, until it was possible to knead it.

Kneaded it for about 10 minutes or less - left it alone until it had risen again - the rise didn't seem very big - again apparently I was being impatient.

The oven was on for a long time, and was very hot.

I went away - came back a bit later and thought I'd ruined it - let it cool down with the melted margerine on the top, I sprinkled some flour on the top for good luck, and covered it with the tea towel - came back just now 05:30 - I can't sleep - 


and - it - was - gorgeous!


I put some margerine on and some of the honey - and bloody hell it was nice.

I am so very excited to try again soon - next time I wont keep it in for so long - I also want to try a half and half mix, where I bake one half upon the first rise - and then bake the second one after I've "punched" the air out of it then let it rise again, just to see if letting it rise a 2nd time is worth it - Jamie Oliver said it wasn't, but to be fair the recipe I tried from his book tasted s***e.

I've wanted to be good at making bread for so long, I can't believe that I'm getting good at it now, I'm over the moon :D

I can't tell you how happy I am about it! 

:)))))))))))))))))))))))))))))))))))))))))))))))))))))))))))))))))))))))))))))))))))))))))))))))))))))))))))))))))))))))))))))))))))))))))))))

Oh god, I have just imagined eating this bread with my home made chicken soup - which is - a chicken (haha) ginger, garlic, some veg like carrots, potatoes, cabbage, onions, and chilli peppers, salt and pepper............


I need to lye down :)

You know what it is? You all probably make far superior bread to mine, but I can't say how happy I am that I've reached this point - it's encouraging me to keep baking, the more I do it the more I love it.

I wish I could share it with you.

In the near future I'm going to make a video for the beginners so they can be encouraged too.

Pages

Subscribe to Recent Blog Entries