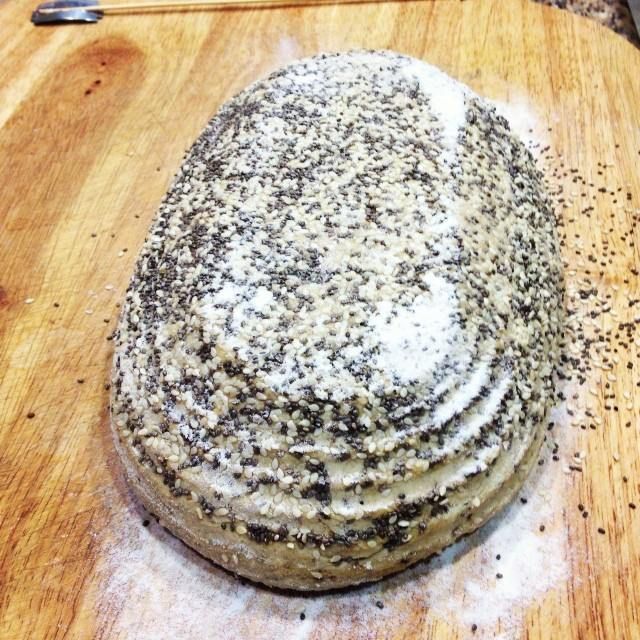
The Fresh Loaf

A Community of Amateur Bakers and Artisan Bread Enthusiasts.

Blogs

Jerrywatts's picture
Jerrywatts

   Hey everyone, I've been on this website for a while and just love the loaves here! I'm from China and I love baking, bread especially. I feel it's time to share some really good bread with you here. I cant just keep taking without giving, right? Anyway, I got this recipe from a Chinese blogger and our family just loved it. Hope you will like it too.

   I made 9 small loaves out of the dough.

High gluten flour:………… 350g

Medium Rye:………… 150g

Salt:………… 8g

Caster sugar:………… 10g

Mature sourdough culture :………… 225g(100% hydration)

Water:………… 300g

Pumpkin seeds:………… 60g

Fig:………… 60g

The recipe originally used walnuts instead of pumpkin seeds but I had run out of walnuts so I just used pumpkin seeds instead. They worked for me. You can use your own combo. Also, the blogger only used 220g water but he didnt state the hydration of his sourdough culture. Using my own sourdough culture, I increased the amount of water to 300g. It was too dry for my dough with only just 220g water.

1.Mix sourdough culture with water, then flour,salt and sugar . Mix well.

2. Mix in the seeds and fig pieces. No need to autolyse or stretch and fold. When I mixed everything together, the dough just came together and I felt the guten was strong enough already.

3. Ferment for about 3 hours at 20°c.

4. Divide the dough into 9 pieces,shape into oblong loaves.

5. Proof until they are 80% proofed.

6.Preheat the oven and bake the bread with steam at 230°c for about 35mins until golden brown.

7. Cool and enjoy!

When it's baked thoroughly, the crust of this bread is wheaty and crusty.

The crumb is full of flavor, bouncy as well.


This bread is definitely worth trying!


dmsnyder's picture
dmsnyder

Powerless Baguettes: Not pretty but quite tasty.

April 10, 2013

A couple days ago, my wife pointedly remarked that there were only two baguettes left in the freezer. This was a fair warning, so I built up a liquid levain and made a batch of SJ SD dough. This afternoon, I divided, pre-shaped, proofed, slashed and loaded 4 baguettes in the oven. The timing was perfect to have them out of the oven in time to get to the farmer's market when it opened and then to enjoy fresh-baked baguette with dinner.

Eight minutes into a planned 20-minute bake, our power went out. The oven is electric. What to do? Well, I removed the steaming skillet as usual at 10 minutes. At 20 minutes, the loaves were browned somewhat, but still pretty pale. I gave them another 7 minutes in the cooling oven, at which point they were still rather pale but had a nice hollow thump and were over 205ºF internally. So, I took them out and let them cool.


The oven spring seemed pretty normal. The bloom was a bit crazy, but I don't know whether that was my scoring or an effect of the cooling oven after the first 8 minutes. The crust was pale and kind of soft, but I can't say the crumb structure suffered.


The crust did have some crispness but was more chewy. The crumb was fully baked. It was chewier than usual. The flavor was excellent – about the same as the last SJ SD Baguette bake, currently featured on the home page. I ate half a loaf with dinner.

David

Noah Erhun's picture
Noah Erhun

Favorite ciabatta recipe so far, apart from the added yeast, which I cut in half increasing the fermentation time. Next time around I'll try to elimiated it complety. 
http://www.farine-mc.com/2009/07/tweaked-ciabatta.html


Levain: equal parts flour, water starter (Ischia). 

Flour 100% (39.6% Caputo 00, 39.6% KAAP, 21% KAWhite WW) 
Water 64.5%
Levain 55% (100% hydration)
Milk 4%
Oil  2.7%
Salt 2.4%
IDY  .3% 

(Final hydration 77.6%)
4 hours @65F bulk, 8 hours in the fridge around 1.5 hours RT in loaves. 
The rounds were baked on a stone covered by a stainless bowl. The free-form Ciabattas were baked without steam...just replaced the oven glass  

Since I don't own a mixer I mixed the dough by hand with some additional stretch and folds. Following Ken Forkish's technique  http://www.youtube.com/watch?v=HoY7CPw0E1s
Excellent flavor with only a slight tang. 

I'm suprsed how well the free-forms turned out considering the lack of steam and being a bit over done. 

-Noah

greedybread's picture
greedybread

Pizza Civitavecchia …Last of the Easter Breads…

Pizza di Pasqua….Pizza Civitavecchia…Pizza di Pasqua…

Lovely….

Tasty!!

Mmmmmm

Too hard!! I can’t choose…

Both are too lovely…

I need to be very greedy and have both…with Pandoro and all my other bready lovelies…

Now this gorgeousness is deceptive.

By the 2nd day, it looked a little dry but it wasn’t, when I ate it, it was lovely, spongey and moist and the aniseed aroma….Divine:)

I am now on day 5 and it is still ok to eat with out toasting but I have been toasting it and having it with greek yoghurt!!

Simply sublime….

Hints of rum, aniseed and the moist ricotta:)

So let us get yeasty beasty as this is the last of the summer breads…err Easter breads!!

Start with the sponge…

Ground the aniseed…

Almost batter like..

rising….

Rising….

What will you need?

A bloody lot of eggs!!:)

For the sponge:

4 tsp of dried yeast

1/2 cup of warm water

3/4 cup of flour.

For the Dough:

3.5 cups of Flour

1/2 cup of castor sugar

Pinch of salt

4 eggs

9 egg yolks!!! (yep- meringues coming up later or almond cookies)

200g ricotta

1/2 cup of rum

3 tbsp of aniseed powder

Grated Zest of 1 lemon

1/2 tsp of cinnamon

250g of butter

rising…

Place dried yeast in the warm water and stir until combined.

Allow to stand and become frothy, usually about 10 minutes.

Add flour and mix in well.

Cover tightly with Gladwrap and allow to stand for an hour and become soupy.

almost ready….

Combine all dry ingredients in a bowl and combine well.

Add the egg yolks and eggs into the yeasty mix, combine well.

Add the ricotta and rum  into the eggy yeast mix, combine until smooth.

Grate zest directly into the dry ingredients to get the oils of the lemon into the mix as well.

Mix well and pour the eggy mix into the dry, forming a dough.

Knead for 6 minutes until golden and springy.

Add in the butter, 30-40g at a time until well combined into the dough.

The dough will be very soft, almost batter like.

Place in a well oiled bowl and rest, well covered for 2 hours.

Place / pour dough when risen into 1 or 2 well greased moulds.

Cover and allow to rise for a further 60-90  minutes until doubled in size.

30 minutes before finishing, pre heat the oven to 200 celsius.

You can brush the top with egg white and sprinkle with sugar pellets if you wish.

Place bread into the oven and bake for 15 minutes, reduce the temperature and bake a further 40 minutes at 175 celsius.

Cover tops of the bread if need be, if they get too brown.

Remove from oven and allow to cool.

Place on a wire rack after 15 minutes to cool fully.

Slice and ENJOY, ENJOY, ENJOY!!

This bread is gorgeously moist but not so delicate as the Pizza di Pasqua.

As Carol Field says ” it has an unusual taste”…

Which it does but its gorgeous, not overly sweet, you could almost have it with cheese but that hint of sweetness is there.

A Fig jam would be divine on it, after toasting…I can verify it is heavenly with greek yoghurt:)

Sit down, have a coffee and Enjoy!!

Adapted from the ever Fabulous Carol Fields “The Italian Baker” 2nd Edition, 2011.


http://greedybread.wordpress.com/2013/04/03/pizza-civitavecchia-last-of-the-easter-breads/


Floydm's picture
Floydm

Every now and then you learn a new technique in the kitchen that really knocks your socks off.  Tangzhong is one of them.

Tangzhong

Tangzhong is the technique of heating a portion of the flour and liquid in your recipe to approximately 65C to make a paste (roux).  At this temperature the flour undergoes a change (gelatinizes?).  Adding this roux to your final dough makes a huge difference in the softness and fluffiness of your final dough.

It is really easy to do a tangzhong.  Take 1 cup of liquid (milk or water) to 1/3 cup flour, or a 5 to 1 liquid to solid ratio (so 250g liquid to 50g flour) and mix it together in a pan.  Heat the pan while stirring constantly.  Initially it will remain a liquid, but as you approach 65C it will undergo a change and thicken to an almost pudding like consistency.  

Once it is evenly thickened, remove from heat and allow to cool down some before making your final dough.  

Reportedly you can cover it and keep it in the fridge for a few days before using it, but I baked with it immediately.

Hokkaido Milk Bread

We have some great Asian bakeries in Vancouver and they all make some version of a Milk Bread.  Soft, slightly sweet, often baked in pullman pans so that the slices are perfectly square, sometimes containing raisins or a swirl of red beans or cream cheese, milk bread is the ultimate comfort food. It has a tenderness I've never reproduced at home until now.  I always figured it was a ton of oil or some other artificial conditioner that gave it that consistency, but now I think Tangzhong and heavy kneading were the secret. 

My recipe is a hybrid of a bunch of different recipes I found online and credit below.  What I offer here is a good place to start but certainly not an authoritative version or one I'd suggest is the best.  Still, it was awfully good.


Tangzhong


1/3 C all purpose flour

1 C liquids (I used 2/3 C water and 1/3 C milk)

Final Dough

800g (around 5 C) all purpose flour

1/2 C sugar

50g (1/2 C) milk powder

1/2 C half and half

3/4 C milk

2 eggs

4 T butter

4 t instant yeast

1 t salt

all of the tangzhong

Combine all the ingredients in a bowl or standmixer and mix the heck out of it, 10 or 15 minutes, until the dough is silky and smooth.  I didn't initially add enough liquid so my dough was quite dry, but by adding more to the bowl and using wet hands I was able to work more milk and water into the dough.  

Once you've kneaded the dough well, cover the bowl and let the dough rise until doubled in size, roughly an hour.

Divide the dough into smaller portions.  I divided it into 8 ~210g pieces, which I baked 4 to a pan in 2 pans.  As you can see, that was a bit much for the pans I have!  Next time I think I'll divide the dough into 12 pieces and bake it in the 3 pans. 

Cover the pans loosely and allow to rise for half an hour, then glaze with milk or an egg wash.

Heat the oven to 350F while letting the loaves rise another 15-30 minutes.  

Baking the loaves at 350F for approximately 40 minutes.  If they are browning too much, you can cover them loosely with foil.

Look at that crumb!  Absolutely the softest, silkiest loaves I've ever made.

Further reading/discussion about Hokkaido Milk Bread and Tang Zhong:

bakingbadly's picture
bakingbadly

Three weeks ago I volunteered to bake bagels for a party. Though, not just ordinary bagels. Sourdough based bagels, with a spicy twist, featuring characteristics of a pretzel---or what I call "pregels".

Visualize this: A doughnut---but not a doughnut---that's as chewy as a bagel, but has a crispy, lustrous, dark brown crust, sparsely topped with coarse sea salt. (I can almost hear bagel purists hollering abomination.)


The first trial (above) was unpleasant. Prior to its consumption, none of my breads had induced retching. (Yes, it was that bad.)

My major mistakes: Too much water was incorporated into the the dough, the parchment paper wasn't coated with enough cornmeal, the dough was overproofed, the (baked) baking soda solution was at the incorrect ratio, and I somehow neglected the fact that I did not own a slotted spoon or strainer. Consequently, I pulled a MacGyver and used a dismantled food steamer filter as a strainer. Clever, isn't it?


The recipe for the first trial pregels was heavily adapted from the Wild Yeast Blog.

Why the heavy adaptation, you ask?

Well, most bagel recipes I've happened upon requires a sturdy mixer---and I don't have a mixer. Second, one of my objectives was to eliminate the tang in my sourdough bagels. Third, it's approaching rainy season where I'm located and the humidity, as well as the temperature, has soared. (For the past several weeks, the average room temperature of my apartment has hovered around 33C  / 91F.)

For these stated reasons, I had to adjust the original recipe. 


Two weeks ago I conducted the second trial. Much, much better, but worst in other respects. In summary, the pregels, amongst other bagels, were underproofed, slightly underspiced, and too chewy.

If you're curious, I taste-tested the following variations: salted and unsalted pregels, (emmental) cheese pregel, plain honey bagel, and seeded honey bagels (topped with poppy and/or sesame seeds).


In terms of baker's percentages, the hydration of the second trial dough was approx. 55 to 56%, whereas the hydration of the first trial dough was 57 to 58%. Such a seemingly minor change in hydration transformed the bagels from moist and tender to very stiff and chewy.


Last Sunday I executed the third trial of the pregels, to be served to the party. Expectedly, I encountered a handful of problems.

Never had I handled and baked over 4kg / 8.8lbs of dough in a single day, and never had I operated a gas oven (based in the hostess' house). Moreover, because the gas oven could only accomodate 4 bagels at a time, due to its small size, I brought along my countertop oven to hasten the process. 

One compact kitchen, two operating ovens, a pot of boiling water, high humidity, and room temperature at above 30C / 86F. Metaphorically speaking, I was a frantic salamander encased in my own sweat.


Sharing the cost of several cheeses as bagel toppings, we purchased and taste-tested the following cheeses: mild cheddar, emmental, gruyere, young gouda, edam, port salut, and cantal jeune. In addition to that, we had Philadelphia cream cheese on hand, homemade honey-peanut butter, Austrian libtauer (spicy cheese spread), French butter, and salami.

Funny thing, as I was tending to the last batch of bagels in the ovens, I instructed members of the party to help themselves and commence eating. What was initially a room filled with chattering became dead silence... for a solid thirty seconds. Enticed by this peculiarity, I peeked out of the kitchen door.

"Zita... This is the best bagel I've ever had."


RECIPE

Makes approx. 32 bagels

Starter:

  • White sourdough starter, 55% hydration [33 g]
  • Water [241 g]
  • All-purpose flour [438 g]

Spice Mix:

  • Caraway seeds
  • Fennel seeds
  • Coriander
  • Black peppercorns

Soaker:

  • All-purpose flour [1,849 g]
  • Medium rye flour [205 g]
  • Vital wheat gluten [82 g]
  • Sea salt [41 g]
  • Spice mix, Lightly ground [12 g]
  • Water, Iced, Strained [1,150 g]
  • 100% pure honey [103 g]

Final Dough:

  • Starter [657 g]
  • Soaker [3,442 g]

Baking Soda Solution:

  • Water [1,500 g]
  • Baking soda, Baked [75 g]

Honey Water Solution:

  • Water [1,500 g]
  • 100% pure honey [20 g]

Topping:

  • Coarse sea salt
  • Poppy seeds
  • White sesame seeds
  • Various cheeses

Instructions:

Caution: Variations in branded products, ingredient amount, room temperature, humidity, altitude, tools and equipment, techniques and methods will affect the outcome of your bagels. Extending the de-chilling or bulk fermentation period is highly advised.

  1. Bake baking soda at 150C / 302F for one hour; store in airtight container
  2. Prepare starter; mix ingredients until combined; rest at above room temperature for 12 hours
  3. Prepare soaker; mix ingredients until combined; chill 10 hours
  4. De-chill soaker; rest at above room temperature for 2 hours
  5. Mix starter and soaker until combined; bulk ferment (rest) 2 hours at above room temperature
  6. Knead dough by hand for 5 minutes; bulk ferment (rest) 2 hours at above room temperature 
  7. Knead dough by hand for 5 minutes; bulk ferment (rest) 2 hours at above room temperature 
  8. Divide dough into 32 equal portions (approx. 125 g each)
  9. Rest 5 minutes to relax gluten, if necessary
  10. Shape dough into bagels; transfer onto cornmeal-dusted parchment paper
  11. Preheat oven at 200C / 392F for 1 hour or more
  12. Proof (rest) 1 hour at above room temperature
  13. Prepare baking soda or honey solution; pour baked soda or honey into boiling water
  14. Boil dough 10 seconds each side; drain 30 seconds on wire rack
  15. Transfer dough to parchment paper
  16. Add topping (excluding cheese)
  17. Bake at 200C / 392F for 30 minutes, rotating at 15 minutes (steaming not necessary)
  18. Add cheese 10 minutes prior to baking completion
  19. Cool for at least 30 minutes on wire rack

If you have any suggestions or feedback on how to improve my recipe, please feel free to post. Thank you in advance and have a jolly baking. :)

Zita 

linder's picture
linder

I finally got around to making Eric's Rye Bread.  I've been wanting to try out this formula ever since I saw it posted here on TFL.  It is a wonderfully fragrant loaf of rye with sourdough, onions and caraway.  I sauteed two medium sized onions in about 2 TBSP of olive oil and added them to the final dough along with all the other ingredients.  The dough smelled sooo good even before it was baked.  The bread is light and fluffy.  I baked the second loaf about 10 minutes more for a total of 50 minutes since it was a 2 lb. boule.  The batard loaf could have stood a little more time in the oven but it still is baked enough in the middle. 

I made this bread to take to a potluck on Thursday.  There will be a hearty soup as part of the potluck so I thought this rye bread would work well.  I'm definitely making this again for us to have with some pastrami and homemade sauerkraut.


Crumb close up

PiPs's picture
PiPs

Today was a big day ... um ... no, it was so much bigger than that ... um ... i'm not even sure if I can put into words the anticipation I have felt for today.

... and all for a tiny little fire that we allowed to burn for only an hour or so.

The black granite stone has been installed at the mouth of the oven and Dennis has constructed a wonderful door from recycled timber (and a bit of high tech ceramic wool and steel)

For the rest of the week we will light small fires everyday and push them around the interior of the oven to further dry the masonry ... then the real fires will begin ...

... then will come bread ...


myself with Dennis the oven builder 


myself with Daryl (the great chef I work with)

Cheers,
Phil 

dabrownman's picture
dabrownman

My apprentice says that sane German bakers don’t usually try to do a pumpernickel style bake of; slowly reducing low temperatures over a long baking time, when baking white bread of any kind.  But, I figured that if professional bakers can call a bread with only 25% to 30% of rye flour in it a rye bread, then we should be able to DaPumperize a white bread too.  

I have to admit this is about the whitest bread we would usually make, but thankfully, only my apprentice is a German baker and she doesn't count when it comes to new and exciting things, bread wise, around here most always.  Now, if the bake goes horribly wrong, then it is all her fault - I mean she is only an apprentice.  She also looks ridiculous in that full body hair net when she bakes anyway.  So who could take what she says seriously looking like that?


We had to break the recent trend of 100% whole grain bakes or risk falling into the dark abyss.  Even though the dark side breads are fantastic and tempting, being stuck there forever is a little much if you aren’t a German bread baker,


We do like breads in the 25% - 30% whole grain range and they make fine sandwich breads.  Sandwiches, as some might know, are right up there with home made amber lager beer, as far as, my apprentice’s way of thinking goes - which admittedly isn't very far or even deep for that matter.


So, mainly out of boredom with a touch of insanity and a touch of spite, I decided to try to DaPuperize a white bread and see if the tremendous boost in flavor this technique usually provides would work with white bread too.  It was worth a shot even though a long one – otherwise you would think people would be doing it all the time as a matter of course – but they don’t.  Maybe it’s the 6 hour bake time that puts them off?


To give the bread a chance at being decent, we included bread spice seeds and the other usual other seeds we have recently been using, to give this bread a chance the bread at some depth and chew like our whole grain breads we DaPumperize.

Since this bake was planned to be 80% wheat we decided to use our new Not Mini’s Ancient WW starter ( a very powerful one)  to go along with a WW Yeast Water one and make separate levains.   All 25% of the whole grains are in the levains and are made up of a mix of WW, rye and spelt.

We upped the whole grains some using 100 g of wheat berries for the scald along with the Toadies and home made red and white malts.  We dropped the molasses and barley malt syrup for this bake. For much of the dough water we used the excess scald water. Aromatic seeds were the usual coriander, fennel, anise and bi-color caraway that we buzzed up a little after roasting this time.   The meaty seeds were also roasted and they included; black and white sesame seeds, cracked flax and 50 g each f pumpkin and sunflower seeds.

We followed usual routine of late by building the levains over 3 stages with the Not Mini’s Ancient WW one doubling every 3 hours from the first build on while the YW one took 4 hours. For the last build – its best showing.  We autolysed the dough flours, salt, malts and Toadies  for 3 hours before adding in the levains. 

10 minutes of Slap and folds followed when the slack dough really came around on the gluten development side.  After a 20 minute rest we stretched out the dough to do an envelope fold and dropped all the seeds and scald onto it and folded it up with a few S&F’s.   We did 2 more S&F’s on 20 minute intervals to further develop the gluten and to distribute the add in seeds thoroughly.

After a 30 minute rest we took half the dough and shaped it into a loaf and placed it into a large loaf tin, filling it less than half full and covering it with plastic.  The other half of the dough was left in the oiled and plastic covered bowl. Both were then refrigerated for 8 hours overnight.  They didn't expand much in the fridge.

In the morning, both were placed on a heating pad, covered with a cloth and allowed to warm up for 1 1/2 hours.  The bulk retarded dough was them shaped and placed into a basket for final proof on the heating pad with the tinned loaf.

After another 2 hours the tinned loaf was 1/2” under the rim.  We covered it with aluminum foil and placed it into the preheated 375 F mini oven for its 6 hour baking schedule where the bottom of the broiler pan was full of water to provide extra steam.    We didn't put any oat bran or poppy seeds on the top of the loaf because we wanted to see how dark a white DaPumpernickel could get in 6 hours.  The baking schedule follows:

375 F - 30 minutes

350 F - 30 minutes

325 F - 1 hour

300 F - 1 hour

275 F - 1 hour

250 F - 1 hour

225 F - 1 hour

For some extra thrill for my apprentice and a comparison baseline for me, we decided to bake the other half; the boule, as one would expect a loaf like this to be baked - just in case the DaPumpernickeled half was a total failure.

We decided to bake it in a hot DO but it took another hour and a half before we thought that it was ready for the oven.  After a poor slash job and lowering into the DO with a parchment sling, this boule was baked at 450 F for 20 minutes with the lid on and another 5 minutes with the lid off at 425 F convection before removing it from the DO and placing it on the lower stone to finish baking - another 10 minutes – 35 minutes total baking time.

We then turned the oven off and left the bread on the stone with the oven door ajar for 5 minutes to help crisp the crust.  The boule baked up nice and brown, blistered and the crust was crispy before went chewy as it cooled.  It smells terrific.

The loaf is now through with its slow and low bake and hit exactly 210 F at the end of 6 hours in the mini oven.  We will slice into this loaf after it has rested for 40 hours. Luckily we have tasted the boule and it is a fantastic loaf of bread.  The crumb is so soft and shreddable, glossy and open like it had butter, eggs and and cream in it - just delicious!   This bread cannot be sliced thin and 1/2" thick, or maybe a little more is its sweet spot. This is another bread could eat every day.  Already ate a quarter of the boule!.Can't wait for the loaf to be ready to slice thin.  It will have to go a long way to be better than the boule.

We got 33 slices oiut of the 83/4" DaPumpernickel loaf.  It wasn't as dark as a black pumpernickel about a couple of shades darker than the other part of this two way bake.  The flavor wasn't as deep or rich as a 100% whole grain pumpernickel but it tastes totally different than the regular baked boule.  This tastes like half a pumpernickel and is much more powerful a taste than the boule.  We like this bread a lot too!  For those that don't like pumpernickel but want something stronger than a rye then this loaf  might be the one for you!

Formula

YW and Rye Sour Levain

Build 1

Build 2

 Build 3

Total

%

WW SD Starter

20

0

0

20

2.47%

Dark Rye

0

25

0

25

5.00%

WW

0

0

50

50

10.00%

AP

50

0

0

50

10.00%

Water

50

50

10

110

22.00%

Spelt

0

25

0

25

5.00%

Total

120

100

60

280

56.00%


Levain Totals


%


Flour

310

62.00%


Water

230

46.00%


Hydration

74.19%


Levain % of Total

31.69%


Dough Flour


%


AP

500

100.00%


Dough Flour

500

100.00%


Salt

13

1.60%


Water

400

80.00%


Dough Hydration

80.00%


Total Flour

810


Soaker Water 300 & Water

630


T. Dough Hydration

77.78%


Whole Grain %

26.67%


Hydration w/ Adds

75.99%


Total Weight

1,704


0.40669


Add - Ins


%


White Rye Malt

3

0.60%


Red Rye Malt

3

0.60%


Toadies

20

4.00%


Bicolor; Sesame, Cracked Flax

13

2.60%


Pumpkin and Sunflower Seeds

100

20.00%


W&B Caraway, Anise, Coriander, Fennel

12

2.40%


Total

151

30.20%


Scald


%


WW Berries

100

20.00%


Total Scald

100

20.00%


Weight of scald is pre scald weight


miranme's picture
miranme

Thank you all for the excellent articles and posts on Larraburu french bread. As a former Bay Area native I grew up with Larraburu bread and loved it. I make my own bread and starter. Does anyone know of a source for the original Larraburu starter. One of the bloggers described a cold storage area where they had it stored.  I would be very interested to get a sample if it is available.

Thanks,

Michael

Pages

Subscribe to RSS - blogs