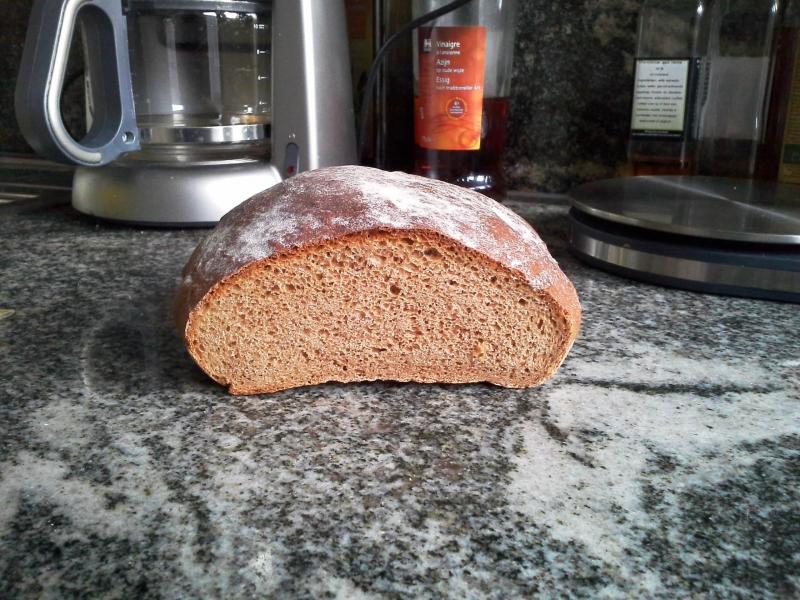
The Fresh Loaf

A Community of Amateur Bakers and Artisan Bread Enthusiasts.

Blogs

pmccool's picture
pmccool

A little something that I put together for breakfast this morning.

Waffle batter:

1/2 cup buttermilk

1 cup orange juice

1 large egg

1/3 cup vegetable oil

1/2 cup AP flour

1/2 cup whole wheat flour

1/2 cup oat flour

1 teaspoon baking powder

3/4 teaspoon baking soda

1 teaspoon cinnamon

1/2 teaspoon ginger

Whisk together the buttermilk, egg, oil, and 3/4 cup of the OJ, reserving the rest to adjust batter thickness.  Add the dry ingredients and whisk until evenly blended.  If needed, use remaining OJ to thin the batter to your preferred consistency.  Cook in a waffle iron.

Peach topping:

2 large peaches, peeled and sliced (approximately 2 cups)

1/2 cup orange-infused simple syrup

Heat the peaches and syrup in a saucepan, stirring occasionally, until peaches are heated through.

Serve waffle with a scattering of hot peaches and their juice/syrup.  If desired, dollop some Greek yogurt on top.

And yes, we desired:

If you don't have any orange-infused simple syrup on hand (and it was only happenstance that I did), you might want to play around with 1/4 cup each of water and sugar and a bit of orange zest, instead.  Or perhaps something else will tickle your fancy.

We were pretty happy with the way these turned out.

Paul

MANNA's picture
MANNA

I enjoy this bread. We usually make it for general eating around the house. Its a straight dough but it disappears before it has a chance to stale. We will make this sometimes to turn into croutons or bread crumbs too. Here are my issues with this though. The flavor has always seemed a little flat to me. And the dough can be slack and not develop good tension. I have solved some of the problems and very happy with the results. The recipe given is not the same as Jeff's and that's why I'm posting it. Please check out his book for the original recipe.

287g   Flour, White

 96g   Flour, Whole Wheat

 63g   Oats, Old Fashioned

227g Water, Warm

 43g Milk

 29g   Molasses

 29g   Butter, Unsalted

  8g   Salt, Kosher

  5g   Yeast, Instant


Toss it all into your KA bowl.

Mix on speed 1 or 2 to incorporate ingredients.

Once incorporated mix on speed 3 for 10 minutes.

Disclaimer: KA states not to mix dough above speed 2. Doing this will void your warranty. My KA 6 quart can handle this dough amount with ease. Other KA models may have an issue. Please watch your mixer and never leave it unattended. You can mix at a lower speed just extend the time to 15 - 20 min.

After mixing move dough to oiled bowl and cover, allow to double. (Turn dough in bowl to lightly cover surface of dough with a coat of oil to prevent drying)

Once doubled, remove from bowl and de-gas. Shape into loaf and let final proof in style of your choice. (I use a brotform) Keep an eye on the loaf it will proof much faster than you expect.

Heat oven and cast-iron double cooker to 425 degrees F conventional or 400 degrees F convection.

Once the loaf is proofed place in cast-iron and slash top. Place top on cooker and bake covered for 15-min. Once time is up remove top of double cooker and bake for an additional 15-min or intill done.

Let cool before slicing.


I used molasses instead of honey. This gave the sweetness for the loaf and also a fuller flavor profile. That took care of the flat flavor I got from the loaf. The slack dough was from using whole oats. It would break the gluten strands. Processing the oats into a finer meal gave better gluten development and improved handling of the dough. The recipe says oil or butter if I remember right. I used oil for a long time but didnt get the crumb I wanted. Butter was the way to go. Think oil for chewy and butter for cakey. I wanted more of a cakey crumb for sandwiches. I also backed down the hydration to 70% improving dough handling and crumb texture. Its summer here now so come winter you may need to increase the water back to 75% hydrated for consistency.

yozzause's picture
yozzause

i decided to make a sour dough in preparation for a promotional baking class in a couple of weeks.

So in the morning i fed  the culture with some whole rye flour so as to have the right amount for a mid day mix, 400g of culture 400g of ryemeal and 800 ml of water this was part by error but also i reckoned that it would allow a quicker fermentation.

At lunch time i went to mix the dough and  found the whole meal bin almost empty  but managed to get 600g and to this i added 3,000g of flour for a  total 3600 (3) then i added  2000ml of water as i had already 400ml extra in the culture build (2)   and then the prepared culture 1200g (1)  

The salt was @ 2% 72g, butter was 2% 72g, 2 eggs =100g  the dough was mixed well and finally the addition of 150g black sesame seeds into the mix, dough finished at 12.00. The dough was allowed to rest in a large plastic container and given stretch and folds @ 1.00pm, 2pm and 3pm the dough was then taken at 4.00pm scaled and handed up loosely.   12 pieces @ 500g and 2 pieces @ 750g.

The dough was then moulded put onto linen couches and into the fridge by half past 4, knock off time is 4.00!

Next morning i got into work early to bake off  before 6.00am the ovens were turned on the dough pieces brought out and transfered to baking sheets they were washed with a boiled cornflour wash white sesame seeds applied and slashed ready for the oven. the steam was applied for the first 6 or 7 minutes and then evacuated.  The bakeing time was about 35 minute  at 200 degrees. the bread can be seen cooling on wire racks. The only thing left to do was the bread delivery run and all done and ready for work in my office by 7.45  with the first loaves already being cut buttered and tasted.

i have my one loaf to take home this evening (1 more hour to go) that will go nicely with the lentil soup that was over from the restaurant at lunch time.   

 Another good day at work! 

Kind Regards Yozza


trailrunner's picture
trailrunner

Have been baking up a storm for 2 days. All is preordered so no guess work as to what to prepare. Orders have grown like crazy ! I have converted my sunroom that is adjacent to my kitchen into a kitchen annex. Added a large maple table that I already had and a bookcase from the used furniture store to hold supplies. So far it is working out great. Here is some of the bounty. My husband is making his pasta also for sale by order. 


sourdoughs...Norwich and SJSD, Challahs , Oatmeal bread and rolls, bagels, dinner rolls and cinnamon rolls with cream cheese icing.  photo IMG_6487_zpsf8c1f895.jpg new storage:  photo IMG_6488_zpsd5811fe0.jpg dinner rolls:  photo IMG_6489_zps41d27137.jpg Challah:  photo IMG_6490_zps4ee66288.jpg more Challah:  photo IMG_6492_zps97cbfb4d.jpg pasta:  photo IMG_6485_zps25794e75.jpg cinnamon rolls:  photo IMG_6491_zps6b9ebc0b.jpg 16 loaves of SJSD !  photo IMG_6481_zps78e4d495.jpg where is the dishwasher ????? he is fired !  photo IMG_6483_zps98848207.jpg

mcs's picture
mcs

It's been a little while since I last told you people about the progress of the bakery here in Belgrade/Bozeman/Big Sky, MT.  In fact, in my last blog entry I was writing about the soon-to-start Big Sky Farmers' Market.

Last night was market #7 up in Big Sky, and this past Saturday was the #9 Bozeman market at the Gallatin County Fairgrounds in downtown Bozeman.

Both of them have gone well, with the Saturday market being more of a breakfast focus and the Wednesday market primarily being dinner/appetizer based.

I've developed a very loyal customer base in both places, and I decided to ask a couple of the customers to come inside the trailer while I was busily working to take some photos for my bakery Facebook page and this TFL blog entry.  Paul and Kim Cameron of Bugaboo Cafe in Big Sky graciously obliged, and snapped bunches of pictures, some of which are below:


There I am pulling some scorching hot baguettes off their pans for customers waiting by the windows.  Last night I sold more baguettes than I had ever sold in one market, despite the rain and lightning that slowed the last half of the market. 


When I got home and checked out the photos Paul had taken, I saw this one and thought 'Now that's a cool one!'


The market has just started and the baguettes are flying out the window!


You can see the customer standing on a platform I had built that raises them up to the same level that I am standing at.


Don't forget the pastries...


Proof that Sinclair's Bakery is at the end of the rainbow!


I've got some more photos on the bakery Facebook page over here...and just so you know that I'm also taking the time to enjoy the people and scenery of the area, I've included a couple of photos below. 

Enjoy.

-Mark


I'm the one with the cowboy hat :)  This past Saturday after a busy market and a quick nap, some of my homies and I performed a few songs on ukulele for a local show.  It was a lot of fun!  Here's an article the local paper did about the ukulele group about a month ago!


And...last but definitely not least, here I am doing some flying just outside of Bozeman on a training hill.  I'm in the process of getting my paragliding certification, and my next flight will be a BIG one from one of the mountains just outside of town.  :)

dabrownman's picture
dabrownman

We based this bun recipe on Ian’s and Cleo’s fine hamburger buns that can be found here: 

http://www.thefreshloaf.com/node/33946/hamburger-onion-parmesan-buns

We don’t have his flour combination but we tried out best to come at least a little close to them.   So, Lucy used some AP and white whole wheat instead of the spelt, European and durum flour that was Ian’s choice.  We called Ian’s hand by keeping the potato flakes, butter, honey, dehydrated onion, Parmesan cheese and a pinch of ADY.


We then raised Ian’s formula a pecorino cheese, some ground sesame and flax seeds,  red and white malt and Toadies while switching out the milk and replacing it with cream and some left over fig re-hydration water from the last bake.


The final change was to use the pinch of ADY with some apple cherry yeast waster and some SD starter in one poolish kind of double levain that should balance itself out with acid and sweetness to become more neutral - as most hamburger buns seem to end up being for some reason.

We did a one stage, 3 hour build to get the levain to double.  We took the dried onions and re-hydrated them in 30 g of water and the salt for 1 hour.  We autolysed everything else except the cheese with the liquids for a half hour and then added the salt, onion and water mix.


We squished this through the dough through our fingers and did 6 minutes of slap and folds before resting the dough for 10 minutes and then doing 4 mote minutes of slap and folds.


A beautiful open moist, soft and grilled crumb.  Jsuit delicious!

The gluten had developed very well.  After a 15 minute rest we did 1 more minute of slap and folds.  We then stretched the dough and incorporated the (2) cheeses with a set of S&F’s.  15 minutes later we did another S& F and then allowed the dough to rest for1 hour.


A bagel breakfast to get the day started.

We then pre-shaped the dough into 4 thin buns that we like so much and 2 hot dog buns.  10 minutes later we final shaped them and put then on parchment paper - on top of the the mini oven’s vented top portion of the broiler pan.  We then egg washed them and covered them in white and tan poppy seeds since we hadn’t used them at all.

 Nothing wrong with a Bologna sandwich and a grilled shrimp salad lunch to go with the mango,nectarine, peach, bread and butter pickles,  pickled eggplant, carrots cucumbers, celery, red and poblano peppers, pickled onion cucumber and tomato relish with a few extra cucumber slices on the side.

Others had a different breakfast and lunch with some stuff being the same.

The buns proofed on the counter in a used trash can liner for 2 hours.  They puffed themselves up nicely so we egg washed then again and placed them in the 425 F mini oven set on convection from the get go. No need for steam when the buns have egg on their face.


Don't forget the peach, nectarine, mango and plum crisp with pecan  and vanilla granola topping.

After 8 minutes, we turned the oven down to 400 F - convection.   In another 12 minutes the buns were deemed done and removed from the oven to cool on a rack.  They browned up well.  When they were still warm, we cut them and put them on the grill to toast.  These are some really fine tasting buns.  The flavor of the onions and cheeses come through well.  No complaints.  Cleo and Ian have a real winner just like trailrunner said when she made them.


We actually divided the levain in half and are using the other half for Thursday’s pizzas trying to follow David Snyder’s Pizza Bliss to some degree.


Formula

Pinch of ADY plus

Build 1

Total

%

Multigrain SD Starter

10

10

2.67%

AP

45

70

18.67%

Yeast Water

45

45

12.00%

Total

100

125

28.00%


Multigrain SD Levain


%


Flour

75

20.00%


Water

75

20.00%


Hydration

100.00%


Levain % of Total

150

23.08%


Dough Flour


%


AP

250

66.67%


Whole Wheat Bread Flour

50

13.33%


Dough Flour

300

80.00%


Salt

7

1.87%


Water

200

53.33%


Dough Hydration

66.67%


Total Flour

375

100.00%


Water

275

73.33%


T. Dough Hydration

73.33%


% Whole Grain Flour

14.67%


Hydration w/ Adds

73.33%


Total Weight

667


Add - Ins


%


Honey

0

0.00%


Butter

0

0.00%


Toadies

0

0.00%


Dehydrated onion

0

0.00%


Ground Sesame 2 & Flax seeds 2

0

0.00%


Parmesan & Romano 10 g each

0

0.00%


Red Malt

0

0.00%


White Malt

0

0.00%


Total

10

2.67%


20g of extra onion water were not included


in the hydration or weight calculations


Isand66's picture
Isand66

I have made sourdough rolls using the Tangzhong method before and they usually come out great.  I decide to change it up a bit and used buttermilk instead of cream or milk and added some sour cream for an added flavor boost.  I also added some fresh parmesan cheese and used rolled oats, white rye and spelt flour to try to make it a little healthy.

I have to say when these were baking the whole house smelled amazing.

The final rolls came out nice and fluffy and soft but with a ton of flavor.  One bad thing about working from home is the temptation to eat and I have to say I sampled way too many of these rolls when they were done.

closeup

Formula

Tangzhong-Butter-Milk-Sourc

Note: Tangzhong consisted of 50 grams Bread Flour and 250 grams heavy cream.  I included this in the overall formula below.

Levain Directions

Mix all the levain ingredients together for about 1 minute and cover with plastic wrap.  Let it sit at room temperature for around 7-8 hours or until the starter has doubled.  I usually do this the night before.

Either use in the main dough immediately or refrigerate for up to 1 day before using.

 Main Dough Procedure

Prepare the Tangzhong.   Use a  5 to 1 liquid to solid ratio (so 250g liquid to 50g flour) and mix it together in a pan.  Heat the pan while stirring constantly.  Initially it will remain a liquid, but as you approach 65C it will undergo a change and thicken to an almost pudding like consistency.  Take it off the heat and let it cool before using it in your recipe.  Some people will refrigerate it for a while but you can use it right away as soon as it cools..

Mix the flours, Tangzhong, rolled oats and buttermilk together in your mixer or by hand until it just starts to come together, maybe about 1 minute.  Let it rest in your work bowl covered for 20-30 minutes.  Next add the salt, starter (cut into about 7-8 pieces), sour cream, eggs, cheese and butter  and mix on low for a minute.   Mix for a total of 6 minutes in your mixer starting on low-speed and working your way up to speed #2 for the last 4 minutes.  Remove the dough from your bowl and place it in a lightly oiled bowl or work surface and do several stretch and folds.  Let it rest covered for 10-15 minutes and then do another stretch and fold.  Let it rest another 10-15 minutes and do one additional stretch and fold.  After a total of 2 hours place your covered bowl in the refrigerator and let it rest for 12 to 24 hours.

When you are ready to bake remove the bowl from the refrigerator and let it set out at room temperature still covered for 1.5 to 2 hours.  Remove the dough and cut into equal size pieces and shape into rolls.  Place on a baking sheet lined with parchment paper and cover with moist tea towels or plastic wrap sprayed with cooking spray.

Tray2

The dough will take 1.5 to 2 hours depending on your room temperature.  Let the dough dictate when it is read to bake not the clock.

Around 45 minutes before ready to bake, pre-heat your oven to 500 degrees F. and prepare it for steam.  I have a heavy-duty baking pan on the bottom rack of my oven with 1 baking stone on above the pan and one on the top shelf.  I pour 1 cup of boiling water in the pan right after I place the dough in the oven.

Right before you are ready to put them in the oven, using a simple egg wash or heavy cream or milk, brush each roll and sprinkle on your topping of choice (I used dried scallions).  Next add 1 cup of boiling water to your steam pan or follow your own steam procedure.

ontray1

After 1 minute lower the temperature to 425 degrees.  Bake for 35 minutes until the crust is nice and brown.

Take the rolls out of the oven when done and let them cool on a bakers rack before for at least 2 hours before eating.

Crumb

Maxcouch2
Where oh where is Max hiding??
 
Sjadad's picture
Sjadad

I recently baked the Pain de Campagne from Ken Forkish's Flour Water Salt Yeast and was very pleased with the result.  This is a "hybrid" bread formula, meaning it is made with both a levain starter and a small amount of commercial yeast.  After a long room-temperature bulk fermentation, the loaves are shaped, placed in bannetons, and then put in the refrigerator to retard overnight befoe baking.  Forkish directs you to bake the loaves right out of the fridge.  I've often wondered about this method as I have come across conflicting advice from various experts and accomplished bakers. Some say to allow refrigerated loaves to sit at room temperature for a couple of hours prior to baking, while others, like Forkish, say to bake straight out of the fridge.

Well, I had very good results following Forkish's instructions to bake straight out of the fridge.  An added benefit to this approach is that scoring this 78% hydration dough is much easier when it is still cold as opposed to returning to room temperature.  I know Forkish doesn't instruct you to score the breads in FWSY, preferring the unpredictable fissures created without scoring, but I much prefer scoring my loaves.

The bread tastes very good.  No perceptible sourness, yet more flavor and complexity than a bread made with 100% commercial yeast.  It also has a very good shelf-life.  I baked the loaves on a Saturday morning and cut into one the following Wednesday.  The crumb was still very moist and creamy.  I suspect it would have been good for another couple of days had I waited that long.


Pain de Campagne Pain de Campagne Pain de Campagne Pain de Campagne

golgi70's picture
golgi70

Well this here is the bread I grew up on back in Westchester, NY. For me NY Rye is a light Rye with a tight moist super flavorful crumb crumb. The crust is soft and chewy and much of the flavor of the loaf comes in the chew. I used to be able to just pull the crust off in a ring around the slice and each separate from the interior as a kid.  And yes I sometimes squeezed the insides and ate as a dough ball.  But the best is simply sliced and served with butter.  So I came up with a good rendition of this maybe 5  years ago but can't find the recipe and figured I can get this down relatively fast.  In the end I'd say this is the lean variation.  The dough needs a touch of oil to have the real proper consistency of what I'm used too.  But this is quite good at first bite.  I'll let you know how I feel after a few more.  Anyhoo here is the formula 


NY Rye (lean) take #1

Rye Sour: (this is a change for sure as the previous had a white starter and all rye was in finish mix)

50 g White Starter (100%)
200 g Rye (I used a local stoneground whole rye)
180 g H20


Dough:
108 g Rye  (more of the local rye)
692 g Artisan  (malted, 11.5% protein)
546 g h20
22 g Salt
31 g Caraway

-----------------------------

autolyse 30 minutes with levain.  

Mixed by hand using a new cut and pull method.  I'm sure slap and folds will work too. Just experimenting with different styles of hand mixing.  I did this til dough got stiff, relax 10 minutes, repeat until I have a moderately developed smooth and elastic dough.  

Followed by 3 s+fs @ 30 minutes

Total Bulk Ferment (from the start of autolyse when the levain is added) 3 1/2 hours.  

Divide in 2 and preshape.  rest 30 minutes

Shape into lined bowls lightly dusted with rye.  seams up.  Proof in warm room (78 degF) for 2:15 

I am sure you could shape and retard and bake cold in the morning and maybe even get a nicer crust. 

Baked at 500 with steam for 15 minutes, vented for a further 20+  rotating as needed.

Josh


Happy Baking All

Josh

Grandpa Larry's picture
Grandpa Larry

About a month ago I ran across the website "The Italian Dish" which contained a post titled Amazing Artisan Bread for 40 Cents a Loaf - No Kneading, No Fussing, No Kidding.

This is the author's take on the no knead bread baking technique and the book: Artisan Bread in Five Minutes a Day.

As most cooks do, I modified the recipe and technique to suit my own schedule and the ingredients on hand and came up with a method I've been employing in my bread and pizza baking. The basic recipe is:

5 cups flour (usually half AP and half bread flour)

2 cups water

1 Tbl. sugar

1 Tbl salt

1 tsp. instant yeast

I have experimented by varying the types of flour, including semolina for a portion of it and using honey in place of sugar.

I mix these ingredients by hand into a pretty shaggy dough, which I allow to rise until doubled. I then place the container into the fridge.for at least 24 hours. The longer, the better. After it comes to room temperature I shape it into a loaf or pizza and bake.

Lately I've been pouring 3 or 4 tablespoons of olive oil over the dough when I place it in the fridge. I don't wash the container between batches.

The bread resulting from this dough, with or without olive oil, with or without semolina, most closely resembles and tastes like ciabatta. It is very, very good. The longer it ferments, the better the flavor. I wish I had a larger container.

The quality of the bread as well as the ease with which it's achieved has made me a happy baker.

I'll experiment further and report.

Pages

Subscribe to RSS - blogs