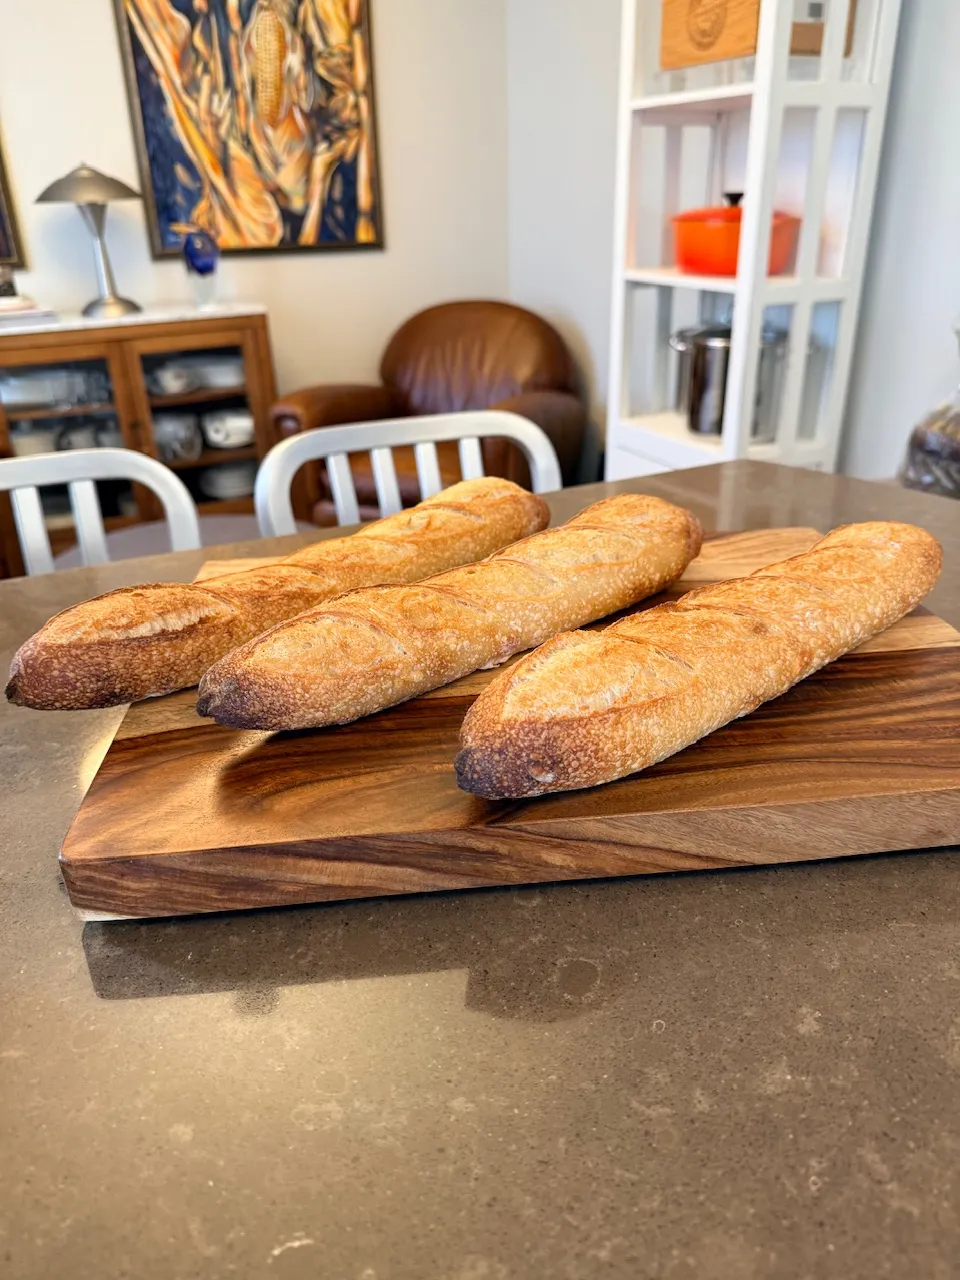
The Fresh Loaf

A Community of Amateur Bakers and Artisan Bread Enthusiasts.

Blogs

WanyeKest's picture
WanyeKest

This is the latest addition to my daily bread rotation. The idea of building this formula is to create a sort of 'cookie cutter' formula, in which the black rice portion can be swapped with other gluten free flours (oats, buckwheat, bean flours, toasted bran, brown rice, etc) depending on what I have on hands. And also to prevent boredom. The goal is to create a dough that is rougly equivalent to dough made with 100% 10% protein white flour.

Theoretically the dough is stronger than APF dough, because all the gluten spent less time fermenting (all black rice went to levain, all 13% protein white flour is added during final mixing), hence less gluten breakdown. The black rice starter is a lot more vigorous than when it was still being fed atta flour. My typical formula involved 30% prefermented flour. But now even at 23% PFF, the loaf was overproofed at the same exact proofing time.

One thing that I found highly interesting, although the hydration is 75%, the tweak made the dough felt like 68% hydration dough, with all black rice goes to final mixing.


Overall: 75% hydration, 23% black rice flour, 3 stages levain, cold pot method, 50% hydration starter & levain, black rice starter.


Day 1

Mix 3 g 50% hydration black rice starter, 6 g black rice flour, and 3 g water. Ferment for 2 hours, then refrigerate.


Day 2

Mix previous levain with 24 g black rice flour and 12 g water. Ferment until mature.

Mix previous levain with 78 g black rice and 39 g water. Ferment for 2 hours, then refrigerate


Day 3

Dechill levain for 45 minutes

Puree levain with 305 g water for 10-15 seconds. Mix well with 370 g 13% protein white flour. Rest 20 minutes.

Mix well 11 g salt. Stretch the dough up using spatula north-south and east-west. Lift the dough up in the air using wet hands, S&F it north-south and east-west. Rest 20 minutes.

Repeat the wet hands S&F and 20 minutes rest until the dough resisting stretch. Usually takes me 1.5 hours or two. I never preshape after the last 20 minutes rest.

Shape and proof in parchment lined enameled pan. During the last 15 minutes of proofing, blow dry the loaf with standing fan.

Score and bake 250 °C for 45 minutes using baking stone.

Taste Assessment

This bread has subtle literal sweet taste (the starter itself smells alcoholic, with literal sweet and sour flavor). The vanilla-ish flavor of black rice is perceivable. I couldn't notice acetic smell without trying hard. Flavor wise, this is a loaf I would confidently gift my picky Asian acquaintances without sounding like a snob trying to explain how to enjoy sourdough (lol). This bread pairs well with peanut butter and curry.


Note:

I prefer more extensible dough, because it gives me clearer signal on when to stop doing S&F. The dough was surprisingly too elastic for my liking. I'd do 80% hydration next time.

Line your pan with parchment VERY well. At this hydration (and higher), black sticky rice displays the reason why it earned it's name (I learned it the hard way. Three times. lol)


.

occidental's picture
occidental

For this Community Bake of Infinity Bread bake I decided to use some blue corn from New Mexico that a friend gave me this summer.

I started by refreshing my sourdough starter with 25 grams whole wheat and 75 grams AP along with 100 grams of water.  Not long after I soaked 100 grams of sesame seeds in 175 grams of water.  

Once the starter reached peak bubbliness I mixed up the dough.

Dough Formula:

  • 100 grams refreshed starter
  • 125 grams bread flour
  • 125 grams whole wheat flour
  • 125 grams blue corn flour
  • sesame seed soaker plus all water from the soaker
  • an additional 125 grams of water (300 grams total including soaker water)
  • 13 grams salt

I mixed by hand, allowed it to rest, than kneaded in the bowl.  I did two stretch and folds at about 1 hour intervals.  I continued to ferment another 2 hours or so. The dough did not rise too much.  I then put the dough in the fridge to continue to ferment overnight.  The next morning I removed the dough from the fridge, shaped and let rise and warm for about two hours.  I heated the oven loaded with a cast iron combo cooker to 450 F.  I baked covered for 20 minutes and uncovered for 25 minutes at a reduced temperature of 400 F..  There was a bit of oven spring which was good as the dough didn't rise much during proofing. 

The crust is a bit dense, as was expected, the color has a bit of a purple hue to it, influenced by the blue corn.  The taste is very nutty, with some good crispness to it due to the sesame seeds.  Overall this came out better than I was expecting, not having baked bread with blue corn before.  If I tried it again I might reduce the % of blue corn to the 15-20% range to get a bit less dense bread, but these proportions met the intent of the community bake and it was a good experiment overall.


Kjknits's picture
Kjknits

I’ve been enjoying baking with my King Arthur sourdough starter so much this fall! I’ve settled on a recipe that I love for my basic bread, the Taste of Artisan no-knead sourdough. It’s a 70% hydration recipe that works very well as an overnight room temp proof. I start the dough around 4-5pm, do several stretch and folds every 45 minutes until around 9pm, then let it sit on the counter until morning. Divide, shape, and place bannetons into the fridge for at least 2 hours. Score, and bake in preheated cast iron dutch ovens at 450 for 25 minutes covered, 10-15 minutes uncovered (internal temp is between 205-210). 

It’s been fun practicing my scoring technique and adding inclusions!


Martadella's picture
Martadella

Honing my improvisation skills! No measurements on that one, not even by volume. Mostly rye, some whole wheat in final dough 

First stiff rye preferment, after that soft one. Rye scald with chocolate barley malt, then acidification of the scald. Opara, final dough, bulk ferment (speedy, only 40 minutes) and final proof, which should last longer, but I didn't have time; that's why the loaf cracked.

Delicious 😋😋😋

WatertownNewbie's picture
WatertownNewbie

Recently I posted a blog with my revised version of Infinity Bread.  That version used emmer flour, and I commented that I intended to try the bread with einkorn in place of the emmer.  Here it is.

This is an excellent bread too, and in some ways I prefer the einkorn version over the one with emmer.  Of course, a few bakes with each will be necessary before I can conclude that, and in any event both versions are fine.

Here are the two loaves.

A friend received one of the loaves.  Here is the crumb from the one we kept.

Once again I thank pmcool for launching the Community Bake that resulted originally in the emmer bread and now this one with einkorn.

Happy baking.

Ted

Sugarowl's picture
Sugarowl

I did the Infinity loaf challengeon October 30, but I'm just now getting around to posting it. I did not really like how the bread came out. It was very crumbly and a bit sandy. That said, I'm not really partial to cornbread either.

The "other" flours I used were rye, oat flour, and corn meal. For seeds, I used soaked bulgur wheat and toasted pecan pieces. The inclusions were fine. I'm not so sure about the cornmeal and oat flour though. I'll try it again after the holidays. And soak the cornmeal next time.

I posted somewhere else the exact quantities so I'll go back and look at that later.Found it: https://www.thefreshloaf.com/node/73115/nothing-too-exiciting-here#comment-527139

The biscotti that I made came out pretty good. I did this November 4. on The only thing is that I should've sliced them a little thinner or baked them longer. Or both. the recipe I used is from Joyofbaking.com: Chocolate Almond Biscotti. The only changes I made were to use toasted pecans instead of the almonds. The dough was a little tacky.


Sorry for the late posts, it's been really hectic around here.In October, I made around 3 dozen muffins plus 3 dozen cookies every week for 3 weeks for a fundraiser. Not much sold. But when I was at their display, it was so overcrowded with prepackaged snacks that it made sense that they didn't sell.

Currently I have 300g of starter rising to start 3 different breads tomorrow: two chocolate breads with cherries and pecans and one I'm not completely sure about yet.Probably a whole wheat and bread flour tangzong milk bread.

On Monday and Tuesday I'll be baking bread, cookies, and muffins for when we go see my parents for Thanksgiving. The cookies with be sugar, oatmeal, and 2 kinds of biscotti: The one I just posted and one with cocoa powder and cranberries. Also part of my future lineup is to make a 1/2 semolina biscotti to see if the texture is different when I come back.

WanyeKest's picture
WanyeKest

In my previous blog post, I mentioned that the post will be my only post, simply as a 'gratitude' post for all the bread baking knowledge I've learned, allows me to eat healthier. Now to think that I have severe commitment issue, which hinders me from having hobbies those I can cling to in long term, maybe it's a good idea for me to write structured methods. The idea is, when I for some reason no longer feel like baking again, and somehow want to get back to it, I have something that I can directly look into without feeling overwhelmed.

Everytime I decide to learn certain bakes, I like to learn the classics first before going wild with experimentation. My first 30 something batches of (re)learning sourdough was pain de campagne. I like it for it's mild flavor profile and light texture. My go-to formula back then involves 20% whole wheat and 10% rye. The problems are:

  1. Regular whole wheat only available in 5kg increments with short lifespan. I'm by all means not a hardcore hobbyist, hence not having the willpower to consume 5 kg bag of whole wheat in less than 2 months. Milling my own flour? Not a chance (lol)
  2. I have zero reason for using rye. First, I'm not a sour seeker. Second, I couldn't notice what difference 10% rye makes in sourdough when it comes to flavor

I live in the tropics, so I was thinking, why not adjust the formula using ingredients those locally are more accessible. First, atta whole wheat is available in 2kg increment. Second, black rice flour is phenomenal for crust color. Third, oat flour is awesome when you want something mild but still in the realm of whole grains.

Speaking of black rice, I planned to always use it in my sourdough bakes, for the reason I mentioned above. It's just logical for me to put it in the earliest part of fermentation process; the starter. Besides that, starter has no role in dough strength anyway, so why not use some weak flour that I really adore.

Here is the method. In my fashion, weakest flour goes first, strongest flour goes last.


Overall: 85% hydration, 5% glutinous black rice flour, 15% rolled oat flour, 20% atta whole wheat, 3 stages levain, cold pot method, 30% prefermented flour


Day 1

Mix 3 g 50% hydration black rice starter, 6 g black rice flour, and 3 g water. Ferment for 2 hours, then refrigerate.


Day 2

Mix previous levain with 16 g black rice flour, 12 g oat flour, and 14 g water. Ferment until mature

Mix previous levain with 60 g oat flour, 48 g atta flour, and 54 g water. Ferment for 2 hours, then refrigerate.


Day 3

Dechill levain for 45 minutes.

Puree levain with 336 g water. Mix in 288 g 13% protein white flour and 48 g atta flour. Rest 20 minutes.

Add 12 g salt, mix well. With spatula, stretch the dough north-south, then west-east. With wet hands, raise the dough in the air and do S&F north-south then west-east. Rest 20 minutes.

Repeat the double S&F and 20 minutes rest until the dough resisting stretch. Usually takes me 1.5 hours or two. After the last 20 minutes rest, you may preshape the dough.

Shape, and proof in parchment lined enameled pot. Proof a bit longer than you would with banneton for fluffier texture.

The last 20 minutes of proofing, blow dry the loaf with standing fan. Score, spray the dough with water, lid on.

Bake 250 °C for 45 minutes.


I noticed whenever I use oat flour, I get better volume despite closed crumb (I'm not open crumb seeker). And more tender crumb too.


Taste assessment

I always toast my bread before eating. After being toasted, it's soooo fluffy with thin shattery crispy crust. That's the wonder of oat and blow drying instead of flour-dusting pre-scoring. As any bread I've made with > 10% oat in the levain, it has slight vegetal taste, reminiscence of cucumber. The acidity is mild. There is slight acetic smell when untoasted, but it's gone after toasting. In my opinion, it pairs well with fish, also anything citrusy.


Notes

High hydration is necessary if oat flour is involved, otherwise the scored surface will have torn and shredded look instead of nice spherical surface

At first, the dough feels a bit slacker than 75% hydration APF dough. But it will get nice and elastic eventually.

I always puree my stiff levain for 15 seconds before use regardless the type of flour used, never had problem (keep in mind I never use more than 30% prefermented flour)

There is no reliable way to judge ripeness of the second stage levain. First, black rice has strong aroma. Second, no significant volume increase. Cracks might occur. Usually my atta starter takes 4 hours to ripe, so I fermented it for 4 hours

This starter is a lot more vigorous than the last time it was still being fed with atta flour. I might have to cut the prefermented flour from my usual 30% to 20-25%


Peace and love,

Jay


 .

VickiePNW's picture
VickiePNW

Recently purchased this oven after deciding that the Anova Precision Oven was too big and too finicky (wifi). After reading the very long, 3 part, egullet thread on the Cuisinart Convection Steam Oven, I decided it was perfect for me.

This oven is small. Baking tall loaves requires a careful watch for burning tops. Since my bread of choice is ciabatta, this is less of a problem. So far, no problem. I continue to prefer to divide my dough into roll size portions, about 125g, refrigerate in small containers, and bake one as needed. I prefer this as opposed to baking all and freezing.

I am not so sure about proofing using the Steam function at 100º (lowest temp). So far, my loaves have signs of overproofing using this. So I continue to use my adjustable heating mat inside the TV cabinet. 

So, I have been using the Bread function, 450º 11 minutes. In the Bread function, the oven uses steam initially. I find this works well. This is a crumb shot of a roll. Very happy.

BTW, Cuisinart has discontinued this oven. Amazon still sells new and "refurbished" units. I bought a refurbished unit because the price was so good, $135. And it looks like new, never used. Now the price of a refurbished unit dropped to $119 and I am debating whether or not to buy a back up. It is great for steaming/baking and reheating other food. 


WatertownNewbie's picture
WatertownNewbie

This is as much for anyone looking for a way to bake with emmer flour as for any other reason, but that should be sufficient.  Emmer is a nice flour (mine comes from Barton Springs, but it is available generally).

For those who read my post in the Community Bake thread, you might recall that I mentioned wanting to make a few changes.  This bake incorporated a soaker, which softened the rye chops especially.  In addition, the soaker added some needed hydration to the dough.  Lastly, I did only two sets of stretch-and-folds.  All of these changes were for the better, and I see no need to make any more for the next few bakes (my opinion could always change, of course).

Here is a summary in case you are looking for a recipe involving emmer.

     Levain

Starter                        40 g

Bread Flour              100 g

Whole Wheat Flour  100 g

Water                       250 g


     Soaker

Rye Chops                50 g

Oats                          30 g

Sunflower Seeds      20 g

Water (boiling)        100 g


     Final Dough

Bread Flour                234 g

Whole Wheat Flour    233 g

Emmer Flour              333 g

Soaker                       all

Water                         470 g

Levain                        all

Salt                              18 g

I prepared the Levain as well as the Soaker the night before and let them sit at room temperature.  When the Levain was properly bubbly, I combined the Final Dough flours, the Soaker, and the water until they were rough and shaggy.  You might think that you need to add water to make the components into a single mass, but resist that urge.  The Soaker will provide the moisture.

Then I let the combo sit for a half hour before adding the Levain and salt.  For this step I employed Forkish's pincher method of mixing, and you will definitely need to work the dough to get the Levain thoroughly distributed in the Final Dough.  After mixing (I included eighty French Folds), the dough temperature was only 72F, and the kitchen was 70F.  I anticipated a little longer bulk fermentation.

After sixty minutes I did the first stretch-and-fold and then another an hour after that.  Thereafter the dough sat until it was ready for pre-shaping.  For this bake the total bulk fermentation was four hours and eighteen minutes.  The dough went onto the counter and was divided into two portions, both of which were pre-shaped into rounds.  After a twenty minute bench rest, one portion became a batard and the other a boule.  The dough went into bannetons (and those into plastic bags) and into the refrigerator for an overnight proofing.

After nearly sixteen hours in the fridge the bannetons came out.  The boule went into a Dutch oven heated to 475F, and the batard went onto a baking stone at 450F.  The lid came off the Dutch oven after twenty minutes.  Two aluminum pie pans filled with hot water provided steam for the baking stone.  Total baking time for each loaf was forty-eight minutes.

The trio of bread flour, whole wheat, and emmer seem to go well together.  This is a bread that I will bake again.  My wife and I kept the batard, while the boule went to some friends.

Here are the two loaves.


Here is the crumb from the one we kept.


Happy baking.

Ted

The Roadside Pie King's picture
The Roadside Pi...

Quick as a jiffy rolls to go with my burgers. Very nice results. My only critique, I should have been more aggressive, pressing them down into the burger bun shape.

The shaping process

1. The well fermented dough ball is divided into three smaller equal pieces.

2. Each of the three dough balls is rolled out into a log shape.

3. Each of the logs is divided into four equal pieces

4. Each of the 111g pieces is shaped into a tight little ball.

5. Under my conditions, proofing covered on the bench took 35 minutes.

6. Each of the flegling hamburger buns is washed with whole egg cut with whole milk.

7. Six are topped with white & black sesame. Six are topped with poppy.

8. The bake took 40 minutes, at 400°F.


Pages

Subscribe to RSS - blogs