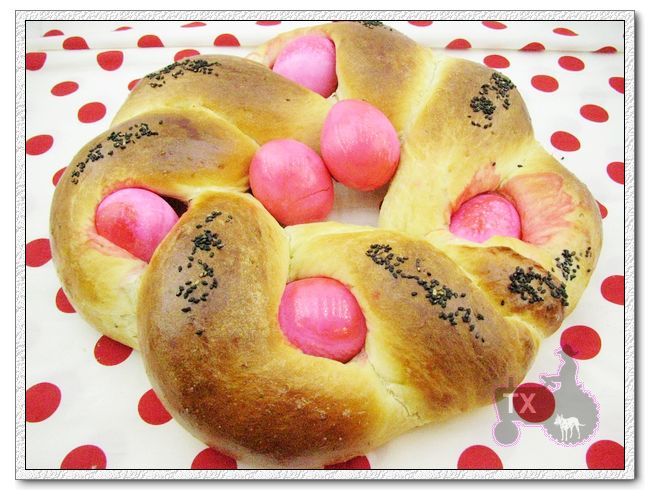
The Fresh Loaf

A Community of Amateur Bakers and Artisan Bread Enthusiasts.

txfarmer's blog

txfarmer's picture
txfarmer

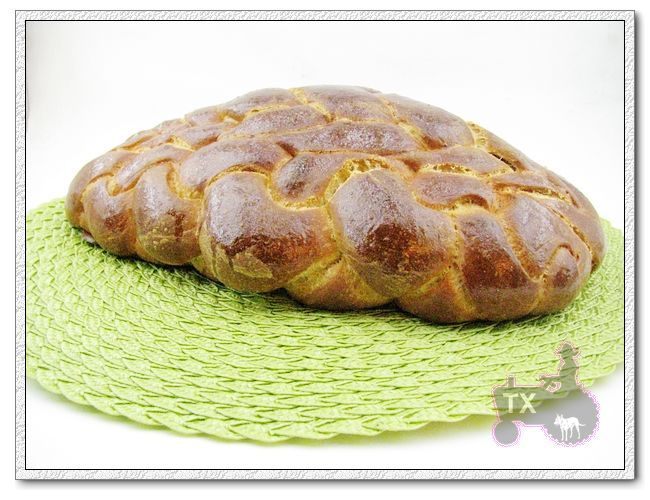
It's from "A Blessing of Bread", and many TFLers here have tried it with great success, I will just list the following two here (recipe can be found there too):

http://www.thefreshloaf.com/node/14803/sourdough-challah-quota-blessing-breadquot

http://www.thefreshloaf.com/node/4200/sourdough-challah-photos-recipe


Since sourdough challah takes a long time to rise (a 5 hour proof), I was able to try a more complicated braiding shape without worrying about overproofing. This Hungarian Celebration Bread shape is also from "A Blessing of Bread", basically two 4 braids at the bottom, with a 5 braids on top. A bit time consuming to divide, round, roll out, and stretch out 13 pieces of dough, but well worth it.

Light and open crumb, so soft, so rich. I absolutely love sourdough enriched breads. Contrary to some may think, sourdough taste doesn't get masked by all the eggs and oil, it lingers in the background and provides a "tang" note, emphasize and complement the rich flavor perfectly. Ever since the sourdough Pandoro that took me forever to make, my DH just can't eat any enriched breads without missing the sourdough flavor. He's finally satisfied again with this sourdough challah.

I proofed for 5 hours as the book instructed, but maybe another hour or two would've been better - the slight tearing between braids is a sign of underproofing.


We loved it enough that I made another one immediately after we finished this first loaf!

txfarmer's picture
txfarmer

The first one is Alsace loaf with Rye from Dan Lepard's book "A handmade loaf". Recipe can be found online here: http://blog.rezkonv.de/2007/08/31/alsace-loaf-with-rye/ , but of course I have the book and love it.

Made one big batard and several small rolls. This is a fast bread to make since there's commercial yeast in it. Dan used fresh yeast, but I used instant yeast (adjusted amount).

The crumb is relatively open, and the rye berries soaked in white wine lends texture and a sweet taste to the otherwise earthy bread, very nice with some butter.


The 2nd one is Black Pepper Rye from Dan Lepard's website: http://www.danlepard.com/forum/viewtopic.php?f=7&t=2605&start=0 - that thread not only has the recipe, but also a very good picture tutorial on how the bread is made. If you do a little search you'll find this bread has been successfully tried by many folks here on TFL, and most liked it.

I started out somewhat skeptical, since only "fakers" add coffee to their rye breads right? Wrong! Coffee, as well as plent of black pepper and poppy seeds, are not here to mask anything, but to provide strong and greatly blended flavors on their own.

I used very strong espresso powder from KAF, so the coffee taste was definitely strong (which I like), the black pepper provided a lingering spiciness, and the large amount of poppy seeds on top got toasted and became so fragrant during baking. Such strong flavors all blended well together, suprisingly.

Using only commercial yeast, it's another very fast bread to make,  delicious with some PB.

txfarmer's picture
txfarmer

The bagel recipe is from Nancy's Siliverton's book "Breads from the La Brea Bakery". The procedure is very similar to the one in BBA, cold rise, boil, bake, except that it uses some starter in addition to commercial yeast. I like the end product a lot, as happy as I was with the BBA ones, I find these ones are more chewy, the crumb is tighter, more like a true NY bagel. I used various toppings, my favorite one was Asiago Cheese, yum!

I used my 100% starter, and adjust water content accordingly. Also used some baking soda in the boiling water to get that shine. The following is my modified version:

water (70F), 14.5oz

instant yeast, 1.75tsp

white starter (100%), 11oz

high-gluten flour (I used Sir Lancelot), 2lbs

sugar, 2oz

salt, 1tbsp

barley malt syrup, 2tbsp

milk powder, 6tbsp

1. Mix everything until gluten is well developed

2. Rest for 10 minutes

3. divide into 4oz pieces, round and relax for 15 minutes

4. shape into bagels - I use the "connect two ends of a rope method", but some prefer the "punch and stretch a hole in the center" method. Keep the hole in the center fairly big.

5. refriderate for 12 to 24 hours.

6. take out and take one to test whether it floats in water, if so, they are fully risen and ready to be boiled, otherwise, they need more time on the counter to rise, check every 20 minutes.

7. boil in water and baking soda, 20 sec each side

8. take out and add on toppings

9. bake at 400F for 20minutes (but oven is preheated to 450F then turned down when breads are loaded).

Liking the bagels, I wanted to make some bialys as well. Used Hamelman's formula even though I see Glezer has one that's straight from Kossar, Hamelman's has lower water content, and bialy is supposed to be chewy, so I chose his instead.

Nice and chewy out of oven, full of onion aroma. The problem is that there's no salt in the onion topping, so while it smelled wonderfully onion-y, but the taste is ... not salty enough. I added a pinch of salt in the onion mixture for the 2nd batch, much better. I checked Glezer's formula, the onion topping is also saltless. I've only tasted Kossar bialy once before, I remmeber it had some salty taste, did I remember wrong? Salt or no salt, these are some yummy little rolls.

Since they are the best fresh, still warm from oven, I think it's really worthwhile to make them at home. Plus they are quite easy to make! I am not posting the recipe since it's straight from the book with no modifications. My order of dried onion is on its way, plan to make some Norm's onion rolls to compare to these.

txfarmer's picture
txfarmer

I have done Italian Chocolate Bread using the SFBI recipe before, as well as the Nancy Silverton version recently  ( http://www.thefreshloaf.com/node/17293/nancy039s-silverton039s-chocolate-sour-cherry-bread ), they were good, so good that I want to create my own version, combining good points of both recipes, and use wild  starter only. I was warned that with this much cocoa powder and add-ins, the bread could be too dense without instant yeast, but I know several people here have successfully done 100% sourdough chocolate breads before, so I decide to give it a try. I've been playing with my 60% starter recently with good results, so that's what I used here, but I think you can use any starter successfully.


Makes 2x750g breads

-Levain Build

active 60% starter, 40g

water, 120g

bread flour, 200g


1.   mix and knead into a dough, fermentate at room temperature (24C) for 8 to 12 hours, until reaching peak volume, starting to collapse (mine rose to about 4x of original size).


-Final dough

water, 340g

Levain Build from above

cocoa powder, 50g

honey, 50g

butter, 35g, soften

bread flour, 430g

salt, 12g

prune, 150g, chopped roughly

70%bitter sweet chocolate, 150g, chopped roughly


2.   mix everything but prune and chocolate, knead until gluten is well developed

3.   flatten dough into a rectangle, scatter prune and chocolate on in, roll up, fold many times until they are evenly distributed. Try not to have too many chocolate/prune on the surface.

4.   bulk rise for 4 hours at 24C. Didn't do S&F since the dough was well developed already, and I want an even soft crumb, not an irregular holy one.

5.   divide, round, and rest for 15 minutes.

6.   shape into boule or batards. the boule was proofed for 100 minutes (I thought it would take longer, but it was definitely ready by 100min), the batard was put into fridge immediately after shaping, took out about 12 hours later, proofed for 1 hour.

7.   oven is preheated to 500F, but adjusted down to 400F after breads are loaded. bake for 50min, the first 15 with steam.


No dense crumb there! The rise during fermentation, proof and baking was more than I can hope for. I like how that little bit of honey and butter make the crumb very soft and spongy, contrast nicely with the chewy crust, chocolate and prune.

Prune goes well with chocolate, I have seen them paired together in cakes and desserts, equally tasty here. However, I am sure the bread would be tasty (but different) if I swap out prune with cherry, nuts, or even more chocolate (maybe some milk choc? or even white choc?).

Very happy with this attempt, I am sure I will bake it often for gifts and ourselves.

txfarmer's picture
txfarmer


This book and this particular baguette formula was first brought to our attention by Shiao-Ping here: http://www.thefreshloaf.com/node/16213/mr-nippon039s-baguette-formulas , Eric later did a fabulous take on it too: http://www.thefreshloaf.com/node/16252/nippon039s-baguette-formula . I happened to have the book (in Chinese translation, DH got it for me from China when he was on a business trip there), the concept of 12hour autolyse is intriguing, and the wonderful pictures in the book, as well as Shiao-Ping and Eric's photos made me eager to try. However, I had such trouble with it. The first 3 times, they all came out flat. Really flat. Flatter than anything I've baked before. After the third time, I sat down and started from scratch. Read up on autolyse and what exactly happens during it. Read on different flours, even asked my friends to investiage the Japanese flour used in the book. Converted a part of my liquid starter to firm, because some have mentioned that firm starters may work better - then read up on the difference between the two. Let's just say, I applied all my research skilled from school and work to studying breads! It was fun though, I learned a lot, and this 7th try was my best one so far, I am finally sort of happy with the results. 


So what's the magic bullet? Well, suprise! There aren't any! Other than the old lesson of "obey the dough (not the book even if it's written by a great Japanses baker who specifies every little detail!)". Same liquid starter, I simply fermentated until the dough is ready (4 hours as supposed to 3 in the book), and did 2 more sets of S&F during bulk rise. I think the culpit is that the book really spelled out the exact temperature, time, even PH values, so in the begining I was trying to match everything in the instruction. During this past 2 months, temperature in Dallas has been perfect for making this bread: night temperature is right around 60F, which is what the autolyse temperature should be. The day time termperature in the house is a perfect 22C, matching the fermentation temperature exactly. But I forgot one thing - wild yeasts, unlike instant yeast, have personalities. They don't go on the same schedule. Mine apparently is a bit slow going, by about an hour for bulk rise. Once I realized that and experimented with different bulk rise/proofing time, the breads started looking decent. So, long story short, LISTEN TO YOUR DOUGH!

Please see Shiao-Ping's original post for the exact formula, the changes I made are: 4 hours of bulk rise rather than 3; S&F at 20, 40, 60, 90, 120, 180, 240 minutes, so 7 in total rather than 5 in the instruction; final proof was 50 minutes rather than 60; flour used was KA bread flour. As for the bread itself, very nice indeed. Open crumb, chewy crust, a noticable sweet taste due to the long autolyse, but not sour at all though. It only has 15% of starter (100% hydration) and 0.1% instant yeast, hence the long rise times, as well as the nice flavor.

There are 34 other baguette formulas in that book, I am sure I will attempt more of them. In the mean time, I am glad this bread is finally out of my mind, I can now shift my focus onto other things - like tax returns! Sigh, not nearly as fun. ;)

txfarmer's picture
txfarmer


I have made Italian chocolate bread before using the SFBI recipe: http://www.applepiepatispate.com/bread/pane-al-cioccolato-italian-chocolate/ , this one is from Nancy Silverton's book "Breads from the La Brea Bakery" (I have the book but you can find the recipe here: http://mamajjsbread.blogspot.com/2008/12/black-boots-and-my-long-necked-deficit.html . Note that the original starter is 145% hydration, I did adjust starter and water amount to use my 100% stater. The original recipe uses 0.6oz fresh yeast in addition to the starter, I used 2 scant tsp of instant yeast, which made rising time a bit shorter than what's in the book - 1hr and 45min before retarding in the fridge, and only 2 hours of proofing.). Silverton's version also uses commercial yeast (fresh yeast, but I adapted to use instant) in addition to a liquid starter, but it's a lot more decadant. A lot more chocolate pieces and a lot of sour cherries in the dough, which means messy kneading, cutting, and eating, but tastier results IMO. The recipe link author thought the bread was too dry and crumbly, but I didn't think so, the crumb was soft and moist to me.

It got good rise during fermentation and in the oven, but since the chocolate pieces and sour cherries were screaming to get out, the bread looks a little "messy".

Made one boule and one batard. The sour tastes of dried cherry complements chocolate well, I used organic imported chocolates, not a cheap bread to make!

Happy with the taste, I am going to try for a chocolate bread with no commercial yeast. Silverton says in the book commercial yeast is necessary otherwise coca powder would make the bread too dense. I wonder whether more starter would do the trick. I see several people here on TFL already tried, I am going to do some research on those.

txfarmer's picture
txfarmer

Over the past 2 weeks, I made several easter breads to share with family and friends, here they are...


- Tsoureki - Greek Easter Breads. No, I am not greek, and I didn't know of this bread until this year, but some of my running friends are, and I made this for our recent gathering.


The recipe is from the book "Celebration Breads", an old fashioned but very interesting book I got from the library. There are many similar recipes online, it's just a pretty rich (19% butter, and some eggs and sugar) firm dough braided with eggs in it. The shaping was quite interesting:

Nice crumb, very flavorful, very well received by my friends.

- Hot cross buns, using Dan Lepard's recipe here: http://www.danlepard.com/forum/viewtopic.php?t=723

The interesting thing about this recipe is that it mixes the dough, retard it for 12 hours, THEN knead and shape them. Make the process pretty easy.

I tried two methods for the cross on top: equal parts of water and flour mixed together and piped on before baking, and icing poured on after baked and cooled. Most people liked the icing one, I thought it was too sweet, especially because there were so much dried fruits in the buns already. Both are tasty though.


- Colomba di Pasqua , Italian Easter Bread. Again from the "Celebration Breads". I know there are authentic sourdough version of this bread that takes days to make like Pandoro, but I was making this for a work gathering and had no time to babysit sweet starters. It's a simple straight dough method with almond paste, about 9% butter, sugar, etc in the dough. The dough was very wet, but it made a high risen, fluffy bread in the end. You can find the recipe online here: http://wandasue22.blogspot.com/2008/01/birds-of-feather.html

Shaping was not as complicated as you might've thought. The whole recipe makes two birds, for each bird, divide the dough in two equal parts, and shape as following:

Twist and get get the head and tail, pinch a bit to get the beak, and cut to get feathers:

At the end of the proofing, brush the dough with egg white mixed with water, and stick almond slices on as feathers. Dont' forget to put a bit of almond as the eye.

I think I actually prefer this to using the mold.

Very fluffy and soft crumb:


Happy Easter Everyone!

txfarmer's picture
txfarmer

From Maggie Glezer’s "Artisan Breads" again, the recipe can be found online here: http://mightymuffinblog.com/2008/04/07/polenta-bread/ , I highly recommend buying the book though.


All the sourdough breads in that book use a 60% firm starter, I recently converted a portion of my 100% starter to 60%, just to see the difference in handling and taste. The firm starter has been going for about 3 weeks now, I'd say it's definitely more sour than my liquid starter. This bread requires to mix the dough very well before adding the cooked polenta, after it's added, the dough became very wet, sticky and slack. It got some structure after 3 sets of S&F, but when I dumped the boul out of the proofing basket, it was a sad flat disk. My heart sank, I thought I'd end up with a dense pizza. Nope! It grew and grew in the oven. In fact, I definitely underproofed (the instruction specifies 2 to 2.5 hours @ 75F, I did 2 hours at 75F). From the crumb shot below, you can see the bottom is denser than the middle and top, another 30 to 60 minutes of proofing would make a more even crumb I think. The big holes were unexpected and amazing though! Must've been all that liquid in cooked polenta, the dough was slack for a good reason.


Made one boule and one batard, the spiral scoring pattern on the boule was from the book's instruction, not easy to get smooth on such a slack dough. Since I underproofed, the boule became more like a pyramid, stretched upward very tightly. To get a more rounded semi-sephere shape my scoring should've deeper, or proofing time should've been longer. Scored the batard in a "leaf" like pattern, also a bit underproofed, which explains the uneven hieght.

I liked how the bread tasted - chewy (there's some high gluten flour in there), earthy (the cooked polenta), mediumly sour. Even though the polenta on top adds texture and makes it more interesting to look at, I would skip it next time since it got very messing during cutting and eating. Polenta all over the counter, table, and floor. A very good bread to try!


Has anyone else notice that firm starters has a lot more rising power in the oven, comparing to liquid starter doughs? I am used to using my 100% liquid starter, which is why I keep under-proofing firm starter breads.

txfarmer's picture
txfarmer

From Maggie Glezer's Artisan Baking, you can find recipe here: http://www.thefreshloaf.com/node/16020/essential039s-columbia

What a great country sourdough, crumb is suprisingly open (only 65% hydration, with some whole grain and wheat germs in), crispy crust and nice chewy texture inside. I am experimenting with firm stater, converted my 100% starter to 60% last week, fed it according to Glezer's instruction in the same book. Even though my wet starter has been performing great, raising beautiful breads, but I want to explore what more flavor a firm starter can bring out, hopefully a bit more sourness. 


I am impressed by the firm starter's rising power - 4 to 6 hours of bulk fermentation (I did 5), 3.5 to 4.5 hours of proofing(I retarted the dough after shaping). It rose quite a bit in the fridge, after taking it out, I proofed it for 2 hours, it's longer than any of the doughs I made with my wet starter before, so I got nervous of overproofing, baked the bread even though the dough was still pretty bouncy. Should've listented to the dough, it exploded a bit at the scoring marks, not terrible, but definitely underproofed. Next time I'd do 3 hours after retarding.

The most impressive part is the flavor - definitely a bit more sour than my previous breads made with wet starter, just more noticable, not overpowering at all (we don't like overly sour breads, but do like some subtle sourness to make the flavor of the bread more well rounded). Along with the barley malt syrup, toasted wheat germs, and 4 different kinds of flour, the taste is deliciously complex. I would definitely make it regularly. I might try to make it with my liquid starter (with hydration adjusted) next time just to see how the dough and bread would be different. 

Since the flavor and character of a starter takes time to develope, I am going to keep this firm starter for a while, make a few more breads before deciding which one to keep.

txfarmer's picture
txfarmer

Made these following the recipe in the Tartine baking book. The recipe is 7 pages long, took me 3 days, yacks, but the results are well worth the effort. You can find the recipe online here: http://kitchenmusings.com/2007/01/my_attempt_to_m.html . I was a big fan of the bakery when I lived in CA, that's why I must try the recipe despite the intimidating details. We loved the crispy shell, crumbly texture biting in, and hollow, many layered, lighter than air crumb.


As far as taste goes, we loved how buttery they are. Long fermentation did add layers to the flavor, if we hadn't had the sourdough Pandoro a few months ago, we would've been 100% satisfied. However, being spoiled by that 90 hour Pandoro, we now think it could be improved if there's a bit more "tang". I am now searching for a good sourdough croissant recipe to try next.

Also made the chocolate variation, very good.


These are American sized huge croissants, just like how they sell them in the store. I made the whole recipe, but only used half of the dough for this batch, good call since otherwise we won't be able to finish them and my oven wouldn't have been big enough. For the other half, I will make smaller, more European style ones, so the ratio of the crispy shell would be higher.

Pages

Subscribe to RSS - txfarmer's blog