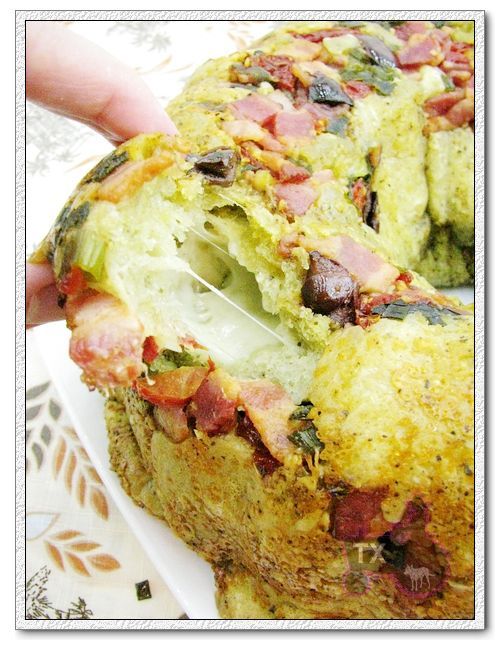
The Fresh Loaf

A Community of Amateur Bakers and Artisan Bread Enthusiasts.

txfarmer's blog

txfarmer's picture
txfarmer

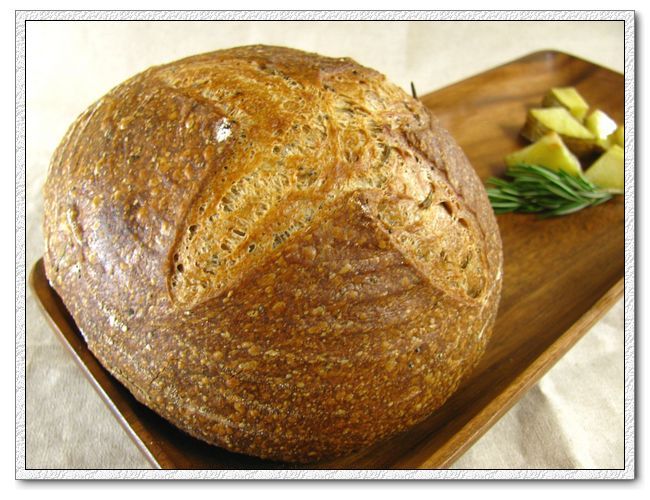
Another bread from the book "Bourke Street Bakery", using the same white sourdough dough as this hazelnut current bread. The potatoes were roasted until barely soft and chopped to big chunks, so that they don't get lost in the dough. I have had too many potato chunks disappearing into the bread, I might have over-compensated and chopped them "too big", however they are delicious though.

The book has quite a few breads using the same basic dough, with different add-ins. The flow is very easy: 2 hours of bulk rise, shape and into the fridge overnight, take out and rise again next morning, then bake. Last time I let it warm up for almost 2 hours, this time it was 1.5 hours, judging from the scoring mark and crumb, I think 1.5 hours is better in my case. Other than roasted potato, there's also fresh rosemary to complement the flavor. Original recipe also used a little soy flour and nigella seeds, I have neither, so I used equal amount of buckwheat flour and poppy seeds, a nice subtle effect.

I am still trying to get up enough courage to try the pie and tarts formulas from this book. It's 100F+ here in Dallas, not the best time to make pastry dough, but cool weather is 4 months away, sigh...

txfarmer's picture
txfarmer

Ever since Don introduced the method to combine cold retardation and gosselin baguettes, I have been eager to give it a try. David's successful try adds fuel to the fire. First I made the original Gosselin baguettes just to compare, it was delicious. Howver my first attempt with the cold retardation version ended up with an overflowing bucket in the fridge - yup, I forgot to reduce the yeast and used a container that's too small. I probably couldn've salvaged what's left in the container, but I didn't, I was too busy wiping my fridge.


This time I reduced yeast to 3/4tsp (Don added to his original post that he used 1/2tsp of yeast, but I didn't see that until ... now. Oops. Sort of decided on the # of 3/4tsp randomly, luckily it's close enough to Don's 1/2tsp.), used a combo of KA bread flour (25%) and GM AP flour (75%), kept the hydration at 75% exactly. The rest is exactly like Don's formula and everything worked out well.One thing I noticed immediately is that even though I baked them as how I bake all my baguettes, these come out MUCH darker. Is it because the long autolyse and long cold retardation brought out more sugar in the flour? They sang loudly coming out of the oven.

I used more AP flour in this batch than the original Gosselin baguettes, which means the dough's even more soft. Channeled David and the chickens, scored with an angle, got ears, however tiny, but there they are!

open crumb, comparable to original Gosselin

Here's what's unexpected about this bread:I would've thought after such a long time in the fridge (36 hours), the dough would lose some of the gluten due to too much proteolysis, especially for a dough that's mainly AP flour. However, it's the opposite. It felt MORE elastic than the original Gosselin dough during preshaping and shaping, in fact, they are so elastic that I had to fight a bit to get them to the proper length. Anyone has a good explaination? Does proteolysis activity slow down a lot at low temperature? Anyway, these baguettes are very flavorful, less sweet than original Gosselin, but more "complex".

Thank you Don for sharing with us such an innovative recipe, it was fun to make and delicious to eat.

txfarmer's picture
txfarmer


I made this decadent bread last Thursday to take to my parents in Seattle for the long weekend. The dough has cocoa powder, melted bittersweet chocolate, coffee, bittersweet chocolate chunks in it, and of course being a brioche, lots of butter (~25%). As if it's not indulging enough, I put some homemade Dulche de leche in each bun. It was a last minute experiment, and OMG, it's perfect!!!! The bread itself is not sweet at all, fragrant with the mocha flavor from coffee and chocolate, which goes so well with the sweet and rich Dulce de leche. I knew it'd be delicious, but it went way beyond my expectations, you must try this mocha+Dulce de leche combo, pure heaven.


For those who are not familiar with Dulce de leche, see this intro: http://en.wikipedia.org/wiki/Dulce_de_leche - basically it's a rich milk caramel. Even though you can buy it in cans, it's very simple to make at home. I use the slowcooker method: put cans of condensed milk (unopened, paper label peeled off) in slowcooker, add enough water to have the cans completely  submerged, cook on low for 8 hours, then you get perfectly brown and rich Dulce de leche. You can also boil the cans on stove top, but then you MUST take care to add enough water so the cans are completely submerged the whole time, otherwise you risk them exploding! If you don't like to cook it in the cans, you can use this method: http://www.davidlebovitz.com/archives/2005/11/dulce_de_lechec.html - I tried it before as well, slightly more work than the slowcooker method, but still a breeze. Once made, you can use it in breads, cakes, cookies, spread like PB or jam, or eat it with a spoon!


Now back to the bread, the dough formula is adapted from the book "The secrets of Baking" by Sherry Yard.

Chocolate Brioche (makes 2lbs of dough)

-chocolate butter

bittersweet chocolate, 2oz, finely chopped

butter, 1 stick, 4oz, softened

cocoa powder, 1/4cup

1. melt the chocolate and keep warm

2. beat butter until smooth, add cocoa powder and chocolate, beat until well incorporated. keep aside at room temperature.

-sponge

instant yeast, 2tsp

coffee, 1 cup (80F) (I used 1tbsp of espresso powder mixed with 1 cup of boiling water, cooled to 80F)

bread flour, 60g

sugar, 1/3cup

1. mix everything together into a very thin batter, cover and let rest at room temperature for 30 minues until bubbles form

-main dough

bread flour, 390g

salt, 1.75tsp

egg yolk, 4, lightly beaten

bittersweet chocolate, 4oz, chopped

1. shift flour and salt into sponge, add yolks, mix with paddle attachment on low speed for 2 minutes, until yolks are absorbed. Increase to medium speed, knead for 5 minutes. The dough is not that wet, so it cleans the bowl and wrapped around the paddle attachment the whole time.

2. on medium low speed, add chocolate butter one tbsp at a time. switch to dough hook, knead until ver well developed, smooth and stretchy. Add chocolate, mix on low until incorporated. 

3. cover and bulk rise for 2 hours until double. punch down and rise again until double, about 45 to 60 minutes (or refrigerator for 4hours or overnight).

4. divide and shape. I divided into 50g dough balls and some 25g balls. the 8 inch cake mold wiht removable bottom took one 50g ball in the center, 6 50g balls in the middle layer, 6 50g balls and 6 25g balls in the outside layer. Still had 5X50g balls left for individual rolls. Of course I did put 1tsp of Dulce de leche in each ball. You can shape in other ways of course. The book says this amount of dough is enough for 2 9X5 loaf pans.

5. proof until double, 30min for me, if you refridgerator the dough, it will take 1.5 to 2 hours.

6. brush with egg wash (1 egg yolk + 1 tbsp heavy cream), bake at 350 until center reaches 180F. Rolls took 20min, the large cake mold took 48min.

Sinfully delicious, bread doesn't get more decadent than this. I highly recommentd the dulce de leche filling, but if you don't use it, the bread is till delicious.

txfarmer's picture
txfarmer

I posted a few days ago asking why my lye pretzels are not dark enough, after much reading and some experimenting, I think I figured out why. After I mixed up the lye solution, I didn't let it sit and completely dissolve, so the solution was too weak. The first time, I mixed and dipped the dough right away. This time, I mixed up a 3.5% lye solution (between 3% and 4% is good, the higher the darker, but don't go beyond 4%) with room temperature water, let the solution sit at a safe place for 15 minutes, slowly stir for the first few minutes. The solution heated up at first, then started to become clear and cooled down. After that, dip the dough for 30sec each, bingo, this time I got the color and shine I want. The devil is in the details huh?!


Also made some other shapes, I think they look cute with wide open scoring marks.

The recipe is from Jeffrey Hamelman's Bread, I did make one change: after reading a suggestion on the web, I used milk instead of water in the formula, I do think it tastes more authentic that way. I loved how the pretzels tasted and looked when I stayed at Germany a few years ago, crispy and hard shell, soft and chewy crumb, and a special "lye pretzel" taste. It's decidely different from American style soft pretzels boiled in baking soda solution (which I also like), good to split open and make a sandwich with. I do need to work on my shaping techniques to get rid of the unsightly holes in the crumb.

I have a whole lot of lye left, will be practicing making pretzels for a while!

txfarmer's picture
txfarmer

This is my first bread made from the "Bourke Street Bakery" book. The book introduces a basic white flour white starter dough, then add various ingredients to it. In this case, it's toasted hazelnuts (yum! I am on a hazelnut kick lately, can't get enough of it), a mixture of currants and raisins (I like that combo, it's better than just currants or raisins alone), and a bit of rye starter to add some tang. In the basic dough, the white starter ratio is fairly high, which is probably why the bulk rise was only 2 hours. The dough was then shaped and put in the fridge to proof overnight. The 2nd day, I took the dough out to room temp for 2 hours then baked with steam.

Fine, you caught me, I increased the amount of hazelnuts and dried fruits again. Fragrant, sweet with some sourness, addictive.

There are a few other flavor combos in the book just jumped out to me, such as Mr. Potatoe bread, spiced fruit loaf, etc. Other than breads, there are also a lot of delicious looking tarts/pies/cakes formulas in the book, can't wait to try them. Oh yeah, the book has metric measures, and pictures of each formula, both are what I look for in a good baking book.

I don't know whether any of you have noticed some changes in my pictures. A few weeks ago, Eric kindly reached out and offered to help me to learn digital photography. I have never been happy with my pictures, when he offered, I jumped on the chance. Lessons from such a knowledgable teacher, yeah! Since then we have gone through lessons and exercises on various aspects of digital photography. I discovered so many new functions on my digital camera (just a cheap point and shoot one) that it's like I have a whole new camera for free. During this whole time, I troubled Eric with endless questions and never ending stream of less than ideal practice shots, he has been very patient and direct, encouraging but never hesitates to point out what I did wrong and what to do to improve - exactly what I needed. My pictures are still a working progress, but Eric and several other TFLers have noticed some improvement, so I just want to take the opportunity to acknowlege my appreciation for Eric's help. The following are some shots of German style lye pretzels I baked last week, I am not happy with the pretzels yet, but the pictures are the best one I have ever taken!

txfarmer's picture
txfarmer

So I finally bit the bullet and bought  "Advanced Bread and Pastry" by Michel Suas. I tried to be good and thrify, I really did. I used to borrow baking books from library, but then I couldn't let them go, wanting to keep them around in case I wanted to bake something from the books, which means I often had to pay hefty late fees and got to keep nothing. Now I just buy them. Amazon loves me, I think I will buy every book on bread baking sooner or later.:P

Now back to "Advanced Bread and Pastry" , it a wonderful book with overwhelming amount of information not just on breads, but on all kinds of baking. Besides great recipes like this Caramalized Hazelnut Squares, there are also valuable technical knowledges, which I intend to read from cover to cover. It will take me years I am sure, so in the mean time, I will bake from the book to fuel my learning! ;) Oh yearh, the book is hella heavy, so I am convinced by holding it, I am getting good strength training too!

The formula calls for no less than 4 preferments - 2 sourdough ones, and 2 commercial yeast ones. Along with making the caramalized hazelnuts, it's not a quick bread to make. However, it's not difficult either. Sticking to the formula, the bread came together pretty easily. It's a wet dough, but not as wet as ciabatta. It is however indeed shaped as ciabatta - rustic squares with no preshaping. The formula does not call for scoring, but I did anyway to one of the squres since I like the look better.

Very open crumb, studded with delicious caramalized hazelnuts, a decadent treat. I, however, am not convinced that we need all 4 preferments. I can see the rye starter preferment providing some sourness, the whole wheat sponge  probably adds some earthy ww tastes, but the white flour starter preferment and the white flour sponge virtually do the same thing, do we really need both?

Highly recommend the bread, as well as the book!

txfarmer's picture
txfarmer

The recipe can be found here: http://www.thefreshloaf.com/node/8524/philippe-gosselin039s-pain-%C3%A0-l039ancienne-according-peter-reinhart-interpretted-dmsnyder-m - thank you David!

I used a bit more than 375g of water, so I am guessing the hydration is around 76% to 78%. For flour I used whatever left in my stock: 50%+ Gold Medal bread flour, ~25%KA bread flour and the rest is GM AP flour. Stuck to David's procedure pretty closely. Took forever for the dough to double, I think next time I will add warm water with the yeast and salt. I preshaped into batards. The dough looked wet then, but not scarily so, probably because I have been handling a lot of wet doughs lately. I did shape them as normal baguettes rather than the "stretching" method, since I was afraid there wouldn't be enough surface tension otherwise. I also tried my hands in scoring these. With such a wet dough, I was just aiming to make a smooth cut, so I held the knife more vertical than usual. It worked as expected - not that much ears, but decent scoring marks. The best part is the crumb, very open and hole-y:

Can you see the shine on the wall of the holes?

They do have a sweet taste like David describled, benefiting from the long autolyse no doubt. Comparing to Mr. Nippon's baguette, which has a similar autolyse schedule, but at a higher temp, I would say Mr. Nippon's is slightly sweeter. Both are very delicious.

In the first picture, do you notice that the bottom baguette's bottom side is not brown? That's because when I took out the parchment paper after the first 10 minutes, two of the baguettes slid too close together, the almost touching sides didn't get browned properly. Another lesson learned. Next I will try this formula with cold retarding, first suggested by a few TFLers here.

txfarmer's picture
txfarmer

I changed the formula to use my 100% sourdough, the rest is as the same as the formula in the book. It's a straightforward bread, autolyse, knead a bit, add olives(I may just have used a tiny bit more than what the book suggested), gently incorporate, bulk rise for 4 hours (two folds), shape, cold retarding for 12 hours, pull out of the fridge and continue to proof for 100min, bake at 460F for 45min.

Semi happy with my scoring. The top one opened up beautifully, the bottom one was "deformed" by an olive in the way. Haha.

Ear!


And it sings!


Open crumb studed by olives (I used two different kinds). In "Bread", Hamelman suggests to keep olive percentage somewhat low to keep the cost down, being a home baker, I don't have such restrictions, so I added a bit more olives than what's in the formula. How lucky. :)

This bread may be basic and straightfoward, but it's so delicious. "Bread" is  my favorite baking book for a reason: its formulas are dependable and accurate, and of course its explanation of techniques are sound and informative.

txfarmer's picture
txfarmer

if pizza and savory monkey bread meet and have a child, it will be this dangerously delicious bread. Recipe can be found here: http://www.choosy-beggars.com/index.php/2010/02/11/bocconcini-stuffed-mediterranean-bacon-pull-aparts/comment-page-1/#comment-4560


Very easy to make, a departure from my usual sourdough and lean artisan breads, but if it tastes so good, it can't be a bad thing!


Fresh mozarella cheese in each dough ball, wrapped in butter and more cheese and herbs, layered with bacon (bacon!), sundried tomato, olives, and green onion, trust me, no one can say no to this bread. OK, maybe vegetarines can, but...you know what I mean.

txfarmer's picture
txfarmer

My MIL was visiting from China for a few weeks. Her teeth aren't the greatest, and like most Chinese natives, she prefers softer, richer breads, so I have been making mostly enriched breads lately. This Brioche dough is from the book "Tartine", from the bakery of the same name. Brioche is so versatile, one batch of dough was enough to make: Brioche Nanterre (570g of dough in 9X5 loaf pan)

Some mini sandwich loaves (160g of dough in a mini pullman pan without the lid):

and Pissaladiere (one 9 inch and several 4 inch ones)

Here's the recipe from "Tartin", slightly adapted by me, it's quite a bit of work, especially during mixing, but so worth it!

-preferment

nonfat milk, 175ML

instant yeast, 1+3/4 tsp

bread flour, 250g

1.   mix into a dough, leave at room temperature (~72F) for one hour, then put in fridge to cool it down for 1 to 3 hours.

-final dough

instant yeast, 1tbsp+2.5tsp

eggs, 3

whole milk, 310ML

bread flour, 495g

sugar, 55g

salt, 1tbsp

unsalted butter, 235g, softened but still chilled

2.   cut butter into small chunks, return to the fridge

3.    mix together preferment and yeast until completely absorbed. turn mixer to medium speed, and add eggs one by one, until absorbed. turn speed to low, and add 250ML of milk, mix well. (I find it impossible to let the fairly dry preferment dough absorb all that liquid, so I just mixed for a few minutes until the eggs and milk are well mixed together, with preferment sit in it.) add flour, sugar, and salt, at low speed mix into a rough mass, then turn to medium high to mix until the dough cleans the side of the bowl and the gluten is mediumly developed. cover and rest the dough for 15 to 20 minutes. (I am guessing the rest time is to let the dough absorb all the liquid, and also to let it cool down so it won't melt the butter.)

4.   while the dough is resting, use paddle attachment to beat the butter until it's soft, but still chilled.

5.   use the dough hook again, mix the rested dough for a few minutes at medium speed until it cleans the side of the bowl. The gluten is well developed by now. increased to medium high speed and add butter bit by bit, making sure it's absorbed completely before adding more. after all the butter is added, continue to mix for 2 minutes, the dough is very well developed and cleans the side of the bowl. now tbsp by tbsp, add the rest of the milk (60ml). by the end, the dough is silky smooth, very wet and "liquid-y", but also very elastic.

6.   put the dough in a shallow container, cover, and freeze for 3 hours to a few days. transfer to fridge overnight to warm up and finish rising before using.

7.   for Brioche Nanterre, divide 570g of dough into 6 X95g balls, put them in a 9X5 loaf pan as following (the two rows are not lined up on purpose):

for sandwich loaf, I used my mini pan, with 4X40g of dough inside:

8.   proof for 2 to 3 hours until it's at least double, and still comes back a little when push with a finger. ideally at 75F to 80F. I proofed at 78F (using my DIY proofing box) for 2 hours. brush on egg wash (1 egg yolk+1tbsp heavy cream), and let dry for 10 minutes before baking.

9.   bake at 425F for 15min, then turn down to 350F, and bake the 9X5 loaf for another 45min (I did 35min only). The smaller ones were baked at 425F for 15min, then 350 for 20min.

The dough "only" had ~32% of butter, not the richest brioche I've made, but it was definitely the "wettest" one. The high water/egg ratio, and the involved mixing process made the end results very light, moist, in addition to very rich. The 9X5 loaf pan normally takes a lot more than 570g of dough to make a decent sandwich loaf, but this dough just rises and rises:

incredible crumb:

The Pissaladiere was easier, just take 285g of dough for a 9 inch tart mold (I used a pie mold), and 57g for a 4inch tart mold. roll out to fit the pan, proof for 30 to 45min. Add typical pissaladiere toppings: caramalized onion, olives, anchoves, and cherry tomato (cut side up), brush the edge with egg wash (1 egg yolk+1tbsp heavy cream), bake at 375F for 25 to 35min. Add fresh thyme before serving.

Very soft and rich dough, matching perfectly with the strong flavored toppings.

MIL's comments after eating the pizza: "It's way better than Pizza Hut." (Pizza Hut has invaded China, and most Chinese people think that's real authentic pizza!) I sure hope so!:P


Pages

Subscribe to RSS - txfarmer's blog