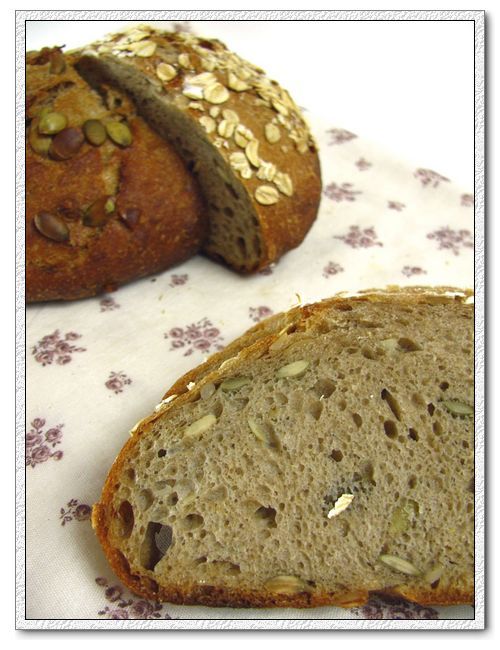
The Fresh Loaf

A Community of Amateur Bakers and Artisan Bread Enthusiasts.

txfarmer's blog

txfarmer's picture
txfarmer

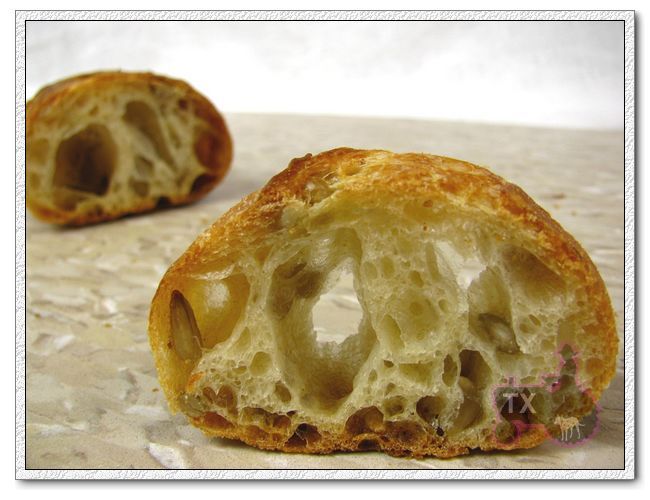
This is a variation on a formula I learned at the SFBI baguette workshop. The original version was delicious, but crumb was not that open since hydration was only 68%(probably to make it easier for students to handle). I increased the hydration to 75%, scaled the amount to fit home ovens, kept the rest the same. Still minimal hand mixing, with a long bulk rise and several folds. Delicious and nice open crumb.

Poolish Baguette With Sunflower Seeds (adapted from SFBI)

-Poolish

Bread Flour (I used KA AP flour), 163g

Instant Yeast, 0.12g (I mixed 1/2tsp of yeast, which is about 1.5g, in 150g of water, then took 12g of yeast water)

water, 163g (if you measure yeast like I did above, minus 12g of water from this amount)

1.Mix and leave at room temp for 12 hours.

-Main dough

Bread Flour (KA AP), 330g

water, 173g (I used 207 to bring the hydration to 75%)

yeast, 1g

salt, 10g

toasted sunflower seeds, 59g

malt extract, 2.5g (I used barley malt syrup)

poolish from above

2.Mix water, flour, malt, and poolish,autolyse for 20mins

3.Add salt and sunflower seeds, hand mix to combine

4.bulk rise for 3 hours, with 3 folds at 45, 90, 135min.

5.divide into 4x220g, preshape, shape into baguettes

6.proof for about 45min

7.bake with steam at 460F.

Sunflower seeds don't absort that much water, so it was a very wet dough. Scoring is tough, no ears to speak of.

Nice open crumb though

The taste is incredibly nutty and fragrant from the sunflower seeds, can't stop eating those!


txfarmer's picture
txfarmer

This is another recipe from "A Blessing of Bread", while the last sourdough challah from that book (I blogged about it here) was very traditional and authentic, this one, is definitely not. 75% of the flour is whole wheat, no eggs, just some oil and minimal honey to tenderize, no egg wash on the surface (the recipe suggests a cornstarch wash instead, I used butter), and a very hot/long bake to get the dark crust. It's not as eye catching as traditional golden challahs, but the taste is wonderful. The dark and hard crust contrasts nicely with the soft crumb, and complex ww flavor is enhanced by sourdough and long fermentation - different from all the other challah breads I've made and tasted, but got major charm of its own.

The following formula makes a 900g loaf, which is scaled down from the book:

-preferment

starter (60%), 22.5g

bread flour, 120g

water, 75g

1. Mix into a dough, cover and let rise for 8-12 hours.

-main dough

ww flour, 375g (I used King Arthur WW Flour)

water, 289g

salt, 9g

veg oil, 42g

honey, 15g

all of the preferment

2. Mix ww flour and water, autolyse for 20 minutes. Add other ingredients, mix well until glutens are well developed. About 12 minutes in my KA pro 6 mixer. See windowpane test below.

3. Bulk rise about 2 hours @73F.

4. Divide, round, relax, and braid. I tried two single braids in a 8inch squre cake pan.

5. Proof @ room temp until triple in size and do not push back. About 5.5 hours in my case.

6. Spray water on the surface, bake @430F for 45 to 1 hour, 50min was perfect for mine.

7. In the mean time, prepare cornstarch wash by mixing 1tsp cornstarch and 1/3cup water, boil until solution becomes clear. Brush onto loaf when it's hot from oven. Cool for 5 minutes, brush again. Note that I did NOT do this, I brushed the warm loaf with melted butter. The crust got a bit soft from it, but flavor was great.


Judging from the dark and hard crust, I thought the crumb would be like a hearth ww bread, nope, it's actually soft and spongy, contrasts nicely with the crust.


I love how WW breads taste, sourdough starter and long fermentation add yet another dimension to the flavor profile, definitely recommend it.

txfarmer's picture
txfarmer

I made Poliane Miche from BBA last year, tried Hamelman's version this weekend. A lot more water, still used Golden Buffalo flour, came out of the oven yesterday morning.

Crumb is more open than BBA version, which is reasonable since it has a lot more water, but not as open as the picture in the book or on some of the posts here on TFL. Might be my handling, maybe my flour is thirsty, or maybe the final proof is a tad too long (the book suggested 2 to 2.5 hours, I did 2 in my 73F house)

But, oh my goodness, I love the flavor. Came out of the oven yesterday, cut and tried a few slices this morning. Comparing to BBA version, this one is less "meaty", more "delicate" (if one can call a 3lb+ dark loaf of bread "delicate"). Only slightly sour, with a very complex flavor profile, I am looking forward to see how the taste would change in the next few days. Now I want to try the miche formula with mixed flour in the same book.

Oh yeah, "H" stands for "Hamelman" of couse, I want to try  a variety of miche recipes, then modify them to come up with my own "txfarmer house miche" formula.

------------------

Made another batch of Gosselin baguette with cold retarding (as I blogged here), I like the retardation methods, which makes it easy to have it ready for Friday dinner. It was perfect with some soup. Used KA AP flour this time, 76% hydration, and reduced yeast amount to 1/2 tsp (adjusted fermentation time accordingly).

Used the "New" shaping/preshaping techniques I learned from SFBI, very nice. Scoring is still insanely difficult with this 76% hydration dough. We like this bread so much, I am sure I will get enough practice, hopefully I will get big ears on them one day!

txfarmer's picture
txfarmer

What's better to celebrate July 4th than making/eating Chicago Style stuffed pizza?!

Followed the recipe here, I have been to chicago and ate their famous deep dish/stuffed pizza numerous times, I won't call this "authentic" (in fear of bashing from Chicago natives ), but it's indeed delicious and VERY similar to what I had from famous Chicago eateries.

My parents had no deep dish pizza pan, nor 9'' deep cake pan, so I used an 9" aluminum pan, which is 3" high, worked perfectly. The extra height allowed me to stuff more ingredients inside! My parents usually prefer Asian foods, but they loved this one - Itatlian sausage, shiitaki mushroom, spinach, loads of fresh mozarella cheese, homemade tomato sauce, what's not to love? Despite the long ingredient list, it's actually not hard to make.

For desserts, I made Japanese style light cheesecake, sometimes called "cotton soft cheese cake".

It has a tiny bit of cake flour and corn starch in the batter along with cream cheese, butter, and eggs, lighter and airier than American style cheese cake, yet still rich and moist. I used a Chinese recipe, but this recipe is pretty similar.

txfarmer's picture
txfarmer

This is a bread from "A handmade loaf" by Dan Lepard. Good thing I googled before making it, the formula has a mistake, the levain amount should be 75g, not 150g. You can see the thread about this issue, as well as the whole formula here.


This is a bread went beyond my expectations. Lemon was a prefect match for barley, bringing out its slightly sweet flavor. Crumb is soft and chewy. It's not delicate and sweet like normal lemond dessert breads, it's hearty with a nice summery undertone.


I did adjust the levain/water amount to accomodate for my 100% starter, also cut the yeast amount by half (in volume) since I used instant and the book used fresh. The dough still proofed a little faster than what the book suggests


Hey, it kinda looks like a lemon huh?

txfarmer's picture
txfarmer


I have wanted to take classes from SFBI for so long, but TX is not exactly close to SF, and my day job really gets in the way of scheduling. When I saw they started offering some weekend workshops, I jumped on the opportunity. And of course, I picked the baguette class, since that's my main obsession.

Arriving early to be greeted by friendly classmates, teacher, and lots of fresh croissants. While we were going through our class, the students were just producing breads nonstop the entire time, and lucky us got to sample a few.


Hmmm, I wonder if I can ask for this to be my birthday gift? I am sure we can fit one in.... if we tear down our living room and den!


Would anyone notice if I just take a couple?....I AM KIDDING!


Now, let's get to work, 3 types for the first day: straight dough, poolish, and sponge. All done with minimal mixing (hand mixed to incorporate), and 3 sets of S&F.


I have done S&F every weekend, but handling 7.5KG of dough is decidely different from handling 1KG. Note to self, must lift weights.

We had lectures while waiting for the dough, but my favorite part is the hands on part. Look at the big tubs of dough, this  is when I realized that professional baking is a very very very physical job. Oh, I also would like a kitchen that's as big as this!

Teacher Frank is showing us how to divide and preshape. Even pieces, even tension, repeat.

We make 5 pieces for each type of baguette, my preshaping is far from perfect


Many many many trays of dough - 15 pieces per person per day

It's almost 2pm, we are starving. Let's get these babies shaped already! My batch of straight dough baguettes here - with my name on it!

Lunch , thank goodness. We inhaled that one. On 2nd day, we had pizza (yum!) and wine for lunch. Let's just say there were a lot more giggling in the afternoon session.

Well fed, let's check on the dough, ready to be scored and baked!

Loading is "interesting". Frank also showed us the home oven method (baking stone, cast iron skillets underneads to create steam etc.).

Best part, time to taste and critique! These are Frank's, hole-y and beautiful

These are mine. The dough is about 68% hydration, not so wet, so scoring was not difficult, I am semi-happy with the left two, no idea what happened for the one on the right. Seems that I loaded it too close to the right edge, didn't get browned on that side. It's straight dough, poolish, and sponge from left to right.


Not as open as Frank's crumb, need more practice with the new shaping method.


We all like the taset of sponge one the best, but all three are delicious.


We did 3 more formulas on the 2nd day (With teff, with sunflower seeds, and ww with wheat germ), and tried epi too.


All in all, a great experience! A lot of the info were familiar to me thanks to the knowledgable people here at TFL, but it helps tremendously to see close up how a professional handles the dough , and practice on 15 baguettes each day. Frank was very helpful answering questions and helping too. The shaping and preshaping methods are slightly different from what I have been doing previously, I like this new way better, will keep practicing at home for sure. Everyone ended up with loads of bread at the end of each day, since I was from out of town, I gave most of mine away to a classmate, who then distributed to elders in her neighbourhood - makes me happy.


txfarmer's picture
txfarmer

Pain au Levain, delicate, well balanced flavor. Not sour at all. DH loved it, I prefer it a bit more sour. Borrowed this shape from SteveB's blog here

Another shape:

Nice open crumb, for a 65% dough, it's surprisingly open:


Now the semolina Sourdough, pretty straightforward formula, the dough indeed rose pretty fast just like the instruction says

I didn't mix sesame into the dough, put them on the surface instead. The shape is from "Amy's Bread". I like how the seam opened up during baking, and sesame got seperated on either side.

Open crumb, but holes are mostly distributed on the outside, probably due to the swirl shape

Made semolina pasta to go with the semolina sourdough above

With homemade pesto sauce & a generous piece of salmon, yum!


txfarmer's picture
txfarmer

Thank goodness for TFL, and good thing I did a search here before making this formula (I always do that with this book, just too many errors). The starter amount is wrong in the book, should be 75g rather than 300g. With that corrected, the process was pretty painless.


I was careful not to overproof since the dough has quite a bit of gluten-less buckwheat flour in it, and it's hot hot hot here in Dallas. Nice open scoring marks with good volume.


Crumb is more open than I expected, especially with all that kneading. I love the nutty taste of buckwheat, crumb is chewy, crust is crisp, very fragrant.


It's a bread I will definitely make this bread again.


I finally bought a hand cranked old fashion pasta roller, made buckwheat noodles! Told ya I love buckwheat.


Took a few tries to get it right, but it worked once I figured out the appropriate recipe. It's from my Cooks Illustrated Pasta and Noodle book, but here's an online version that's similar: http://blackberrypockets.blogspot.com/2008/02/buckwheat-noodles.html


A nice light dinner.


txfarmer's picture
txfarmer

Both are from the book "Advanced Bread and Pastry". I have been baking from it a lot lately as you can tell from my blog entries, my feeling about the book is mostly positive, with some caveats. It''s a textbook for SFBI students, and stays true to that premise. I like the fact that it not only has interesting recipes, but also solid theories. Some material doesn't apply to home bakers (flour enhancement etc.) and instructions mostly assume a professional baking environment with all the neat tools, but I don't mind, I like seeing the behind the scene theories and operations, with the principals explained, it's entirely possible to adapt the instructions to my own kitchen. The bread part is only 1/4 (if that) of the book, but it's a lot of material since the whole book is huge and dense - dense in both abstract and physical sense, I am getting an arm workout just holding it! However, textbooks often require in class instructions to make them complete, and this book is no exception. There are blanks in the book I can't fill by just reading it: various starter hydration ratios are not specified, formulas just say "stiff starter", "rye starter" etc.; some breads have interesting shaping procedures, but they are NOT outlined at all in the book, this Pain de Beaucaire is a well known example, the pear buckwheat bread is another; as I found out recently, some formulas have mistakes, the two castle rye I blogged last was a good example, there's also no picture of the bread, so I can't even guess from the crumb/crust. Unlike reliable cover-all books like BBA or "Bread", this book often leaves me feeling like a student who has skipped one too many classes (a scenario I am familiar with :P). However, these flaws can be easily overcome with the help of internet. I found shaping instructions (with step by step pictues) for both the pear bread and this pain de beauaire from wildyeast's wonderful blog; got the formula error figured out after noonesperfect emailed SFBI for me; other minor details like starter hydration can be approximated with educated guess. All in all I am glad I bought this book, and I will keep baking a lot of breads and other items from it (all those beautiful cakes!) - with the help of knowledgable resources from TFL and blogs of ex-SFBI students.


Now the breads:

1. Baked SF Sourdough a few weeks back. Recipe can be found here. Probabaly not a good idea to make the Auvergnat shape, then proof it upside down in the brotform overnight. Part of the "hat" got stuck, and it became crooked during baking, kinda a funny look huh?

Nice open crumb, not nearly as sour as I expected, probably due to my "not very sour" starter. However it IS more sour than my usual sourdough which uses a liquid levain with an overnight proof.

2. Baked the Pain de Beaucaire last weekend, what an interesting shaping procedure! Without Wildyeast's instruction, I would've never guessed how it's done.

The big holes in the middle are created by pockets of wheat bran and water/flour paste (as you can still see some wheat bran on the wall of the hole), sort of a "cheater's way" of getting holes in the crumb. :P However the rest of the crumb is pretty open too.

It's a bread with both levain and commercial yeast, so pretty quick to make. The taste is clean, crumb is nice, cool, and chewy, crust is thicker than a baguette.


Still amazed that a 60% hydration dough can lead to a bread this light and open.

txfarmer's picture
txfarmer

This was the bread that confused me last week. The original formula in "Advanced Bread and Pastry" just seemed to have too much yeast (in addition to a whole lot of rye levain), and too long of a bulk rise and proof. Having faith in the book, stuck to the formula for the first try, massive failure. Overrisen and overproofed even after I cut the proof time in half, and drop the temperature by 10 degrees. Not one to give up easily, tried again with much less yeast (1/10 of original amount), nice results, even though I am not entirely sure ths is how the original formula intends to be.


There isn't a picture of the final product in the book, took a bit of google skills to find someone's flicker account, in which there are some photos of him taking the SFBI whole grain workshop. In two pictures, there's a glimp of this bread, they are covered by seeds and oatmeal flakes, which the book didn't mention, so here's my version of this bread.

- levain

medium rye, 85g

water, 68g

rye starter (100% hydration, no idea what hydration the original formula asks for), 10.5g


1. mix and fermentate at room temp for 12 hours.


- soaker

coarse whole wheat flour, 25g

oat flakes, 25g

sunflower seeds, 25g

pumpkin seeds, 50g

water, 121g


2. mix and soak at room temp for at least 2 hours


- main dough


bread flour, 127g

high extraction flour, 127g (I used Golden Buffalo)

medium rye, 64g

water, 165g (this is more than what's in the origainl formula, I find the dough way too dry otherwise)

salt, 11g

instant yeast, 1/8tsp (the formula calls for 1/8oz ==3.5g, 1/8tsp is about 0.38g)

honey, 7g

all soaker

all levain


3. mix everything togethe except for salt, yeast, and soaker, autolyse for 20 minutes. Add salt and yeast, mix until medium development, knead in soaker. At this point, the dough became MUCH looser and wetter. S&F came to the rescue!

4. bulk rise for 1.5 hours at about 73F, S&F at 20, 40, 60 minute.

5. divide, round, rest for 20 minutes.

6. shape into boules or batards, and place close to each other so they can proof into each other. Proof for 50 minutes. spray water, and put seeds and oat flakes on top. No need to slash.

7. bake at 450F for 35 minutes, the first 10 with steam. I covered the top for the last 15 minutes so the seeds and flakes don't get burnt.


The surface is crunch and frgrant with seeds; crumb is soft and moist from the soaker; seeds add great crunch; rye(~37%), ww, high extraction flour mingle together and create a very nice earthy flavor. A delicious and hearty bread, worth all the trial and error.


Pages

Subscribe to RSS - txfarmer's blog