The Fresh Loaf

A Community of Amateur Bakers and Artisan Bread Enthusiasts.

Recent Blog Entries

wassisname's picture
wassisname

These are a couple of the bakes from my ongoing attempt at combining methods from Whole Grain Breads and Tartine Bread into a simple, mostly whole wheat sourdough.  The bread is turning out pretty well - crackled crust, soft, springy crumb, lovely flavor.  It's amazing what even 15% white flour will do for the texture of a whole wheat bread.  The hardest part is just making up my mind about the details!

I'm still tinkering with the hydration (the first photo is 79%, the second is 82%) and trying to hit the proofing time just right (first photo could have used a bit more, the second a bit less).  I think I like the first loaf better.  The loaf in the second photo is also a product of forgetting-to-turn-the-oven-down-when-you-take-out-the-steam-pan.  It baked at 500º F for better than 30 minutes before I noticed.  It was a very near miss... whew!  I'm also thinking that reducing the size of the loaves would help lighten up the crumb a bit, I'll have to try that one of these days.

Trying to apply this to a 100% whole wheat bread is turning out to be another matter altogether, but that's for another post.


This is where the formula stands at the moment, but the tinkering is far from over.

-Marcus

varda's picture
varda

Over the last month or so I have been chasing the elusive yeast water open crumb.   I was working under the theory that one could replace a regular poolish with a combination of yeast water and flour and then bake as usual.   This ran into some technical problems - namely aggressive protease action.   In trying to figure out how to respond to this, I came upon the following enlightening sentence in Hamelman: "Protease is an enzyme whose function is to denature protein, and in a loose mixture like poolish, protease activity is relatively high."  I think this means that protease is generated by yeast as it tries to digest (i.e. denature) the proteins in flour and that in a poolish environment at 100% hydration and with an unknown quantity of yeast in my yeast water  that I was overdoing it.   This time, I pulled back on the amount of yeast water and the hydration of the poolish but not on the hydration of the bread.    The result was much better.  

I have still not got the cuts to open as I would like, but I am quite happy with the flavor which has a lot of depth and somewhat happy with the crumb.   Suggestions for improvements are most welcome.

Formula:

7/5/2011


Final Dough

    Poolish

     Total

  %

KAAP

500

150

650


Yeast water


120

120


Water

340


340

71%

Salt

12


12

1.8%

Poolish

270


23%


1122


Method:

Mix yeast water and flour night before.   Leave on counter for 12 hours.   Add flour and water for final dough and mix to develop dough.   Autolyze 1/2 hour.   Mix in salt and mix again.   Ferment for 30 minutes, then stretch and fold in the bowl.   After 30 minutes stretch and fold on the counter.   Gather dough together and do a loose shaping.   Do a third stretch and fold after 30 minutes and another shaping.   Let ferment for 30 more minutes.   Cut in half and preshape.    Rest for 20 minutes.   Shape into batards and place in couche.   Proof for just over an hour.   Bake for 20 minutes at 450 with steam, 25 minutes without. 

A few notes about this.   The dough was quite liquidy until the first counter stretch and fold when it came together pretty nicely.   This was despite two 3 minute mixes in a kitchenaid at progressively increasing speeds.   It was difficult to slash because it was quite sticky and the blade got caught.   

Franko's picture
Franko

Since posting my last effort at making the Pane Tipo Altamura http://www.thefreshloaf.com/node/24102/pane-di-altamuramy-ongoing-project it's been an unexpected pleasure to have received so much interest and support for this project from so many TFL members. Thanks to everyone who's responded with new information, tips and suggestions, videos, etc, but especially to David Snyder for taking enough interest in the project to do his own bake of the bread. http://www.thefreshloaf.com/node/24139/pane-tipo-di-altamura-quotlocal-breadsquot

It's always a bonus when you have David's insight and scrupulously well taken notes to refer to. I found them very instructive before beginning this latest bake. Thanks David!

Although I strayed slightly from some of the criteria outlined in the Altamura DOP document, http://eur-lex.europa.eu/LexUriServ/LexUriServ.do?uri=OJ:L:2003:181:0012:0019:EN:PDF I feel I could have stayed within the criteria and produced a bread of similar quality and attributes as this latest effort. Something I'll endeavor for future bakes now that I have a much better understanding of the process.

The most significant difference between the DOP regs and what this mix included is the percentage of preferment. The DOP calls for 20% of preferment and I used 24.25%. Overall hydration (not counting that of the starter) was slightly higher than 60% regulation at 62% . Other than that it stayed reasonably close to what was outlined in the DOP.

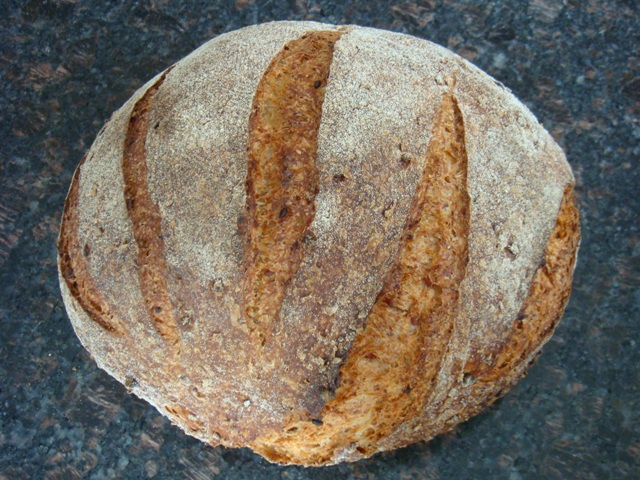
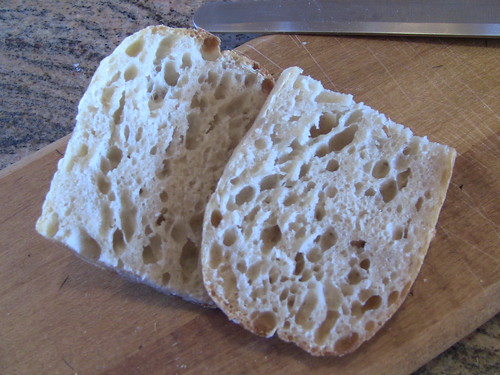
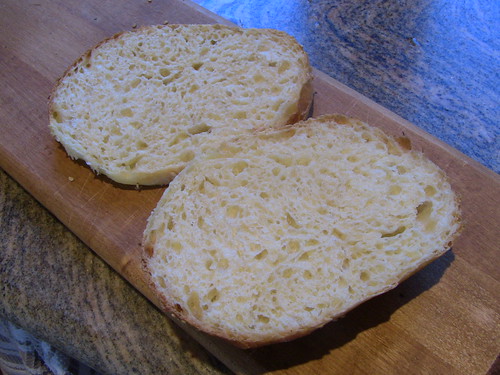
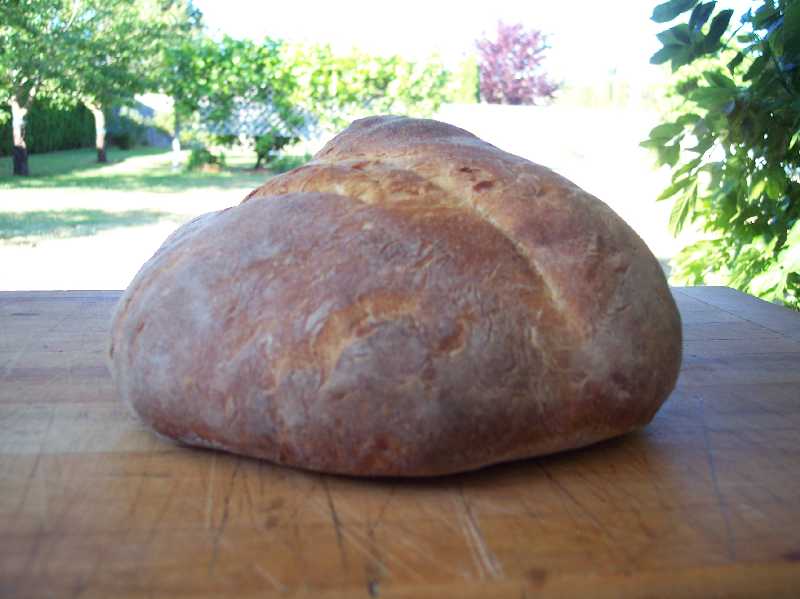
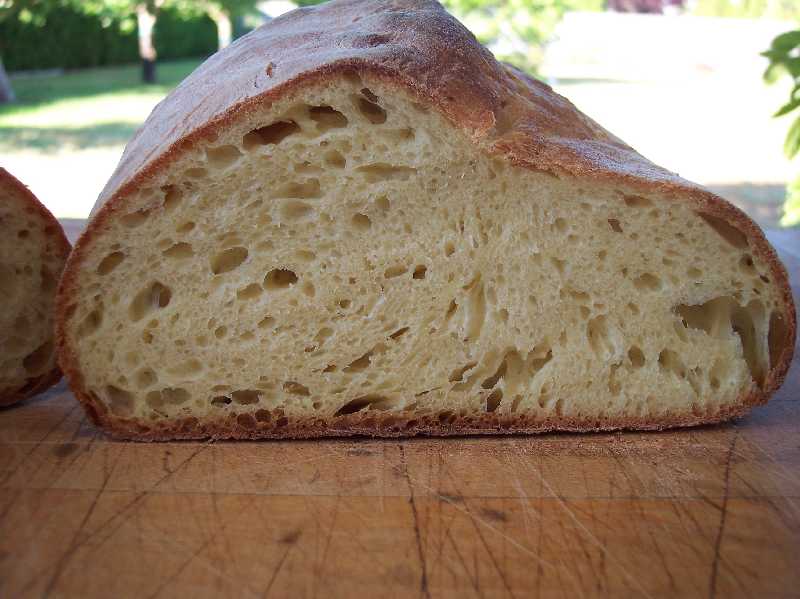
The differences between this dough and the last one were like night and day in terms of the texture and fermentation. The preferment was considerably stronger, and why I'm sure that had I used only 20% instead of the 24%, I would have achieved very similar results. The lower hydration of this dough also made a world of difference to the crust and crumb.The crust is crackly, with a good chew to it, and a rich, toasty flavour.The crumb is wonderfully moist, almost spongy, with a medium level sour background that lasts on the palate well after eating. It's not so strong that it wouldn't compliment anything within reason on the sweet side, and pretty much everything on the savory. Very tasty stuff indeed!

Taking this bread out of the oven last night was one of those classic whooohooo! moments I know all of us have from time to time in our baking pursuits. It's been a while since I've had one of those, and the first I've had since starting this endeavor, so it's a genuine pleasure to be able to share what I regard as a first success of the project with everyone here on TFL.

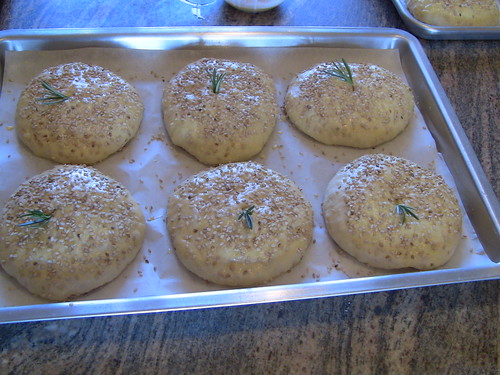
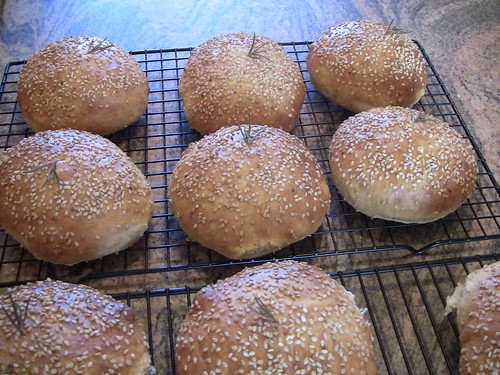
Formula, procedure and photos below.


Best Wishes,

Franko


Pane Tipo Altamura


Ingredients

%

Kg/Grams

Preferment


Semolina flour starter

32

32

Duram flour

100

81

Water

100

81

Total


194


Final Dough


Durum flour

100

800

Water

59.2

474

Preferment

24.2

194

Sea salt

1.9

17

Total weight


1.49

Total Hydration

62.9


PROCEDURE:

Semolina flour starter;

Mix equal portions of semolina flour and tepid water and keep covered at 65-70F. Refresh daily over the course of 3 days. Reduce the water by 50% on the last feeding to thicken the starter and build acidity.


Preferment;

Build the preferment over 24 hours in 3 stages using equal increments of the total flour and water indicated in the formula. Keep covered at 70F.


Final Dough; Hand Mix- DDT 76-79F Oven temperature of 450F


Combine the flour, water, and preferment and autolyse for 30-40 minutes. Add the salt and adjust the hydration slightly if needed to form a medium firm dough. Knead the dough on the counter for 3-4 minutes until the dough is smooth and cohesive.

NOTE: throughout the kneading and the stretch and folds to come be aware of any signs of tearing on the dough surface. When this starts to show, stop working the dough and let it rest.

Place the dough in a bowl and cover with linen or plastic wrap and begin the 2 1/2 hr bulk ferment.

Stretch and fold the dough in the bowl every 30 minutes during the course of the bulk ferment. The S&F's can be done several times (8) before tearing begins to show depending on the individual tolerance of the dough at hand.

After the last S&F allow the dough to rest for 15-20 minutes then round and rest a further 15minutes. On a well dusted counter press the dough into a thick disc. Fold the bottom half of the dough to almost meet the edge of the top half, or approximately an inch back from the edge.

Place the dough on well floured piece of linen, cover with another piece of floured linen and begin the final rise of 1 to 1-1/2 hours. When the dough is not quite fully proofed slide a peel under the dough and transfer it to a 450F preheated oven and stone. Leave the door ajar and the vents unblocked for the first 10 minutes. Note: No steam is used.

Close the door and bake for 15 minutes before rotating the bread for even colouring. Continue baking for 10 minutes before lowering the temperature to 430F with a further 15-20 minutes of bake time. Lower the temperature to 300F, prop the door ajar and bake for 10minutes. Tap the bottom of the loaf for a hollow sound to ensure complete baking.Turn the heat off and leave in the oven for ten minutes then remove to a wire rack and cover with linen. When the bread has cooled for 6 hours or more dust off the excess flour before slicing.

Floydm's picture
Floydm

Hi hi from Vancouver, British Columbia!

My family and I are spending the remainder of summer up here, with me telecommuting back to the office a few days a week.  

There is a ton to see and do here.  Bakeries are, of course, on my hit list.  I've already sampled a fair share.  I visited Siegel's Bagels our first morning here. 

Their bagels are so, so good.

Terra Breads are quite good and easy to find in the local grocery store and on Granville Island.  I hit Mix: the Bakery this morning (beware, music on the website) and tried their scones, which were heavenly. The flat bread selection at the local market is amazing, too: pita bread, naan, taftoon bread, and other flat breads I've never seen or heard of before.   Many more photos and posts from up here as I get out and explore the city.

-Floyd

Mebake's picture
Mebake

I made this bread yesterday from Hamelman's yeasted prefermets section. I used 50% Strong white Hovis bread flour, and 50% Snowflake Nutty Wheat Flour. As the latter contains too much bran, i adjusted by adding some all purpose flour to the final dough.

I mounted two baking stones on two separate racks. The oven spring was better this way, i think. I used Sylvia's Steaming technique.. (very effective).

I cut some slices today morning, and the bread smelled strongly of buckwheat. I used buckwheat in lieu of millet called for in the recipe. The crust is crunchy, and the crumb is soft and satisfying. I love this bread!

Khalid

dmsnyder's picture
dmsnyder

You can go nuts trying to find the perfect pizza dough formula. The cookbooks and the web are full of recipes for various types of dough and full of opinions regarding the type of flour to use, the ingredients (beyond flour, water, salt and yeast) and the mixing and fermentation methods that work best.

My goal for today was what I understand to be classic pizza napoletana. The dough should consist of the four basic ingredients only – no oil, sugar, malt or other stuff. The crust should be very thin and crisp on the bottom, not soft or soggy. The toppings should be minimal, so the crust is the main attraction.

After reading through many, many recipes, I settled on the one in Maggie Glezer's “Artisan Breads.” It uses the 4 ingredients only. It is for a Naples-style pizza. It is credited to Emanuele Leonforte of Hosteria restaurant in Port Chester, New York.

Leonforte uses a mix of Doppio Zero and high-gluten flour that Glezer calculates as resulting in about 12.5% protein. He uses a remarkably short mix. He ferments the dough for a long time but only once. Glezer gives the option of retarding the dough overnight and fermenting it the next day, and that fit best with my schedule. The method I used is described below.


Ingredients

Wt.

Baker's %

KAF Bread Flour

500 g

100

Instant yeast

1/4 tsp

0.2

Salt

10 g

2

Water, lukewarm

330

66


Method

  1. Measure the flour, yeast and salt into the bowl of a stand mixer and mix them.

  2. With the dough hook in place and the mixer at slow speed, gradually pour in the water.

  3. Mix until the dough forms a ball and cleans the side of the bowl, about 3 minutes.

  4. Cover the bowl and let the dough rest for 10-15 minutes.

  5. Mix the dough at Speed 2 for about 3 minutes. It should be fairly smooth but will not pass the window pane test.

  6. Transfer the dough to a lightly floured board and divide it into 4 equal pieces of about 200 g each (to make 10 inch pizzas).

  7. Shape each piece into a tight ball.

  8. Place each ball into a 1 qt Ziploc bag with a tablespoon of olive oil. Roll the ball in the oil and seal the bags.

  9. The dough can be refrigerated overnight, frozen for later use or allowed to ferment at room temperature for 5 to 6 hours for use the same day. (I refrigerated two balls and froze two.)

  10. For refrigerated dough, remove it to room temperature 3-5 hours before you plan on making the pizza, depending on room temperature.

  11. An hour before baking, pre-heat the oven to 500ºF (or more, if possible) with a baking stone on the middle shelf.

  12. Remove one ball at a time from its bag and shape into a 10 inch round by your method of choice.

  13. Top the pizza as desired, immediately transfer it to the baking stone, and bake for 8-10 minutes until done. Repeat for additional pizzas.

The toppings I used for each pizza were:

  1. Brush the entire surface of the shaped pizza dough with olive oil.

  2. Sprinkle with a tablespoon of finely chopped fresh rosemary.

  3. Sprinkle with a large clove of garlic, sliced very thin.

  4. Distribute on the pizza a cup of cherry tomatoes, halved, cut side up or a cup of fresh roma tomatoes peeled, seeded and cut into quarters.

  5. After baking, optionally top with fresh arugula or basel leaves.


Pizza with Cherry Tomatoes, pre-bake

Pizza with Cherry Tomatoes, baked

Pizza with Roma Tomatoes, pre-bake

Pizza with Roma Tomatoes, baked

The results were wonderful! The dough stretched easily to paper thin without tearing and baked so crisp there was no sagging when a slice was help up by the corona. Biting into it was a noisy crunch. The flavor of the crust was delicious. The whole experience sold me on minimalist toppings.

Pizza bottom crust

Thin crust

Crust

I don't think adding a few capers, or olives or mushrooms would do any harm, but I don't think making pizzas with heavy saucing, lots of cheese or lots of anything will be tempting again.

 The pizza was a nice follow-up to last night's bruschetta.

Bruschetta with fresh funghi porcini and with tomatoes and basel

David

Submitted to YeastSpotting

SylviaH's picture
SylviaH


This sourdough focaccia if based on the excellent post,  for a 'sourdough raisin focaccia' by bwraith.  http://www.thefreshloaf.com/node/2581/sourdough-raisin-focaccia

 I halved the recipe and adjusted the hydration to use all duram flour to mix with my regular bread flour sourdough pre-ferment.  It turned out very much to our liking, my husband ate 3 slices and said he liked it best with the goat cheese.  Thanks to Franko recent posts on using duram flour, I was inspired to bake a semolina sourdough focaccia today.  I knew my figs were not going to wait for my next wfo baking!

So for winging this recipe, it turned out quite delicious. 

                                       The focaccia is steamed oven for 10 minutes.  Placed in a 10" oiled pan.


       Happy Fourth of July!

               Sylvia


GSnyde's picture
GSnyde

This weekend has been pretty much perfect.  We’re on the North Coast.  The weather is sunny and mild.  The birds and flowers are enjoying Summer.  I’m barbecuing three nights in a row (loin lamb chops, Bulgogi and Tandoori Chicken).  And I baked something new and something familiar; something sour and something sweet.

After my Bouabsa baguette fail a couple weeks ago, I didn’t panic.  And I didn’t fall back on the old reliable (and always wonderful) proth5 Bear-guettes for my next baguette bake.  Yesterday, for the first time, I baked the Baguette Tradition After Gosselin After DMSnyder which Brother David recommended (http://www.thefreshloaf.com/node/23821/baguette-tradition-after-phillip-gosselin).  According to the instructions, I divided and “shaped” the gooey dough into “baguettes”, with no proofing before baking.  The shapes are sorta long and skinny—skinnier in some places than others, but they basically refused to be pulled into any regular shape.  I believe the term “roosteek” makes them sound prettier than the term “gummy snakes”.

The crumb also is not perfect.  Better than the Bouabsa ones, but still just a tad rubbery.  Perhaps under-fermented.  The crust is nicely crispy.  The flavor is outstanding, a bit sour and very complex. 

I’ll try this formula again.

Tomorrow is my brother-in-law’s annual barbecue, and today I made a bunch of Sylvia’s amazing sandwich buns (http://www.thefreshloaf.com/node/17329/buns-sandwiches) for burgers.  I had tried this formula before, and again found it simple and satisfying.  I made 14 of them with a double batch of dough.  The convection oven allowed me to bake two pans together (oooooh!).

Here they are ready to go in the oven.

And here’s the finished product.

They are delicious!  My wife says I should have made seven more so we could have a 21 bun salute for the occasion.

I leave you with a view of the garden we love to tend.

Happy Independence Day to all!

Glenn

hanseata's picture
hanseata


In front of the store where I sell my breads I saw a bed of lavender in full bloom. The smell was wonderful, recalling memories of glorious summer holidays as a student in the Provence. It also reminded me of a bread recipe with lavender that I always wanted to try, and some lavender cupcakes I had made last year, but wasn't quite satisfied with.

The lavender buds in my garden have not opened, yet, but I have some dried lavender flowers, and the assurance of reliable sources in the internet that fresh and dried lavender had the same strong aroma, and were therefore interchangeable.

At the first bite the breads' seasoning appears a bit unfamiliar, but then the taste buds open up, and welcome the subtle lavender flavor - a hint of Provence.


LAVENDER BREAD (6 mini breads)

STARTER
22 g whole wheat mother starter (or white starter)
63 g all-purpose flour
45 g water

DOUGH
3 g instant yeast
270 g water, lukewarm
all starter (130 g)
400 g all-purpose flour
100 g bread flour
20 g sugar
12 g salt
1/2 tsp. vanilla extract
1 1/4 tsp. dried lavender flowers, or fresh lavender flowers (from 6 stems)

DAY 1
In the morning, mix starter. Cover, and let sit at room temperature.

In the evening, dissolve yeast in warm water. Add to all other dough ingredients. Mix at low speed (or by hand) for 1 - 2 minutes, until all flour is hydrated. Let rest for 5 minutes.

Knead at medium-low speed for 2 minutes, adjusting with more water as needed (dough should still be sticky). Continue kneading for 4 more minutes, the last 20 seconds at medium speed (dough should still be somewhat sticky).

Transfer dough to lightly floured counter, and (with wet hands) stretch it gently into a rough square, and fold it like a business envelope. Turn it 90 degrees, and, from the small sides, fold it again in thirds.
Gather dough package into a ball, tucking edges under, and place in lightly oiled bowl (seam side down). Cover, and let rest for 10 minutes. Repeat Stretch & Fold 3 more times, with 10 minute intervals. After last S & F place dough in oiled container with lid, and refrigerate overnight.

DAY 2:
Remove dough from refrigerator 2 hours before using. Its volume should triple.

Preheat oven to 425 F/220 C, including steam pan.

Divide dough into 6 equal pieces, and shape first into rounds, then roll them into strands. Score, cover, and let rise at room temperature for ca. 45 minutes.

Bake breads at 425 F/220 C for 12 minutes, remove steam pan, rotate loaves, and bake for another 13 minutes, until golden brown (internal temperature at least 200 F/95 C)

Let breads cool on wire rack.

This recipe is an adaptation of Richard Ploner's Lavendelbrot (from: Brot aus Südtirol).

HokeyPokey's picture
HokeyPokey

No crazy marathon baking for me this weekend - just one loaf of bread and one apricot frangipane tart.

I love English apricots - a massive box for £2.50, can't complain, can I? I wonder if I can make a recipe for Apricot bread? Hmmm....


Meanwhile, I did a take on Western Wheat Bread from "Discovering Sourdough" e-book. I have a comment "very good" written next to the recipe in a print out - I do remember it being good when I made it last time, following the recipe exactly. Now I've decided to play around with the recipe a little bit - it came out looking quite nice, can't wait to cut it open and have a taste of it tomorrow.

Full recipe and pictures here

Pages

Subscribe to Recent Blog Entries