The Fresh Loaf

A Community of Amateur Bakers and Artisan Bread Enthusiasts.

Recent Blog Entries

glora's picture
glora

Hi all,

Is there anywhere that I can rent or lease a steam injected stacked deck oven?  I am looking for a bakery to rent space that has such an oven and it has been very hard to find.  I live in LA and don't think that there are many bakeries that have this type of equipment.  Any feedback would be appreciated.

Gena


varda's picture
varda

It has been hot here, and doesn't always seem like the right time to make bread, but this morning it was almost chilly, and before long the kitchen warmed up to 76degF.   A perfect day for pain au levain.  I recently rediscovered King Arthur White Wheat flour and decided that should have a role, as well as having gained a fondness for Arrowhead Mills stone ground whole wheat.    Mixing flours always seems to bring out the best of both, so there's no need to choose.   I went back to my teacher, Mr. Hamelman,  and followed his procedures if not his formula.   They are so straightforward and powerful.   After banging my head against the yeast water wall, it was fun to step back and make a simple pain au levain.  

and also fun to photograph outside with plenty of light and color:

Hopefully next bake will be in my newly rebuilt wood fired oven, which is drying as we speak.

Formula:

7/14/2011


Final

Starter

Total

Percent

Bread Flour

250

140

390

60%

Rye


9

9

1%

Whole Wheat

125


125

19%

White WW

125


125

19%

Water

354

101

455

70%

Salt

12


12

1.8%

Starter  

250


23%


1116


Mix all but salt.   Autolyze 1 hour.  Add salt.  Ferment for 3 hours with 2 S&F.   Cut and preshape.   Rest for 20 minutes.  Shape and place in couche.  Proof for just over an hour.   Bake at 450F for 20 minutes with steam, 25 without.


codruta's picture
codruta

Hi everybody. I made a light loaf with 19% rye flour. I took my inspiration from hamelman's Vermont Rye Sourdough and from txfarmer http://www.thefreshloaf.com/node/23852/light-rye-cumin-and-orange. I used a liquid levain 100% and 20% of the total flour was in the preferment. The dough had a 72% hydration, but I was surprised of how easy was to handle it. I usualy have difficulties in handling very wet dough, especially in final shaping.

The formula was:

270g AP flour

80 g Rye flour

230 g Water

160g Liquid Levain 100%

9 g salt

9 g caraway powder

zest from a big orange.

After autolyse, I added the salt and caraway, I mixed the dough with my tiny spiral mixer, I added the orange zest, and did the rest of the mixing by hand. I let the bulk ferment for two hours, with 2 S-F at 40 minutes interval. It is very hot here, maybe 29-30C, or even more. After shaping I put the dough directly in the fridge for 10 hours. It increased its size very much during second fermentation. I baked it directly from he fridge, on a baking stone, with steam in the first 15 minutes.

I thought the taste from the orange zest would be more fragrant, but it wasn't. Even the caraway flavor got lost somehow... it's distinct, but not like it would have been if I'd used whole caraway seeds. The loaf was very very light, like a feather, I have no idea why. The crumb is sweet, soft, with no sour taste at all. I liked it, but I don't consider it a favorite.

You can read full post with more pictures at my romanian blog, with sidebar translation. Apa.Faina.Sare.

SylviaH's picture
SylviaH

After a couple failed attempts using semolina grind for my starter.  My starter was going great with the duram flour.  I had only enough duram flour left for one loaf of Franko's Altamura.  I gave it a go today in my wfo.  Franko's formula 'Rocks' 'lol'.  I hope to have a better bake next go round.  My oven was to hot and the bread was getting overproofed, just to many irons in the fire today!


                   Altamura and SD Boules


                Oven was to hot and I hope to do better, next go on the crumb, shaping and timing :-)


                           Bread was over proofed and so went into an un-stablized oven that was to hot. 


                                    Something new.  B

aking with door off.  No steam added and there is a small fire to the left of the oven, mostly                                        hot coals.


                         Apricot, brown sugar, almond, dessert pizza, dusted with powered sugar


                                     My new DVD came today.  Ciril Hitz, new wfo baking dvd.  K.Hitz gave me a shipping discount :)

                          Altumura, SD boules and SD pizza balls.


                                       Altamura 


                                                         SD Tomato Pizza with fresh Mozz


                              Garlic wfo roasted chicken and little pre roasting of apricots for the dessert apricot pizza


                                                    wfo roasted organic chicken for tomorrows sandwiches


                                                    To be enjoyed on Franko's Altamura bread Panini style.  

                                          ADDED:  up to late, long day..added link in to Franko's formula for Altamura 'altumura' 'lol' should have

                                                           got that right.  I apologize Franko :) 


             Good to be baking!

              Sylvia


GSnyde's picture
GSnyde

If one prepares and freezes stocks and stews and sauces, and breads, it  is necessary to re-organize one's freezer frequently.  In my case, "frequently" means approximately annually.

I recently went on an expedition in my freezer, to determine whether there was a stash of frozen pesto there (there was not, so I have another project when I didn't need to have another project).  In the course of my expedition (picture pitons and ice axes), I realized that I was reorganizing my freezer.  Fine, it needed it.

In the process, I came to a useful realization: Bread that isn't very good frozen and then thawed (e.g., my cheese-onion-curry bread) just sits in the freezer, gathering age, with no real prospects for a happy future.  This is especially true of breads that don't make good croutons or bread crumbs or altus (the proper destiny of most mediocre loaves).  So, I've adopted a new rule: don't make more cheese-onion-curry bread than we can eat or give away within a day of baking.

Also, in the process of organizing my freezer, I found a forgotten treasure.  Way in the back, in the bottom, behind and/or beneath the 2010 baguette experiments (destined to be crumbs) and the 2010 Smoked Turkey Gumbo (destined to be dinner this week), I found one of the first pan loaves I ever baked.  Labeled "Honey Whole Wheat Bread September 2010", it appears from my blog that this bread was baked on September 28, 2010, approximately one month after I started baking bread.  I didn't really remember this bread, but I had bacon, lettuce and tomatoes on hand and I was not interested in a BLT on stale baguette.

So out came this frozen specimen, like a Mastedon from the Arctic ice.  Unlike a Mastedon from the Arctic ice, however, it thawed quickly and I sliced it up, toasted it up, mayoed it up and ate it with the above-mentioned B, L and T.   And here's what I found: (1) a well-packaged sandwich loaf keeps very nicely for 10 months in the freezer, (2) that honey-whole wheat formula (http://www.thefreshloaf.com/recipes/wholewheathoneybread) is pretty dang good and I should try it again, (3) forgetting things in the back of the freezer can be exciting (if you don't have a life), but doesn't really make for much of a blog post.

So, do any of you have a shorter memory than the freezer-shelf-life of your breads, so that you make exciting "discoveries" when you go on an expedition in your freezer?

Happy Thawing!

Glenn

raqk8's picture
raqk8

I've seen a ton of posts on TFL about Reinhart's "100% Whole Wheat", but nothing (that I can find) on Reinhart's "Light Whole Wheat" from BBA. So, I decided to give it a whirl, with a few alterations to fit my diet. I substituted the dry milk powder and some of the water with soy milk, and I increased the hydration a bit to get a dough that was easier to work with. This bread turned out AWESOME, and is definitely my favorite sandwich bread so far. It is a couple days old in these pics as I didn't get around to shooting them until later (hence the reason there's only a little left!). The crumb got a little loose around the top, so I will try to fix that next time I make it, but this was overall a wonderful loaf.

Please visit my (very new!) blog at thedeliciousways.blogspot.com to see the full post. Thanks for reading!

HokeyPokey's picture
HokeyPokey

Another very productive weekend, with two beautiful brioche loaves. Can’t tell you how pleased I am with them, the loaves came out beautiful and light, with a wonderful texture and taste.

I gave one loaf away and already finished another one, well, I did freeze a couple of slices to have later on as a treat, plus I want to see how well the brioche freezes.


Wonderful photos courtesy of my husband –a real improvement to my own ones, taken with an iPod :)


Full story and more photos on my blog here


Postal Grunt's picture
Postal Grunt

Last month, I posted about my work on developing a formula for the Pioneer Bread recipe from the Kansas Wheat Commission.

http://chaosamongstthefloursandflowers.blogspot.com/2011/06/variation-on-pioneer-bread.html

Being quite pleased with my effort, I said that I'd get to work on a sourdough version of the same bread. After some work with my ADY yeast formula this past weekend, I baked that loaf and feel pretty good about it as well. I do concede that the slashing needs some work but I like the flavor, so does Mrs PG.

It turned out to be relatively stress free in that the most work was the flagrant calculator abuse to figure out my starter quantities. I have yet to master using a spread sheet.

I've indulged myself by posting some chatter about the loaf at my blog

http://chaosamongstthefloursandflowers.blogspot.com/2011/07/sourdough-pioneer-bread.html

I think the formula is fairly solid at this time and it may be one of my entries in the Leavenworth County Fair. Before I lock into that, I want to try using butter in place of the sunflower oil in the recipe. I have the most current version of the recipe in a seperate document that I can forward in either an .odf for Open Office users or a .pdf attachment for everyone that is interested in a copy. Just leave a message for me here at TFL and I'll send it along. Comments, humor, and questions are welcome.

dmsnyder's picture
dmsnyder

Okay. I know this is a baking forum, but consider: Rye bread cries for pastrami, and pastrami sandwiches cry for pickles. In fact, the respondents to my recent blog on Jewish Sour Rye Bread  and Eric's blog on home-made pastrami have more or less demanded I share my mother's recipe for the best ever garlic pickles.

But, first,  you have to hear a story about them, you should be warned.

I don't make pickles often. Typically, several years go by between picklings, so there are things I forget.

A few years ago … about 25 years, actually … I put up a case of my mother's garlic pickles. (See the recipe, below.) My wife and I disagreed about the process, which is a normal step in the pickle-making procedure, but I am in charge of pickling in our household, so I did it as I remembered my mother doing it.

Well, after the pickles were in the jars and three days had passed, we took the jars out of the box to tighten the lids. The brine in the jars was fizzy with gas, and the contents were extremely cloudy. My wife, whose first career was as a clinical microbiologist, wanted me to throw them out; they clearly had bacterial contamination and were unsafe to eat. My memory was that my mother's pickle jars always got cloudy. This was normal. They hadn't killed anyone yet. I was sure they were just fine.

We continued this “discussion” for several days. Then, in exasperation, I called the University of California, Davis Agricultural Extension Service, after getting my wife to agree they would be a reliable source of health safety information regarding home preserved vegetables.

I spoke with the nice young women to whom I was transferred who identified herself as a consultant on home canning. I described the condition of my pickles. She asked for my recipe, and I gave it to her. There was a long pause. She asked, “No vinegar?” I confirmed that the pickles were made without vinegar. She told me that vinegar was absolutely required. Acidification of the brine was essential to prevent growth of bacteria, including Clostridia botulinum. Another long pause. “Sir, I believe you have a very dangerous product there,” she announced, with considerable emotion.

My wife, of course, reminded me she had “told you so!” But, I was unconvinced. I told the nice Cooperative Extension Service Canning Consultant I was just positive my mother's pickles always turned cloudy and gave off gas, and they hadn't killed anyone yet. I was sure they were fine. She said she was still sure I had a lethal “product,” but she would talk to the Cooperative Extension Service Pickle Consultant when he returned from vacation in 2 weeks and get back to me.

Two weeks later, as good as her word, the Cooperative Extension Service Canning Consultant called me back. She had talked with the Cooperative Extension Service Pickle Consultant, and she had learned something new which she shared with me: “You have not made pickles,” she announced. “Pickles are made with vinegar. What you have made is fermented cucumbers.” The Pickle Consultant had told her to tell me the way to be sure they were safe to eat was to look for carbon dioxide gas generated by the fermentative process and a cloudy precipitate in the brine, which was made of dead yeast bodies.

After waiting a week after I had eaten a few, to be sure the pickles didn't kill me or make me sick, my wife and children joined me in enjoying the delicious fermented cucumbers. 

Phyllis Snyder's Garlic Not-Pickles

Ingredients

  1. Pickling cucumbers

  2. Peeled garlic cloves

  3. Celery cut into 1/2 x 3 inch sticks

  4. Dried hot red peppers

  5. Fresh dill weed

  6. Pickling spice

  7. Brine made with 1 part un-iodized salt stirred until dissolved in 21 parts water.

Equipment

  1. Glass canning jars and lids

  1. Large pot to sterilize jars and lids

  2. Tongs to handle hot jars and lids

  3. Clean kitchen towels to drain sterilized jars and lids

  4. Large colander

Procedures

  1. Wash jars and lids in hot soapy water. Rinse thoroughly.

  2. Bring a large pot of water to a boil. Place jars and lids in the water and boil for 7 minutes.

  3. Remove jars and lids from water and drain on kitchen towels until they are room temperature.

  4. Scrub pickling cucumbers well. Drain in colander.

  5. Pack each jar tightly with a layer of cucumbers, upright.

  6. Over this layer, pour 1 tsp pickling spice, 1 or 2 garlic cloves, 2 dill sprigs (stems and flowers) and 1 pepper. (These quantities are for quart jars. If you are using pint jars, use half these quantities for each jar.)

  7. Pack the rest of the jar tightly with cucumbers.

  8. Insert 2 or more celery sticks in among the cucumbers. (These supposedly help the pickles stay crisp. Anyway, they are good to eat too.)

  9. Fill the jar with the brine to cover the jar contents completely.

  10. Screw the lids onto the jars loosely.

  11. Leave the jars in a cool place for at least 3 days. (If you want “half-pickles,” refrigerate the jars immediately at this point.) There will be significant carbon dioxide gas generate which will appear as tiny bubbles in the brine, and the brine will become cloudy with a white sediment which will eventually settle to the bottom of the jars.

  12. Tighten the jar lids and store them. The pickles can now be eaten, but will keep for a few years.

 Enjoy! 

David


lumos's picture
lumos

So here’s my first blog entry here at TFL. After lurking and secretly stealing and borrowing brilliant recipes and ideas from wonderful TFLers for a few years, only contributing very occasionally to the community with odd comments here and there, I decided (nudged by my fellow Essex TFLer, maxwellion) it’s ‘bout time I should pay back my long-overdue debt with some humble offerings of my recipes and  what I’ve learned from not-always-perfect bread making experiences.

Yesterday, I baked my regular WW sourdough loaves, one for my friend and the other for ourselves. This is a favourite of another friend of mine who’s kind enough to buy my breads every week, so I’ve baked this many, many times before and it always turns out quite nice. Very reliable recipe…..except for yesterday. I contemplated for a long time whether this should be my first blog entry or should I wait until I get more satisfactory (=less embarrassing) result. But, heck, if I start from a bottom, the only way is UP!

(Excuse my English. It’s not my first language….Been using this excuse for about a million years now….)


Here’s the basic recipe and method for this bread.


Ingredients (for one loaf )

200g  Wholemeal flour 

90g  White strong flour 

10g Rye flour 

1 tbls  toasted wheat germ

125g  active sourdough (75% hydration) *see the note below

210-220g Water 

1/8 tsp or less instant dried yeast (optional)

6g  Sea salt

2 tsp-1 tbls good quality olive oil  (optional, for slightly improved keeping quality) 

*Note - Apologies for unusual hydration level. Most of my bread I make are 70-75% hydration, so this is how I’ve been keeping the hydration of my sourdough to make adaptation of new recipes easy for me. I believe Shiao-ping used to keep hers at this level, too.  I always feed SD twice before I use it to make sure it’s active.


Method

Feed the sourdough twice in 10-14 hrs before you use it.

Mix all the flour and instant dried yeast (if using) in a large bowl.

In a separate small bowl, put water and sourdough (cut in to small pieces) and mix a little to loosen the sourdough.

Pour the sourdough water mix into the bowl with flour and yeast, mix into shaggy mess until there’s no dry flour.  Autolyse for 40 minutes.

After autolyse, sprinkle sea salt and S&F in a bowl (8-10 strokes, turning the bowl gradually as you S&F).  Cover and rest for 40-45 minutes.

Do another 2-3 sets of S&F every 40-45 minutes, adding olive oil before the second S&F, if using.

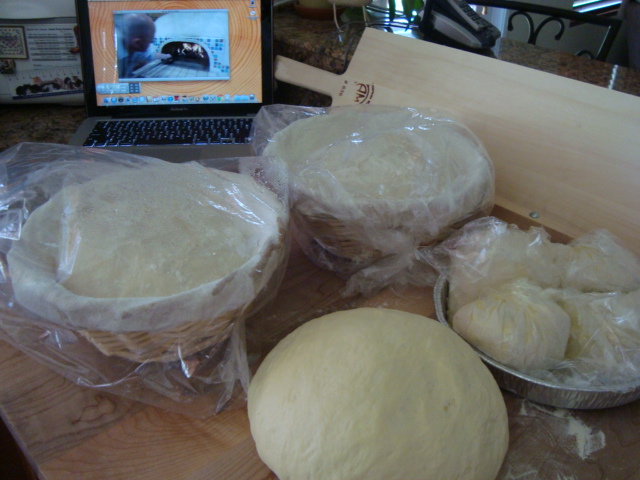
Put the dough in an oiled bowl and cold retard in a fridge for 12-16 hrs.

When cold retard is done (I’ve been using a few, large air-bubbles on the surface of dough as the sign when it’s done), leave it at room temperature for 30 minute-1hr and pre-shape and  shape into whatever shape you desire, put it in a banneton and final-proof at room temperature for how-long-it-may-need-to-take.

Pre-heat oven to 240C with a lidded pot (Dutch oven/cast iron pot/Pyrex casserole/whatever you have) in it.

When the dough is ready (finger-poke test!), turn it out to a sheet of baking parchment (cut to a slightly larger size than your baking pot), slash the top and transfer it to the heated pot with the parchment.

Bake 20 minutes, covered, remove the lid/cover, lower the temperature to 210-220C and bake another 20 minutes.

Turn off the heat but leaving the bread inside the oven for 10 minutes with a door open ajar.


Easy enough. It works fine everytime without any drama.....except for this time.  I noticed the dough was fermenting a bit quicker than usual while the S&F sessions, the dough feeling weirdly softer and more extensible. It almost felt as if I were playing with a ball made out of old and weak elastic bands, only stickier.  I attributed it to slightly warmer and murkier weather last few days (though it wasn’t that warm yesterday) and completed S&F sessions quicker than usual and put the dough in the fridge as soon as it's done. But…..when I checked the dough in the morning, there’re so many huge bubbles on the surface of dough, much more than usual and could see the top of the dough was starting to sag in the middle a bit. Sure sign of over-fermentaion! (usually I can leave it in a fridge until around mid-day with no problem)  I quickly pre-shaped and shaped without waiting for the dough to come to room temperature, let it finish the final proof in a shoter time than usual while warming up the oven + my trusted Pyrex casserole, slashed and baked as usual.  While I was pre-shaping and shaping, I noticed the dough was much, much stickier (even more than previous evening)  than usual (hence the overly-white surfaces on the finished breads from tons of rice flour I sprinkled in the bannetons) , felt much weaker and it was very difficult (almost impossible) to achieve good enough surface tension.  So I feared for the worst, half expecting the dough would collapse while baking, but fortunately it had good enough oven spring, got reasonable ears and volume, smelled alright. I was really relieved that I din’t have to make another (better) one for the friend, froze one of them to keep until I see this friend on Friday. (Have to make 3 more loaves of different variety for her, so making a loaf or two at a time. Not enough space in my fridge to cold ferment 4 loaves!)

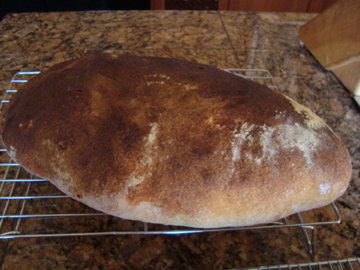
This is how it came out…(Sorry I just realized how bad I’m at taking  close-up photos)


A reasonably respectable ear….


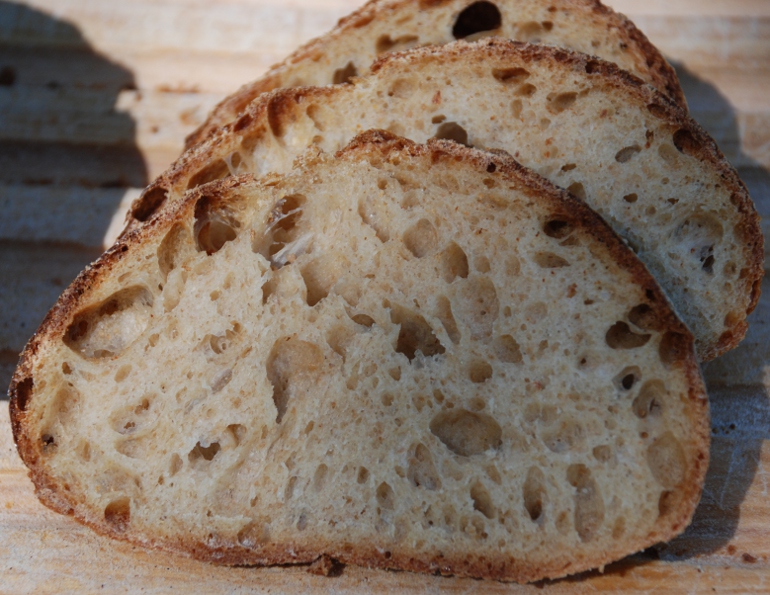
An obligatory crumb shot, of course…

(the white streaks are the trace of tons of flour I had to use during pre-shaping and final shaping because of extreme stickyness of the dough)

This morning I sliced the other one to have it at breakfast and….. understood the reason for  all those weird and unusual behaviour by the dough. I forgot to double the amount of salt though I was baking two loaves…… Nothing to do with ‘slightly warmer' (which was not) weather after all. Just my usual carelessness.


I’ve just fed my sourdough to make another loaf for my friend tomorrow.…

Pages

Subscribe to Recent Blog Entries