The Fresh Loaf

A Community of Amateur Bakers and Artisan Bread Enthusiasts.

Recent Blog Entries

lumos's picture
lumos

Been clearing up old files on my PC and found photos of breads I baked ages ago and had comletely forgotten about….. One of them was Tartine’s Basic Country Bread.

Ever since I read Shiao-Ping’s blog about her ‘imitation of Chad Robertson’s Country Sourdough’ and all the buzz following the publication of ‘Tartine Bread’ last year, I’d been so intrigued to find out how wonderful its famous bread.  Thought of buying a book, but didn’t in the end after reading many reviews and contemplating for a long time. It was very interesting to read Eric’s view on the book he posted a while ago, because that was exactly what I’d thought the book might be like and the reason why I decided not to buy. 

 But still, my interest in the bread itself never faltered, so I searched through the internet for the formula and found this wonderfully generous site with detailed formula. It was a God sent! (Thank you, Martha! :))

 Didn’t follow its method of ‘how to start the levain’ but I just fed my starter with 50:50 = WW : Strong with hydration of 75%, as my regular starter, and increased the ratio of pre-ferment to a bit over 30%.  Here’s my formula for my take.


My Take on the famous Tartine’s Basic Country Bread


INGREDIENTS

Levain.....WW 35g

                  Strong flour 35g

                   Water 50g


Main Dough ..... Strong 220g *

                                Plain  50g *

                                        * (or 270g AP flour)

                                 WW  30g

                                 Water  210g

                                  Salt 6g


 METHOD

  1. Mix WW and strong flour for the levain ingredient. Feed the starter with it twice during 10-12 hr period before use.  (1st feed = 20g flour + 15g water, 2nd feed = 50g flour + 35g water)
  2. Mix all of the levain with main dough flours and water until shaggy mess. Autolyse for 30 – 40 minutes.
  3. Sprinkle the salt over the dough and S & F in the bowl until the salt is evenly distribute. Rest for 40- 45 minutes.
  4. Repeat S & F in the bowl every 35 – 40 minutes over next 3 hrs until the dough increases the volume by 30% or so.
  5. Pre-shape and rest for 20 minutes.
  6. Shape and cold retard overnight.
  7. Take out of the fridge and leave until the dough returns to room temperature and fully proofed. (finger-poking test!)
  8. Pre-heat the oven to 240C with a Pyrex with lid or a cast iron/Dutch oven in it.
  9. Bake at 240C for 20 minutes in a covered Pyrex (or similar).
  10. After 20 minutes, remove the cover, lower the temperature to 200C, and bake for another 20 minutes.


Verdict :  Not too sure……:p  It was pleasant tasting bread with quite well balanced, gentle flavour, for sure.  I can see why a lot of people like this as the daily basic bread, but tbh it was too gentle and lacked complexity of flavour I’m used to from other breads I bake regularly, I thought.  It was good bread, but to be entirely honest, I didn’t find it was that sensational.  Which is actually very similar thing I’d found from Hamelman’s Pain au Levain (::gasps:: BLASPHEMY!!!!) ; another bread which is very popular,  but the one I only baked a few times.

I did not follow CR’s formula to a tee, so it’s quite possible I’m missing something here, I must admit.  

 OK….I’m open to anyone telling me off!!!

 ::braces herself::   :p

(Must admit it makes good sandwich bread, though, thanks to its mild flavour profile, probably....)


OldWoodenSpoon's picture
OldWoodenSpoon

I baked this recipe for the third time tonight, and I am still scratching my head.   For this iteration I made the following adjustments:

1)  Reduced the malt to 10 grams, based on Eric Hanner's parallel bake comments and results here.
2)  Reduced my mixing time to 10 minutes to reduce the level of dough development.
3)  Added a wire rack to the middle of my oven to avoid baking directly on my quarry tiles.

The results are strange, to say the least, and certainly not "right" yet.  Here is a pictorial tour:

After 10 minutes the dough still seems fairly well developed, but it is certainly much less so than the previous iterations.

This blurry shot shows the dough at the very beginning of bulk fermentation.

Here is the dough 45 minutes later at the end of bulk fermentation.  I may have let it go just a bit too long.

Divided into 2 loaves of 521 grams each, shaped and panned,  and ready to proof.

After 45 minutes they were proofed to show above the top of the pan.

Here are the panned, slashed and egg-washed loaves in the 350 F oven (that really needs a good cleaning so please ignore that if you would).  Note that the loaves are even, there is good clearance all around, and the slashes are down the center.  I am using conventional heat, not convection, so the fan at the back is not in use.  From here it gets really strange.

These loaves baked for 35 minutes.  I tested the internal temperature of the one on the left at 25 minutes, and stuck my big thumb into it getting it out of the oven.  That is why it has the big dent in the end.  It was not up to temperature yet so I put it back in the oven for 10 more minutes.  After a total of 35 minutes the internal temperature was 207F. 

The loaves rose unevenly in the oven, or so it appears to me.  The slashes now appear to be off center, and the outer edges of the loaves are taller than the inner edges.  This could be from weak shaping, or from uneven temperature, or from something I have not thought of.  They also have the same caved in side profile (see the next photo) that the previous bakes have shown.

I have not yet cut a loaf, so I do not know what the crumb looks like, or if there is a compressed doughy line up the inner or outer sidewall of these loaves.  I do expect to find one, but I will do that in the morning and post it back here then.

Edit on Tuesday, 11/8/2011:  Crumb shot added below.  This is the less distorted of the two loaves posted above.  There is an only-barely-visible compressed doughy line up one side of this loaf, and the crumb is a little less airy and insubstantial than previous bakes.  The largest holes seem to be smaller than in previous bakes.

My next steps are going to be to buy some true All Purpose flour, remove my baking tiles entirely for the next bake, and recheck the temperature of my oven in several locations to make sure I am still getting even and accurate heating.  It was accurate and consistent (as much as can be expected from a home oven) just six months or so ago, but this project requires re-verifying everything.  I will also consider modifying the shaping from that commended by the authors.

Thanks for stopping by.
OldWoodenSpoon

raqk8's picture
raqk8

Here is the fourth (!) installment of my breadmaking tutorials. As always, your input is appreciated! Please see Ovenmitts Blog at www.ovenmittsblog.wordpress.com for the whole post!

Breadmaking 104 - Bakers' Percentages

So many people ask, “What’s up with these bakers’ percentages?? How does one loaf of bread make 175%?!”

So, I’ve come to tell you all about these bakers’ percentages. Let’s do this backwards. I’m going to tell you the summary first, and the reasons why after. It’s like a scientific paper! What is that called again? Oh yeah. The ABSTRACT! I feel like I should start all of my posts with an abstract….

Anyway! Here is my abstract: Bakers’ Percentages are the best things ever!

I guess that doesn’t help much, does it? Maybe I should reconsider my biology major…

Let’s start with Hydration.

The hydration of a bread recipe is the ratio of water to flour. For example, if you are using 10 oz flour and you add 6 oz water, you have a 6:10 liquid to flour ratio, or 60%.....

Please see the original post for the rest!

Chausiubao's picture
Chausiubao

More then a few times now I've stroked my ego and declared, “grilled burgers with handmade hamburger buns!” Each time I might add, it has been in front of the eyes and stomachs of my friends. Whatever they happened to think of my attempts and the results that they ate, I knew the truth. They were horrible! Not surprising, considering my experience up until this point has not been in straight doughs, has not been in hamburger buns, and I really didn't know what I was talking about. Give me some dough to laminate, some brioche to mix. I can make several different types of hearth bread shapes, but more “American” type breads I am ashamed to say I am somewhat ignorant.

That last statement would be true up until about two months ago when I started working at an establishment that focused on making hamburger buns and dinner rolls. Sure there are some other types of breads, brioche pullman loaves for example (brioche toast for breakfast?), but more then anything else, we make thousands and thousands of rolls and burgers. And it really blew my mind, one of those steps. It makes sense though, if you want a wide, squat, cylindrical bread, your bread shape has to be wide, squat and cylindrical. You take a nice well rounded roll, let it proof up, then you smash it flat. I must admit, it hurt to flatten my little burger babies.


Sure at the other bakery I worked at we did the same thing. But we didn't do it anywhere near to the same extent. We didn't let them proof up, but more like like them rest. We didn't flatten them completely either, seeing as how they weren't particularly relaxed after being rounded. Just a gentle love tap all across the top. They were slightly flattened, and it was visible in the final product, a somewhat squat, yet quite tall, “hamburger bun”. But what they have me doing now, its totally different. Everything gets smashed flat. All the burgers that is. Kaiser rolls too, and the result is just like at the grocery store! Which is not necessarily a good thing, or a bad thing for that matter. It is different. A different shape for a different job I imagine. So tonight, having gotten out of work early armed with the knowledge working at an American bakery has equipped me with, I will be having hamburgers tonight.


ananda's picture
ananda

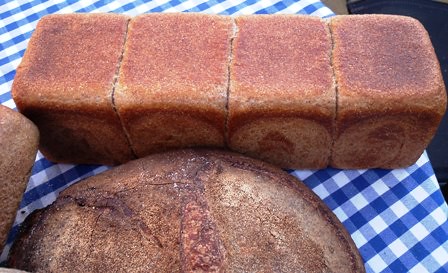
“Rossisky” using the Three Stage Auerman Process; Pain au Levain using Rye Sour and Wheat Leavens; Panned “Wholewheat-style” Loaves with mixed leavens.

Refreshment Régimes:

  1. 1.     Rye Sourdough

Refreshment One.   Saturday 16:00

Material

Weight [grams]

Rye Sour from Stock

90

Bacheldre Organic Dark Rye Flour

60

Water

100

TOTAL

250


Refreshment Two.   Sunday 07:30

Material

Weight [grams]

Refreshment One

250

Bacheldre Organic Dark Rye Flour

300

Water

500

TOTAL

1050


Refreshment Three.   Sunday 15:00

Material

Weight [grams]

Refreshment Two

1050

Bacheldre Organic Dark Rye Flour

130

Water

215

TOTAL

1395


  1. 2.    Wheat Levain

Refreshment One.   Saturday 16:00

Material

Weight [grams]

Wheat Levain from Stock

20

Marriage’s Organic Strong White Flour

100

Water

60

TOTAL

180


Refreshment Two.   Sunday 07:30

Material

Weight [grams]

Refreshment One

180

Marriage’s Organic Strong White Flour

200

Water

120

TOTAL

500


Refreshment Three.   Sunday 15:00

Material

Weight [grams]

Refreshment Two

500

Marriage’s Organic Strong White Flour

315

Water

189

TOTAL

1004


************************************************************************************************

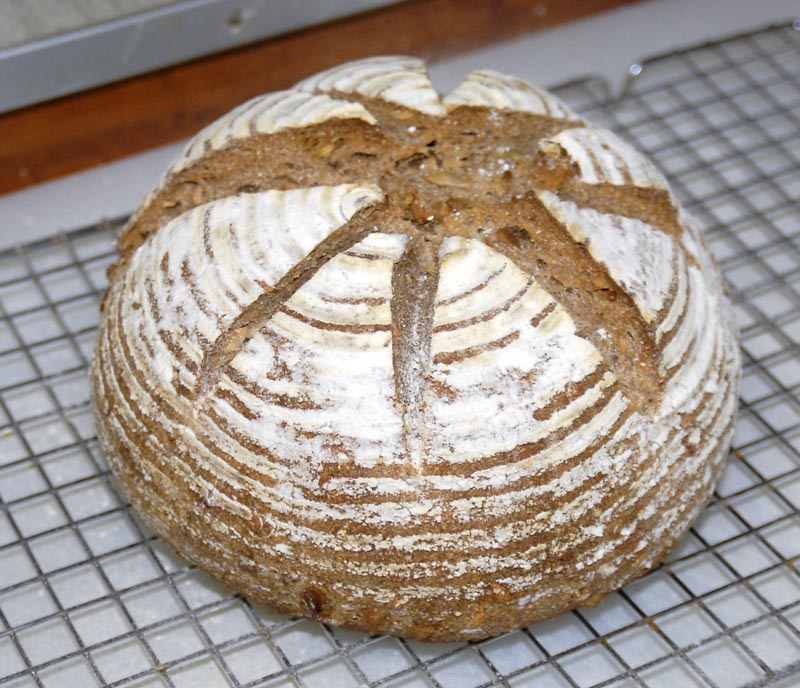
  1. 1.    “Rossisky” using the Three Stage Auerman Process

See Refreshment Régime above for sour building.   The “Scald” was made at the same time as the 3rd refreshment.   The “Sponge” was made 21:00 Sunday night.   The final paste was made 09:00 Monday morning.

Material/Stage

Formula [% of flour]

Recipe [grams]

1. a] Built Sour [see above]


Bacheldre Organic Dark Rye Flour

24

240

Water

40

400

TOTAL

64

640


1. b] “Scald”


Crystal Barley Malt Powder

6

60

Bacheldre Organic Dark Rye Flour

20

200

Boiling Water

39

390

TOTAL

65

650


2. “Sponge”


Built Sourdough [from 1. a]]

64

640

“Scald” [from 1. b]]

65

650

TOTAL

129

1290


3. Final Paste


“Sponge” [from 2.]

129

1290

Bacheldre Organic Dark Rye Flour

50

500

Salt

1.5

15

Water

6

60

TOTAL

186.5

1865

Overall % pre-fermented flour

24 + 26 =50

-

Overall % hydration

85

-

FACTOR

10

-

Method:

    • Build the sour as above.   Make the “scald” at the same time as the final refreshment of the sour, by pouring boiling water onto the flours and mixing.   Allow to cool to room temperature, covered.
    • Make the “Sponge”, by combining the Built Sour with the “Scald”.   Leave to ferment, covered, for a further 12 hours [this proved to be too long; recommended time is 4 hours!]
    • Add the remaining ingredients to the “Sponge” to make the final paste.   Target temperature is 29 - 30°C.
    • Bulk Ferment for one hour.
    • Scale and divide: I made one loaf in a pan @ 1kg, and one shaped round and proved in a banneton using the remaining paste.
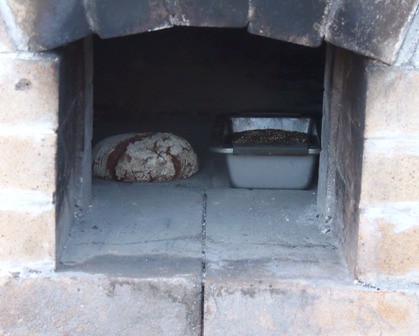
    • Bake on the “dead” wood-fired oven.
    • Cool on wires, and set aside wrapped in linen cloth for 24 hours, before slicing.


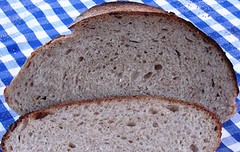
  1. 2.    Pain au Levain using Rye Sour and Wheat Leavens

See Refreshment Régime above for the rye sour and wheat levain building.

Material/Stage

Formula [% of flour]

Recipe [grams]

1. a] Wheat Leaven


Marriage’s Organic Strong White Flour

15

300

Water

9

180

TOTAL

24

480


1. b] Rye Sourdough


Bacheldre Organic Dark Rye Flour

9

180

Water

15

300

TOTAL

24

480


2. Final Dough


Wheat Leaven [from 1. a]

24

480

Rye Sourdough [from 1. b]

24

480

 Carrs Special CC Flour

60

1200

Allinson Strong Wholemeal

16

320

Salt

1.8

36

Water

44

880

TOTAL

169.8

3396

% overall pre-fermented flour

24

-

% overall hydration

68

-

FACTOR

20

-


Method:

    • Build the sour and leaven as above.
    • Autolyse flours, water and rye sourdough for the final dough for 1 hour.
    • Combine all materials for the final dough and mix to develop.
    • Bulk proof 1½ hours
    • Retard overnight, covered.
    • Scale and divide: one @ 1500g, one @ 700g and one just short of 1200g.   Mould round and proof in prepared bannetons.
    • Final proof: 3 hours
    • Bake: Decant each loaf onto the peel, score an “S” shape onto the top, and set in the wood-fired oven to bake.
    • Cool on wires.


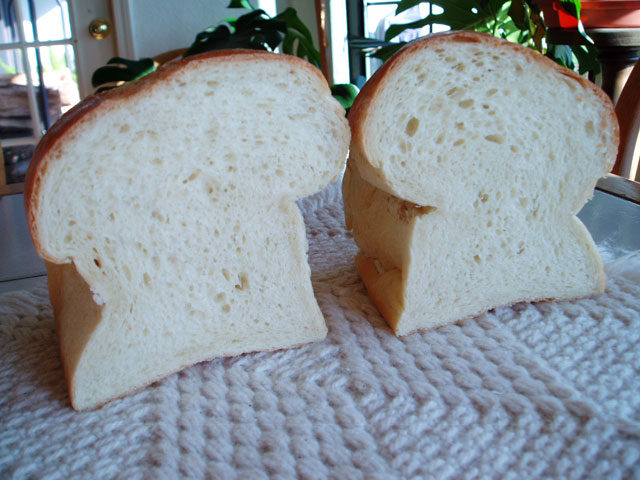
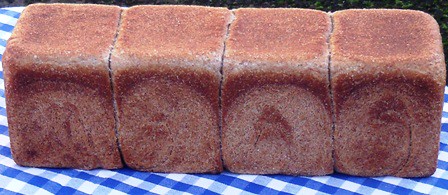
  1. 3.    Panned “Wholewheat-style” Loaves with mixed leavens.

These loaves are a request from a new-found customer who lives in the next village to us, and has been buying bread from the Village Bakery, Melmerby, where I used to work, for many years.

It’s as “plain”, as I go when working at home, and is largely wholewheat-based, which was the main tenor of the request.   It’s also made in pans, to allow for breaking into small and easy quantities for freezing down.

The refreshment régimes for both the pre-ferments are shown above.   The soaker was prepared at the same time as the final refreshments took place.

Material/Stage

Formula [% of flour]

Recipe [grams]

1. a] Wheat Levain


Marriage’s Organic Strong White Flour

25

300

Water

12

144

TOTAL

37

444


1. b] Rye Sourdough


Bacheldre Organic Dark Rye Flour

6

72

Water

10

120

TOTAL

16

192


2. Soaker


Gilchesters Organic Farmhouse Flour

9

108

Salt

10.8

129.6

Water

0.2

2.4

TOTAL

20

240


3. Final Dough


Wheat Levain [from 1. a]

37

444

Rye Sourdough [from 1. b]

16

192

Soaker [from 2.]

20

240

Allinson Strong Wholemeal

60

720

Salt

1.5

18

Organic Lightly Salted Butter

1.5

18

Water

37

444

TOTAL

173

2076

% overall pre-fermented flour

31

-

% overall hydration

69.8

-

FACTOR

12

-


Method:

    • Build the leaven and sour as above, and prepare a cold soaker [2], at the same time as the final refreshment stage for each pre-ferment.
    • Combine the rye sourdough, soaker, flour and water for the final dough for 1 hour autolyse.
    • Add the remaining ingredients and mix to develop a strong dough.
    • Bulk proof 1½ hours.
    • Retard overnight in the chiller, covered.
    • Scale and divide: 4 pieces @ 390g for the Pullman Pan, and one piece @ 516g for the smaller loaf.  Mould round and rest, covered for 15 minutes.   Shape and pan.
    • Final proof for 3 hours.
    • Bake in the wood-fired oven.
    • De-pan and cool on wires.

Comments.

The Russian Rye paste was too stiff, and therefore slow to prove; always a worry from my experience, producing a tasty, but dense loaf of reduced quality.   I fear the “zavarka” was too stiff, as a result of exuberance on my part boiling the water, resulting in excessive starch gelatinisation.   Result?   A very tasty dark loaf, but very dense!

I badly need more wood to fire the oven.   It was pleasing to bake these 3 varieties, but I now acknowledge I need a regular supply of tinder dry, soft wood; cut small.   The search continues…

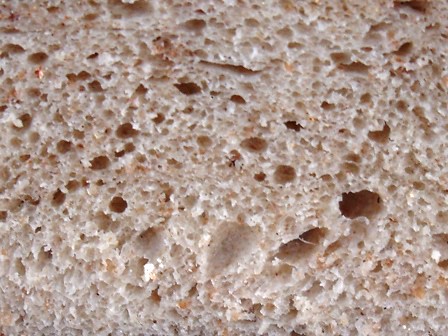
Both the other doughs proved well and made good bread.   Today was a lovely sunny day here in Northumberland; however, there was a really sharp frost overnight, so it was a challenge to keep the dough warm enough to enable active final ferment, given 2 of the doughs had overnight retard.   The wholemeal looked particularly good.   Oven spring in both was fine, and the crumb of the Pain au Levain with the 2 pre-ferments looks great.   The crust?   This is where the wood-fired oven is really coming into its own with wonderful radiated heat from the arched roof of firebrick.

I managed to sell 4 of the 7 loaves I made today and net £10 proceeds.   My business adviser came to see me, and he left with a loaf he was happy to purchase, full of positivity about my progress, and other ideas I have too: a “pre-order Pizza Takeaway” service one night a week?   Seems like a winner to me!

This is arriving on a pallet by courier tomorrow, and I can’t wait!   An old 20 quart Hobart planetary mixer, but in excellent working order.   So, making up to 10kg of dough at a time should be really easy moving forward.

http://www.flickr.com/photos/24731237@N03/6324106618/in/photostream


Happy Baking Everybody!

Andy

ehanner's picture
ehanner

When I saw the strong proofing OWS was getting from his attempts at baking the Vienna Bread from Inside the Jewish Bakery.  I baked this as a tester a long time ago but this is the now released version so I thought I’d give it a whirl. It's a fast rising enriched dough that just takes a few hours to complete.

The first thing I noticed is that the volume amounts an gram measurements don’t line up just right for me. The flour I scoop and level weighs 135g per cup. The recipe calls for 4-1/3 Cups. In my kitchen that would be 584 grams where the gram number is 620g. The oil is 2 T at 3.0 grams. I measured over 3 T of oil to be 30 grams. I didn’t go down item by item to see how they all worked out, I figured these are really Norms recipes and he would have kept notes in percents, Cups and pounds/ounces. I chose to use the gram weights and ignore everything else.

Another variable I had to make a decision on was the dough temperature. The recipe calls for warm water. I figured if the water was 82F the dough would come out near 78F after adding a cold egg and the other room temperature ingredients. That worked out perfectly. My dough temp was 77F.

My standard bread flour is Gold Medal, Better For Bread in the bright yellow bag. I think it’s right around 12% protein. The recipe calls for bread flour so my BFB should be OK.

One other thing that caught my attention was the use of malt and sugar. I only added 1 heaping teaspoon of dry malt powder where as the recipe calls for 2 T of dry or liquid malt or 20 grams. 2 T seems like a lot for under 4 cups of flour.

I used my Kitchen Aid mixer for this 2.3 Lb batch. It took 10 full minutes to reach a semi smooth consistency and a decent window pane window.  I think I could of continued a little longer and fully developed the dough in retrospect. After removing the dough and manually kneading it for a minute or so, I shaped it in a ball and returned it to the mixer bowl and put it in the proofer, set at 78F. The dough was at 78F and after the rise it was still just where I wanted it, 78F. It took just 1 hour to double as you can see. I divided and shaped it into 2-534g logs. The recipe calls for 510 g pieces but this is what the recipe gave me. I don’t think the additional 24 grams will cause any serious over flowing of the dough. But considering what OWS has been seeing, it’s worth considering.

I egg washed after slashing and baked for what turned out to be 30 minutes at 350F to get an internal of 205F. I’m a little surprised the top tore open so much but It looks nice. The crumb is soft and tight grained as would be expected. The crust has a little bit of crunch where the egg wash came in contact with the sides of the pan. Sugar is caramelized slightly. I followed the directions pretty near right like the recipe called for, except for holding a little malt back. Looks OK to me and tastes great. This would be a great French Toast. Actually I almost made rolls out of half the dough and stuffed them with stewed onions. The girls loved this bread.

NOTE TO OWS: The only thing I am aware of that I did differently than you did is change the flour and held a stable dough temperature so I could judge the oven spring fairly. The spring seemed about right to me. Oh, and the malt may have been lower.

Eric


No collapsing here. Just a great enriched dough loaf.


After 8 minutes the dough looks about there. Total mix/kneading was 10 minutes


I would call this the right size pan for 534 grams of dough. 8.5X4.5 inches


Finishing proof at 78F at one hour.


Divided and shaped


Back in the 78F proofer for another hour.


Proofed to just over the top of the pans. Looks good.


Better lighting, proofed.


Egg wash and slash.


They look pretty good to me here.


Not overly expanded. Just right. They didn't collapse after cooling


loydb's picture
loydb

This was inspired by Franko's 25% Sour Rye with Toasted Seeds. I followed his recipe with the following alterations:

  • Instead of AP flour, I milled 45% hard red wheat, 45% hard white wheat, and 10% rye, then sifted the results to a final extraction of 85%.
  • That said, I ended up adding an extra 1/2 cup of KA BF during kneading to get the stickiness under control 
  • After the final stretch-and-fold, I let the final dough proof for another two hours, then refrigerated overnight 
  • This morning I took it out of the fridge, let it warm for two hours, shaped, and then let proof for 3.5 hours in a banneton

It's cooling now, I'll taste this evening!


MickiColl's picture
MickiColl

I desperately need help with crust. what I want is a paper thin, shatteringly crisp crust. but all I can achieve is moderately crisp but thick, hard, turtle shell crust. I have tried everything imagineable. dutch oven, cloche, steaming, misting absolutely everything I can think of.  KA AP, Gold Medal AP, bread flour ..got desperate and  yesterday I even used 1/2 C rice flour .. got the shattering part, but under it was 1/4 inch of turtle shell. (great rise and crumb) Fortunately my sandwich loaves are most always good. specially James Beard's sour cream bread. I'm still working on a satisfactory graham flour bread like I was raised on (70 years ago) Your help is appreciated ..

breadsong's picture
breadsong

Hello,

Mr. Reinhart’s Wild Rice and Onion Bread is back on the front page; the picture and the recipe tempted me to try making some :^)

Not having any wild rice, black-and-mahogany short grain rice (a blend) was substituted, and a mixture of caramelized sweet onion, leek and shallot used in place of raw/dried onion.
In place of all bread flour, I used 1/3 each bread, 75% Red Fife, and 100% whole-wheat (locally-grown) flour.

I added some (golden) sage from the garden, recalling the beautiful use of the herb in this post (Pine Nut and Sage Sourdough – thanks Marcus!).
The bread  was shaped as a crown with a ‘wreath’ of golden sage leaves on top (crispy after the bake).

Mr. Reinhart’s instructions are for overnight fermentation, but wanting to bake this bread today, I mixed a flying sponge (1.25 hour ferment, as per Mr. Hamelman’s technique), then mixed the dough using less yeast overall, then a
2-hour bulk ferment, and 45-minute proof.

My kitchen smelled like Thanksgiving as these breads were baking and cooling.

With thanks to Mr. Reinhart for his very flavorful recipe, and also to Floyd for featuring it.
It is a very-good-tasting bread, and a new favorite.


Before baking, and the crumb (sliced while warm, had a hard time waiting for this to cool!):
  

Happy baking everyone!
:^) from breadsong

OldWoodenSpoon's picture
OldWoodenSpoon

After last night's poor results on the Vienna Bread recipe from Inside The Jewish Bakery, I received some excellent tips and advice.  I wasted no time putting them to work tonight in a fresh bake.  Unfortunately I am still not getting it right.  I have the same result, albeit less severly, in this next bake. 

The essential change in this bake over my first was to change to a lower protein flour.  This bake was done with 100% unbleached Pendleton Mills Morebread flour, which is right at 12% protein and 0.55 ash content according to the specs in their technical booklet.  The dough took slightly less time to form a window pane, and the house is warmer today so proof times were closer to those prescribed in the book.  I also baked these to a slightly higher internal temperature (208F) than the called for in trying to get them properly colored up on the crust.  When the crust color seemed right, the IT ended up being high. 

Here are the latest results:

These loaves started to contract almost immediately upon unpanning them.  I rotated them over onto their sides at the first indication of trouble, and the contractions predominated on the "top" sides after that.  Thus the "hourglass" is lopsided in the cross section on these.

It is interesting that the compressed, doughy patch is on the side of the loaf that is not sunken in.  The sunken in side does not have that doughy, compressed effect.  Also, the crumb seems to be pretty uniform across the cross section, with considerable openness, indicating vigorous activity.  That may be contributing to the problem.

The flavor in this bread is, again, very good.  The crumb is light and tender, but still with a good "bite", even with the reduced strength of the flour.

I will bake this yet again once I find some quality flour that is below 12% protein.  Also, based in part on the information provided in response to my blog post on the previous loaves, I will  consider reducing the yeast in the next batch if further reducing the strength of the flour does not solve this.  I always get explosive response from instant yeast, and I seem to have to reduce it in nearly every formula I bake with it.  This one seems headed in the same direction, but I will stick to varying only one thing at a time.  More baking for me that way!

Thanks for stopping by.
OldWoodenSpoon

Pages

Subscribe to Recent Blog Entries