The Fresh Loaf

A Community of Amateur Bakers and Artisan Bread Enthusiasts.

Recent Blog Entries

wassisname's picture
wassisname

I haven't been able to get pumpkin and sunflower seeds out of my head since Franko posted about the combination here.  In the end I went in a little different direction, using 25% whole wheat instead of rye and adding flax seeds.  No special reason for either change - the flax seeds just happened to be beside the other seeds in the freezer, so in they went, and I've been on a light whole wheat kick lately that isn't quite out of my system.  So, I came up with this:

The pumpkin and sunflower seeds were toasted in the oven at 375ºF for 6-7 minutes.  The flax seeds were soaked in all the cold water they could absorb for about 8 hrs.  I drained the flax seeds before adding them to the dough so the water used does not figure into the formula at all.  I should note that the weight in the formula is the dry weight of the flax seeds.  I didn't think to weigh them after the soak... hmm... throws my formula off, doesn't it... sorry, too late now.  Between the toasted seeds and the wet flax I think I came out about even on the hydration.

For the final dough the white flour and water were autolysed for 20 minutes.  The starter and salt were then added.  I kneaded until the WW starter and white flour portion were fully incorporated.  Easy to see because of the color difference.  Then I added all of the seeds by flattening out the dough, spreading the seed mixture over it and folding repeatedly.  When it turned into a sticky mess with seeds falling out everywhere I gave it a five minute rest.  It behaved much better after the rest and I kneaded another minute or two until everything was evenly incorporated.  The dough was given 3 S&F's at about 45 minute intervals before I went to bed.

The weather had turned chilly so I decided to use an overnight bulk ferment in one of the cooler corners of my house.  That corner turned out to be considerably cooler than I expected and by morning was 42ºF.  Oops.  So much for shaping the dough first thing in the morning!  It took a couple of hours more in a warm place before it looked even close to ready .  Probably could have used longer but I was tired of waiting. 

Final proof was about 3 hrs (75ºF - 80ºF).  I baked at 450ºF for 15 minutes with steam, then about 40 minutes at 410ºF.

The result was delicious!  The smell filled the house and was almost too much to bear.  The "bread" turned out mild and tasty but the seeds are, of course, front and center.  I mixed a little honey and butter "just to see how it would go with the bread" and went weak in the knees.  More seeds please!

Marcus


louie brown's picture
louie brown

This bread combines Larry's idea for kneading the cheese into the flour with my own practice of showering the top with parmigiano and then topping it with caramelized onion, which in turn came out of Silverton.

I mixed a dough of about 75% hydration using Central Milling flour. 100% starter made up about 20% of the formula by baker's percentage. I wanted a soft, white crumb, so I added some olive oil and some milk. I kneaded about a cup of finely grated cheddar into about 18 ounces of flour. This gave a very mild cheese flavor to the crumb. Twice as much cheese, or a more strongly flavored one would give more flavor.

Given the schedule this week, I fermented the dough in bulk overnight after folding it pretty aggressively in the first hour. This yielded a dough in the morning that was both wet and taught. 

I flattened out the dough and gave it two hours on the bench, which was about an hour less than it needed. This, with the milk and olive oil and cheese kneaded in, did no favors for the cell structure. I docked it all over with wet fingertips before loading. It baked at 450 degrees for about 20 minutes. I gave it another five minutes at 475 to darken it.

So, not a pizza, not a foccaccia, and not really a loaf of bread; sort of a bastard, but very well received by tasters. After all, everyone loves cheese and onions baked to brown and black.


Sheblom's picture
Sheblom

Hi everybody!

I did my normal weekend baking and unfortunately either my brain wasn't with it or i was not paying the proper attention. My loafs didn't come out that great.. I think my first mistake was making my dough to wet therefore it was very sticky when it came to shaping. Which in turn stuck more to my hands than actually getting in to a nice tight shape, and being still pretty new to this, I got very frustrated.. so my shaping was of poor form. My sourdough came out alright-ish, I think it would have been a bit better if it was a more tacky dough than sticky and having a benneton would have been good to keep a nice tight shape. Plus with it being sticky when I tried to slice it its just came out wrong. My other sourdough loaf...well lets just say i am having a flat bread tonight for supper..

Same issue with my enriched white loafs, too sticky a dough and over proofing.. they are eatable and the flavour will be good, but look wise needs alot of work..

So at the end of the day I was very dissapointed with my baking this weekend. I still need to learn loads and need lots and lots of practive. PLuse if anyone can give any advice or an article on proofing that would be great, that one area where it is always hit and miss with me.

But here are my photos from the weekend. Please be kind!


davidg618's picture
davidg618

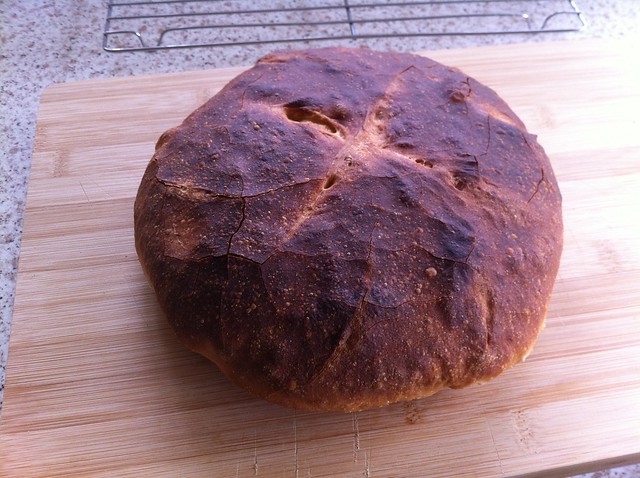
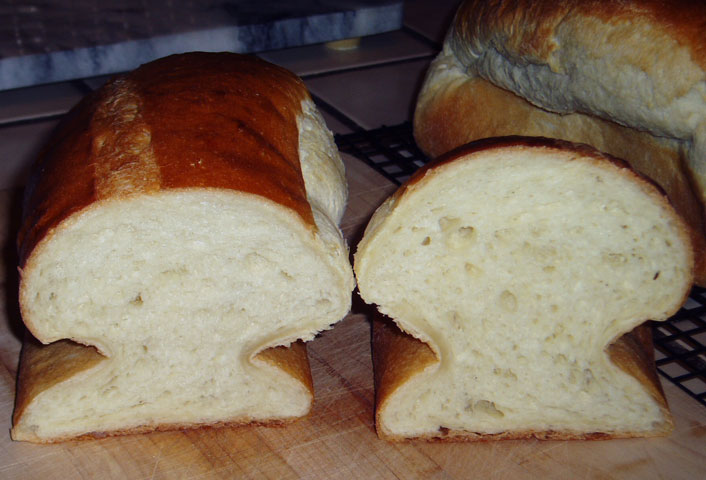
I've been homing in on a 50% Whole Wheat sourdough loaf, made with a levain built entirely with Whole Wheat flour. This quest has been ongoing (but relaxed) for about a year, and recently I've been close: flavors are especially to our liking, crumb al dente as we like, and nearly as open as desired, but still room to improve. Today, I think I've hit it.


My previous attempts' short-falls were all dough strength related, in two words: slack dough. And slack dough directly led to shaping difficulties, flat loaves, and closed crumbs.

Getting to this point has been evolutionary.

I've only been baking sourdough a little more than two years. For the first six months I religiously mixed and kneaded doughs in my KA mixer, usually following the formulae authors' recommended mixing times and mixer speeds (generally 2 or 3 minutes on speed one, often followed by 1 to 3 minutes on speed 2). Early on, I learned about Stretch-and-Fold; never a fan of hand-kneading I adapted it quickly. I was mostly content with the results, but, prompted by TFLer suggestions, I switched to hand-mixing, and for about a year except for speciality doughs, e.g., Foccacia, Brioche, the mixer gathered dust. I learned how dough "feels" in all its various stages. I also developed a skin rash, on my mixing hand only, that may--and I emphasize "may"; I've not yet seen a dermatologist--be attributable to flours or sourdough.

For the past four months I've returned to mixing doughs in the mixer, and wearing latex gloves when I S&F, or hand manipulate dough. The rash is clearing slowly.

At the same tiime I was in the middle of my quest to bake a satisfactory 50% WW loaf. I'll define satisfactory; these are in priority order:

1. Good, strong wheaty flavor

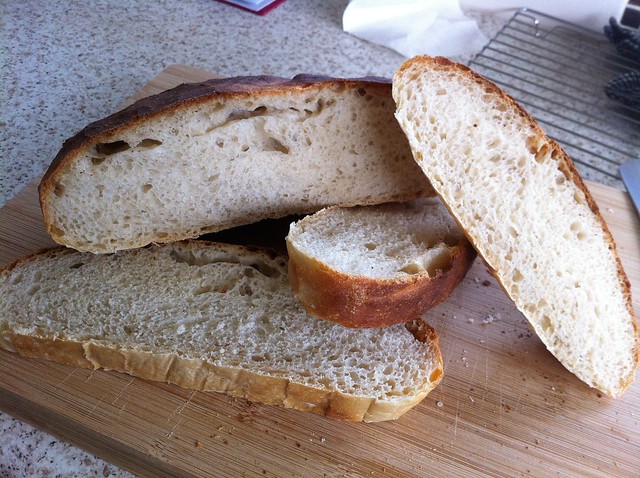
2. Al dente crumb; i.e., when you mash it, it springs back; when you bite it, there is resistance.

3. Open crumb. Now I'm not looking for gaping holes. I want irregular size aveoles,  the biggest of which occupy no more than the thickness of a good sandwich slice--about 3/8ths of an inch radius. I frequently use sourdough breads for sandwiches. Unquestionably, sandwich-making is its singlemost use. So, I don't want mustard or mayo dribbling on my shirt front. I also think #2 is closely related to #3--if you don't have 3, you don't have 2.

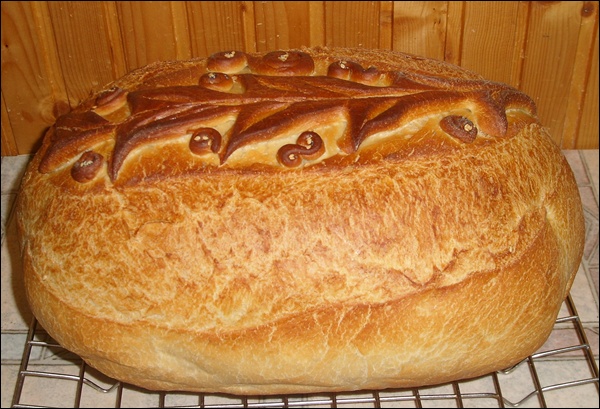
4. Eye-appealing loaves. If I can have 1, 2, and 3 I'm a happy baker; if I can also have 4 I'm an elated baker.

So, back to the evolution.

Two changes from my earlier routine are, I reasoned, the keys to this success.

1. I now machine-knead the dough on speed 2 for 7 minutes, following a 1 hour autolyse. Subsequently, I still S&F 3 or 4 times at 1 hour intervals (3  or 4 depends on the perceived tenacity of the dough).

2. I retard the dough at reduced temperature (54°F) for 15 hours.

Furthermore, I believe these two changes are coupled, meaning it requires both to achieve the desired open crumb. I haven't found a corraborating "expert" reference yet, but I'm certain I perceive a change in dough's attributes occuring between S&F's and the beginning and end of retarded fermentation. I retard dough primarily for flavor development, but I'm convinced, too, it also conditions the doughs' physical behaviors.

I got the idea for this two changes from two TFL members: #1 from TxFarmer's blog, and #2 from an e-discussion with Proth5.

The formula for this bread is simple:

100% hydrated levain  30% (all whole wheat flour except seed starter)

Whole Wheat flour       35%

Bread Flour (KA)         50%

Salt                                    2%

Hydration                     68% 

Preheat: 500°F

Bake: 450°F with steam 15 mins; finish bake 450°F (steam removed)

I've also changed the way I refresh my seed starter. Following Debra Wink's guidance, now, when I build levain for baking I make enough extra to completely replace my seed starter with fresh levain. I normally build levain using bread flour. This time I built the levain using Whole Wheat flour. Consequently, I also built a small amount of levain with bread flour to refresh my seed starter for the week.

As usual, I after mixing the dough, and refreshing my seed starter I still had levain left over. I mixed the two together, fed the mix 1:3:3 with a 50/50 mix of Bread and Whole Wheat flours, and popped it into the refrigerator overnight. This morning, while I worked the bread baking, I let the leftover levain come to room temperature, and work another three hours. While the bread loaves were proofing I made a 50% Whole Wheat version of my Sourdough Biscuits ala Cookie (see http://www.thefreshloaf.com/node/21536/sourdough-biscuits-trying-real-thing and http://www.thefreshloaf.com/node/21967/sourdough-biscuits-trying-real-thing-take-2 ).

It's been a fun Whole Wheat Sunday

David G


sam's picture
sam

Hello,

Here is another attempt of soft butter honey rolls.  I used the following hydration estimates for the following ingredients:  Butter = 17%, Honey = 75%, Eggs = 75%, Milk = 90%.   My targeted overall dough hydration was 66%, and fortunately the dough was spot on.  Nice and pliable, not sticky at all, but not too stiff/dry either.

Here was the recipe I made w/pics.    All flour was KA bread flour, all weights in grams.

Total Dough Weight: 950
Targeted Dough Hydration: 66%
Total Dough Flour Weight: 572
Total Dough Water Weight: 378

Percentages:
    
Leaven Percentage: 39%
Leaven Hydration: 100%
Starter Percentage: 20%
Starter Hydration: 125%

Butter Percentage: 20.0%
Eggs Percentage: 10.0%
Whole Milk Percentage: 10.0%
Honey Percentage: 10.0%
Salt Percentage: 1.8%
Baker's Yeast Percentage: 5.0%

Levain Sour:

Flour Weight: 203
Water Weight: 198
Starter Weight: 45
  
Final Dough:

Flour: 349
Butter: 114
Eggs: 57
Whole Milk: 57
Honey: 57
Salt: 10
Baker's Yeast: 29

Procedure:

1) Mix ingredients for levain and ferment until ripened.
2) Mix all ingredients into final dough.
3) Bulk ferment 90 mins, folding the dough once half-way through.
4) Scale rolls at 50 grams, I could fit 15 in a 13x9 pan, with an initial space between each roll (they will join together as they rise).
5) Final ferment 60 mins, or until fully risen.
6) Make an egg-wash + butter glaze, brush before bake.
7) Bake at 375F for 40 mins.


I made 15 rolls for a single pan, and some extra which I made a small loaf from.  The crumb is shreddably soft and light, the crust is also light and flakey.

Pics.

First one is about 15 mins into the final rise, the first balls I shaped had just started to join together:


I cut open the loaf to sample it.   (Saving the rolls for now..)


Happy baking!


Szanter5339's picture
Szanter5339
OldWoodenSpoon's picture
OldWoodenSpoon

I baked two loaves of Vienna Bread from Inside the Jewish Bakery tonight, and have a problem I have not seen before with pan breads.  Since pictures are worth a thousand words, here they are:

and the crumb shot:

These loaves went together without a hitch, using my stock Pendleton Mills Power bread flour.  I mixed the dough in my Bosch.  It took 13 minutes to get to a nice window pane.  Bulk rise went about 1 hour and 15 minutes due to the cold day and cold kitchen.  Same for final proof going about 1 hour and 30 minutes after shaping and panning.  The oven preheated for an hour with stones in place, and the bake took 30+ minutes to get the internal temperature up to 204F.   I took the loaves out of the oven and unpanned them onto my wire rack and went back to the movie.  When I looked in on them in about a half hour, I saw what you see.

The sides and ends of the base of these loaves all collapsed inward at the mid-line up the panned section.  If you look at the background loaf in the crumb shot you can see evidence of a "breakout" that would indicate the loaves could have proofed even a bit longer.  As the crumb shot itself shows, the loaves have a distinct hourglass figure now that they are fully cooled.  The crumb is light, with many holes of varied size, yet there is also a puzzling doughy patch up just part of just one side of this loaf.  I am assuming, but can't actually know, that this was the "inside" of the pan, toward the center of the oven and about 6 inches away from the other loaf, baked at the same time.  Given that the loaf made 204F in the center, this is a complete puzzle to me.

I ate a piece of the sample above, and aside from that doughy patch, it tastes excellent, is well done, tender and soft in the crumb with a nice "chew" to it.  I don't understand the collapse, and if you have and idea what causes this, I'd love to hear them.

Thanks for stopping by.
OldWoodenSpoon

lumos's picture
lumos


Sourdough Potato Focaccia


INGREDIENTS

   For Dough

      Starter (70% hydration)   70g

      Strong flour   100g*

      T65 flour    100g (or 95g Plain flour + 5g WW)*

              *(or alternatively, 195g AP + 5g WW)

      Salt  4g

      Extra Virgin Olive Oil  1 tbls

      Water   155g (78%)


  For Topping

     150 – 200g Small new potatoes (no need to peel)

     1 clove garlic, crushed and chopped

     Rosemary

     Salt and freshly ground black pepper

     Olive oil

     Coarse sea salt

     Optional … Parmesan cheese


  METHOD

  1. Mix all the ingredients for the dough and autolyse for 30 minutes.
  2. S & F 3 times in the bowl every 40 minutes or so until medium gluten development.
  3. Put in the fridge and cold retard for overnight – 24 hrs.
  4. Take it out of the fridge and leave for 30 minutes -1 hr at room temperature.
  5. Letter-fold the dough once or twice to give extra-strength if necessary. 
  6. Rest until fully proofed.
  7. Meanwhile, thinly slice the potatoes to a thickness of ₤1 coin….which may not give much clue to people outside UK. :p….it’s about 3mm thick. The important point is that the slices should be quite thin or they won’t cook in the time the dough bakes.
  8. Put the sliced potatoes, olive oil, rosemary, chopped garlic and salt & pepper in a large bowl and mix well.
  9. Spread the dough into 20-21cm X 30-31cm rectangular on a well oiled baking parchment, dimpling all over with oiled fingertips.
  10. Layer the potato slices over the top and scatter the rosemary and garlic over the potatoes.

  11. Cover and leave for 1- 1 1/2 hours until dough increase the volume and the edges get puffed up a little. 

  12. Pre-heat the oven to 200 – 210 C.

  13. Sprinkle coarse sea salt over the top with freshly grated Parmesan cheese (if using). Drizzle with more olive oil and bake for 25- 35 minutes until golden and potatoes are soft and cooked.


Roast Turkey Sandwich with the left-over focaccia next day


OldWoodenSpoon's picture
OldWoodenSpoon

A couple of days ago David G. posted this recipe in his blog here.  Being a chocoholic that refuses recovery or treatment, I could/would not resist the temptation to indulge.  First, though, I must point out in my defense that I have never baked a biscotti before.  Ever.  They came out well enough to rapidly become an endangered item in the kitchen though!

David mused in his original blog post that he thought these would be better with as much as 3/4 teaspoon of chipotle chili.  My wife and I both enjoy the heat, and neither of us has ever had chocolate with chili before, so I used a scant teaspoon.  Well, more like a fat 3/4 teaspoon, of chipotle.  All I can say is, "I gotta do this again!".

The heat of the chili just trails off the back of the bite, and does not persist overly long, but it is there and lends a lingering tangy tail to the chocolate flavor.  I also used the Hershey Special Dark chocolate chips, but had to settle for the plain old Hershey Dark Cocoa I had in the cupboard since the grocer did not have the special dark cocoa powder on the shelf.

Never making a biscotti before, I did not know what to expect.  I certainly did not expect the dough to be so sticky, and I wonder what it really should be like.  It also took twice as long as the recipe prescribes to bake to the first stage where I could cool and cut them, and they took twice as long as well in the second stage to dry them out/crisp them up.  My oven temps are spot on because I test a couple of times a year, and I have no trouble with bread timings.  I just think I made some kind of mistake, or should have added more flour, making these up.

If you like chocolate, you will really love these!  Try them if your waistline will stand it.  Mine won't, but I went for it anyway!
OldWoodenSpoon

Szanter5339's picture
Szanter5339

I left a few, and overlay made ​​of bread dough on top.
Scissors and cut around the letters as I told, then I put the shaped bread.
Blade will cut around the pattern.
  Beautiful, decorative and what is important, very tasty!


Pages

Subscribe to Recent Blog Entries