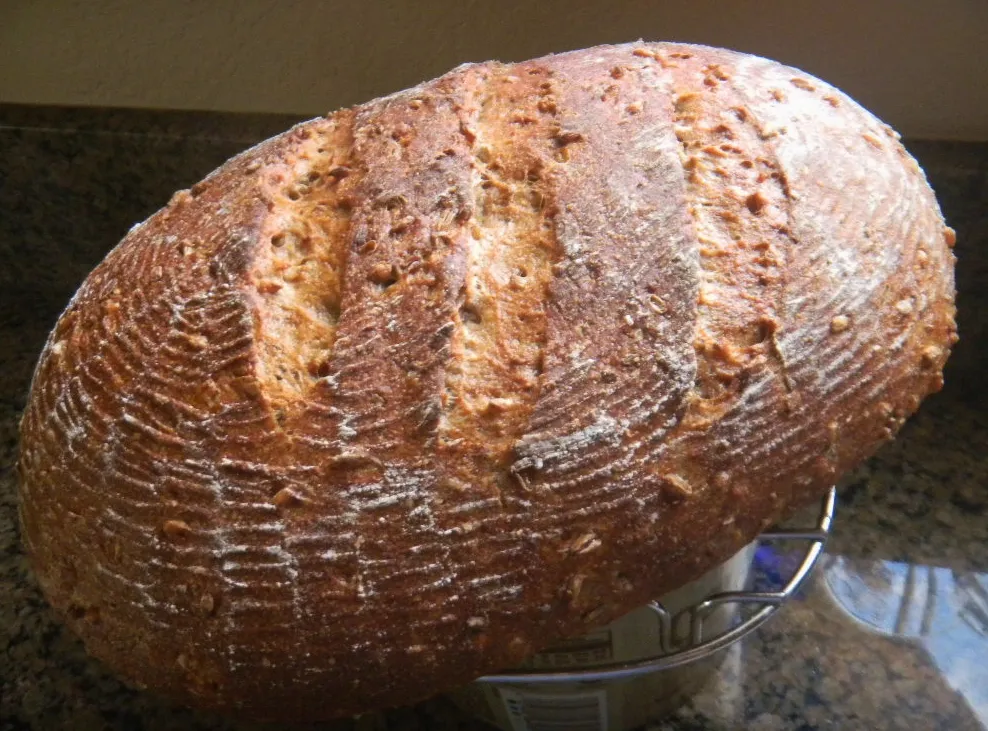
The Fresh Loaf

A Community of Amateur Bakers and Artisan Bread Enthusiasts.

Blogs

bakingyummies's picture
bakingyummies


 Flavored with cocoa powder and adorned with semi sweet chocolate chips, these muffins are one of the best ways to start your day.

PY's picture
PY

My first blog post. How is it that my SD is never sour? This was retarded for 3 hours in the fridge but I have also tried retarding overnight and it still has no tinge of sourness...sweet n buttery though


jamesjr54's picture
jamesjr54

Wanted to use some of the lavender that's growing like crazy in our garden. Inspired by the Provençal formulae by Karin et al. Taste is different - complex, bready and savory. It's semi-sour because I used 2.5 g yeast to get this done in a day. 

Formula:

120 g 100% starter

436 g Bread flour

400 g water

32 g whole wheat

32 g Rye flour

2.5 g active dry yeast

17 g salt

1 TBS chopped lavender leaves

1 TBS chopped Rosemary leaves

40 g creme de cassis liqueur (any sweet liqueur will do I'd imagine)

Dissolve yeast in some of the water

Mix starter, liquor, water and yeast

Mix dry ingredients , including herbs

Mix em up

Knead 10 minutes

Proof 90 mins with stretch and folds at 30 and 60 mins

Pre-shape and shape. Proof 60 minutes

Preheat oven to 500F form last 30 minutes of final proof

Bake 40 minutes in cast iron (20 covered, 20 uncovered)

miranme's picture
miranme

Floyd and Chris,

Thank you for your post. I am working on getting the original Laraburu yeast and bacteria. Can you give me some advice on how to access the yeast and bacteria files and how to get a sample of the yeast and bacteria to start a starter? Are there charges to get specific samples?  I assume once I get the bacteria and yeast I add them to warm water and then add some whole wheat flour and let it rise.  Can you give me more details and links on how to get the starter, bacteria and yeast to grow and form a new starter with Laraburu yeast and bacteria?


Since my post I have made some good progress on producing a very sour loaf which I can titrate and a loaf that is light but sour. I have a few unique situations. I have diabetes which means that regular white flour is bad for my blood sugar and I cannot use it. The other is that I am having massive dental restoration done and cannot chew hard crusted bread. While old I am not completely feeble and useless. At least I can still make good sourdough.

Another post by carthurjohn describes a common problem with sourdough and his hitting a brick wall. Below are my revisions for a sourdough starter and interesting dark sourdough relatively low glycemic bread.

1.     The starter- Many people asked about making a very sour starter. I have one that is very sour and can be even too sour. I read a link about “pineapple starter” in which pineapple juice was used to make a very sour starter. The pineapple juice idea did not appeal to me. They did mention using Apple Cider Vinegar to make a very sour starter. This appealed to me. I use natural Apple Cider Vinegar to start Red wine Vinegar and it has worked well. It has a pure all natural safe lactobacillus culture which grows well.  If it is too sour I add more water and flour to make a milder starter.


I took my standard sourdough starter (about 2 cups worth) and added about 1/3 cup apple cider vinegar and then refreshed it with warm water and white whole wheat flour. It started and worked well. I left the starter outside in warm weather (80-90 degrees) for a day or two and it was powerfully strong and I was ready to start using it.

2.     Making Bread with a lower glycemic index.  Now that I had a sour starter I experimented with trying it out. I worked from a recipe for Laraburu style French bread. Laraburu’s bread was not typically extra sour but a good balance. The recipe calls for adding rye flour to enhance the sourness.


The first step is to autolyse 2 cups warm water, 2 cups whole wheat white flour, 1 cup rye flour and 1 cup buckwheat flour. After letting it sit for thirty to sixty minutes I add 2 teaspoons salt, and 1 cup of the extra sour starter. I mix everything thoroughly by hand and then put a clear plastic film over it and cover it with a towel. I put it outside when the temperature is hot i.e. 80 to 90 degrees. I leave it overnight even if it cools off. By the next evening, it is ready for the next step.


The next step happens the morning of the second day after I started the process. I punch the bread down and add 2 table spoons honey, 1 tablespoon canola oil, 2 tablespoons regular yeast, 1 teaspoon salt and 2 cups of whole wheat white flour. If I want to make it sooner into loaves, I roll it out on a breaded marble top and set up the loaves. I usually get two French loaves and a round loaf.


The next step if I am planning to bake the bread that day is to let it rise at a lower temperature i.e. 70 degrees for anywhere from 1 ½ to 4 or 5 hours until doubled in bulk. I coat it with olive oil and sprinkle sesame seeds on it and bake it at about 375 degrees for 45-50 minutes. The loaf is light, sour and very dark. It is soft and easier to chew than crusty bread cooked with steam. I have tried cooking it over wood in a Weber stove. It was edible but somewhat burnt and heavy.


If I want to wait a day, I simply punch the bread down, add more flour and let it continue to rise. The next day I add the yeast, honey etc. and prepare the loaf as above.


One of the dilemmas with making good sourdough bread is that the bacteria are productive at 90-105 degrees Fahrenheit. Increased sourness needs a warmer rise. This slows or stops the yeast. I use two rises at different temperatures. One at a warm temperature encourages the bacteria and creates a sour flavor. The other at a lower temperature stimulates the yeast. By adding commercial yeast, sugar flour and salt before the final rising I get bread that is both sour and well risen. I debated about whether or not using the commercial yeast was “cheating” and should I or should I not rely on the wild yeast in the starter. My conclusion is that some times for a heavier loaf I go with the wild yeast. Since most of my friends prefer the lighter better risen yeast crust, I usually go with that.  The rye and buckwheat flour makes the bread very dark but it also has much lower impact on my blood sugar.


I am interested in any comments or suggestions to improve on this process.

Miranme


dabrownman's picture
dabrownman

King George V of England, Tsar Nicholas II of Russia and Wilhelm II of Germany were cousins. Their family squabbles created WW1 a war that could not be settled until the end of WW2.


Prince George was named after King George VI; the ‘Stuttering King’.  George VI was king during WW2 and was the father of Queen Elizabeth who took the throne in 1952, some 61 years ago.  She is the great, grand mother of the newly arrived Price George.


With all of this history, the design of the Prince George Chacon was not easy.  The rye flour and rye sprouts came from his German connections mainly but also from his Russian ones.  Even the Windsor name was adopted by King George the 5th in 1917 from the real German royalty of Saxe-Coburg-Gotha.


German sounding royalty in England during WW1 was not a good thing in their royal eyes.  The English Samuel Smith’s Imperial Stout used for the liquid in the dough was first presented to the Royal Imperial Court of Russia where it was a favorite.  It was also very tasty and not poisonous.   I wanted to be the official taste taster like The Prince would have.  Just trying to keep the bake in line with the royal theme.


I forgot to put the aromatic seeds I had ready to go so I chalk that up to Queen Elizabeth’s old age so, no seeds is a tribute to her adn my wprthless apprentice who is supposed to reminds her master of these forgottenn things.  It’s not much of a tribute but better than some funnier ones that come to mind and associated with her ancient age on the throne.


The chacon is a favorite shaping technique we use for special occasions and celebrations.  The corn meal and wheat are from America the home of the baker, the new home of my German apprentice and the USA was once an unruly British colony.


The corn meal also represents the common heritage of the Prince’s mother and our wish that the Prince show a little true grit as he grows older.   The white wheat flour represents his royal father.   At one time, white flour was used in bread that was only bound for royals.   By all accounts, Will is the real deal.  The sprouts are, of course, for the Young Royal Sprout himself.


 This recipe was loosely adopted from a Tzitzel recipe that Varda was working on.  For all we know, if the Windsor Royal Family had kept their German names and married  some Jewish Royalty like I did somewhere along the way, this young one might well have been name Prince Tzitzel .  His nickname could have been Tizzy!


Breakfast on bake day.

If he had a sister, she could have been named Elizabeth for her grandmother; the Queen, and Lizzy for short.  Oh…… what could have been!  Sadly, we won’t be seeing Tizzy and Lizzy in the royal family tree any time soon.


A nice salad for dinner.

We started the rye sprouts 2 days before they were needed.  The rye sour levain was a 3 stage process of 3 hours each for the first 2 stages.   When the levain had risen 25% after the 3rd feeding we refrigerated it for 48 hours.  We pulled it out of the fridge to warm up and to finish doubling.

Bake day lunch

The flours were all home milled in the Krup’s coffee mill - the perfect size for the little guy and The Prince deserves the best flour we can manage from a small coffee mill.  We used a 75% extraction again for the rye and the whole wheat but cut down the hydration from 91% last time to 85% this time.  It was a much stiffer dough but Tzitizel supposedly is a less hydrated kind of rye than the normal.


Saturdays breakfast - the fuel to slice the Prince's Chacon

When we pulled the levain out of the fridge we also started the autolyse by mixing the stout into the flours which included everything except the levain, salt and sprouts.  We sprinkled the salt over the autolyse ball so that we wouldn’t forget it but it wouldn’t interfere with the autolyse very much.


After 3 hours later we mixed the autolyse with the levain and did 10 minutes of slap and folds to get the gluten developed.  We then let the dough rest for 15 minutes before doing (3) sets of S&F’s on 20minute intervals where we incorporated the sprouts on the first one.  One set consisted of 4 stretches from the cardinal direction points and 4 folds - that’s it.


After a 30 minute rest on the counter the chacon was shaped in the bottom of the basket after dusting it with corn meal ala Tzitzel.  The design used was one meant to resemble Franko’s flower that he posted earlier this week.  We started with a ball in the middle and then did 4 tapered petals radiating out from it and added 4 smaller balls to fill in between the petals at the base.


The reminder of the dough was air shaped into a huge bialy and laid on top of the design on the bottom of the basket.  Can’t wait to see what this design will look like after baking.  After 30 minutes on the counter in a used plastic bag, into the fridge it went for a 16 hour retard.


If it rises to 85% overnight in the cold we will bake it cold right out of the fridge.  If not, we will let it warm up and finish proofing on the counter before loading it into the mini oven, a perfect oven for the little tot.  We used 2 of Sylvia’s steaming cups as usual for steam and we preheated to 500 F


In this case the bread needed a little more time to proof on the counter before hitting the oven with a splash of water going onto the bottom of the oven for a burst of additional steam.  After 2 minutes we turned the temperature down to 450 F and continued the steam for a total of 15 minutes.


The steam was then removed and the temperature was turned down to 425 F, convection this time.  We rotated the bread 180 degrees every 5 minutes until the bread reached 205 f on the inside when it was removed to a cooling rack.

The chacon cracked and bloomed unevenly but nicely and almost where we expected.  The bread browned well and we baked it boldly. The corn meal made for a different crust effect too.  Have to wait for the crumb shots but with the rise and lower hydration, we would expect the crumb to be a little less open than our normal for a rye bread like this one using fresh ground flours.

How did that Chinese 5 spice pork get in there?

The crumb came out like we expected and not quite as open a we wanted but it was soft and moist.  It is the best deli rye style of bread we have managed to date.  Very tasty indeed.  Next time we will up the hydration back to the 90% level to open the crumb some more,. When we take away the beer, sprouts and cornmeal and add in so caraway we think it will be very close to the Tzitzel we remember, only better. because of the home ground 75% extraction flour that just can't be bought anywhere.  This is the way bread is supposed to taste - killer with smoked meats as we will soon find out.

Time to relax with a prickly pear margarita


Formula


Build 1

Build 2

 Build 3

Total

%

Multigrain SD Starter

10

0

0

10

2.03%

75% Extraction Rye

15

25

35

75

15.24%

Water

15

25

35

75

15.24%

Total

40

50

70

160

32.52%


Rye Sour Levain


%


Flour

80

16.26%


Water

80

16.26%


Hydration

100.00%


Levain % of Total

15.00%


Dough Flour


%


75% Extraction Rye

118

23.98%


Corn Meal

20

4.07%


75% Extraction Wheat

274

55.69%


Dough Flour

412

83.74%


Salt

10

2.03%


Imperial Stout

360

73.17%


Dough Hydration

87.38%


Total Flour

492

100.00%


Total Stout 360, Water 80

440

89.43%


T. Dough Hydration

89.43%


% Whole Grain Flour

20.33%


Hydration w/ Adds

85.11%


Total Weight

1,067


Add - Ins


%


Red Malt

5

1.02%


White Malt

5

1.02%


VW Gluten

15

3.05%


Total

25

5.08%


Sprouts


%


Whole Rye Berries

100

20.33%


The spout weight is the dry weight before sprouting.


HokeyPokey's picture
HokeyPokey

We've been having such hot couple of weeks here in London that I've been struggling to even think of baking. But I have made an exception for my birthday and baked myself a lovely birthday treat - a tangy lemony cake. A perfect end to a day with a nice hot cup of tea.


Full recipe in my blog here


wspahr's picture
wspahr

Just finished baking a couple of loaves of Tartine sourdough.  Handling of this wet dough has become much easier after watching some You Tube videos showing how to shape. I have found that doing an overnight proofing in the refrigerator makes the Scoring much easier.  It also gives better time flexibility in baking as you do not have to let the dough warm up after the overnight proofing. All of this is outlined in the book Tartine bread.  This is a fun bread to make.   Tastes great too.

Skibum's picture
Skibum

Okay this loaf definitely blew a tire and I am not sure why. Overproofed? Underproofed?  Poorly shaped?  Poorly scored?

This was a simple lean hearth loaf using my new SD starter and following dabrownman's excellent instructions:

http://www.thefreshloaf.com/node/34282/modifying-peter-reinharts-recipes-sour-dough-starter

to the tee.  HELP, any suggestions would be welcome. Other than the sidewall blowout the crumb looks pretty good and the flavour is great!

TIA, Brian

Luis's picture
Luis
  • My first sourdough. Made with 3 day poolish and only regular flour. The scores went too deep. It resembles a bicycle helmet. Thats funny. The taste is great. Knead by hand. Crumb not too open. Try this bread with jam, ham and cheese. With cheese is absolutely wonderful.
trailrunner's picture
trailrunner

This is a straight dough. Old recipe..regular cup/tsp measures. Sometimes the tried and true is the best. I did wet the shaped dough and pressed the top into the oatmeal,read about it here on TFL ..worked like a charm !  The bread is for a customer so no pic of crumb. 

Here is the dough just before going in the oven. c

 photo IMG_6402_zpsa3b14e8f.jpg

Pages

Subscribe to RSS - blogs