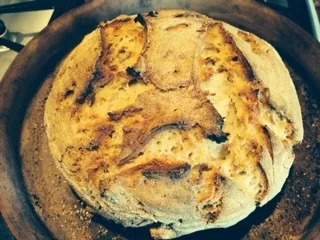
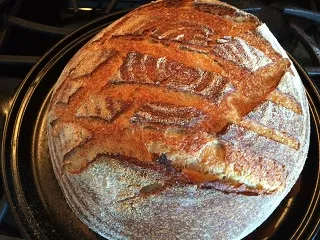
The Fresh Loaf

A Community of Amateur Bakers and Artisan Bread Enthusiasts.

Blogs

gmagmabaking2's picture
gmagmabaking2

We talked, we texted, we discussed ideas and recipes... but this week we all baked somewhat differently. Barb made the amazing Tartine bread on the lead in... many times... many loaves... maybe obsessively!! Maybe not, she had a wealth of talent and people standing in line to eat her breads... or sitting and reclining... however it gets them bread they are doing it!!! 

 Absolutely beautiful and holes that have never been seen in

MY kitchen... I am going to get there someday... Helen baked a variation of the Olive loaf we baked last week, this time she put in ripe olives and cheddar cheese along with some swiss... 

 Now does that

look good or what... she is serving this with toasted with minestrone soup... which we all made... it all looked pretty much like the recipe in Ina Garten's book... where we found it. I am showing you my pot of soup... Barb's and Helen's looked the same.

  and then for dessert I had Angel Cake,

same old "Better Homes and Gardens, red and white checkered book" from the old days.

Sliced and topped with some berries  and whipped cream and it was a good baking day... or days, this week we all baked on different days... the only for sure commonality this week was the minestrone and the sharing... Love our times together, baking, talking, planning, texting, and emailing.

Happy Baking, see you next week.

Helen, Diane, and Barbra.

CAphyl's picture
CAphyl

Thanks so much to blueboy2419 for posting the recipe for this French bread.  It looks fantastic.  Just letting it cool down for lunch.  Ironically, blueboy2419 mentioned adding stout to the bread (I didn't) and getting it at the Liverpool Organic Brewery in England, and, while we live in California, my husband is from Liverpool, and we were just there over the holidays visiting with his family.  We go often, so I hope we can visit the brewery.  I saw on their web site that there is a big beer festival when we are visiting, so my husband will be "made up" with that.  It's really a small world.

David Esq.'s picture
David Esq.

As an exercise I created a spreadsheet for Diagram 3, Part II "Rustic Sourdough with Three Flours, a Cracked Wheat Soaker and a Yeasted Preferment.

I have no idea if it will be of any use to anybody, but here is the google doc link if you are interested.

Diagram 3

The only difference is that I used grams instead of kg, though that is easily changed if people find that annoying.

I wanted to create a second tab that would calculate  the bakers% based on inputted  weights, and which would yield the same bakers% as in the the original formula (using their calculated weights) but for some reason that alluded me (no doubt due to rounding) I was  unable to do this. The yeast kept giving me .003 instead of.002 no matter what I did.

CeciC's picture
CeciC

Lately I have been seeing many post on Tangzhong in softening the crumb n giving it a better spring. I decided to have a go my self. I have slightly modified the formulae from our TFLer Janet. 

 Build 1YW LevainBuild 2RouxSoakerFinal DoughTotal
Levain       
White Starter (100%)20     20
Wholewheat Starter      0
Rye Starter      0
Yeast Water Levain (100%)      0
       20
Flour      0
Extra-High Protein Flour (>14%)      0
Bread Flour      0
AP Flour      0
  000000
Wholemeal Flour      0
Wholewheat Flour  5015030770 1000
       0
       0
 0501503077001000
Liquid       
Water      0
Milk   150425 575
Dark Ale      0
Yeast Water 50100   150
       0
       0
       0
 0501001504250725
Others      0
Yeast     22
Salt    81523
Honey     100100
olive oil     4040
Malt     1010
Egg     100100
 00008267275
ADD-IN      0
Sesame     135135
sesame oil     1414
       0
       0
 00000149149

First I refreshed my starter and built the YW levain the night before I planned to bake. I then combine the starter, YW levain and Built 3 into a levain for this dough.

In the morning I pre-soaked the wholewheat flour with a pinch of salt n sit for 12 hours while im at work.

Mixed the levain, soaker, and all of the add-ins to form a dough. Let it rest for 30 mins.

During the 5 hours fermentation I did 6 S&F, as the gluten in WW flour isnt very strong.

A Pic when its shaped n ready for basket n loaf pan

8 Hours Retardation and 2.5 hours warming up on the bench. 

Looks like its ready for the oven. When I put it in the dutch oven i dropped it so part of the loaf is squashed. 

I baked it at 240 covered for 25min uncovered for 25min.

Crumb shot from the boule and loaf

Crumb is soft with strong taste of Sesame n a hint of sweetness from honey. this makes a really good healthy sandwich bread. Next time Im gonna cut down on water and do more intensive kneading to see if the crumb can be shredibly soft 

yozzause's picture
yozzause

We are experiencing some pretty hot weather here in the West at the moment but i did find time to bake.

I was impressed with the 36 hr baguettes that were featured recently on TFL, i retrieved my s/d culture from the deep freeze here at work and it proved to be a little sluggish to start with, taking 3 or 4 days  to come out of its christmas holidays slumber.

I did a half size of tx farmers dough and here are the results, still not as good as the others but quite acceptable and very tasty.


                                                        the single test loaf

                                                             the crumb shots.

I was able to trade half of the baguette with David the French chef just back from his holidays to Northern France for the sweet he made for the class of chefs from one of the big catering companies that provide catering to the mining companies operating in the gold and iron ore camps across the state.

David said the bread was as good as any he had back in the old country and we enjoyed the sweets back in our office!

That was a win win I reckon.


Hoping the weather cools soon.

kind regards Derek


Lorilu2's picture
Lorilu2

 Today I produced 2 lovely loaves of Honey WW sandwich bread since I was taking dinner to some dear friends who have had more than their share of troubles recently. It's always so rewarding to see how fresh, homemade bread is received. As we all sat dragging our bread through the stew gravy in the bottom of our bowls everyone seemed to just relax and enjoy the quiet company of good friends and good food. 

I have used the same recipe countless times, but decided to utilize the stretch and fold method instead of traditional kneading and was thrilled with the process and the outcome. The crust was thin, but crispy and the bread developed a much more intense WW flavor and the sweet undertones of the honey were much more pronounced. 

I am waiting a few more days now for my sourdough baby to develop a little further. He was born 7 days ago and has been weaned to 4:1 AP/WW feedings every 12 hours. I think I will maintain the AP/WW combination until spring as my house is usually around 67 degrees and I figure they can use the extra boost from the WW. If anyone has any great formulas for my first bake, send them on. I hope to be baking by Thursday or Friday, if all goes well. Plan to post pics of this first adventure, good or bad.


Skibum's picture
Skibum

This was an orange chiffon cake and I will call it an upside down cake and explain that later. I used a spring form pan and manually sliced 3 layers using a vanilla fudge spread for one layer and a chocolate fudge for the other. The cake was finished with enrobing chocolate and I thought a sprinkling of ground almond and some sliced almonds would go well, as a ski bum I don't need to watch my weight.

Well this was not amusing at the time, but this bake turned into a bit of a rodeo. After pouring the chiffon batter into the spring form pan, I began to load it into the oven, accidentally releasing the spring in the process -- chiffon batter all over my kitchen floor. Undaunted, I scraped up what I could and re-filled the spring form pan and baked it off. I then spent the next 10 minutes cleaning up my kitchen floor, cabinets and so on. This morning I bought myself a bundt pan!

The yeasted doughnuts were a snap to prepare and bake off in my deep fryer and mighty tasty with the honey glase!

This is a wonderful book and has opened up a world of dessert baking I never knew I could bake. 

Loving it! Brian


Nomad Bread's picture
Nomad Bread

(Note: copied from my actual blog)


This is actually my first attempt at the basic country bread from 'Tartine' (with an exception, see note below). I read and re-read the sections on bulk-fermentation and shaping, until it was etched in my brain, sure not to mess it up. So, of i went...


3rd Test Formula - Basic Country Bread


Final Dough:

900g Strong white bread flour

100g Wholemeal flour

200g Levain

700g H2O*

20g Salt


Baker's percentage (of total formula, i.e. including the levain):

1,100 flour (100%)

800g water (73%)

20g salt (2%)


*Exceptional Note: I omitted the additional 50g of water asked for in the book (that goes in with the salt after autolyse), more out of caution than anything else. At this point I still didn't fully understand how British flour works compared to US equivalents, hence the hesitation. After having backed this bread again, and slowly mastering the shaping techniques described in the book, I have no qualms of re-incorporating more water into the recipe.


Method (this time with some more detail):

  • Mix the levain with about 90% of the water, then add all the flour and mix well until the flour has absorbed all the water.
  • Let the dough rest for about 30min. (autolyse stage)
  • Add the remaining water with the salt and squish into the dough and incorporate well.
  • Transfer the dough into a lightly oiled plastic container for the first stage of fermentation (bulk-fermentation stage). This is probably the most important part of the whole process. Give the dough time to rise and, with 'stretch and fold' turns every half an hour, time to develop strength. Take it easy on the turns after about the second hour (the dough needs a good 3.5-4hrs in total of bulk fermentation), as you don't want to destroy the wonderful work the CO2 is doing to give your crumb that nice open texture.
  • After the last turn (of stretch and fold), let the dough rest for a further 30min. Now the dough is ready for the first shaping.
  • Let the dough ooze out of the container and cut it into two equal-sized pieces. This is the trickiest part of the whole process, so listen carefully, je ne vais pas répéter deux fois, I won't repeat it twice.
  • To avoid adding loads of flour into your wet sticky dough (and changing the formula as a result), cover the working area of the bench with either some odourless vegetable oil, or as I prefer to do, with olive oil. Do the same with your bench knife and make sure the surface is kept oily for the duration of the shaping process. Have a small bag of AP flour at hand for your other hand. 
  • Carefully pre-shape the doughs into balls and bench rest for about 30min.
  • Now comes the final shaping. The special way of shaping the (almost) flat disc into a firm boule is illustrated clearly in the book, and involves multiple horizontal and vertical folds, so that, what eventually will be the outer top surface of the loaf, holds enough tension to keep its shape during the final prove in the fridge, and to spring nicely in the oven when ready to bake.
  • Finally cover a proving basket or linen towel covered bowl with enough rice flour (works best for me) to avoid sticking, and swiftly and carefully transfer the round dough into the bowl.
  • Prove in the fridge for 15-17hrs.
  • The next day, pre-heat the oven as hot as it goes, i.e 250°C, with the dutch oven/combo cooker inside, for at least an hour.
  • When ready to bake, flip the bread onto a baking paper covered oven peel or sheet, and quickly slash with lame or razor blade. Transfer into combo cooker and cover. Place back into oven and bake covered for 30min. Don't be tempted to uncover before that. Patience!
  • Then uncover the lid, and put back into oven and back for a further 30min, until the crust is dark brown with some burnt edges.
  • Let cool on wire rack.Et manger.

Result:


dylemma's picture
dylemma


Here is my 3rd attempt at the Oat Porridge Bread.   I reduced the amount of extraction flour (hard red/spelt) to 25%, and omitted the chopped almonds.  At 4.5 hours of bulk, the dough only rose 10% but was well aerated, so I took a gamble, shaped it and proofed for 13 hours at 49 degrees Fahrenheit, and on the counter for 1 hour at 71 degrees.                                                      

1522624_10152182697829218_2067913842_o   1614315_10152184200484218_1430029222_o 1524212_10152185068694218_1812855167_o

pmccool's picture
pmccool

January has been a busy month already and there is nothing to indicate that it will slow down anytime soon.  Consequently, I haven't posted much recently but I have been busy with baking.

I taught two classes at the Culinary Center of Kansas City this month.  Last weekend was a Breadmaking 101 class and this weekend had an advanced course on formula design utilizing the BBGA spreadsheet format, which I think is unique to the area.  Each went well, with 17 in attendance for the Breadmaking 101 class and 5 in attendance for the formula design class.  We would usually cancel a class if only 5 people sign up for it, since it isn't profitable for the Center to deal with a group that small.  However, we felt that it was important to hold this first-ever class so we made some adjustments and rolled with it.  The small attendance may have been a real advantage, since it gave me much more time with each student than would have been possible in a larger group.

As the name implies, the Breadmaking 101 class was geared to people who are new to baking bread.  The focus was on introducing the basics that are so important, and often so daunting, to new bakers.  We only dealt with two breads during the 5-hour class so that students would have an opportunity to learn about ingredients, mixing, kneading, and fermentation first-hand.  While I had wanted to have the students bake at least one of the breads while they were in class, circumstances just didn't allow that to happen so they took the dough that they had prepared to bake at home.  They did get to see the bake for one of the doughs that I had made while setting up for class, which gave them an idea of how the finished product should look, as shown below:

I'm not sure what point I was making but it was obviously an important one!  The bread in question is a simple Italian-style white loaf.  Here's a picture of what I baked from the demonstration dough:

Interestingly, the adjoining classroom had an all-day Italian cooking class going on.  From talking to that instructor before our classes started, I learned that her father had owned S&A Italian Bakery, one of the larger bakeries in the Kansas City area dating back to the early 1900's.  Apparently the old bakery building in downtown KC has been converted into condominiums and one of those condos still houses the old brick oven, though it is not in use.  Her comment was "Someday, I'm going to buy that condo!"  When we took a break for lunch, I carried one of the loaves into her classroom, making her a very happy camper.

The other bread featured in class was a honey whole wheat, which gave the students a panned bread to work with, too.  As usual, I stressed the importance of measuring by weight, instead of by volume.  This was the first class in which I had the students do all of their measurements by weight, using new scales that the Center has recently acquired.  That presented some mental shifting of gears for a few of the students but all got through it in good shape.  One student commented that the whole idea of hydration, and how it could be controlled, was an important new understanding for her.  All in all, a tiring but enjoyable day.

This Saturday's class was the polar opposite.  It was structured to have the students develop and make a bread of their choosing (within some parameters that I set to keep things simple) so that they could familiarize themselves with the thought processes that go into formula development.  I had set up a spreadsheet with three different templates, all based on the BBGA format, that was emailed to the students in advance of class.  They were encouraged to bring a computer, or tablet, or other device that would allow them to manipulate the templates in class to produce their formula.  Before getting to the spreadsheet proper, we covered the importance of measuring by weight and how to use Baker's Math, since those two concepts are at the core of the BBGA format.  As part of that discussion, we mixed three series of hydration experiments, one each of bread flour, whole wheat flour, and rye flour, with hydration levels from 50% to 90%.  Each sample used 50g of flour and the students did all of the mixing by hand so that they could see how the flours behaved across the range of hydration levels and how they changed from one flour to the next.  That turned out to be an eye-opener for them, since they gained a visual and tactile understanding of what the hydration numbers meant.  Each student's packet included two worksheets with a series of questions that prompted them to think about what they wanted in the finished bread, with regard to intended use, flavor, shape, texture, crust, and other factors.  With that background, each one put together a draft formula for their new bread.  I also let them use some bread books as references, not so they could copy formulae but so they could get a sense of how different ingredients were combined, and in what percentages, for various styles of bread.  

After mixing, kneading and setting their doughs to ferment, we regrouped for a discussion and demonstration of various techniques.  From there we broke for lunch, with occasional interruptions for stretch and folds by a couple of the students.  The menu included sandwiches made with Italian bread and German Farmer's Bread, the latter from Hamelman's bread.  It's absolutely lovely stuff, very flavorful with a small inclusion of rye and yogurt, moist, and chewy.  A loaf is shown in the headline photo and sang quietly while its picture was being made.  Some slices showing the crumb are pictured, below:

After the students shaped their breads, we spent some time discussing various ingredients that can be used in breads and what kinds of effects they have.  Then the students went to work on designing a second bread.  By the time they were ready to mix and knead their second bread, the first set of loaves were ready to bake.  After their second doughs were prepared, we cleaned up our area and had a discussion to answer any questions that hadn't been adequately covered earlier in the day.  Eventually, the breads came out of the oven and the students went their separate ways with one baked loaf and some dough to bake at home, plus a headful of new understanding.  

Considering that it was the first-ever presentation and radically different than any of my other classes, I'm very pleased with how the class went.  There are things that can be improved, certainly, but it was a definite success.

A bake from earlier in January featured Hamelman's Tarte Flambee, which is a kind of pizza in much the same way that a Bugatti Veyron is a kind of automobile.  Luxe, in other words.  Bacon, onions, creme fraiche (I substituted Mexican crema), a hint of nutmeg, plus some mushrooms that I threw in just because; all combining to produce an artery-clogging rapture.  This is seriously good stuff and should probably not be indulged in more than once a year.  The picture, below, was taken with my cell phone and seems to have emphasized the red end of the spectrum, leaving the bacon appearing much more pink than it actually was.

The other thing that I've been playing with is King Cake for Mardi Gras, since I've been invited by Slow Food Kansas City to teach a class at their February meeting.  The dough itself is where I want it to be and I've worked out a shaping technique.  The only thing that I'm still fiddling with is the filling.  The one that I have used tastes great but it has a tendency to liquefy and ooze out of the cake while baking, so that needs a bit more work.  The second iteration, unadorned, is shown below:

That about catches me up, I think.

Paul

Pages

Subscribe to RSS - blogs