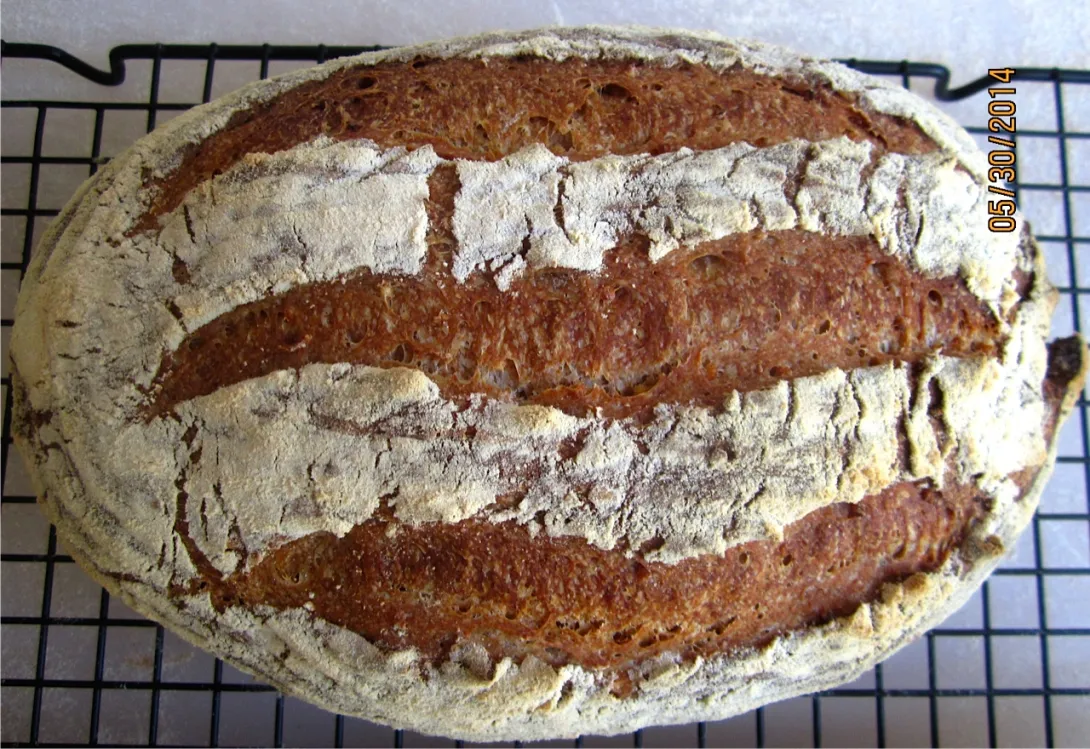
The Fresh Loaf

News & Information for Amateur Bakers and Artisan Bread Enthusiasts

Blogs

  • Pin It
bwraith's picture
bwraith

Olive Bread - Sourdough Yeast Hybrid (1)Olive Bread - Sourdough Yeast Hybrid (1) 

Olive Bread - Sourdough Yeast Hybrid (2)Olive Bread - Sourdough Yeast Hybrid (2)

My wife said we were invited to dinner and could I make some bread to bring. This was in the morning of the same day, so I was unable to do a long rising, multiple step, sourdough bread, as I would have with more warning. So, I went for a fast approach. I had some left over starter that was intended for some bread I never got to. It was 5 days old sitting in the refrigerator. I decided to use it as a flavor ingredient, and add regular yeast to the dough in a "hybrid method". I also have had some kalamata olives in the pantry, thinking I might want to make some olive bread, which I had not done before. The result was a very mild sourdough flavor combined with olive fragrance and brine flavor. It seemed to go over fairly well. I took some photos and thought I would post this recipe. It's a way to get some sourdough flavor even if your starter is not fully revved up or if you are just in a hurry.

Olive Bread - Sourdough Yeast Hybrid

For the Dough:

  • 360 grams of 5 day old refrigerated 100% hydration sourdough culture (mine is BBA style, fed with KA bread flour)
  • 320 grams of AP (I used KA organic AP)
  • 100 grams sifted white wheat flour (this could just be more AP, some white whole wheat flour, or other "rustic" flour)
  • 50 grams KA rye blend (again any rye, whole wheat, or other "rustic" flour)
  • 285 grams water
  • 13 grams salt
  • 1.5 tsp instant yeast (I used SAF instant)
  • 0.5 tsp diastatic malted barley flour (not critical - optional ingredient)
  • 200 grams kalamata olives, pitted, halved, stored in natural brine (that's what I had, but I'm sure lots of other types would be good, too)

There is a lot of flexibility in the age of the starter and the type of starter. I'm just using it as a flavor ingredient. You could easily make this a pure sourdough recipe by using fresh starter and leaving out the instant yeast. The bulk fermentation and final proof would just run longer, maybe 4 hours for the bulk fermentation and 2 hours for the final proof if done with pure sourdough.

Autolyse

Mix flours and water together, and use frisage, dough hook, or mixer to get it reasonably well mixed. Let sit for 20 minutes.

Mixing and Kneading

Work in the starter, yeast, then salt, and use frisage or mixer to get all the ingredients well mixed. Press in olives a dozen at a time and fold dough a few times to get them integrated into the dough. Knead for a few minutes until the dough is resilient. It will probably be quite sticky. The hydration is about 71%, so it is wetter than regular french bread dough. The ripe starter will make it have a wetter stickier consistency also. Place the dough in a covered container to rise. You can spray a little oil in the container beforehand and also on the exposed surface of the dough, but it's not that critical.

Bulk Fermentation and Folding - about 2.5 hours at 78F (or a little longer at room temperature)

Fold the dough at about 1 hour and then again at about 2 hours. At 1 hour it should have risen to about 1.5 the original dough volume. At 2 hours, it should have risen to about double the original dough volume. To fold, turn the dough out onto a lightly floured surface. Spread it out, pressing down gently without ripping the dough. Then, grab one corner of the dough, stretch it out gently and fold it over itself into the center of the dough. Do this for all four corners. If the dough is hard to stretch, just do two opposite corners, like a letter, rather than all four corners.

Shaping

Turn the dough out onto a lightly floured surface. Split into two equal pieces and let rest 10 minutes. To shape, create a rectangle about twice as long as it is wide. Roll the rectangle up from the short side, tensioning the outer surface as you roll. Pinch the sides under tightly to create more tension. Then, pinch the ends under also. Let it rest ten minutes with the seams down. Place the shaped loaf seams up in a couche lined banneton floured with a very small amount of rice flour or use other rising form as you prefer and optionally spray a little oil over the exposed surface. Cover with a towel and let rise for about 1.25 hours until puffy and probably a little less than doubled in volume (I did this at 78F, so adjust times if doing it at room temperature).

Bake

Preheat oven to 500F. Turn loaves onto a peel using your favorite method. I use parchment paper sprinkled with corn meal on a peel. Slash lengthwise a couple of times. Optionally mist the loaves with water very lightly using a fine mist spray bottle. Place loaves in oven, and generate steam using your preferred method. Just wetting the surface of the loaves is one simple appproach. Bake at 500F for about 10 minutes. Open the oven door and remove all the steam generating stuff you may have, and drop the oven temperature to 450F. Bake another 10 minutes or more until internal temperature is about 207F (at sea level).

Cool

Let them completely cool before you cut into them.

bwraith's picture
bwraith

A Hamburger BunA Hamburger Bun

I just got a new barbecue grill, so hamburgers were in order. As a home bread baker, I've occasionally made homemade hamburger buns, and there is no question that a hamburger is just better with freshly baked buns.

If you've had the same thought, well here's a recipe for a hamburger bun. The recipe uses direct method instant yeast, so it only takes 3-4 hours. The hydration is a little higher than french bread, but still very easy to handle.

A Hamburger Bun

The Dough:

  • AP flour (I used KA AP) 650 grams
  • Water 290 grams
  • milk 200 grams
  • olive oil 30 grams
  • salt 13 grams
  • 1 package active dry yeast
  • Mix flour, water, milk together using frisage and a few folds, and let sit for 20 minutes.

Mix/Knead

Work yeast into the dough, then work salt into the dough, then work olive oil into the dough. This can be done with a mixer or by hand using frisage and a few folds. Then knead the dough for about 5 minutes until it becomes workable, stretchy, and seems like it bounces back when you punch it, or whatever magic you use to tell if the dough is right. Add flour or water if necessary to make the dough elastic and not too stiff, but it shouldn't spread out when placed on a table. Place the dough in a container to rise.

Bulk Fermentation and Folding (about 2.5 hours)

When the dough has risen by about half, which should happen in roughly an hour, turn it out on the counter, spread it out a little, pressing on it gently. Then, pull a side of the dough and gently stretch and then fold it into the center of the dough. Do this for four sides. You will now have approximately a ball of dough again. Turn it over and push the seams created by the folding under it. Place it seams down back in the container. Repeat this again in about another hour when it should be about double the volume of the original dough when you first mixed it. Then, let it rise for another 0.5 hours or so.

Shaping

Split the dough into ten pieces. I use a scale and break pieces of dough off if necessary. Let the pieces rest for 5 minutes. Take each piece and do the same type of fold as above in the bulk fermentation. You press it down and spread it out gently, and then fold the four sides toward the middle. After folding, turn it over, and make it into a small boule by pushing the sides under and creating some tension on the top surface. Press down on it with your palm again, to seal the seams underneath. Shape all ten buns and place them on a peel or sheet, leaving some room. I had to bake these in two batches in order to have enough room in my oven. Spray them very lightly with oil. Cover them with a towel.

Final Proof

While the buns are rising, preheat the oven to 450F.

Prepare to Bake

Paint the buns with milk and sprinkle sesame seeds on top. Press them down gently with your palm to spread them out a little.

Bake

Bake for about 15 minutes at 450F. The internal temperature should be around 207F

Cool

Let them cool for a few minutes at least.

breadnerd's picture
breadnerd

I love getting up early on sundays with a good excuse to bake. Today we have family passing through town, and they'll be on the road a bit so I wanted to make them some portable snacks.


BBA Bagels, with oh about 50% wheat flour. I love this recipe because you can leave them in the fridge until you've got everything set up for baking, and because you can have hot bagels first thing in the morning without a lot of effort. I made a few toppings--poppyseed, salt, "everything" (with fresh onion and garlic tossed in olive oil, mixed with the previous toppings).


ready to go:


Boiling:


Out of the oven:


I also made a scones: Cranberry orange, and oatmeal date. It smells rather good in here!


redivyfarm's picture
redivyfarm

Ah, there are so many things I want to try but the counter is covered with ciabatta requiring me to slow down on the baking. So sad. I cared for my starters and they are thriving.  My 4 day old rye and grapefruit starter was ready for its first feeding of AP flour and water and it really took off. At the same time, I refreshed my old potato water starter for the third time and it was interesting to note the comparative rise and fall of the two. Jes look!

 3 hours elapsed

New and Old Starters: 3 hours elapsed

 4 hours elapsed

New and Old Starters, 2: 4 hours elapsed

There is now another opinion to gauge my success on the three ciabatta recipes baked this week. RC prefers my tried-and-true recipe using yeast but fortified with the excess unrefreshed sourdough. The flavor is really developed in the old potato water starter, dubbed Lazarus this week! (It was uncovered and scented the kitchen with a peach fragrance). I'll try that recipe again using my notes from this week's baking to see if I get consistent results. If so I'll share the recipe as an idea for using excess starter. Tossing it still bugs me!

I get to bake my first no knead tomorrow in one of my heirloom dutch ovens. I wonder if the 90 year old cast iron will flavor the bread like gumbo or chicken and dumplings? RC promises to take bread to our project Monday and feed it to the crews if I will bake tomorrow.

Now I have a strategy!

mse1152's picture
mse1152

Last night I baked this bread for the first time. I started the biga on Thursday after dinner and made the final dough Friday around 5 p.m., finishing the bake around 9:15. The biga spent the night in the fridge (in a bowl covered with plastic wrap), and developed a skin. The skin seemed to get incorporated into the final dough alright, but next time, I'll wrap the biga in oiled plastic and zip it into a bag as well before refrigerating.

It's a soft bread with tight crumb. Since I've never made it before, I don't know if that's what Italian bread is supposed to be or not. Tastes pretty good though. I think it would be a good bread to make into individual sandwich-sized rolls.

I'm not yet able to post a photo here, so I'll include a link to my Webshots album:

http://tinyurl.com/ywlfrc

Sue


TinGull's picture
TinGull

 After about 2 1/2 weeks of love and care, my starter is officially alive and kickin'! I made a couple olive sourdough loaves today, since this is my girlfriends favorite, and wanted to use my sourdough starter. It looks delish! It just came out of the oven (still crackling as I took this picture) so I haven't cut into it yet. One of the reasons I LOVE making bread is to fill the entire house up with that aroma of wild yeast and flour. Mmmmmmmmm.....


I'll put up some pics after I cut into it. I heard on one of those Julia Child PBS videos that it's illegal in Italy to even sell bread when it's warm....how intense!

And the crumb


redivyfarm's picture
redivyfarm

I spent all day on a long fermentation trying to duplicate bwraith's beautiful sourdough ciabatta. What I produced was the best tasting thing I've baked. On the down side the crumb is unremarkable again, proving I'm starting pretty low on the learning curve. My sourdough starter which has been dormant for months is now hyperactive as evidenced by this proof-

Sourdough ProofSourdough Proof

I think I overproofed. The dough was very soft, very puffy, very sticky!  I had to fold it some more to get it workable for shaping. Onto a cloche for final proof went the dough until I lost my nerve and moved the four ciabattas to oiled paper on a baking sheet. Envision a sticky mess of dough and cloth instead of tasty bread! To get a crunchy crust, I spritzed the loaves with water and steamed with a cup of water in a skillet. This recipe baked 18 minutes at 450 and still came out only a golden brown. Bwraith, how do you do it?

Sourdough Ciabatta #1Sourdough Ciabatta #1

Even if unremarkable in appearance, this bread won't last long. Its delicious!

It is day three for my rye and grapefruit juice starter and as Grandma Gracie would say, it is really going to town!

redivyfarm's picture
redivyfarm

Well I'm starting a self-directed course of study in bread making.  I'm taking inspiration from the products of the very accomplished bakers of The Fresh Loaf community and plotting a course to learn what they know-and-can-do in their kitchens. I plan to document my efforts in this space.

This week I have revived my tired and sluggish sourdough starter with two feedings at better ratios.  I'm happy that the starter doubled vigorously this morning in three or four hours.  It is day three for the rye and grapefruit gruel; patience required there.

Yesterday I baked two ciabatta recipes after preparing the preferments for each the night before. The first is a yeast leavened white that was very successful when I first made it last year.  I experimented by adding unrefreshed sourdough starter in place of the liquid to add flavor. My recipe calls for very little handling, just dividing, shaping and dimpling after the first rise. The bread baked up very moist and light with a gazillion small holes.  The flavor is so good; the sourdough really did the trick. I wonder, do the large holes come from a longer final proof? I've been afraid of letting it go too long and falling flat.

 Baking of 4-11-07Simple Ciabatta: Baking of 4-11-07

Next Ciabatta Integrale as shared by JMonkey. I followed his KA recipe and notes exactly with one exception. When I mixed all of the ingredients I felt the mix was too dry so I added two teaspoons of water before the autolyse.  The hand mixing worked fine for me and allowed me to determine when I thought the hydration was right. As promised, this dough really rises actively! I enjoyed learning the stretch-and-fold technique; that was new to me. My result is a really light and moist wheat bread that is much more like sandwich loaf than a chewy ciabatta. My husband will love it when he comes home because that is what he prefers!

Whole Wheat CiabattaWhole Wheat Ciabatta

I hope to refer back to these ciabattas once I have found my baker's mojo.  To end on a positive note; I haven't baked anything inedible for almost a year!

Thegreenbaker's picture
Thegreenbaker

Since my faith in my baking skills has come back I have been baking every 2 days or so.


I made a batch of rustic bread last night and it was soooooooo tasty. We couldnt get enough of it......needless to say we have almost finished the first loaf :)

Each time I bake I get more and more excited.!


heres a link to my flickr bread photo site.   

http://www.flickr.com/photos/7688602@N04/


So when I make Rustic bread, I add 3 tablespoons of Rice bran oil and 1/2 cup of semolina flour. (fine ground semolina really)


It adds to the taste and is AMAZING!


thegreenbaker.........one day I will be able to post pics properly. 


bwraith's picture
bwraith

Sourdough Raisin Focaccia

Sourdough FocacciaSourdough Focaccia

Sourdough Raisin Focaccia (a)Sourdough Raisin Focaccia (a)

Sourdough Focaccia CrumbSourdough Focaccia Crumb 

My wife's favorite bread is without a doubt sourdough raisin focaccia. The recipe is loosely based on the BBA (Reinhart) "Poolish Focaccia", including his mention of raisin focaccia and a tradition in certain parts of Italy for "breakfast focaccias".

Many thanks to various contributors to this site as always. Photos of the process have been posted for this sourdough raisin focaccia and the sourdough ciabatta I made at the same time and mentioned recently in a previous blog entry. A spreadsheet is also posted showing weights in ounces or grams.

Starter:

  • 14 oz BBA style barm fed w/KA organic AP flour (1:1 by weight flour:water)

The day before this bread was baked, I took my "BBA style barm", a 100% hydration starter fed with KA Bread Flour, out of the refrigerator. I fed it 1:2:2 (starter:flour:water) three times over the course of the day at room temperature, which refreshed the starter and built enough starter for this recipe, the sourdough ciabatta I also made the next day, as well as some left over to return to storage in the refrigerator. The larger amounts were made by feeding with KA organic AP flour, to convert to KA organic AP flour, a choice of a slightly lower protein flour that should be good for irregular, large holes and artisan style bread.

Dough:

  • 14 oz 100% hydration starter using KA organic AP Flour
  • 13 oz KA organic AP Flour
  • 2 oz KA Rye Blend Flour
  • 2.5 oz olive oil
  • 10.5 oz water
  • 0.5 oz salt (14 grams)
  • A box of golden raisins (about 2.5 cups)

Autolyse:

Mix the flours and water together in a bowl (I used a dough hook for this). Let sit for about 30 minutes.

Mix:

Mix flours and water above with the 14 oz of starter, 0.5 oz salt, 2.5 oz olive oil, and mix for a couple of minutes - just long enough to thoroughly mix the starter and salt with the flour and water from the autolyse step. Add a box of golden raisins (about 2.5 cups). The dough should be quite "wet", meaning it will not clean the bottom or even much of the sides of the mixer bowl. It should be fairly sticky and already have a fair amount of gluten development. I realize I needed a little more water than I actually used (10 oz), so the recipe says 10.5 oz and is what I will use next time. As a result, the dough was a little too stiff and the crumb wasn't quite as open as I think it would be with the extra ounce of water.

Bulk Fermentation and Folding:

Make a fairly thick bed of flour on the counter about 12 inches square. Using a dough scraper, pour the dough out into the middle of the bed of flour. Allow it to rest for a few minutes. Then, fold the dough by flouring or wetting your hands, then grabbing one side of the dough and lifting and stretching it, folding it over itself like a letter. Do this for all 4 sides. Brush flour off the dough as you fold over the sides that were in contact with the bed of flour. You don't want to incorporate much flour into the dough as you fold. After folding, shape it gently back into a rectangle or square, spray it with a light coating of olive oil or some other oil spray, and dust very lightly with flour. Then cover it with plastic wrap, and drop a towel over it. If the dough seems a little stiff at this point, it unfortunately probably already doesn't have enough water in it. You can put it back in the mixer and add 1 oz of water and try again. Or, soldier on and adjust your water next time. Repeat the folds approximately every 45 minutes two more times. If the dough seems very resistant to stretching, only fold it from two directions instead of four. You don't want the dough to get really stiff from too much folding. The amount of folding you will need will be more if you have more water and less if you have less water. Note that even an ounce can make a very big difference in the consistency of the dough. After three folds, let the dough rise for another 1.5 to 2 hours, at which point, the dough should have doubled roughly in volume. Use the "poke test" to get a feel for how long to continue the bulk fermentation.

Shaping:

Line a standard (the ones that are about 17 inches long and 13 inches wide) baking sheet with parchment paper and spread about 1/4 cup of olive oil over the parchment paper. Transfer the dough to the sheet. Spread the dough out by dimpling it systematically with your finger tips, pressing down firmly into the dough with all ten fingertips, and slowly getting the dough to spread out in the pan. Don't stretch the dough, just dimple it by pressing into the dough vertically with your fingers. If necessary, wait 10 minutes for the gluten to relax, if it won't spread out enough to fill the pan at first. As you do the dimpling with your fingers, work about another 1/3 cup of olive oil into the top of the dough by spreading it over the top of the dough as you dimple away. Once the dough has  spread all the way out and nearly fills the corners, you can cover it with saran wrap.

Final Proof:

Let the dough rise for about 2.5 hours, until it is puffy and has increased significantly in volume. With this sourdough version it may not rise above the lip of the pan, but it should come close. If it rises unevenly, you can dimple the high sections again periodically to even out the height of the dough across the whole pan. I actually let this one rise almost 3 hours. It finally seemed to relax and rise around 2.5 hours, so I went ahead and tried baking it. As I mentioned before, the result wasn't quite as open of a crumb as I hoped, but it was fine - next time a little more water, and it will be better.

Prepare to Bake:

Preheat oven to 500F. Remove plastic wrap, and use your fingers to spread about 3/4 teaspoon of kosher salt evenly over the dough. Don't use more than 3/4 tsp of salt, or it will come out too salty. Spread the salt with your fingers by holding the 3/4 tsp of salt in your palm and picking up pinches of salt and slowly spreading it over the dough. Again, it's important to get it spread evenly in just the right amount, and that is very difficult to do unless you measure out 3/4 tsp of kosher salt and then spread it in small pinches very evenly over the whole surface.

Bake:

Place pan in the oven and lower temperature to 450F. Bake for about 12 minutes, until the internal temperature is around 207F (I'm near sea level), rotating it after about 9 minutes. You can bake longer to get a darker, harder crust. Actually, I think this KA organic artisan AP flour may benefit from a little bit of added diastatic malted barley flour, as the breads I baked with this flour today were more pale than previous results with KA AP or KA Bread Flour combinations. I don't think I overproofed them, but maybe that's a factor. The focaccia should spring up from their "flattening" with your fingertips, such that not much evidence is left of the dimples you made with your fingers.

Cool:

Let bread completely cool, if you can stand to wait.

This bread is especially good for breakfast lightly toasted or heated with a little butter and/or honey. The mixture of salt, sourdough flavor, and the sweetness of the raisins is delicious.

Pages

Subscribe to RSS - blogs