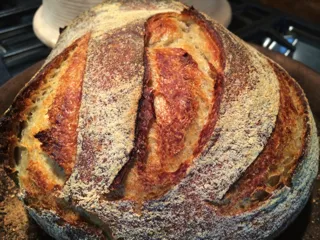
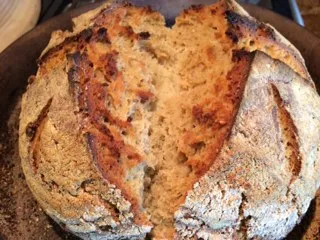
The Fresh Loaf

A Community of Amateur Bakers and Artisan Bread Enthusiasts.

CAphyl's blog

CAphyl's picture
CAphyl

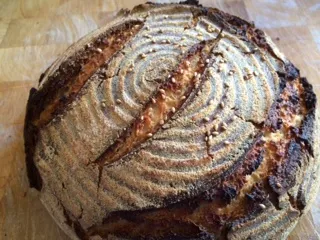
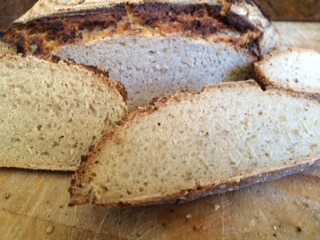
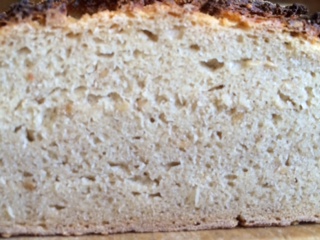
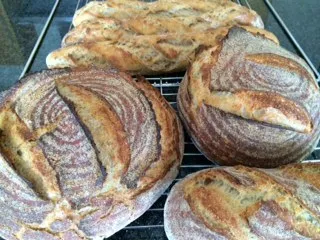
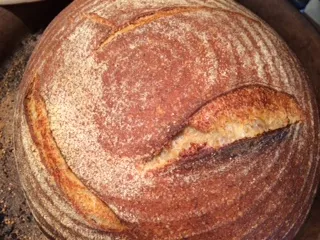
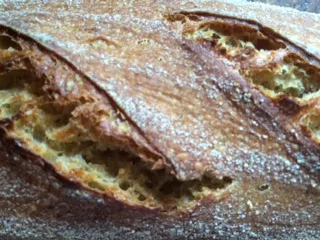
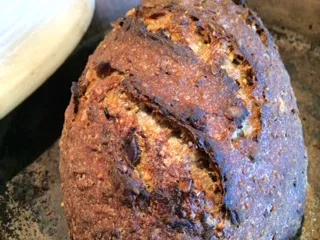
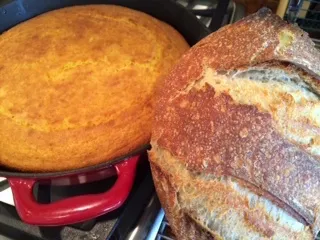
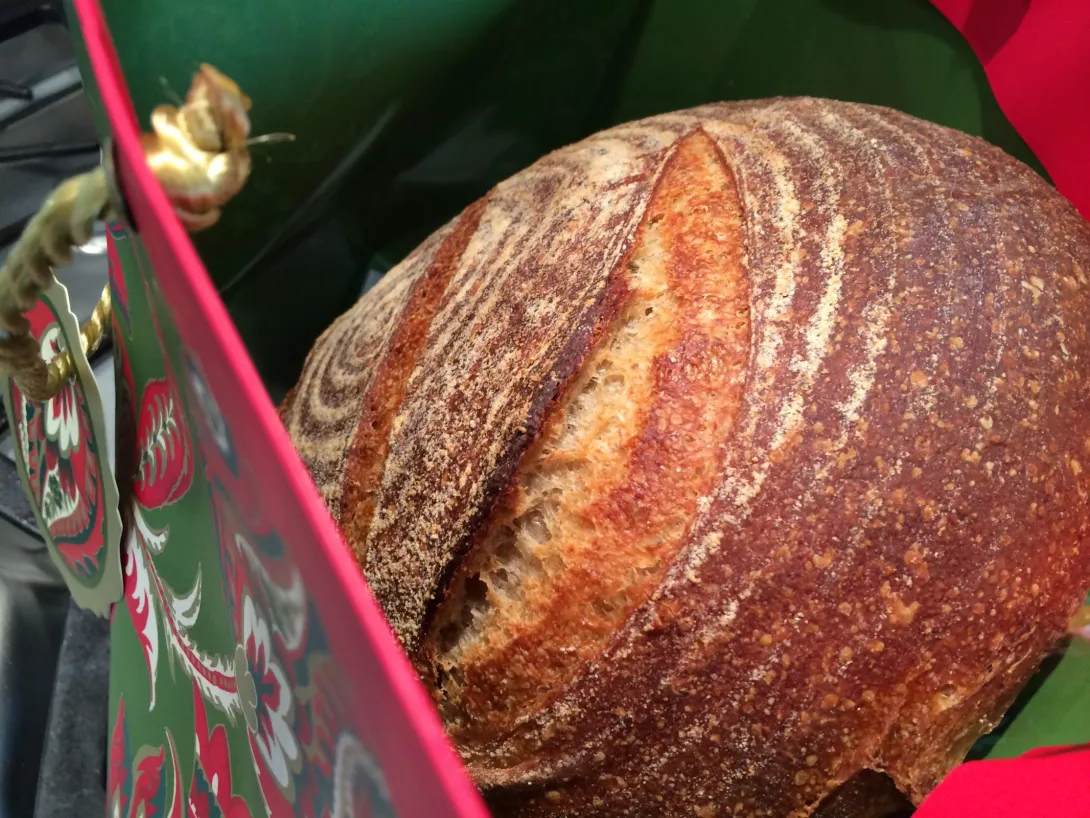
I keep trying to improve my gluten-free bakes.  It is so hard to achieve anything close to my gluten loaves, but I did have some improvement on this one.  I altered the recipe slightly (see below).  The dough is difficult to work with and doesn't hang together too well, so you have to stick with it. It is also a very heavy loaf...very filling.

The crumb is always a bit dense and wet, and I have to eat small pieces, as it is so filling.  I maintain my gluten-free starter, but I don't bake loaves very often.  Progress is slow, but the loaf was a bit better than the last one.  Phyllis

Gluten-Free Sourdough Bread

I used the start of Nicole Hunn’s  “No-Rye Rye Bread” for this recipe, but altered it quite a bit.  Gluten-free bread is frustrating, but I really wanted to make a sourdough loaf that was edible.

I made a sourdough starter from gluten-free flour and kept it in the refrigerator.  I used Nicole’s recipe, but it is confusing and complicated, so when I refreshed it, I just used gluten-free brown rice, oat and tapioca flours.  It perked up very well.

Here is the recipe I used:

Starter

80 grams starter

½ cup plus 3 tablespoons bottled water at room temperature

1 cup plus 10 tablespoons gluten-free bread flour (I used Pamela’s gluten-free  bread mix)


Dough

Starter

1-1/4 cups plus 2 tablespoons warm bottled water (about 95 degrees)

3-1/4 cup gluten-free bread flour (I used Pamela’s bread mix)

½ cup whole grain gluten-free flour (I used King Arthur’s WW gluten-free)

1 tablespoon salt

1-1/2 tablespoons sesame seeds


Method

Place the starter into the bowl of your stand mixer and add the water; mix using your paddle attachment for a few minutes.  Add the bread flour until it is incorporated and switch to the dough hook and knead for about two minutes. Transfer to a lightly oiled bowl, cover with plastic and place it in a warm location until the starter has doubled in size (at least 6-8 hours).

Making the Dough

Once the starter has doubled, add it to your stand mixer bowl along with the water. Mix with the paddle attachment (or by hand) for one minute. Add the bread flour and whole wheat flours and switch to the dough hook.  Mix on low speed and knead. Add the salt and mix on medium speed for about three minutes.  Add the seeds and mix until incorporated. Place the dough in the refrigerator in a lightly oiled bowl for at least 12 hours or until it is doubled in size.  I left it for more than 24 hours.

Shaping the Dough

Take the dough out of refrigerator, ease onto a floured surface and shape into a ball. Place into a banneton coated with brown rice flour (gluten-free). Place in the refrigerator overnight.

Baking

On baking day, preheat your domed  covered baker to 500 degrees.  Sprinkle some corn meal  (gluten-free) into the bottom tray and place the bread on top of the corn meal.  Spray lightly with water and score as desired.  Bake at 500 degrees with the lid on for 30 minutes and then remove the lid and bake at 450 for another 15-20 minutes.

Cool on a wire rack for at least 30 minute before slicing.


CAphyl's picture
CAphyl

Hello everyone:  I have been off-the-grid for some time while I was traveling, as we don't have the best internet access when we are in the UK.  I will have to catch up on everyone's bread posts while I was away.

My visit got off to a rough start when I saw that my starter that I left in the UK for a couple of months (carried over from California several years ago), had gone off, for the most part.  I have never had this happen before.  I had several different jars of starter and most were bad with strange mold.  The one that survived was pure AP flour. I find that the white flour starter lasts much better for long periods than the mix of ww, rye and white that I usually keep as well.  I always have several starters  on hand for this reason.  I slowly built up the AP starter into several different containers and starting my UK baking after the second day of feeding.  Unfortunately, I got sick right after I arrived in the UK and spent the vast majority of the trip resting.  About the only thing I did do was bake as I had to stay in. Unfortunately, when I wasn't feeling well a few batches of dough were over-proofed and had to be tossed.

I baked quite a bit for family and friends, and made David's San Joaquin baguettes twice and they turned out well.

I made my classic sourdough loaf a number of times, in both boule and batard form.

I gave most of the bread away, as well as making sure my husband had plenty of fresh bread! 

We just got back last night, so I have to get my starter going here back in California and get back to baking.  Look forward to catching up on everyone's bakes over the next few days.  Best,  Phyllis

CAphyl's picture
CAphyl

I have never made this bread before, so I thought I would give it a try. I modified the original recipe a bit, as I have described below. Another TFLer found the recipe, and I used that, with some modifications. The original recipe link shows how to build the 100% rye starter from scratch, but I used my existing starter and saved that step.

I really liked the dough once it came together.  For a tartine dough, it didn't seem to have enough hydration, so I added a bit more water than the recipe called for.  After that, and the addition of the salt and the olive oil, I just loved the dough. It had a wonderful silky feel.

Just had some with butter, and it was really tasty.  Very moist, nice crumb. My husband made a corn beef sandwich and really enjoyed it.

I baked it in my LaCloche and had a slight bit of sticking as the dough rose above the lip of the banneton and didn't want to come out when I turned it upside down.  I was afraid of this and had even added more brown rice flour to the banneton before I popped the dough in!  It landed on the side of the LaCloche tray, but I was able to shake it back to a better position.  As a result, the shape wasn't a perfect boule, but worse things can happen. I guess I have learned with enough of these mistakes to make the best of it.

Semolina Tartine

Here is the website that has the original recipe: http://tartine-bread.blogspot.co.uk/2013/02/9-days.html?m=1

Levain

50g 100% hydration, 100% rye starter

100g organic dark rye flour

100g cold, filtered water

I started this and left it on the counter overnight at room temperature.  I had mixed the rye with my AP/WW/rye starter mix, so it wasn't 100% rye starter as the recipe called for.  However, it responded beautifully and really popped overnight.  You have got to love a rye starter. It was a bit crazy, but it made about exactly the 250 grams required for the recipe.

Final Dough

250g mature whole rye starter 100% hydration 

200g semolina 

300g bread flour

300g water 

12g salt

30g extra virgin olive oil 

Method

Combine all ingredients minus the salt and olive oil.

Autolyse for about one hour.

Add salt plus olive oil and incorporate. At this point, I really gave it a knead in the bowl to incorporate the ingredients as another blogger mentioned she did not do this and didn't feel she got the proper gluten development and suggested a bit of a knead at this point rather than a turn or stretch and fold.

For first two hours do stretch and fold every half hour.  (I had some schedule issues and let it sit out a lot longer and did stretch and folds over a longer period of time, perhaps even four hours before I put it in the fridge for the bulk fermentation. I really liked how the bread responded and actually seemed to become more like the Tartine dough I have worked with before.

For last two hours of bulk fermentation finish off in the fridge. 

Take out of fridge, do first shaping and let rest for 15 minutes. 

Then do final shaping, pop into your banneton and final proof in the fridge overnight.  (It really came up by morning; I was impressed. It does not need much counter time to pop up, so don't leave it out of the fridge very long before baking).

Bake:  I baked my loaf in the LaCloche covered baker, preheating the lid and bottom at 500F and baking for 30 minutes with the cover on and then 15 minutes with it off, lowering the temperature to 435F convention.  You can also bake with normal steam, 450F or 235C for 40 45 mins, turn the loaves half way through the bake. 


CAphyl's picture
CAphyl

It is one of those days that started with bread and will probably end with bread.  I've got dough in different stages and plenty caked on my hands. I have been experimenting, too, and it's been a bit mad. I have been pushing the limits of cold fermentations and began making one bread and then made another with the same dough!

Today, I baked a baguette that started as a classic sourdough.  I had been bulk fermenting some dough for a really long time as a test (about five days) and decided to divide it in half and bake part of it.  I had waited so long as I had three loaves of the eight grain in line ahead of the classic sourdough. I made a batard from the half of the classic dough for my husband the other day with the first half of the dough (see below). I am not sure why, but I tend to make boules with the classic sourdough and this time I made a batard.  I was glad I did.

After the batard, I had a crazy idea that I wanted to use the rest of the dough to make a baguette, even though this was definitely not dough prepared to be a baguette! I had one bad experience with the baguette-type banetton I purchased long ago and never used it again before this bake (see below).  I shaped the dough last night, and put it in the fridge overnight. I created steam in the oven and heated the stone to 500 degrees, bringing it down to 480 degrees for the first 12 minutes and then down to 455 degrees convention for the last 10 minutes or so. (Thanks, David!)

While not even close to David's San Joaquin baguettes, it turned out OK for a cheatin' type of baguette.  The crumb wasn't as open as it should be, but OK.  My husband really enjoyed it and got annoyed at all of my questions about the taste, size of the wholes, lightness, etc...

Well, I was really pleased with the experiment on the baguettes and may try it again. Call me crazy!

In the last week, I also made some more five grain (it's really eight grain now as I added so many seeds to the soaker) and my usual classic sourdough, which I gave to a number of friends.

I have to share one of my favorite new recipes, which is for heirloom carrots.  It is so simple and good.  We got the heirloom carrots at the farmer's market, and they are just so beautiful.  I used our own fresh thyme, but you can also use rosemary. The recipe is at bottom. 

Today, I am working on three different breads, and we will have to see how they turn out.  One other thing I wanted to mention.  Do you notice that all your devices are clogged with bread photos?  That is the case with me.  I really have to remember to keep cleaning them out, as there are inevitably so many more to come!

Hope all my bread friends out east in the U.S. survived the snow.  Just stay home and bake!  Best,  Phyllis

Balsamic Roasted Carrots

 Author: Isabelle Boucher (Crumb)

Recipe type: Side

Prep time:  10 mins

Cook time:  30 mins

Total time:  40 mins

Serves: 6

Make sure to use tender young carrots for this recipe - the kind sold in a bunch with their green tops still attached - rather than bagged utility carrots. If you can find them, rainbow-coloured heirloom carrots make a particularly pretty presentation.

Ingredients

•2 bunches fresh carrots, peeled and trimmed

•1 tbsp olive oil

•1 tsp salt

•½ tsp pepper

•5 sprigs fresh thyme (I used fresh chopped rosemary)

•2 tbsp honey

•2 tbsp balsamic vinegar


Instructions

1Preheat oven to 425F. Line a large baking sheet with aluminum foil.

2Slice the carrots in half lengthwise. In a large mixing bowl, toss with oil, salt and pepper until evenly coated.

3Arrange carrots in a single layer on the prepared baking sheet, and scatter thyme sprigs overtop. Roast in preheated oven for 15 minutes.

4In small bowl, whisk together honey and balsamic vinegar. Pour over the carrots, and gently roll them around to coat. Roast for a further 15-20 minutes or until carrots are tender and caramelised. Serve immediately.

CAphyl's picture
CAphyl

I have never made beer bread before, so I had to do it, inspired by dabrownman's 16 grain and some other wonderful beer breads I have seen on this site.  My husband is a real beer guy, so the first order of business was not to use a beer he wanted to drink.  Someone got him some porter, and it is not his favorite, so I had my start. I should point out that I do not like beer, which is strange for a girl originally from Milwaukee. 

I did a three stage levain build (per dabrownman's recipe) and prepared the soaker.  I wanted to have lots of seeds and grains in the bread, so I kind of morphed dabrowman's recipe and my adapted five grain into one recipe.  Both the levain build and the soaker smelled great, but that hot porter and the seeds really had a wonderful aroma.  Loved it.

It was a very fast bake and browned beautifully.  The crumb was incredibly moist....perhaps I could have used less porter. I think the beauty of this bread is that you can use so many different combinations of flours and seeds.  I wanted to use some of the many different flours I had on hand, and that is why I used kamut and oat flours.  I actually had many more flours around, but just decided to stop with a couple of different ones that I don't use as often as I should.  I also think I was a bit loose on some of the measurements, as I tried to write them down as I went along and I wasn't sure I remembered them quite correctly!

We had some much-needed rain this weekend in southern California, and as the clouds started to clear last night we had a another stunning winter sunset.

I enjoyed the sunset with a glass of Pinot Noir (not beer!), celebrating the big Green Bay Packers win.  My husband drank his beer out of my Green Bay Packers shareholder glass. Yes, you can take the girl out of Wisconsin, but once a cheesehead, always a cheesehead.  I was on pins and needles the whole game.  I had to get the bread going after the game to calm down!  I had an elaborate dinner planned, but my husband requested pizza, so that is what we had--an appropriate dinner on a big football Sunday.  Tonight, I am making a new recipe:  risotto with wild mushrooms and peas.  Wish me luck.  Best,  Phyllis

Multi-Grain Sourdough with Porter

Inspired by dabrownman’s 16 Grain and my adapted Five Grain Levain recipes

Sourdough Levain Build

Build 1

12 g rye/wheat/AP starter

15 g water (meant to do 12g!)

12 g KAF white wholewheat

39g total

Build 2

22g water

22g dark rye

44 g total

Build 3

24 g water

24g KAF white whole wheat

48g total

131g Total Levain Build

 Soaker

50g rolled oats

50g sunflower seeds

10g sesame seeds

5g poppy seeds

45g flax seeds

20g kamut seeds

30g millet seed

30g bulgur

30g pumpkin seeds

30g cous cous

400 grams hot Wachusett Black Shack Porter

5 grams salt

675g Total Soaker

Final Dough Flour

50g kamut flour

20g oat flour

85g KAF white whole wheat

20g dark rye

225 KAF bread flour

8g Salt

100g Wachusett Black Shack Porter (I kept 200 on hand, but did not need more than the 100g.  The soaker was still quite wet, so it will depend on how dry the soaker is to determine the final amount of porter).

Total 508g Final Dough

  1. Prepare the Levain:  Build levain over hours/days.  I eyeballed it to see when it was ready to be built again. It depends on the temperature in your kitchen and other factors, but it has to be at least 6 hours or so.
  2. Build the Soaker:  I heated up the porter before adding it to the seed mix.  (I actually wasn’t watching close enough, and it almost boiled over!)  Stir the porter into the seed mix very well and seal your container tightly.  It really smells great. Leave on the counter for hours or overnight until liquid is absorbed.
  3. Final Dough Autolyze: Mix together the levain, soaker and all final ingredients except the salt. Let the mix utilize for 20-60 minutes.
  4. Mix Final Dough: Add the salt and use your stand mixer and mix for 3-5 minutes on medium speed.
  5. Bulk Ferment:  Bulk ferment at room temperature for 2-3 hours, turning every 45 minutes.
  6. Shaping:  Divide into two loaves and shape into rounds. Let rest 30 minutes.  Final shape into batards or rounds.
  7. Final Fermentation:  Place into brown rice coated bannetons, and put in plastic bag and refrigerate overnight.
  8. Baking:  With normal steam, 235C (450F) or 40-45 mins, turn the loaves half way through the bake. (I retarded the dough and took it out in the morning. I then let it rest at room temperature for about an hour. It popped up nicely. In the meantime, I preheated the oven for about an hour to heat up the baking stone.) (For this particular bake, I used my covered baker, preheated at 500 degrees, baking with lid on for 30 minutes; lid off at 435 convention for 10 minutes). If you make smaller loaves, watch carefully as this dough was a fast bake.
  9. Cool: On wire rack at least 30 minutes before slicing.
CAphyl's picture
CAphyl

I have had a lot of fun making a five grain levain recipe over time, and I wanted to add more grains and play around with hydration and fermentation on this bake.  The recipe below is an adaptation of Hamelman's five grain levain.  This time around I added pumpkin seeds, sesame seeds and poppy seeds to the other grains: bulgur, sunflower seeds, oats, flax seeds and cous cous. Maybe it's really eight grain; not sure if all the seeds count as grain!

Khalid inspired me to make my first five grain, and Zita got me thinking about adding more grains when he worked for months to perfect his seven grain, which was fabulous. And dabrownman is always baking with many wonderful grains, and his bakes are always inspiring to me!

I really love making the soaker.  It absorbs all the water very well and quicker than you think.

I used a bit more water this time, so the dough had higher hydration.  The crumb turned out OK as a result. My husband enjoys a very crusty crust, and he gave this loaf good reviews.

I used my covered baker, which is different from the recipe below. I baked the loaf with the lid on for 30 minutes at 500 degrees and then 10-12 with the lid off on convection at 435 degrees. I also was a little loose on the gram weights for the seeds.  I bet the final total was a bit higher than the recipe below.

The only other change I made to the recipe below was doing a longer bulk ferment at room temperature and did a bit of a room temperature proof after shaping just before I put the shaped loaf in the refrigerator for the night. I am continuing to bulk ferment the rest of the dough as I only made one loaf today.  I plan to bake the rest tomorrow, so I hope they turn out OK.

Five-Grain Levain Bread (with added grains)

Adapted from Jeffrey Hamelman’s Bread: A Baker's Book of Techniques and Recipes 

Makes 3 medium loaves

Overall formula
Bread flour 680 g
Whole wheat flour 226 g
Cous cous 70 g

Flaxseeds 27 g

Sunflower seeds 56 g

Oats 71 g

Poppy Seeds  15g

Pumpkin Seeds 40g

Sesame Seeds 12g

Water 890 g

Salt 22 g

Total 2.13 kg


Liquid Levain build
Bread flour 226.8 g
Water 283.5 g
Mature culture (liquid)  45 g

 
Soaker

Cous cous 70 g

Flaxseeds 27 g

Sunflower seeds 56 g

Oats 71 g

Poppy Seeds  15g

Pumpkin Seeds 40g

Sesame Seeds 12g

Water, boiling 400 g 

Salt 5 g (1 teaspoon)

Final Dough
Bread flour 453 g
Whole-wheat flour  226 g
Water 250 g

Salt 17 g (1 tablespoon)

Soaker all of the above
Levain all less 3 tablespoons

Baker Percentage

Bread flour 75%

Whole wheat flour 25%

Cous cous  9.2%

Flaxseeds 9.2%

Sunflower seeds 7.7%

Oats 7.7%

Water 98%

Salt 2.5%
Total 235.1%

 METHOD

1. Liquid-levain build: Make the final build 12 - 16 hours before the final mix.  I ran out of time, so I accelerated this to seven hours, placing the hot soaker on top of the levain build bowl.

2.   Soaker: Make the soaker at the same time when making levain build. Pour the boiling water over the grain blend and salt, mix thoroughly. Put it in a tightly covered container and sit at room temperature.

3.  Mixing: Add all the ingredients to the mixing bowl except the salt. Mix or stir the ingredients together until it becomes a shaggy mass. Cover the bowl with cling wrap or plastic bag and let it stand for an autolyse phase for 20 -60 minutes. At the end of the autolyse, sprinkle the salt over the surface of the dough and mix on a medium speed of your stand mixer for 3 -5 minutes until the medium gluten development is achieved. (I have also made this by hand without a mixer).

4.  Bulk fermentation: 1 to 1 ½ hours or 2 hours if the dough is retarded overnight. 

5.  Folding: If the fermentation is 1 ½ hours, fold once after 45 minutes.

6.  Dividing and shaping: Divide the dough into three equal pieces, pre-shape the dough into round. Cover the dough with tea towel and let it rest for 15 minutes. Final-shape the dough into either oblong  or round.

7.  Final fermentation (proofing): Retard the loaves in the refrigerator over night.

8.  Baking: with normal steam, 235C for 40-45 mins, turn the loaves half way through the bake. (I retarded the dough and took it out in the morning. I then let it rest at room temperature for about an hour. In the meantime, I preheated the oven for about an hour to heat up the baking stone.)

CAphyl's picture
CAphyl

I did a lot of baking recently, but wasn't able to post very much as we had family visiting.  They left today to return to the snowy midwest, so I will get back to a normal baking schedule.  We did have a wonderful time over the holidays, and I will miss them.

My niece loves sourdough, so I made quite a bit of bread during their visit.

For Christmas, I made a classic sourdough and cornbread sage stuffing.  You can see the sourdough bread and homemade corn bread I made in the photo above. My niece and I cut up the cornbread for the stuffing and added fresh sage from the garden  (Recipe at bottom).

I have been making lots of the Classic Sourdough lately, so I need to try some different breads for my January bakes.

My niece loves banana bread, so I made some with chocolate and walnuts...gluten free. She loves pizza, too, so I made her a sourdough cheese pizza and one with pepperoni, onion, olives and mushrooms for the rest of us.

My niece also loves baguettes, so I made David's San Joaquin baguettes.  I made progress, but they weren't as good as David's.  I still have a long way to go!  Still learning the best way to work with the high hydration dough, the shaping and scoring.  It was better than my last attempt, so I will keep trying. My niece really liked them, and I made baguette sandwiches for my sister and niece for the plane ride today back to the Midwest. I also gave them a few slices of the banana bread, so they will have a nice meal on the plane.  

The crust and crumb were better than my last attempt, and the gang seemed to enjoy them.  My husband sure liked his sandwich! He is always so neat with the cheese placement.  I tend to put the sandwich together in a more random fashion.

We have had some of the coldest weather in several years here in California (not complaining as so much of the rest of the country has snow and real cold, and our family in the UK had a nasty storm recently).  The colder weather brings beautiful scenes looking out the back of our house.

It is interesting that we had a 4.5 earthquake last night when we were at the movies, but totally missed it.  Did not feel a thing. Glad it did not cause any real damage. I guess that's the price we pay for these beautiful scenes.

I am excited to try a new recipe tonight for Coq au Vin.  Will let you know how it goes.  I am planning to pair it with heirloom carrots from the farmer's market and a really nice Pinot Noir!  Downton Abbey starts its new season tonight, but we got a head start when we saw a number of episodes of this season when it debuted in the UK this fall.  It's been a while, so we may watch it again.  

Looking forward to seeing everyone's January posts.  Best,  Phyllis

Here's the recipe for the sage stuffing (from the New York Times):

Cornbread and Sage Stuffing

Cornbread

1 cup yellow cornmeal, preferably organic stone ground

1/2 cup all purpose flour or whole wheat flour

3/4 teaspoon salt

1 tablespoon baking powder

1/2 teaspoon baking soda

2 eggs

1 cup plain low-fat yogurt or buttermilk

1/2 cup milk

1 tablespoon mild honey

2 to 3 tablespoons unsalted butter (to taste)

1. Preheat the oven to 400 degrees. Place a 9-inch cast iron skillet, a heavy 2-quart baking dish or a heavy 9-inch square baking pan in the oven while you prepare the batter.

2. Place the cornmeal in a bowl, and sift in the flour, salt, baking powder and baking soda. Stir the mixture with a spoon or whisk to amalgamate. In a separate bowl, beat together the eggs, yogurt (or buttermilk), milk and honey. Whisk the cornmeal mixture into the liquid mixture. Do not overwork the batter.

3. Remove the pan from the oven, and add the butter to the pan. Swirl the pan so that the butter melts quickly before it gets too brown, then quickly whisk the butter into the batter. Brush the sides of the pan with any butter remaining in the pan.

4. Quickly scrape all of the batter into the hot pan, and place in the oven. Bake 35 to 40 minutes, until golden brown and a toothpick inserted in the center comes out clean. It will be quite brown on the edges. Allow the bread to cool in the pan, or serve warm.

Yield: Makes 8 to 10 servings. This is easily doubled for a larger quantity of stuffing. Bake it in a 3-quart baking dish (it will take about 45 to 50 minutes) or in two 9-inch pans.

Variation: Sage Cornbread

Stir 1 tablespoon finely chopped fresh sage or 1 teaspoon rubbed dried sage into the batter before turning into the pan.

Cornbread and Sage Stuffing

2 tablespoons extra virgin olive oil, or 1 tablespoon each olive oil and unsalted butter

1 large onion, finely chopped

Salt to taste

4 stalks celery, cut in small dice

4 garlic cloves, minced

2 teaspoons rubbed sage, or 2 tablespoons chopped fresh sage

1 tablespoon fresh thyme leaves or 1 1/2 teaspoons dried thyme

1/2 cup finely chopped flat-leaf parsley

Freshly ground pepper

A double batch of cornbread (see above), crumbled (you can do this in a food processor fitted with the steel blade)

1/2 cup milk, or as necessary, for moistening

4 tablespoons unsalted butter if baking separately

1. Heat the olive oil (or oil and butter) over medium heat in a large, heavy, nonstick skillet, and add the onion. Cook, stirring often, until it begins to soften, about three minutes, and add 1/2 teaspoon salt and the celery. Cook together for another few minutes, until the onion is tender. Add the garlic, and stir together for 30 seconds to a minute, until fragrant. Transfer to a large bowl, and add the remaining ingredients. Combine well. Taste and adjust salt. Moisten as desired with milk.

2. Stuff the cavity of the turkey, or transfer to a buttered or oiled 2-quart baking dish. Dot with butter. Cover with aluminum foil, and heat through in a 325-degree oven for 30 minutes.

Yield: Makes enough stuffing to fill an 18-pound turkey.

Advance preparation: You can make the cornbread several days ahead and the stuffing a day ahead.


CAphyl's picture
CAphyl

Sorry I haven't posted for some time as I have been busy with the holidays and visiting family (they are still here!)  I did bake a number of loaves of bread as gifts for friends, and that seemed to go over well.

I will have to get back to more baking when I have the kitchen back to myself. Thanks for all the wonderful advice, guidance and support throughout this year.  I talk about my bread friends to my family and friends all the time.  You are all such inspirations and give me such great ideas.  I have so many breads on my list to bake in 2015, it is difficult to know where to start. For now, I've got to get going and make dinner!

Hope everyone is enjoying the holidays and all the best to everyone for a fantastic 2015.  I really look forward to your posts throughout the year.  Phyllis


CAphyl's picture
CAphyl

I have been experimenting with different flours, different bulk fermentations, cold vs room temperature proofs, shaping, banneton vs. no banneton, etc. to see how the various changes would make a difference in the final bread.  I also tried different scoring patterns.  I really had fun.  I used combinations of AP flour, WW flour, rye, spelt and bread flour for the different breads. Most of the time, I used a variation of Classic Sourdough recipe below, often adding more ww, rye and spelt; one time I made five grain levain loaves with the soaker. I baked these during a visit to Milwaukee and when I returned home to my California kitchen.  I found that my Milwaukee sourdough starters are so active once revived, more so than my California starters.  Perhaps it is because my Milwaukee starters don't get used as much.  Not really sure, but the starter certainly does make a difference in the bakes. I got more height in Milwaukee than CA.  I did not use bannetons in Milwaukee and only used a banneton briefly for one bake in California. Here are photos of some of the results.

These are the today's bakes.  We are invited to dinner, and I am bringing the top loaf for our friends. Used a banter for loaf on top, not the one on the bottom.

Above is the five grain and the crumb, baked in Milwaukee, no banter.

A Classic Sourdough I baked in Milwaukee.

A sourdough batard I made for my husband in CA, crumb below.

The bake from today.

Classic Sourdough Variation

Makes: One 2 pound loaf.

Method adapted from: Classic Sourdoughs by Ed and Jean Wood. 

I varied the recipe by using my active starter that was a 70/20/10 mix of AP flour, WW flour and dark rye at 100% hydration. I really liked this mix, as it added a bit of texture.  The original recipe starter has no whole wheat or rye. I also added a cold bulk fermentation to the room temperature fermentation, per the recipe.

Ingredients:

Final Dough:

  • 230 grams (about 1 cup or 240 ml) active starter, 70/20/10 mix of AP, WW and Rye flours at 100% hydration
  • 300 grams water (Approximately 1 1/2 cups or 360 ml water)
  • 10 grams salt (about 2 teaspoons) 
  • 500 grams unbleached all-purpose flour (about 4 cups)

Method:

  1. Mixing the dough. Pour the starter into a mixing bowl. Add the water and mix well.  Add the flour a little bit at a time until it starts to stiffen.  Hold some flour out to knead in a bit later.  Let the mix autolyze for 30 minutes and then add then fold in the salt.
  2. Kneading the dough. Turn the dough out onto a floured surface and knead in some of the remaining flour if the dough is too sticky. Knead for about 10 minutes until it the dough is smooth and easy to handle.
  3. Bulk fermentation. Lightly coat a glass bowl with olive oil and place the dough ball into the bowl, making sure that the top of the dough ball has a thin coat of oil. Cover and bulk ferment in the refrigerator for about 8 hours.  I made the bread during the day and then took it out for 8 hours overnight at room temperature on the counter. The original recipe calls for it to proof at room temperature for 8-12 hours, so I made a major change here. 
  4. Shaping and final proof. Use a spatula to ease the dough out onto a floured surface. Allow the dough to rest for 30 minutes. After 30 minutes, shape it into a rough ball, cover it with a cloth, and let it rest again for 30 minutes. Now, shape the dough into a boule and place it seam-side up into a banneton coated in brown rice flour.  Leave it for 30 minutes while the oven preheats.
  5. Baking the loaf. I used my covered baker, so I preheated it with the cover on at 500 degrees (260 degrees C).  When the oven and baker are at temperature, remove the lid and pop the loaf into the bottom tray. Score it in the pattern you desire.  I sprayed a light mist of water on the dough, trying to avoid the hot surface, as I was hoping for a really beautiful crust.  Bake at 500 degrees with the lid on for 30 minutes, and then take the temperature down to 450 degrees and remove the lid for the final browning, which is another 10-15 minutes, depending on the type of crust you like.  We tend to like a bolder crust, so I bake it a bit longer. Watch it closely during this phase. If you do not have a covered baker, you can use a baking stone or tray with parchment paper, but make sure you create steam by using your steaming apparatus or baking tray with boiling water from the start of the bake.  Bake the loaf at about 480 (250 C) degrees for the first 25 minutes and then reduce the temperature to 435 for the next 15-20 minutes, depending on how bold you like the crust.
  6. Cooling and slicing the loaf:  Remove the loaf from the covered baker tray or stone and let cool for at least 30 minutes before slicing.
CAphyl's picture
CAphyl

I used the start of Nicole Hunn’s  “No-Rye Rye Bread” for this recipe, but altered it quite a bit.  Gluten-free bread is frustrating, but I really wanted to make a sourdough loaf that improved on my last effort.

I made a sourdough starter from gluten-free flour and kept it in the refrigerator.  I used Nicole’s recipe, but it is confusing and complicated, so when I refreshed it, I just used gluten-free oat and tapioca flours the first time and buckwheat and brown rice flours the second time.  It perked up very well.

The frustration I have is that the bread turns out quite heavy. While this effort was better than the first, it still is not where I would like it to be. It also is a bit sweet and overly moist. I will have to keep experimenting to improve it.  Gluten free is a real challenge.

The crumb was OK for gluten free.

Here is the recipe I used:

Starter

80 grams starter

½ cup plus 3 tablespoons water at room temperature

1 cup plus 10 tablespoons gluten-free bread flour (I used Pamela’s gluten-free  bread mix)


Dough

Starter

1-1/4 cups plus 2 tablespoons warm water

3-1/4 cup gluten-free bread flour (I used Pamela’s bread mix)

½ cup whole grain gluten-free flour (I used King Arthur’s WW gluten-free)

1 tablespoon salt

1 tablespoon honey

1 tablespoon molasses

1-1/2 tablespoons sesame seeds

Method

Place the starter into the bowl of your stand mixer and add the water; mix using your paddle attachment for a few minutes.  Add the bread flour until it is incorporated and switch to the dough hook and knead for about two minutes. Transfer to a lightly oiled bowl, cover with plastic and place it in a warm location until the starter has doubled in size (at least 6-8 hours; I left mine for 24 hours due to schedule).

Making the Dough

Once the starter has doubled, add it to your stand mixer bowl along with the water. Mix with the paddle attachment for one minute. Add the bread flour and whole wheat flours and switch to the dough hook.  Mix on low speed and knead. Add the salt, molasses and honey and mix on medium speed for about three minutes.  Add the seeds and mix until incorporated. Place the dough in the refrigerator in a lightly oiled bowl for at least 12 hours or until it is doubled in size.  I left it for more than 24 hours.

Shaping the Dough

Take the dough out of refrigerator, ease onto a floured surface and shape into a ball.  Place into a banneton coated with brown rice flour (gluten-free). Place in the refrigerator overnight.

Baking

On baking day, preheat your domed  covered baker to 500 degrees.  Sprinkle some corn meal  (gluten-free) into the bottom tray and place the bread on top of the corn meal.  Spray lightly with water and score as desired.  Bake at 500 degrees with the lid on for 30 minutes and then remove the lid and bake at 450 for another 15-20 minutes.

Cool on a wire rack for at least 30 minute before slicing.

Pages

Subscribe to RSS - CAphyl's blog