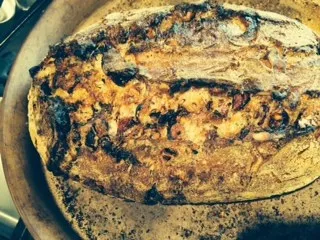
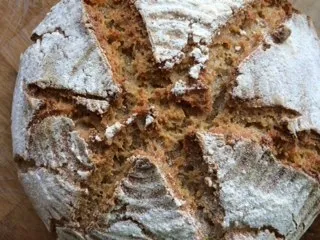
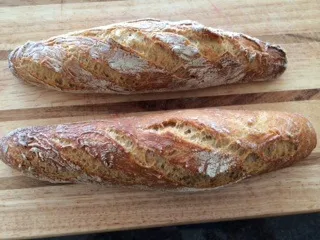
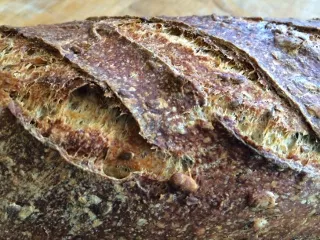
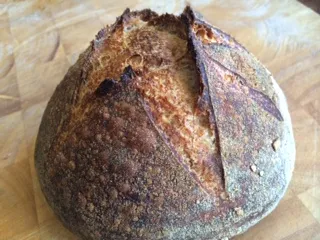
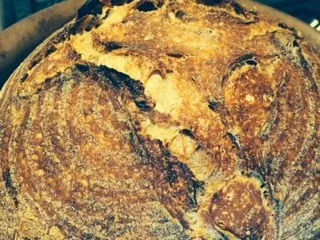
The Fresh Loaf

A Community of Amateur Bakers and Artisan Bread Enthusiasts.

CAphyl's blog

CAphyl's picture
CAphyl

I have wanted to make this recipe for some time, and I have finally done it.  Very exciting. There are just so many on the list to do!  My husband and I love olives, and I make so many dishes with lemon zest that this seemed a natural for me.  My starter was getting a bit tired, so I refreshed it just before beginning this recipe. I have adapted this recipe from a blogger, foodtravelthought.

Makes two large loaves. (The one below was 2 lbs. 6 oz).

You can see those olives in there!

I used my LaCloche baker, as usual.

The crumb turned well, and the crust was very nice. The taste was very tangy and the olives strongly flavored the bread. I probably added more flour than I wanted during the shaping due to the high hydration of the dough.

It sure made great sandwiches.

The dough autolyzing.

Speaking of olives, these are some of the seasoned and marinated ones I used. Many recipes say not to use these as they add too much flavor to the dough, but this is what I had on hand after using a whole bottle of non-seasoned kalamata olives (make sure you drain these thoroughly before using.  You don't need any more hydration in this dough, believe me!) I would say that the olive taste was strong in the final bread due to the marinated olives, but both my husband and I appreciated the flavor.

You have to love how this smells...yummy.

Add in the herbes de provence and mix well.

The dough at rest. At this stage, I thought there might be too many olives, but that is not what I saw in the final dough.

Pre-shape. This is not an easy dough to work with!

As the oven pre-heated, I took the dough out of the refrigerator after the overnight proof.

Here is the recipe I used below.

Starter

  1. 55g ripe starter
  2. 200g water
  3. 200g whole wheat flour ( actually used sprouted whole wheat)

Mix the starter and water together in an medium-sized glass bowl until the starter is fully absorbed.  Add the flour and mix well.  Cover and leave on the counter at room temperature overnight.

Dough

  1. 250g (25%) leaven
  2. 800g (80%) white bread flour
  3. 200g (20%) whole wheat bread flour
  4. 20g (2%) salt
  5. 730g water and 50g water in reserve for after you add the salt (step #5 in Method below)
  6. 3 cups pitted olives (I used 1-1/2 cups kalamata and 1-1/2 marinated kalamata and green spicy olives from our farmer's market) halved
  7. 2 tsp herbes de provence
  8. Zest of one lemon

Method:

  1. Add the 250g of the starter to a large mixing bowl
  2. Pour in 730g water and mix until the water and leaven are completely mixed and dissolved
  3. Add 800g bread flour and 200g whole wheat flour and mix until all the dry flour is incorporated
  4. Cover your bowl with a towel and let autolyse for 40 minutes
  5. After 40 minutes add 20g salt to the dough and slowly pour your 50g reserved water on top.
  6. Use your dough scraper to turn the dough several times.

Now, leave this on the counter covered with a towel for the bulk fermentation phase of about four-five hours with frequent turns. For the first step, let it sit for 45 minutes. While it is sitting, zest your lemon and add it to the olives and mix in the herbes de provence.  After 45 minutes, add in the olive mix, incorporating well.  (I actually added mine in after the third turn, but the recipe says do it earlier). Now, turn the dough with your scraper every 30 minutes for two hours.  After that period, leave the dough to rise untouched for another two hours.

Pre-Shape

As many of you know, Tartine bread has high hydration and can be difficult to handle, so this is where it gets tricky. I lightly floured my surface and eased the dough on the top of it and then floured the top as well.  I split the dough in half using my scraper and then roughly shaped the dough into two balls.  You'll need to add some flour as you go, but try to limit it as much as you can so that the final loaf will have that wonderful crumb. At this point, let the dough rest for 30 minutes.

Shaping

After the dough has rested, shape into a ball, getting the dough as smooth as you can.  Place into a banneton dusted with brown rice flour and retard in the refrigerator overnight.

Baking

Preheat your oven with your covered baker inside at 500 degrees.  Remove the tray from the oven, use a bit of cornmeal at the bottom to prevent sticking, place the dough into the tray and score.  I sprayed with just a touch of water to get the nice crust.  Bake with the dome on for 30 minutes at 500 degrees, then remove the dome and bake at 450 for 15 ir 20 minutes or so.  I usually bake a bit longer to get the bold crust.  Just check it during this phase and thump the bottom to be sure it is done.

If you don't have a covered baker, place your baking stone in your oven pre-heat to 500F. You can take your loaves out of the fridge to warm up while the oven is preheating.

Place the dough onto the stone, score it, get your steaming apparatus in place and turn the heat down to 450ºF, bake for approximately 45-50 minutes until you have the crust color you desire.

I actually froze the other loaf, so we will see how that turns out when I bake it.  I had lots of fun on this bake.  Best,  Phyllis

Oh, I made one of my husband's favorites, pizza, last night.  I put pesto in the sourdough crust I made, per dabrownman's recent post.  I don't think it turned out as well as his pizza, however! I did use some of the olives that I used in the bread, as you can see.

CAphyl's picture
CAphyl

I have made this recipe a few times since I first posted it on this site, and I received some great suggestions from TFL bakers.  Steve22802 did two cold fermentations rather than one, and Tanorama added fruit, so I tried a few different twists on this batch of dough, which makes three loaves.  I did three things differently than the recipe (link below) on this bake:  1. I did everything by hand and didn't use my KitchenAid stand mixer; 2. I did two cold proofs, one after the room temperature bulk proof, per the recipe, and a second overnight proof after shaping. 3. I added raisins, dried cranberries, walnuts, cinnamon, nutmeg and a touch of brown sugar to create a breakfast loaf for one of the loaves.

This is such a great dough coming together with all the grains.

Here's the first loaf I baked yesterday, sans any fruit.

It was very tasty, crumb and crust fine, and a bit more tangy with the extra cold proof.

I baked the fruit loaf today (our anniversary!). It tasted quite good, not too sweet at all.

I have frozen the third loaf to bake later.  I do love this recipe (see link below).  Thanks to Steve and Tanorama for their suggestions.  Phyllis

http://www.thefreshloaf.com/node/38489/five-grain-levain-bread

CAphyl's picture
CAphyl

Well, I had to try it again, to see if I can do better than my last effort.  I would say that this is the best gluten-free loaf I've ever made, and it's sourdough, which I prefer. Not close to regular sourdough, but OK.

Gluten-free bread tends to be much heavier than gluten-bread, and this was no exception.  However, I got decent crust this time, and the crumb was OK. The taste was good, very dense and moist compared to gluten bread, but tasty and tangy.

I used the start of Nicole Hunn’s  “No-Rye Rye Bread” for this recipe, but altered it quite a bit.  Gluten-free bread is frustrating, but I really wanted to make a  decent gluten-free sourdough loaf.

I made a sourdough starter from gluten-free flour and kept it in the refrigerator.  I used Nicole’s recipe, but it is confusing and complicated, so when I refreshed it, I just used gluten-free oat and tapioca flours.  It perked up very well. You can make a gluten-free sourdough starter similar to regular sourdough starter using gluten-free flour(s) and water.

Here is the recipe I used for the sourdough bread:

Starter

80 grams gluten-free starter

½ cup plus 3 tablespoons bottled water at room temperature

1 cup plus 10 tablespoons gluten-free bread flour (I used Pamela’s gluten-free  bread mix)

Dough

Starter

1-1/4 cups plus 2 tablespoons warm bottled water (about 95 degrees)

3-1/4 cup gluten-free bread flour (I used Pamela’s bread mix)

½ cup whole grain gluten-free flour (I used King Arthur’s WW gluten-free)

1 tablespoon salt

1 tablespoon honey

1-1/2 tablespoons sesame seeds


Method

Place the starter into the bowl of your stand mixer and add the water; mix using your paddle attachment for a few minutes.  Add the bread flour until it is incorporated and switch to the dough hook and knead for about two minutes. Transfer to a lightly oiled bowl, cover with plastic and place it in a warm location until the starter has doubled in size (at least 6-8 hours; I left mine for 24 hours due to schedule).

Making the Dough

Once the starter has doubled, add it to your stand mixer bowl along with the water. Mix with the paddle attachment for one minute. Add the bread flour and whole wheat flours and switch to the dough hook.  Mix on low speed and knead. Add the salt, molasses and honey and mix on medium speed for about three minutes.  Add the seeds and mix until incorporated. Place the dough in the refrigerator in a lightly oiled bowl for at least 12 hours or until it is doubled in size.  I left it for more than 24 hours.

Shaping the Dough

Take the dough out of refrigerator, ease onto a floured surface and shape into a ball.  Place into a banneton coated with brown rice flour (gluten-free). Place in the refrigerator overnight.

Baking

On baking day, preheat your domed covered baker to 500 degrees. Sprinkle some corn meal  (gluten-free) into the bottom tray and place the bread on top of the corn meal.  Spray lightly with water and score as desired.  Bake at 500 degrees with the lid on for 30 minutes and then remove the lid and bake at 450 for another 15-20 minutes.

Cool on a wire rack for at least 30 minute before slicing.

CAphyl's picture
CAphyl

I actually baked this recipe while I was in the Midwest twice and again today back in California.  The new twist is using a mixed starter (AP/WW/Rye), which adds some texture to the loaf and a much different cold proofing process.  This was produced a wonderful crust, moist interior and the most tangy, sourdough loaf I ever baked. This is the CA loaf (above); the Midwest loaf is at top.

I was pretty excited because I used an Emile Henry baker (below) for the first time a couple of weeks ago when I baked the loaf in the Midwest. It worked well.

In California, I use my LaCloche covered baker, which has had plenty of use!

The Midwest crumb came out well...

I'd say that this was the biggest loaf I have ever made.  The California loaf was huge as well; it weighed in at 2 lbs. 9 oz. It lasts for some time, and my husband finished the entire Midwest loaf!  It makes great toast as well.

The crumb on the California loaf was more open.

The bread made excellent sandwiches; I think mine was a bit messy. My husband has an engineering background, so his was much neater!

One of the things I changed considerably from the recipe was the proofing.  I added an extended bulk fermentation in the refrigerator and an overnight cold proof vs. a room temp overnight proof from the original recipe. I've detailed the changes below.

It's a beautiful, but warm day in California today. Probably too warm for baking, but I started early this morning, so I was done with the bake before the temps started to move up.

Makes: One 2 pound loaf (or more as I saw today with the 2 lb 9 oz loaf).

Method adapted from: Classic Sourdoughs by Ed and Jean Wood.

I varied the recipe by using my active starter that was a 70/20/10 mix of AP flour, WW flour and dark rye at 100% hydration.  The original recipe starter has no whole wheat or rye. I also changed to cold fermentation vs. room temperature.

Ingredients:

Final Dough:

  • 230 grams (about 1 cup or 240 ml) active starter, 70/20/10 mix of AP, WW and Rye flours at 100% hydration
  • 300 grams water (Approximately 1 1/2 cups or 360 ml water)
  • 10 grams salt (about 2 teaspoons)
  • 500 grams unbleached all-purpose flour (about 4 cups)

Method:

  1. Mixing the dough. Pour the starter into a mixing bowl. Add the water and mix well.  Add the flour a little bit at a time until it starts to stiffen.  Hold back some flour to knead in a bit later.  Let the mix autolyze for 30 minutes and then add then fold in the salt.

  2. Kneading the dough. Turn the dough out onto a floured surface and knead in some of the remaining flour if the dough is too sticky. Knead for about 10 minutes until it the dough is smooth and easy to handle.

  3. Bulk fermentation. Lightly coat a glass bowl with olive oil and place the dough ball into the bowl, making sure that the top of the dough ball has a thin coat of oil. Cover and bulk ferment in the refrigerator for 24-72 hours.  I did three bakes of this bread in the last several weeks, and I bulk fermented the first and last loaf for 72 hours, and both came out really great with a wonderful sourdough taste.  The long fermentation period contributed to the strong sourdough taste. I actually think that 24 hours may not be enough for this recipe. The original recipe calls for it to proof at room temperature for 8-12 hours, so I made a major change here. Over this period in the refrigerator, the dough should about double in size.

  4. Shaping and final proof. Use a spatula to ease the dough out onto a floured surface. Allow the dough to rest for 30 minutes. After 30 minutes, shape it into a rough ball, cover it with a cloth, and let it rest again for 30 minutes. Now, shape the dough into a boule and place it seam-side up into a banneton coated in brown rice flour. Put in a clean plastic bag and refrigerate overnight.

  5. Baking the loaf. The next morning, remove the loaf from the refrigerator and let it warm up before baking. You should be the judge of how long you need it to warm up.  My loaf needed to pop up a bit, so I let it warm up for about an hour at room temperature as I preheated the oven. It will over-proof if you keep it out at room temperature too long. My experience is that this pops up in the oven quite nicely. As the original recipe calls for 8-12 hours of room temperature proofing, I did notice that this dough did need time to warm up and rise a bit at room temperature before baking. I used my covered baker, so I preheated it with the cover on at 500 degrees (260 degrees C).  When the oven and baker are at temperature, remove the lid and pop the loaf into the bottom tray. Score it in the pattern you desire.  I sprayed a light mist of water on the dough, trying to avoid the hot surface, as I was hoping for a really beautiful crust.  Bake at 500 degrees with the lid on for 30 minutes, and then take the temperature down to 450 degrees and remove the lid for the final browning, which is another 10-15 minutes, depending on the type of crust you like.  We tend to like a bolder crust, so I bake it a bit longer. Watch it closely during this phase. If you do not have a covered baker, you can use a baking stone or tray with parchment paper, but make sure you create steam by using your steaming apparatus or baking tray with boiling water from the start of the bake.  Bake the loaf at about 480 (250 C) degrees for the first 25 minutes and then reduce the temperature to 435 for the next 15-20 minutes, depending on how bold you like the crust.

  6. Cooling and slicing the loaf:  Remove the loaf from the covered baker tray or stone and let cool for at least 20 minutes before slicing.

CAphyl's picture
CAphyl

Cheddar and Apple Sourdough, adapted from Paul Hollywood

I have enjoyed making a number of Paul Hollywood recipes, and this one is a favorite of my friends.  They aren't as fond of sourdough, so I had to do something different.  My sister likes this recipe, too, and she is not into bread or sourdough.  It's tough not to live cheddar, apples and sourdough together. I halved the recipe to make one loaf instead of two, as these loaves tend to be quite big. I’ve left the original recipe below, which will result in two loaves.

The dough, stuffed and ready for the oven.

Ingredients

750g strong white bread flour, plus extra for dusting

500g sourdough starter

15g salt

350-450ml tepid water

Olive oil for kneading

200g cheddar, grated, plus extra for sprinkling over the top

3 dessert apples, cored and roughly chopped

A bit out of sequence here, but look how yummy it looks inside when baked.

Method

Put the starter in a large bowl and mix in the water. Add the flour a little bit at a time and leave a bit extra for later.  When the dough is stiffer, fold in the salt.

When it gets too difficult to mix in the bowl, flour your surface and ease the dough out and knead it for 5- 10 minutes until the flour is incorporated and the dough is silky and smooth. Add the extra flour as you need it.  Now, put the dough  into a lightly oiled bowl and cover. Leave to rise in a warm place for about five hours or until doubled in size.  I put it in the oven with the light on.

Paul Hollywood’s recipe calls for two trays to be covered with cloths and dusted heavily with flour. I skipped this and just used a baking tray with parchment paper and lightly floured it.

Tip the risen dough onto a lightly floured surface, and fold it in on itself a few times to knock out all the air. Divide the dough into 2 pieces, and flatten each piece into a rectangle about 30x20cm and 1-2cm deep. Put the dough on the floured tray or cloth.

Sprinkle half the grated cheese over one side of the rectangle, and top with half of the apples, leaving a 1cm clear margin along the edges. Fold the dough over to make a smaller rectangle and press down the edges firmly to seal.

Put each loaf on a floured cloth (or the floured baking tray with parchment paper) and place inside a clean plastic bag.

Leave to proof at room temperature for 13 hours, or until the dough is doubled in size and springs back when lightly prodded with your finger. (I actually put it in the refrigerator for a few hours and then took it out right before I went to bed. This dough really does get very big; I am not sure you need the entire 13 hours. I’ve made it before, and it really does get big, so watch the dough rather than the clock!)

When the dough is ready, heat your oven to 200C (395F). Line two baking trays with baking paper if you have used floured cloths and transfer your loaves to the prepared baking trays.

Make an indentation in the middle of each loaf and sprinkle some more grated cheese over the surface of the loaves.

The final product went pretty fast.

Bake for 35 minutes, until the loaves sound hollow when tapped on the base.

Cool on a wire rack.

CAphyl's picture
CAphyl

When I first made this bread (recipe currently on the top right of FL), I froze two loaves.  I baked the first of the frozen loaves today, and it really came out well. I defrosted the dough in the fridge during the day yesterday, and did a stretch and fold and shaping before putting it into the covered baker to retard in the fridge overnight.


The crumb was a little more open on the frozen loaf than the loaf baked right away. The frozen loaf crumb is above; the crumb baked freshly is below.  I continue to have decent luck with frozen loaves.  This dough was frozen May 12, so it was frozen for about five weeks. This dough seems to hold up very well from frozen, as it was easy to deal with when it thawed. The baked bread today was very moist and tangy, and got the thumps-up from my husband.  Both loaves were excellent; I have one more frozen, so we will see how that is after baking.  I am sure I will continue to experiment.

CAphyl's picture
CAphyl

I made my first gluten-free sourdough loaf, adapted from a recipe by Nicole Hunn in her book, Gluten-Free on a Shoestring Bakes Bread. (I've attached a link to her blog site below.)  I made a sourdough starter that was gluten-free, per her instructions in the book.  It doesn't work that well (probably my fault), so I may try and redo it, as I froze the liquid starter before I made the Mother starter.  Gluten-free bread is always such a disappointment compared to my regular sourdough, but this was the best I've made so far.  It's always heavy and has a real gluten-free taste to me, but it was OK. It does have a bit of the sourdough taste. I actually added a little yeast during the process because I didn't believe the starter was going to perform well.

The crumb was less dense than I have had with other gluten-free loaves I have made in the past.

I actually used King Arthur Ancient Grains and whole wheat gluten-free flours to make the bread (which deviated from her recipe), combined with the starter I made earlier. I'll have to try it again to see if I can improve each time.

http://glutenfreeonashoestring.com/

CAphyl's picture
CAphyl

When I was in the UK last week, I made David's excellent recipe below.  As I have done many times in the past, I prepared the dough and froze half of it to bake later.  I hadn't tried this with baguettes, so I was interested in how it would turn out.  I froze the dough for four days. On the first batch, I had a heck of a time moving them, as I didn't have all the tools I have in my home kitchen.  They got a bit flat as I moved them. For the second batch, I bought a metal baguette baker with tiny holes that I used for the final proof and baking, and this worked much better for me.

I defrosted the dough overnight in the fridge, and it was ready to go the next morning.  I followed the recipe instructions from there, placing the new baguette baker on a heated stone.

My husband really enjoyed these baguettes, as did our UK friends who tried them.  The taste was wonderful and the crumb fine. My husband loved the really crusty crust.

San Joaquin Sourdough Baguettes

Total ingredients

Wt (g)

Bakers %

AP Flour

479

89

WW Flour

33

6

Medium rye Flour

29

5

Water

392

72

Salt

10

1.8

Liquid starter

17

3

Total

960

176.8

9.2% of the flour is pre-fermented

Liquid Levain ingredients

Wt (g)

Bakers %

AP Flour

29

70

WW Flour

8

20

Medium rye Flour

4

10

Water

42

100

Liquid starter

17

40

Total

100

240


Final dough ingredients

Wt (g)

AP Flour

450

WW Flour

25

Medium rye Flour

25

Water

350

Salt

10

Liquid levain

100

Total

960


Method

  1. Mix the levain by dissolving the liquid starter in the water, then add the flours and mix well. Ferment at room temperature, covered tightly, until the surface is bubbly and wrinkled. (8-12 hours)
  2. Dissolve the levain in the water, add the flours and mix to a shaggy mass. Cover and autolyse for 30 minutes.
  3. Add the salt and mix to incorporate.
  4. Transfer to a clean, lightly oiled bowl and cover tightly.
  5. Bulk ferment for 3-4 hours with stretch and folds in the bowl every 30 minutes for the first 2 hours, then a stretch and fold on the board after 2.5 hours. The dough should have expanded by about 50% and be full of small bubbles.
  6. Refrigerate the dough for 18-24 hours.
  7. Take the dough out of the refrigerator and transfer it to a lightly floured board.
  8. Divide the dough into 4 equal pieces and pre-shape as logs or round.
  9. Cover the pieces and allow them to rest for 60 minutes.
  10. Shape as baguettes and proof for 45 minutes, covered.
  11. Pre-heat the oven to 500ºF with a baking stone and steaming apparatus in place.
  12. Transfer the baguettes to your peel. Turn down the oven to 480ºF. Score the loaves and load them onto your baking stone.
  13. Bake with steam for 10 minutes, then remove your steaming apparatus and continue to bake for another 10-12 minutes. (Note: After 10 minutes, I switched my oven to convection bake and turned the temperature down to 455ºF.)
  14. Remove the loaves to a cooling rack, and cool for at least 30 minutes before serving.


CAphyl's picture
CAphyl

I adapted the Hamelman recipe below, as I really wanted to make a multi-grain bread with a soaker. I didn't have any bulghur, so I used cous cous instead. I continue to go for the bold crust, so I allow a little extra time on the bake.

It is just so much fun getting that soaker going, isn't it?

The liquid levain got so bubbly and smelled great.  I had to push this a bit, as I indicated in the recipe below.

I love my covered baker and used it for this recipe. I have started using the oblong covered baker a bit more with better results than my early bakes.  I never tried this before, but for this bake I proofed the dough in the baker (with a bit of cornmeal underneath) and pre-heated the lid. I have always found it difficult to transfer the proofed dough to the baker, even using parchment paper.  This new system worked well, with a nice bake underneath and a bold bake on top.  In fact, in the past the bread would be a little overdone underneath, and this was just about perfect, so I think this is my new method for this baker. There was good oven spring as well and decent height.

I am always concerned about the crumb, but it was fine for a dense bread like this.

I got in trouble with my husband as I snatched his sandwich for a photo just as he was getting ready to take a bite!  The bread was crusty, tangy and very nutty.  Delicious.  It's nice to know that you can vary the soaker and still have very good results.  Phyllis

Five-Grain Levain Bread

Adapted from Jeffrey Hamelman’s Bread: A Baker's Book of Techniques and Recipes

Makes 3 medium loaves
Overall formula
Bread flour 680 g
Whole wheat flour 226 g
Cous cous 82 g (I didn’t have Bulghur as called for in the recipe, so I used the same amount of cous cous)

Flaxseeds 82 g

Sunflower seeds 71 g

Oats 71 g

Water 890 g
Salt 22 g

Total 2.13 kg


Liquid Levain build
Bread flour 226.8 g
Water 283.5 g
Mature culture (liquid)  45 g


Soaker

Cous cous 82 g

Flaxseeds 82 g

Sunflower seeds 71 g

Oats 71 g

Water, boiling 400 g

Salt 5 g (1 teaspoon)


Final Dough
Bread flour 453 g
Whole-wheat flour  226 g
Water 250 g

Salt 17 g (1 tablespoon)
Soaker all of the above
Levain all less 3 tablespoons


Baker Percentage

Bread flour 75%

Whole wheat flour 25%

Cous cous  9.2%

Flaxseeds 9.2%

Sunflower seeds 7.7%

Oats 7.7%

Water 98%

Salt 2.5%
Total 235.1%

METHOD

  1. Liquid-levain build: Make the final build 12 - 16 hours before the final mix.  I ran out of time, so I accelerated this to seven hours, placing the hot soaker on top of the levain build bowl.
  2.  Soaker: Make the soaker at the same time when making levain build. Pour the boiling water over the grain blend and salt, mix thoroughly. Put it in a covered container and sit at room temperature.

3.  Mixing: Add all the ingredients to the mixing bowl except the salt. Mix or stir the ingredients together until it becomes a shaggy mass. Cover the bowl with cling wrap or plastic bag and let it stand for an autolyse phase for 20 -60 minutes. At the end of the autolyse, sprinkle the salt over the surface of the dough and mix on a medium speed for 3 -5 minutes until the medium gluten development is achieved.

4.  Bulk fermentation: 1 to 1 ½ hours or 2 hours if the dough is retarded overnight. (I bulk fermented for 2 hours with a fold over with my dough scraper at the 1 hour mark).

5.  Folding: If the fermentation is 1 ½ hours, fold once after 45 minutes.

6.  Dividing and shaping: Divide the dough into three equal pieces, pre-shape the dough into round. Cover the dough with tea towel and let it rest for 15 minutes. Final-shape the dough into either oblong or round. (I froze the other two loaves, which were a touch smaller than the one I baked.  It will be interesting to see how these come out when I bake them later).

7.  Final fermentation (proofing): Retard the loaves in the refrigerator over night.

(I baked my loaf in my covered baker.  I proofed the loaf in the bottom of the covered baker with cornmeal on the bottom.  I preheated the top of the baker at 500 degrees and allowed the loaf to warm up at room temperature while the oven preheated.  I baked the loaf with the cover on for 30 minutes at 500 degrees and then took the lid off and lowered the oven to 435 degrees convection.  If you don’t have a covered baker, the original recipe instructions follow).

8.  Baking: with normal steam, 235C for 40 45 mins, turn the loaves half way through the bake.


CAphyl's picture
CAphyl

I was inspired by Syd's bake to try my first Pain de Campagne.  I wasn't happy with the first bake, although my husband really enjoyed the taste and texture of the bread.  It was extremely light and made great sandwiches. As I often do, I froze the other half of the dough to make at a later date, and I baked it today.  As usual, my second bake from the frozen loaf turned out better than the first bake from fresh.  The first loaf didn't get much height, but had good crumb. The second loaf had much better oven spring and more height. Both had excellent, tangy taste. I have made a crumb comparison between the two loaves below. The first crumb shot is from the fresh loaf; the second is from the bake today. 

Crumb from the first bake.

Pain de Campagne (adapted from Syd’s recipe)

Levain

  • 50g mature whole wheat starter (mine was mixed)
  • 100g water
  • 100g whole wheat flour

Allow to peak.  This could take from 4-10 hours.  Mine took 8 hours.

Main Dough

  • 200g of the levain
  • 350g water
  • 50g rye
  • 1/2 tsp diastatic malt powder
  • 450g bread flour

Disperse the levain in the water with a wire whisk until there is a good foam on top. Next, whisk in rye and malt powder.  Then add bread flour with spatula and mix until all the flour has been moistened.

  • autolyse for 50-60 minutes

Then:

  • add 10g salt
  • knead to medium gluten development (if the dough is sticky, you can use your dough scraper.  Try not to add more flour.  Just enough for your surface and hands.

Now:

  • bulk ferment for 1-2 hours with a turn at 30 minutes (I left the dough for 2 hours and turned twice).

Next:

  • pre-shape
  • rest 10 minutes
  • final shape

Put into well floured banneton and after about half an hour cover and:

  • retard for 12 hours in the fridge
  • let the dough warm up just before the bake; you’ll see it rise a bit more

Bake

  •  at 500F in a covered baker for 30 minutes

Then:

  • Remove the lid and reduce heat to 435 convection, baking for another 20 - 25 minutes

If you don’t have a covered baker (Syd’s original instructions):

Bake

  •  at 230 C with steam for 15 minutes

Then:

  • reduce heat to 200 C and bake for a further 30 - 35 minutes

The proportionately large amount of levain in this recipe means that the dough develops really quickly hence the relatively short bulk fermentation time.

Pages

Subscribe to RSS - CAphyl's blog