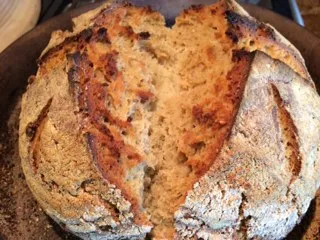
I used the start of Nicole Hunn’s “No-Rye Rye Bread” for this recipe, but altered it quite a bit. Gluten-free bread is frustrating, but I really wanted to make a sourdough loaf that improved on my last effort.
I made a sourdough starter from gluten-free flour and kept it in the refrigerator. I used Nicole’s recipe, but it is confusing and complicated, so when I refreshed it, I just used gluten-free oat and tapioca flours the first time and buckwheat and brown rice flours the second time. It perked up very well.
The frustration I have is that the bread turns out quite heavy. While this effort was better than the first, it still is not where I would like it to be. It also is a bit sweet and overly moist. I will have to keep experimenting to improve it. Gluten free is a real challenge.

The crumb was OK for gluten free.
Here is the recipe I used:
Starter
80 grams starter
½ cup plus 3 tablespoons water at room temperature
1 cup plus 10 tablespoons gluten-free bread flour (I used Pamela’s gluten-free bread mix)
Dough
Starter
1-1/4 cups plus 2 tablespoons warm water
3-1/4 cup gluten-free bread flour (I used Pamela’s bread mix)
½ cup whole grain gluten-free flour (I used King Arthur’s WW gluten-free)
1 tablespoon salt
1 tablespoon honey
1 tablespoon molasses
1-1/2 tablespoons sesame seeds
Method
Place the starter into the bowl of your stand mixer and add the water; mix using your paddle attachment for a few minutes. Add the bread flour until it is incorporated and switch to the dough hook and knead for about two minutes. Transfer to a lightly oiled bowl, cover with plastic and place it in a warm location until the starter has doubled in size (at least 6-8 hours; I left mine for 24 hours due to schedule).
Making the Dough
Once the starter has doubled, add it to your stand mixer bowl along with the water. Mix with the paddle attachment for one minute. Add the bread flour and whole wheat flours and switch to the dough hook. Mix on low speed and knead. Add the salt, molasses and honey and mix on medium speed for about three minutes. Add the seeds and mix until incorporated. Place the dough in the refrigerator in a lightly oiled bowl for at least 12 hours or until it is doubled in size. I left it for more than 24 hours.
Shaping the Dough
Take the dough out of refrigerator, ease onto a floured surface and shape into a ball. Place into a banneton coated with brown rice flour (gluten-free). Place in the refrigerator overnight.
Baking
On baking day, preheat your domed covered baker to 500 degrees. Sprinkle some corn meal (gluten-free) into the bottom tray and place the bread on top of the corn meal. Spray lightly with water and score as desired. Bake at 500 degrees with the lid on for 30 minutes and then remove the lid and bake at 450 for another 15-20 minutes.
Cool on a wire rack for at least 30 minute before slicing.
- CAphyl's Blog
- Log in or register to post comments
I will check out these recipes. I did try one recipe with psyllium husk and have some, so I may give these new recipes a try. It seems like I have to try a new gluten free every couple of months. Thanks for sharing. Best, Phyllis
Breads made with xanthan gum and guar gum, which are most likely included in the flours you mention, Phyllis, tend to become rather crumbly within 2-3 days. I've made a sandwich loaf using psyllium husk that turned out quite nicely. The texture will never be the same as a wheaten bread but it was pleasant to eat.
This past weekend, using a tweaked version of the bread in my earlier post, I taught a class on gluten-free breads. The class featured scones and crackers, too, but the run-away favorite for the students was the sandwich loaf. For many of them, it's the closest thing to a wheat-based sandwich bread that they've had in years. They were very appreciative of the bread's flexibility and cohesiveness, compared to the GF breads that some have purchased.
That the bread is flexible and does hold together instead of falling apart is entirely due to the psyllium husk gel. Until something better comes along, I think psyllium husk is probably the best option for individuals who need to bake GF breads.
Paul
The problem is twofold: one, the GFOAS bread book recipes are not adequately tested (if they are tested at all, which I doubt) and aren't very good. All of the breads are heavy and dense and hard and tough. Two, while I love Pamela's Artisan Blend for quick breads, it isn't great for yeast breads, especially those from which you want a high rise.