May 25, 2016 - 2:16am

Problems with splitting when baking
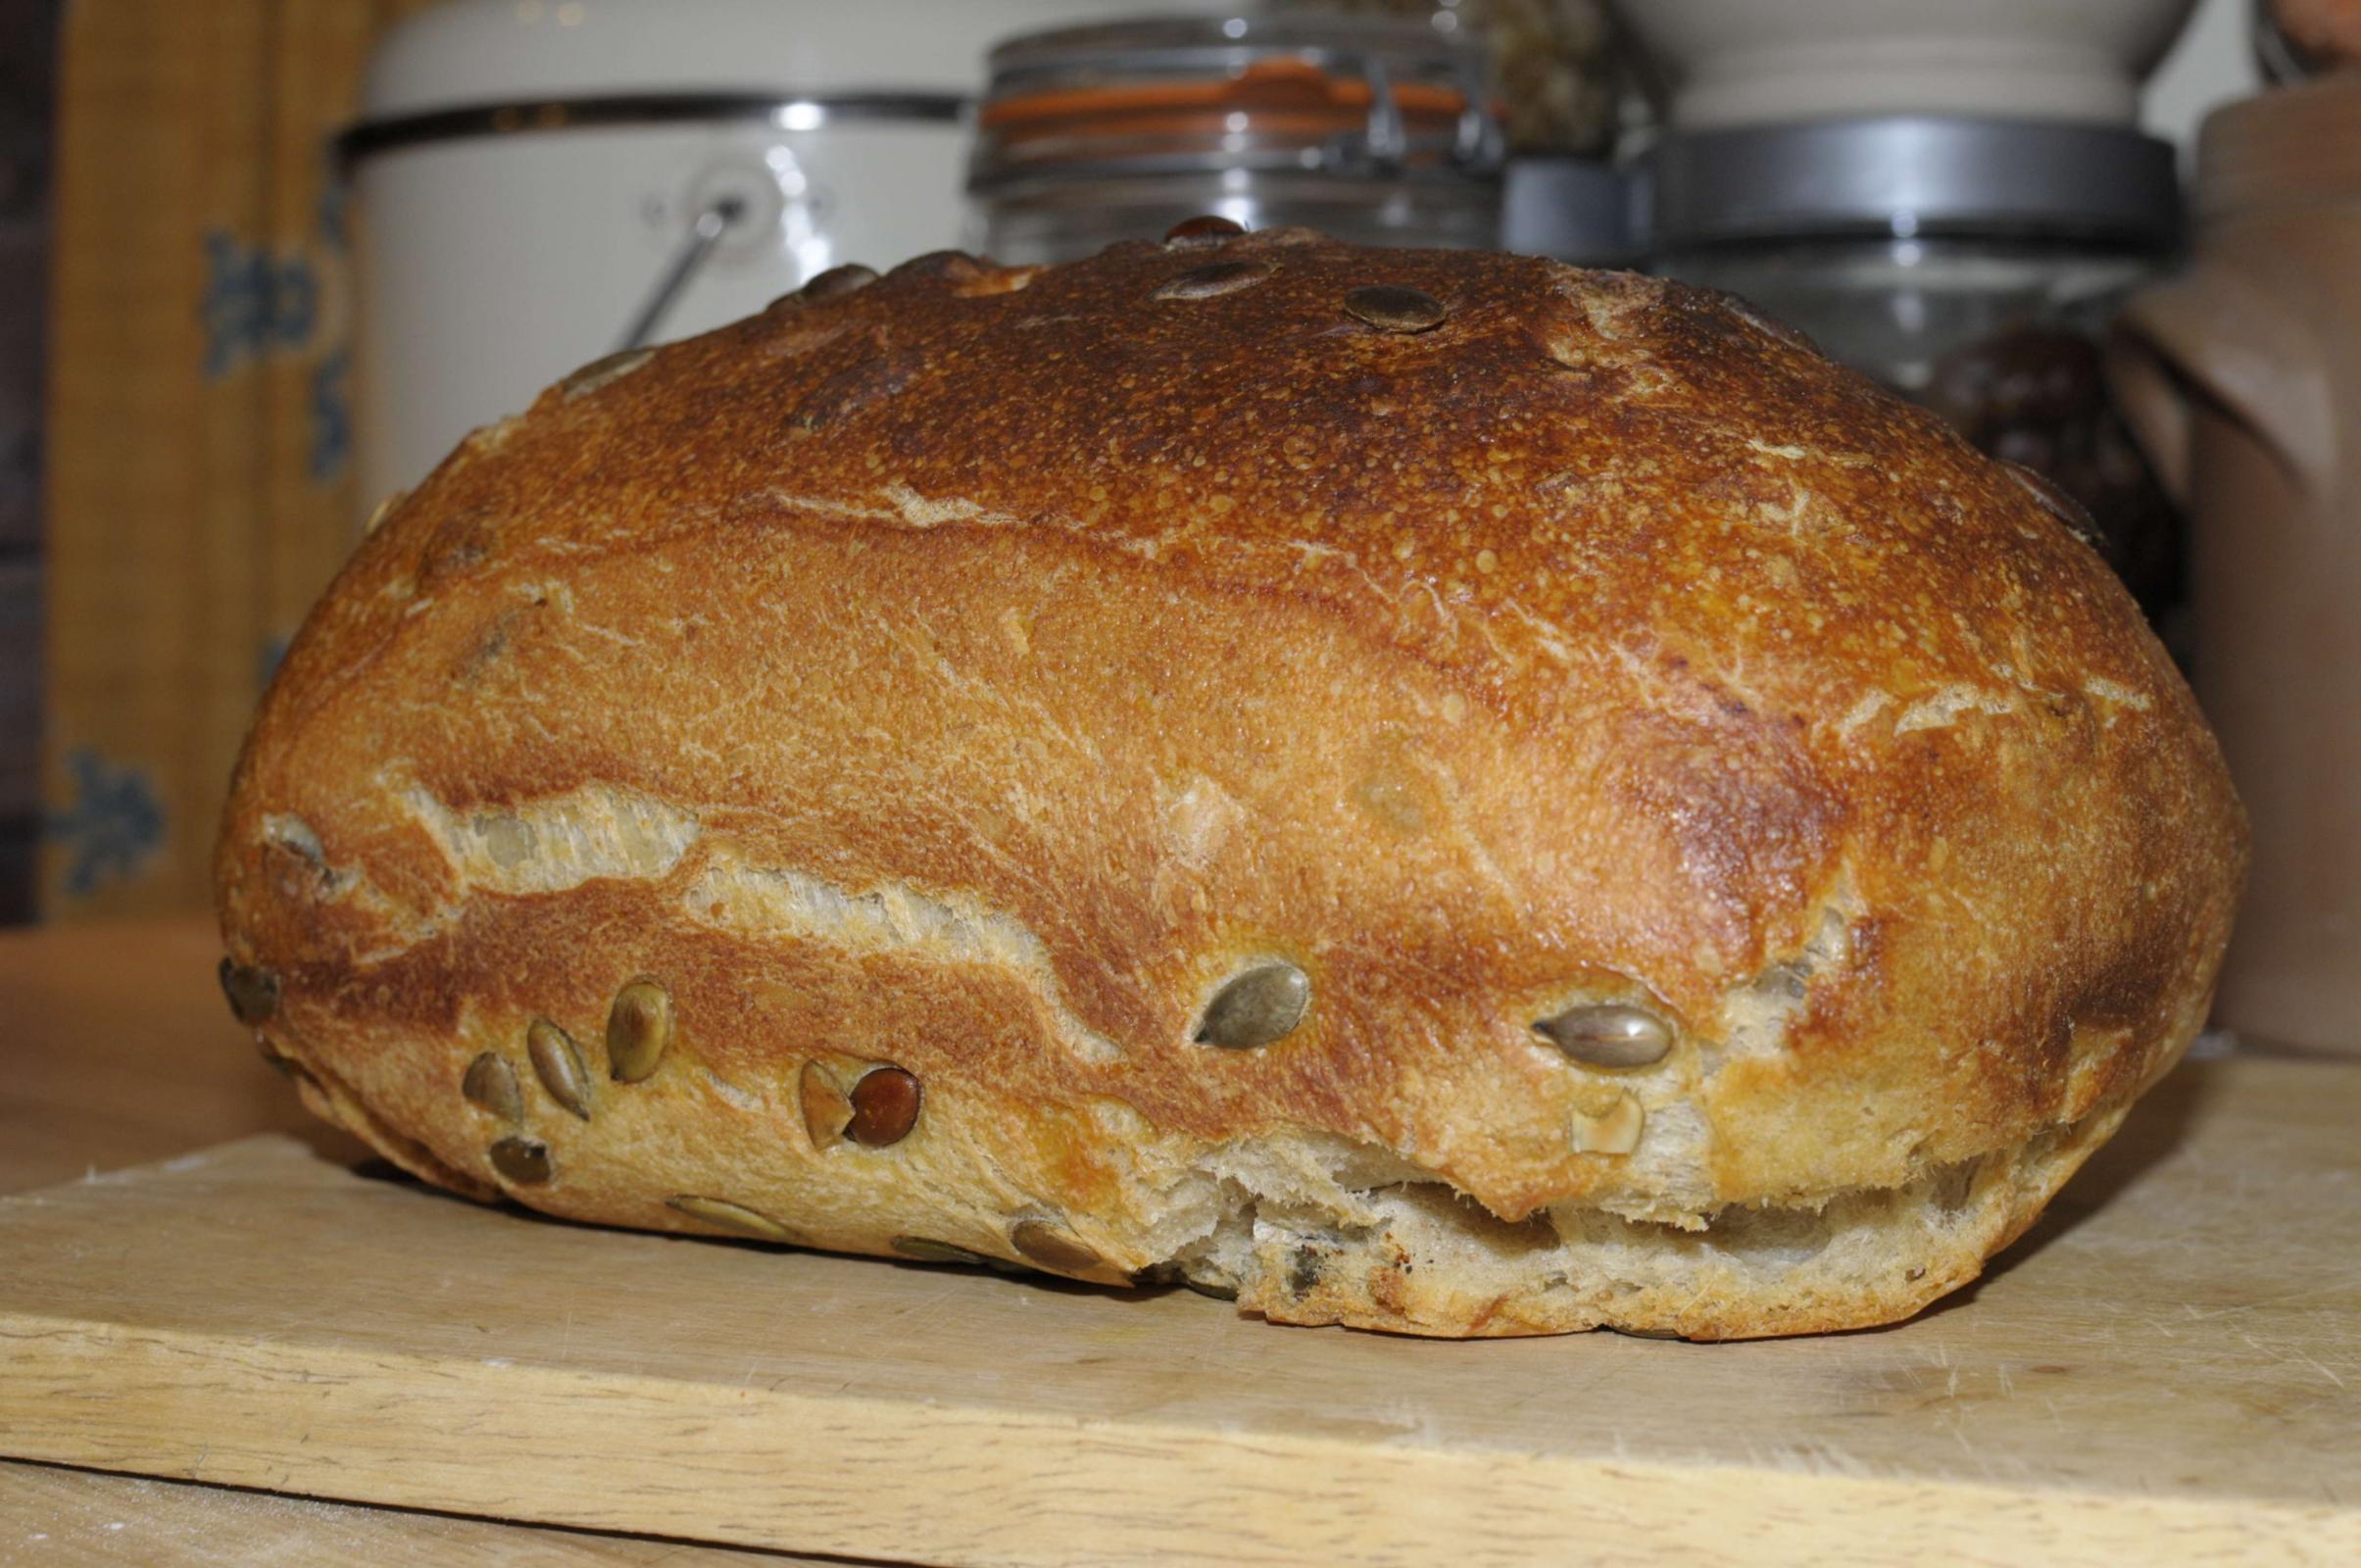
I'm just heading out into the world of bread baking and getting better, mainly thanks to TFL members! My latest effort had some good and bad features!
On the good side, I've achieved the best, softest and lightest crumb so far and also retained a lovely thin, yet crunchy crust. The taste of the crumb is very good throughout most of the loaf but see below.
On the bad side, the loaf split whilst baking and I hope the picture that I've used shows this. There was a slight underbaked, more doughy part at the bottom, centre of the loaf.
Any help or suggestions would be great!
The recipe and method that I used was:
- 495g strong white from Wessex Mill http://www.wessexmill.co.uk/
- 55g wholemeal from Wessex Mill
- 165g of mother culture (100% hydration)
- 313.5g water
- 8.8g salt
- A handful of toasted pumpkin seed in the mix, plus more to decorate.
The method was:
- Mix and pre-ferment (or is this an autolyse?!) for 30 minutes.
- Fold for about 1 minute and bulk ferment for 10 hours overnight at about 18-20 degrees C.
- Proof in a tin for 1.5 hours with three folds at regular intervals.
- Bake, with a tray of boiling water in the oven and some, sprayed water, for 15 minutes at 230 C.
- Bake for 20 minutes (with water tray and more spray) at 200 C.
- Bake for 5 minutes at 200 out of the tin.
Share


I put three diagonal cuts in the top of the dough before putting it in the oven. These did not open fully during baking.
it could be a shaping thing. Or perhaps your slashes on top weren't deep enough?
What did you bake your loaf in/on?
Your loaf still looks good though, love the pumpkin seeds! Yum!
Thanks for the reply Ru007
I've focussed on mixes and fermentation/proofing so far so it looks like the finishing is where I need to develop some expertise.
For the shaping I've done so far, I've just finished up the last of my folding (I think I did three repeats) and moulded the dough in my hands by rolling it and then dropped it into my baking tin as best I could. It was then baked in the tin in a conventional domestic oven on the upper rack, above a roasting tin, which had pre-boiled water in it. As I shut the oven door I sprayed water in as well with a (clean!) garden spray. The spraying was repeated whenI dropped the oven temperature after 15 minutes at 230 C.
The dough, even when proofed, doesn't touch the tin all round before it goes into the oven. I posted in the Gear > Baking Equipment forum under the title "Bread Baking Tin Sizes" about a week ago, with the result of upping my mix quantities to try and fill the tin! Maybe up them again.
I shall also try deeper slashes next time. I didn't want to go too deep!
I was pleased with all other features of the loaf, save the splitting. The pumpkin seed worked out well!
if perhaps during the final rising of the dough, the crust dried out too much so that when in the oven it rose pulling up and tearing the sides. Try keeping the dough moist and covered while it is rising. A damp wrung out cloth is my favourite or a large bowl turned over the tin.
The loaf is lovely despite the crack.
If the tin is shiny, might want to cover the loaf with a foil tent once it is brown enough on top so the bottom can finish baking. Could also be an indication that the oven is just a tad too hot and/or the baking time not long enough. Upon removing the loaf from the pan, should the bottom not be crispy like the top, carefully put the loaf back inside the hot oven, naked, for 5 to 10 minutes. Upside-down also works.
Since you've added 5 min to the above loaf using this technique, I might also suggest checking the oven situation to get more heat under the loaf. That might include lowering the baking platform or shelf, or using bottom heat only, or baking with convection, or checking the lower coil to see if it's working properly, or switching to a dark pan. :)
Hello Mini Oven,
Thanks for all of the suggestions for overcoming this one. I'll start trying them on my next bake.
On temperature, what should I be aiming for? My baking plan was:
What would you suggest in the way of changes?
Ah yes, out of the tin and upside down, I remember my mother, years ago, using this trick!
Part of your method got me a little confused:
I'm not sure why you are doing three folds during the final proof. Perhaps this is affecting the way the dough rises or springs once you put it in the oven. Try shaping the loaf after the bulk ferment, then just let it rise until it passes the poke test (do you know this one?). Then slash and bake. I bake lean sourdoughs in pans sometimes, just spritzing the oven right at the beginning. I preheat at 475F and bake for 5 minutes at this temperature, then lower the heat to 425F for another 30 to 40 minutes (depending on the bread and the size).
Hello Lazy Loafer,
Thanks for your reply.
Maybe I'm getting confused with all of the recipes I've seen, videos I've watched and books I've read! I thought that I had seen Ken Forkish of Flour, Water, Salt Yeast fame, doing some folding before shaping but maybe I was mistaken. My earlier baking efforts had resulted in quite a heavy crumb, with no significant bubbles and I had thought that the folding helped build a mesh of gluten strands, which would then trap gas bubbles. Is this right?
Happy to try anything so if including folding stages are right and required then should I be doing more before or during (difficult as I bulk ferment overnight) my bulk fermentation? Earlier advice that I had taken was that the dough did not need a rigorous kneading and that folding was the way to go. Although this loaf split, it was the lightest crumb that I achieved to-date so I was doing something right!
Yes, I know the poke test (Poke it and watch the dough re-fill the depression created. If it doesn't or is very slow, then more proofing time is needed.)
Unfortunately, I can't achieve 475 F (246 C) in my oven. Top-wack is about 446 F (230 C). The longer baking at a lower temperature should be worth a try but the temperature you suggest of 425 F (218 C) is approaching the hottest I can get my oven anyway! Any thoughts on this would be great.
Yes, there are so many different ways to make bread - it's quite amazing, isn't it? And sometimes confusing, I agree.
What I've sort of settled on (though it varies with the type of bread) is
There are several variables in all this but generally I don't work the dough very much after the bulk ferment. It might be tightening up too much when you do your stretch and folds and then it's pulling back out of the rolled shape when it springs in the oven.
Have fun experimenting!
Lazy Loafer,
Many thanks for the reply. It's eight o'clock in the evening here in the UK so I'm heading off to start another mix and plan to do the following:
Mix, autolyse, stretch and fold and let it rise 'til about ten thirty this evening and then bulk ferment overnight until about seven thirty in the morning. As temperatures are starting to pick up here (as much as they do!), I'll probably do this in the fridge. In the morning, I'll have a go at shaping it ready for proofing.
Just a couple of questions...
You refer to "a high amount of starter or pre-ferment." My mix has 30% starter in it (at 100% hydration) Is this high or low? How do you judge what is high or low?
You say you will "scale it and pre-shape." What's the "scale it" bit? Does that mean multiply up the quantities so you have more dough?
Thanks!
Hmmm, just as an example, a Tartine bread will have about 15% starter to flour ratio. I would consider that fairly low and would probably bulk ferment that dough overnight either at room temperature or in the basement (cooler room temperature). Most of my other doughs are 20-25% starter to total flour ratio, but some of them are more starter than flour! The 20 to 25% ones I would likely put in the fridge after they have shown signs of swelling or rising at room temperature, but that sometimes changes with different flours. You say yours is 30% starter - is that starter compared to the total amount of flour (so, 1000 grams of flour to 300 grams of starter), or 30% of the total weight of the dough? Either way, it should be fine in the fridge after a bit of stretching and folding and rising.
For doughs using pre-ferments made with commercial yeast (e.g. a poolish or biga), I'll usually let the dough rise at room temperature for a couple of hours then put it in the fridge overnight (or longer).
'Scaling' simply refers to weighing the pieces of dough. I bake for customers so I usually do four to 12 loaves per batch, and I want them all the same weight. So I 'bench' the dough (dump it all out onto the bench or counter), cut it into pieces with my bench scraper and weigh them (usually 750 grams per loaf), then pre-shape, rest, shape and then leave them alone to proof. Sorry, shouldn't use jargon!! :)
Good luck with tonight's / tomorrow's bake!
Thanks for the reply Lazy Loafer,
Using the quantities in my mix tonight, I mean 180g (starter)/600g (total flour) X 100 = 30. I've done a couple of stretch and folds already so a third will probably be my lot for me tonight. The dough is progressively giving more stretch and elasticity so it looks like something is happening.
Thanks for explaining your use of the word "scaling". I won't need to weigh my dough as it's all going in one tin as a single loaf which, all in, will weigh a little over a kilo or a tad over 2lb. It should fit in my tin nicely.
I'll post the results (but I don't think that I can post a picture on this forum?)
Weird context to use the word, but in the bakery world, it means to put the dough on the scales - or weight it out in measured lumps. You're probably only making one loaf, so no scaling needed, just tip it out and pre-shape/rest/shape/prove/bake ...
-Gordon
...yup just one loaf this evening. About how long to rest for after pre-shaping?
My bake went ahead but alas, I experienced the same issue of splitting whilst baking.
The things that I changed following my first split loaf were:
The loaf is properly baked and has come out with a nice, even, soft crumb and a nice crunchy crust. It is very tasty! The splits are all on the lower parts of the sides and on the bottom. The cuts opened up a bit but a large amount. I looked back at Mini Oven's comments about oven temperatures etc. were getting on the right track. Any advice about oven temperatures and baking duration would help.
My oven, just a basic domestic appliance, can reach a top temperature of about 230 C (446 F) and it is a fan oven. A secondary oven thermometer suggests that the temperature set on the thermostat control is reasonably accurate. There are no other control options, such as switching off the fan or bottom heat etc.
Any further advice would be great!
Let me begin by saying that this has happened to me SO MANY TIMES and I found it comes down to two things: the dough being too strong and underproofing. I thought it was a lot of things, such as getting a bad seal on the seam on the bottom of my loaf, but since I altered these two things I've had great success. Underproofing, like people said above, is really just a feel thing and you just have to learn what feels right.
The biggest contributor is that I believe the dough is just too strong. I'm calculating that this loaf is at 62.5% hydration (with a strong flour I might add) and has three folds on top of that. I would say that it honestly probably doesn't need any folds if you make the first mixing stage more sufficient. If you want to fold it, I would up the hydration to at least 75% to counteract all the strength you're adding by the folds. This would also explain why you're not getting the open crumb with big holes that you're looking for.
I'm almost positive that this will solve your loaf-splitting troubles. I made this account just to respond to this post because I've been plagued by this forever. I hope this helps!
Thanks for the post VPglutenpride.
Looks like I'm trying too hard to get where I want to be! Next bake, I'll ease back on the folding. It's only an estimate from my last bake as I didn't write it down but I think I folded three times after adding the salt to the autolysed mix all within about two to two and a half hours. Each time I folded maybe six or eight times, giving a maximum of about 24 folds. This looks like too much from what you advise? From my limited experience, when shaping the dough, it didn't feel too springy or strong but more like it was pliable and I could shape it. Is an overtly strong dough very distinctive in its feel and touch?
It's only an estimate from my last bake as I didn't write it down but I think I folded three times after adding the salt to the autolysed mix, within about two to two and a half hours. Each time I folded maybe six or eight times, giving a maximum of about 24 folds. This looks like too much from what you advise.
So as to only change one thing at a time, I'll look at changing the amount of folding first before I look at hydration.
What's confusing me a little, though, is that I appear to be heading in the direction of no folding or kneading and being new to baking, i thought that this was an essential part of the process? Have I got it right now that for a strong flour, that is one with a high gluten content, that the autolyse phase mainly but also a pre-fermentation and/or bulk fermentation will do all I need to have done as far as gluten fibre formation is concerned? If I was using a flour with a lower gluten potential, I would need to work it a bit more by folding or kneading to get a sufficiently good gluten fibre network?
I also need to get more used to judging when the proofing is right. This is something that can be too little or too much and the poke test is the best things to use?
your comment:
Yes, I know the poke test (Poke it and watch the dough re-fill the depression created. If it doesn't or is very slow, then more proofing time is needed.)
That would actually be a good test for over proofed if near the end of a final proof before baking. I tend to lay my hand or several wet fingers on a loaf to see how much it gives way when I press it. Depending on flour, hydration and type of bread, this will vary. The dough should be springing back each time you poke but the closer it gets to baking time the slower it fills in and the softer it feels. If it doesn't fill in at all, it is more likely over proofed.
I tend to lay my hand against the dough, I get a better feel for the gas pockets inside and the density of the dough. I also evaluate carefully the volume differences from flat dough when mixed, to raised dough I'm aiming for.
You can also make a crude gauge using a small ball of the dough compressed into a narrow straight sided glass. Those skinny olive glasses or a tall shot glasses work well. Pull off a ping pong size glob of dough when shaping. Shape and fold the little ball too and drop into the bottom of glass, flatten out with the end of a wooden spoon or something similar. Mark the level with a rubber band or some tape or marker. Mark also for "double" and depending on your dough, mark for the desired "ready" level. Often this is just below double, about 4/5 ths. Cover loosely and set next to the rising dough trying to keep both at the same temperature.
When the dough ball reaches the desired height, bake the loaf. See if this helps you with the proofing.
Mini Oven,
Thanks for sharing your techniques. I will have a go at feeling the progressive change in spring-back on my next proofing. I guess it's down to experience judging the point when the dough goes from well proofed to over proofed. If you get to the point where the dough does not spring back is there anything to do, or do you just get baking as swiftly as possible?
I like the idea of the proofing gauge! I shall look out a suitable glass for next time.
But like VPgluten says, the hydration should be addressed. 62% is not impossible, it just takes longer.
If the rising dough is not filling in the corners of your bread pan, it is more likely too stiff (not enough water or too much flour) and hasn't proofed enough. This was mentioned this in the beginning of the post (or is seen in the photo.)
Thanks for the post-Mini Oven. It's good to have some confirmation about the actual baking regime that I'm using, with regards oven temperatures and timing. As you will see from my reply to VPglutenpride, I'm going to experiment with reducing the dough strength by reducing the folding. I'm also going to try and judge the optimum proofing point better. However, I was relatively confident with what I did last time but will watch to see how the dough responds to a poke more carefully!
If I get the same issue again I'll look at hydration.
I hope this sounds a sensible route to follow.
Some things that stand out as I read your posts:
- Tinned loaves aren't typically steamed during baking. Five of the six surfaces are protected from the direct heat of the oven, so they don't dry out and form a resistant crust the way hearth breads do. Note that oven steam won't reach the lower corner of the loaf that is protected by the tin. Consequently, it won't reduce the cracking that you see.
- You mention that "The dough, even when proofed, doesn't touch the tin all round". That indicates that the dough is not adequately proofed before baking or that the dough mass is too small to fill the tin properly.
- Most of the cracking visible in the photo is around the base of the loaf where plenty of moisture is available to keep the crust soft (see the first observation about tinned loaves). That, in combination with the dough not having expanded enough to fill the pan, points more strongly to under-proofed dough, rather than too little dough for the tin.
- It may just be the way that you wrote the post but I have the impression that you rely more on timing to determine dough readiness than anything else. The poke test, or Mini's suggestion to gently squeeze the dough, will tell you more about whether the dough is ready for baking.
- Tinned loaves are less likely to be slashed than are hearth-style loaves. That doesn't mean you can't slash them, just that it isn't common practice. If you do want to slash your tinned loaves, experiment with a single slash along the longitudinal axis of the loaf, instead.
- The photo seems to indicate that a seam has opened along the side of the loaf. If so, then shaping may be a secondary issue for you. No matter the shaping technique you use, be sure that the seam is on the bottom of the loaf to minimize blow-outs. Focus on the final fermentation first, though, since that appears to be the bigger problem.
- The total bake time is only 40 minutes. Combine that with opening and closing the oven door for spraying, which drops the temperature, and it isn't surprising that the bread is somewhat underbaked. I'd suggest a 45-50 minute bake at 190-195C with no steam for a loaf of this type.
Pictures of the crumb, if you have them, would be helpful, too.
Regards,
Paul
Just a note here - it is not uncommon to see tin loaves slashed in the UK - a single long slash in a "farmhouse" type loaf (the ones with rounded corners) is common and diagonal slashes are also often seen in tinned breads too.
I sometimes slash tinned loaves, depending on who they're for (and if I can be bothered)
-Gordon
Yes, my local bakery has a line in white tinned loaves, with a top slash. I think they even call it a "split tin."
Paul,
Many thanks for your reply and useful observations.
I'm learning that assessing the progress of the bulk fermentation to a recognised point (which seems to be based on the increase in the volume of the dough) and the correct point to stop the proofing and bake (Based on the springiness of the dough) are all key skills in this business! I have posted at http://www.thefreshloaf.com/comment/353695#commeabout3695 asking questions about the bulk fermentation!
Other issues like my folding and hydration need watching as well, as there is a risk of getting these out of balance.
Also, the shaping and amount of dough going into my tins needs attention, along with the duration of the bake.
...so a few things to work on!
Aidan