The Fresh Loaf

A Community of Amateur Bakers and Artisan Bread Enthusiasts.

Blogs

Muffin Man's picture
Muffin Man

  I recently rewatched an old King Arthur baking DVD and thought, well, why not try it.  It was revelatory.  I had gone over to weighing everything (a la Peter Reinhart) and using my Kitchen Aid (a Christmas present four years ago from my son).  In the vid, Michael Dubinski measured all but the flour (OK, so he used cups).  He brought the mixture from liquid to dough manually, adding only as much flour as was needed.  i tried this and rediscovered why I started baking some 5 years ago (I'm an old, slow learner).  What joy, watching ingredients transform into a dough before my eyes.  In a production environment, machinery is necessary for survival.  At home, it is pure joy to watch the dough develop, ferment with only the warmth provided by sunlight and the moisture in the air (not a problem in Florida), being shaped and proofed (again by the warm air found here) and finally baked into a delicious bread.  I look forward to as many years as I am given to baking continually.

ericjs's picture
ericjs

Here is a picture of my jury-rigged cloche. Not pretty but it works quite well.

It is a La Creuset round dutch oven (enameled cast-iron, I'm not sure the size) over a Sassafras "Deep Dish Pizza and Pie Baker" (ceramic), upside-down. Someone gave me this as a gift years ago and I've hardly used it until now as I'm not a deep dish pizza fan and can't imagine baking a pie in that thing.

Note that the handles of the dutch oven are not flush with the top, but the stick below the level of the rim slightly (above when right side up) so this won't work unless the deck is raised and just the right size like this pizza pan. It's sheer luck that these worked together so perfectly.

I started out using quarry tiles, with an enormous terra cotta flowerpot as the top (hole plugged with wadded up aluminum foil), but I worried that the spaces between the tiles would let steam out and defeat the purpose of the cloche. Also the flower pot is unweildy and has no handles. I've left the quarry tiles in place under the pan, but I'm not sure if they contribute anything.

The only downside is it only fits one boule at a time and you have to have decent aim delivering the loaf from the peel. I've had a couple of loaves wind up squashed on one side (which didn't impair their taste or texture, but they looked a bit wonky).

The pizza baker has developed some cracks, but I've patched them with high temperature silicone (hoping nothing toxic is coming out...I've only patched from the other side, not the baking surface). While the silicone was drying, I switched to a metal pizza pan (also upside down...and larger) with the flower pot. The couple of loaves I baked on that wound up burned slighly on one side which has never happened with the stone which always produces evenly baked loaves.

I just recieved a baker's stone from NY Bakers and intend to make myself a couple of terra cotta cloches (I'm also a potter) to replace this setup eventually, probably in different shapes and sizes. I wonder how closely the cloche needs to fit around the bread to work? Would too much space make it less effective?


dmsnyder's picture
dmsnyder

Hansjoakim recently showed us a Flax Seed Rye Bread he baked from a formula Jeffrey Hamelman published in Modern Baking in March, 2009.

I have baked a number of Hamelman's rye breads before and a number of his breads with seeds. I have enjoyed them all. This Flax Seed Rye is a new formula that is not in Hamelman's “Bread,” however. Yet its components are all familiar to anyone who has baked the ryes and multi-grain breads from that book. The combination of a 40% Sourdough Rye and a seed and “old bread” (altus) soaker sounded like a bread I'd really enjoy.

Hamelman's published formula for this bread is scaled for commercial bakery quantities. I scaled the formula to make a single 1 kg loaf.


Overall Formula


Ingredients

Wt (gms)

Baker's percentage

Flour (11.7% protein)

300

60

Whole rye flour

200

40

Water

402

80.3

Salt

10

2

Instant yeast

6.5

1.3

Flax seeds

50

10

Old bread

40

8

Total (approx.)

1 Kg

201.5


Sourdough (rye sour)


Ingredients

Wt (gms)

Baker's percentage

Whole rye flour

200

100

Water (cool)

166

83

Rye sour

24

12

Total (approx.)

390

195


Method: About 16 hours before the final mix, disperse the mature sourdough culture into the cool water. Add the whole or medium rye flour, and mix until it is incorporated. Sprinkle a layer of rye on top, and cover the bowl with plastic to prevent dehydration. Ripen the sourdough at about 70°F.

Soaker


Ingredients

Wt (gms)

Baker's percentage

Flax sees

50

100

Old bread

40

80

Water (cool)

150

300

Total

240

480

Method: Make the soaker at the same time you make the sourdough. Cut the old bread into cubes, and put it into a bowl along with the flax seed. Add the water and cover overnight.

Final dough


Ingredients

Wt (gms)

Flour (11.7% protein)

300

Water

85.5

Salt

10

Instant yeast

6.5

Sourdough

366

Soaker

240

Total (approx.)

1 kg


Method

  1. Remove a portion of the sourdough to perpetuate the culture.

  2. Dissolve the sourdough in the water, mix in the soaker, then add the rest of the ingredients and mix thoroughly. The dough will be rather loose. You can adjust by adding small amounts of water or flour, but avoid adding too much flour.

  3. Mix at Speed 2 (KitchenAid) to a moderate degree of gluten development. Desired dough temperature is 78F. (This dough, which Hamelman says is “tacky” was extremely sticky for me. I suspect the dough was over-hydrated. I would be inclined to reduce the water, use a more absorbent flour or both next time. I mixed for 25 minutes. There was better than “moderate” gluten development. It was just a very wet dough.)

  4. Bulk ferment in an oiled bowl for 45-60 minutes.

  5. Transfer the dough to the board and pre-shape into a round. Let it rest while you flour your banneton and pre-heat the oven to 480F with a baking stone and your steaming method of choice in place. (Note: Hamelman suggests baking 1.5 lb loaves. I chose to make one larger loaf. Also, you could shape this bread as one or more bâtards, if you choose.)

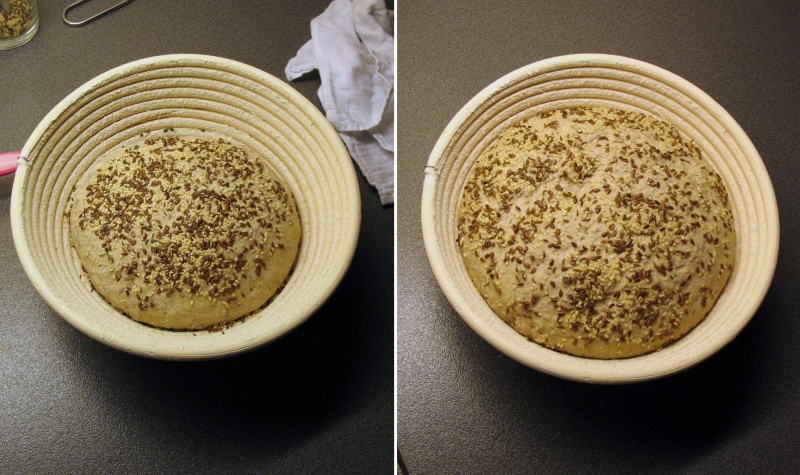
  6. Shape the dough into a tight boule. Optionally, press the dampened smooth side of the dough into a mix of seeds (Flax seeds 45%, sesame seeds 45%, caraway seeds 10% suggested by Hamelman. I brushed the smooth side of the loaf with water and sprinkled on some caraway seeds only.)

  7. Transfer the boule to a floured banneton. If you used the optional seeds, place it with the seeded side up. If you didn't seed it, place it with the seamed side up. Cover the banneton with a kitchen towel or plasti-crap, or place it in a food-safe plastic bag.

  8. Proof the boule for 45-60 minutes. (Hamelman specifies an ambient temperature of 80F.)

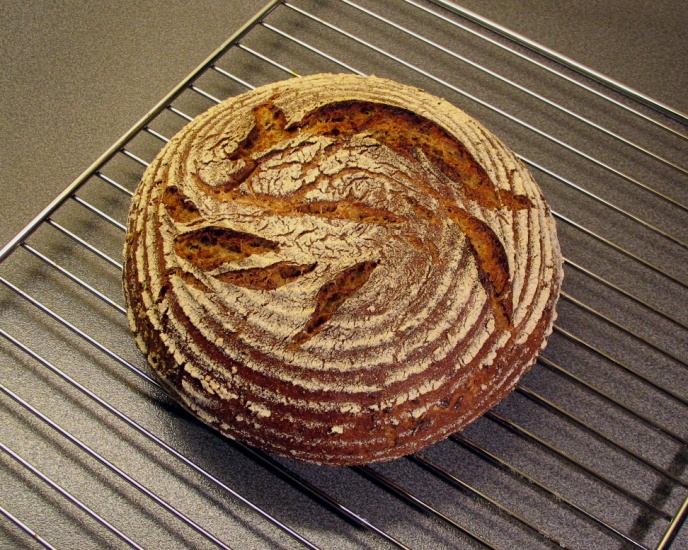
  9. Pre-steam the oven. Load the loaf on your baking stone, and steam the oven again.

  10. Bake at 440F for about 40 minutes with steam for the first third of the bake. (Note: Hamelman specifies about 38 minutes for a 1.5 lb loaf. For larger round loaves, a longer bake is needed, but be prepared to lower the oven temperature as the bake progresses if the crust appears to be getting too dark. Also note that, if you shape the bread as an oval loaf, the baking time may be less than for a round loaf.) The bread is done when the internal temperature reaches 205F and the loaf gives a “hollow” sound when thumped on the bottom.

  11. Cool completely before slicing.

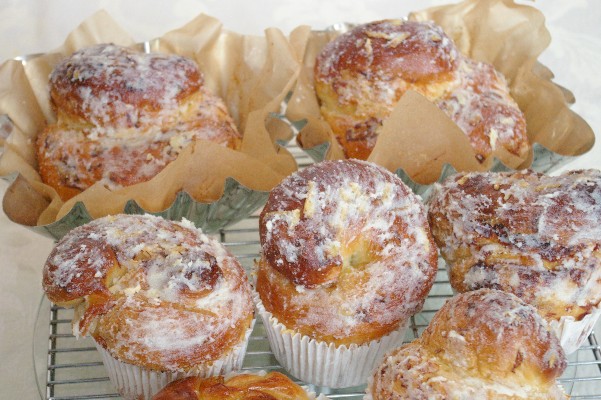
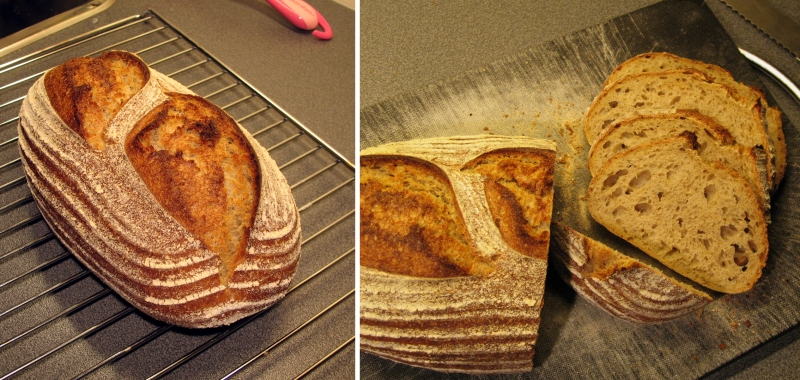
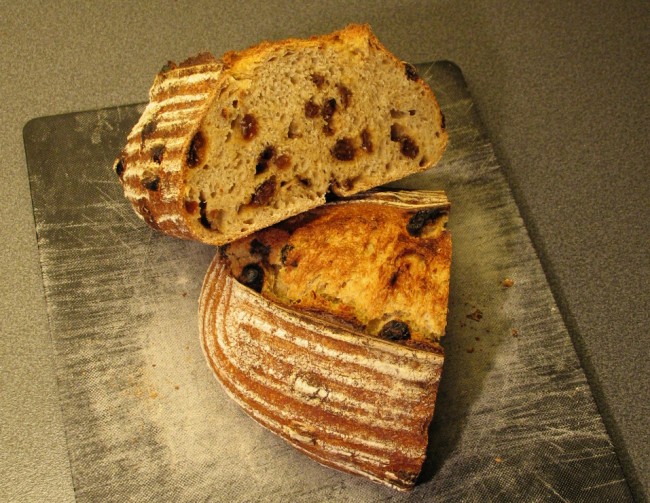
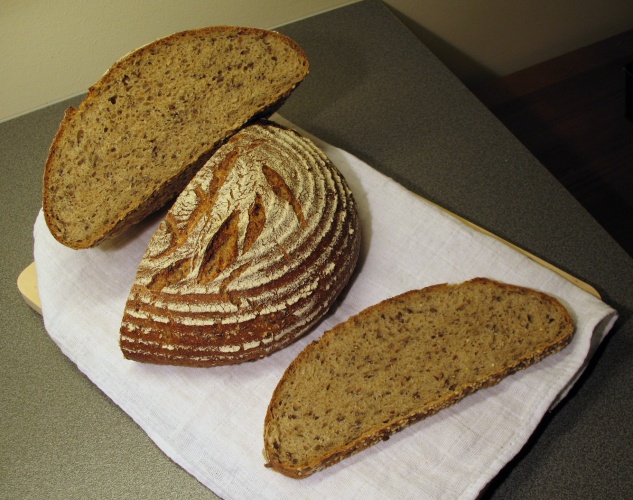
The "supporting cast" is a couple loaves of Susan from San Diego's "Original" favorite sourdough. My timing was a bit off. The sourdough boules needed just enough more time in the oven to result in the rye over-proofing.

The rye had only modest oven spring and has a lower profile than hansjoakim's bake. In any event, it smells delicious!

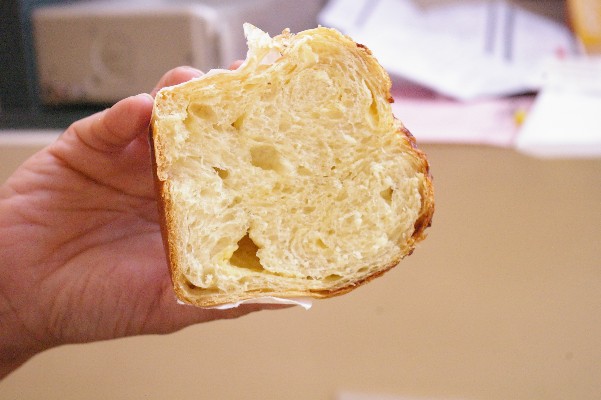
The crust was quite hard when the loaf came out of the oven. By time it had cooled, the crust was soft. I left it on the counter, wrapped in a cotton cloth for about 20 hours. By the time I sliced it, the crust had firmed up again and was chewy. The texture of the crumb is drier than I expected, given the hydration level of the dough. I wonder how much impact my long mixing had on the dough structure and mouth feel.

The flavor of the bread is like that of other 40% sourdough rye breads, which is to say very nice. There is a subtle overtone  from the flax seeds which is not as pronounced as that in some of the other 5-grain breads in "Bread." 

I am thinking of ways I might modify the formula for future bakes. For example, I might use First Clear flour rather than AP. I would make the dough drier - more like what I think Hamelman describes. I might make Hamelman's "5-grain sourdough rye" with some old bread added to the soaker. 

Thanks again, hansjoakim, for bringing this bread to our attention!

David

Submitted to Yeast Spotting

sharonk's picture
sharonk

After nearly 4 years of gluten free sourdough experimentation and observation I can now intuitively work with the never ending variations that emerge during the sourdough process. Much like people, every gluten free sourdough starter is unique. They respond to temperature, humidity, air flow, and miniscule differences in measurements.


Lately, I’ve become so adept at this kind of baking that I can “correct’ the starter or bread dough as I move through the tasks rather than dutifully following the recipe and ending up with a brick.


I can tell by the smell of the starter if it’s fermenting too quickly and needs to be fed more often. I can tell by the density if more flour blending is necessary. In a heat wave I can correct before over-fermentation sets in. The way the pizza dough comes together tells me if I need more arrowroot flour to attain that stretchy doughy quality. The quality of sponginess of the nearly finished bread batter tells me if it needs more ground flax seed.


My hope is that people who bake my bread will get a feel for working with a gluten free starter and the resulting dough so that they can correct as they go. My other hope is that they will be brave enough to try variations so that they can turn my bread recipes into their favorite breads. I love when people tell me they experimented with dried cherries instead of raisins and sage rather than coriander or used mini loaf pans instead of muffin tins.


My new motto is “Go forth and bravely bake!”


http://glutenfreesourdough.com

http://glutenfreesourdough.blogspot.com


cake diva's picture
cake diva

Fall has arrived.  It's been a gloomy, drizzly few days in SW Ohio.  I should really go out and finish preparing the garden for the long winter ahead. Something's holding me back, though.  Maybe I'm avoiding the feeling of melancholy that comes with pulling the last tomato plant off the ground.  No more sweltering hot days, busy bees, giant zucchinis, crisp green beans, sweet eggplants;  no more grilled Pizza Margheritas, kabobs, and sipping mojitos in the patio...  In the end, I think what I really try to deny but can't is the stark parallel that the seasons have to our own lives, and the inevitability of where we all must go as others before us have.

And so I turn to baking.  This time, I'm piggybacking on to PMcCool's endeavors to create a sweet bread popular in the Philippines, the ensaymada.  It's a brioche type of bread, most likely brought by the Spaniards who colonized the country and stayed there for 300 hundred years before turning it over to the Americans after the Spanish-American war. The bread is exponentially richer than any brioche I've had (a typical batch made with 7 cups of flour also contains 22 yolks and butter), but the presence of grated Edam cheese nicely balances the richness of the bread and the butter-sugar glaze that comes with it.

Where I differed was how I treated the dough after the bulk fermentation.  At this point, I divided the dough into 10 boules, then let rest for 10 minutes.  The rested boules were then deflated and rolled into thin, almost transparent rectangles.  About 2 tbsp. of grated aged Edam cheese were sprinkled on the dough;  the dough was then rolled into skinny logs.  The logs were wound into the characteristic brioche shape, sprinkled with more cheese on top, then allowed to double in volume (about 45 minutes).  The rolls got an application of Vanilla glaze before baking in a 350F oven for 40 minutes.  Once cooled, the brioche received the final treatment- a light frosting of room temperature butter and sugar.  So here it is.

ensaimada

And the crumb shot.

ensaimada crumb shot

The bread isn't as sweet and rich as I remember it, but it's a perfect treat for the calorie and cholesterol-conscious.  Me- I throw all caution to the wind, so next time, I'll try being truer to tradition.  Maybe when they have eggs on sale at Jungle Jim's.

Yippee's picture
Yippee

Thanks to both Mr. DiMuzio and bblearner's input, I made my first pain de mie successfully.   This loaf was made with 20% pre-ferment maintained at 50% hydration. To add a bit of Japanese touch to the loaf,  3% flour and 17% water was used to make water roux starter. Honey was used in place of sugar.  The rest were milk, milk powder, butter and etc., pretty typical ingredients.

As Mr. DiMuzio mentioned, this sourdough sandwich loaf is more compact than the yeasted version loaves and has more substance (bigger dough size) and is slightly chewier in texture.    It is a nice loaf of milky savory bread with a very subtle hint of tang. 

My kids were fascinated with the square shape and called it the loaf with no 'butt' (as compared to the dome-shaped loaves I made before).  They've enjoyed it without butter and have already requested another loaf.

The kneading was done completely by my Zojirushi and no folds by hand.  I adopted Mr. DiMuzio's procedures to utilize the fridge to both bulk ferment and proof.  The loaf was done with minimal dough-sitting, which was my ultimate goal.   I'd also applied the same procedures in my nut-and-fruit bread and it turned out great as well.  Thank you again, Mr. DiMuzio.

http://www.flickr.com/photos/33569048@N05/sets/72157622439989640/

hansjoakim's picture
hansjoakim

Here are some of the breads baked over the last couple of weeks:

First is a pain au levain with whole-wheat (p. 160 in "Bread"):

Pain au Levain

The original formula is great and it's a very nice dough for practicing folding, shaping and different slashes. It's a pleasure to see the cuts open up and bloom during oven spring, and the subtle flavour works well with just about anything. One of my all-time favourite loaves that I keep making often!

Below is a photo of a levain stuffed with dark raisins:

Raisin levain

The loaf is based on the formula for "Golden Raisin Bread" in Hamelman's book (p. 172), but I made this without commercial yeast, and with 25% prefermented flour from the levain instead. I found a 2hr. bulk ferment and an overnight retardation to work well, and I soaked the raisins in water prior to mixing, so they should not rob moisture from the dough. I like the addition of rolled oats in the formula, which works great with the raisins.

Finally, yesterday I made a flax seed rye with an old bread soaker (click here for Hamelman's recipe). It's a 40% whole-rye loaf, with a healthy dose of flax seeds. I omitted the commercial yeast here as well, and instead lengthened the final proof to 1 hr 45 mins. I would also like to add that my sourdough was fully ripe after approx. 12 hrs, so I did not let it go the full 16 hrs as suggested in the formula. I also had to add some water to get the desired degree of stickiness - I'm guessing an 82 - 83% overall hydration is right for my flour. After final shaping, the loaf was rolled in a mix of sesame, flax and caraway seeds, and placed with the seam side down (i.e. seed side up) in a brotform. Below is a photo of just after final shape (left) and just prior to baking (right):

Flaxseed rye proof

Here's the loaf just after pulling it from the oven - once again baked with the seam side up (seeded side down):

Flaxseed rye

... and here's the crumb:

Flaxseed rye

I think it's a very nice formula that produces a loaf with a deep flavour and a slight sour tang. It keeps for days due to the high hydration, and is a solid every-day sort of bread. Recommended!

Finally, two fruit desserts this week: A galette (using cream cheese pie dough) with nectarines and blueberries:

Galette

... and a charlotte with raspberry bavarian cream (and the remaining blueberries):

Charlotte


mcs's picture
mcs

For those of you who may have missed one or two of the recent postings of the intern bakers who have visited us at the Back Home Bakery this year, I thought I'd use this as a reference page for all of them.  Click on the links to visit the pages specifically about them.  Enjoy.

The cast in order of appearance:

Thomas (tssaweber):  Having grown up in Switzerland, Thomas had the taste of fantastic bread from an early age.  When he moved to the US ten years ago, he began baking his own bread and during the past 5 years he has spent much time experimenting with sourdoughs and native Swiss breads too.  This is the page of his internship.

Diane:  Diane's been cooking and baking bread for many years also.   In her spare time, she's also a cheese maker and dairy farmer.  Here's her internship page.

Paul (PMcCool):   Paul's enjoyed baking breads for over 30 years.  He's also a regular contributor here on TFL and he frequently blogs about his baking adventures.  This is his blog about his visit.

Callie (calliekoch):  Callie has spent most of her life cooking at home and has been baking bread for the last few years.  About a year ago she began to enjoy baking sourdoughs with her own starter.  Here's a bit about her internship.

Greg (gcook17):  Greg's well versed in both pastries and breads.  Although not a professional baker, he's taken several courses at SFBI and has been baking artisnal breads for many years.  This is the page about his stay.

Pat (proth5):  Pat's a great bread baker with the mind of a pastry chef.  Not only has she baked bread since she was a little child, she's also studied under some of the top bread bakers around the country.  This is her blog about her stay.

Brendan (smithbr11)  Brendan is relatively new to bread baking, but is improving quickly.  With his kinesthetic learning style and detail oriented mind, he'll be an expert in no time.  This is my blog entry about his internship.


Thanks so much to all of you interns for all of your help and time.  I hope you went home with some improvement in your skills and maybe a little more baking knowledge too.  Take it easy.

-Mark

http://TheBackHomeBakery.com

Yippee's picture
Yippee

This bread was made with 40% levain and is a variation of Mr. DiMuzio's double raisin walnut bread. I used a 3-build firm starter of 50% hydration and adjusted the formula to Mr. DiMuzio's percentages.  The 75% nuts and passion fruits medley have made this bread very colorful and attractive.  It is a bit chewy and has a medium-mild sourdough taste.

I utilized my Zojirushi to knead the dough for ten minutes and gave it a few folds afterwards before bulk fermenting it in the fridge overnight.  Before shaping, nuts and fruits were folded in.  Shaped dough was proofed in fridge overnight. Steamed and baked at 460F for 40 minutes. 

 http://www.flickr.com/photos/33569048@N05/sets/72157622439976366/

Green Tea's picture
Green Tea


Well.  It has been numerous weeks since my last entry and I have discovered I just don't have the dedication it takes to keep a bread blog.

So... I mean to do a post on these sooner or later.


Mm... I think I may do a post on these also. (Well eventually.  :D)


I became very enthusiastic with my scoring.... (ah, thank you, Russ for your advice on my blog post before...)


And this was my first sourdough bread from the new member of our family, Loxley (a.k.a. the Loch Ness Monster of the Fridge)  I absolutely love sourdough... I find the oven rise is always so much more!  So far my favourite game into the kitchen is to take out 3/4 cup of sourdough starter and 3 cups of flour, then improvise the rest.


Here's another sourdough which i made with spices, buttermilk, fresh orange juice, raisins, dried cranberries and mostly whole wheat flour.


This is the dough for the blueberry buttermilk bread, without the blueberries yet added in.  The specks are lemon thyme.


And here it is cooked...


This isn't much of what bread I've been baking, but it's a tad bit.  Unfortunately i don't have the dedication to take a picture of every bread either!!


Update: Thank you to Kuret. I'll have to work on that so until then I just got rid of the pictures! :)

Pages

Subscribe to RSS - blogs