The Fresh Loaf

A Community of Amateur Bakers and Artisan Bread Enthusiasts.

Blogs

emilyaziegler's picture
emilyaziegler

The original post can be found on my blog: http://www.foodbuzz.com/recipes/1765649-homemade-baguettes-and-rolls-

Tuesday, January 12, 2010
Homemade Baguettes and Rolls!!!
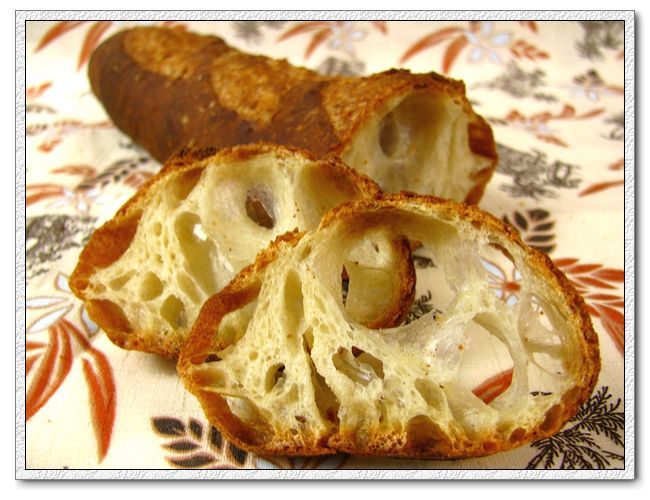
This was my first attempt at making homemade bread and I was absolutely TICKLED with the results. This dough was so easy to manipulate and tasted so good after it was finished baking. I recommend this to anyone and everyone. It is so simple. I know that working with yeast can be intimidating, but I promise you it's not. I am a complete novice in this realm of baking. Trust me. Use the boule dough recipe I have recently posted to make baguettes, rolls, or any shaped bread your heart desires! I promise you will not be disappointed. I couldn't keep enough of this bread on the table. It was eaten up so quickly! It remains soft for quite some time, unlike what is purchased in a store. DO IT. DO IT NOW. MAKE THIS BREAD. :o)


Homemade Baguettes
Courtesy: Artisan Bread in Five Minutes a Day

1. Use a grapefruit sized amount of Boule Dough.

2. Here are the instructions, verbatim, from the cookbook: "The gluten cloak: don't knead, just "cloak" and shape a loaf in 30 to 60 seconds. First, prepare a pizza peel by sprinkling it liberally with cornmeal (or whatever your recipe calls for) to prevent your loaf from sticking to it when you slide it into the oven. Sprinkle the surface of your refrigerated dough with flour.

3. "Pull up and cut off a 1-pound (grapefruit-size) piece of dough, using a serrated knife. Hold the mass of dough in your hands and add a little more flour as needed so it won't stick to your hands.

4. "Gently stretch the surface of the dough around to the bottom on all four sides, rotating the ball a quarter-turn as you go. Most of the dusting flour will fall off; it's not intended to be incorporated into the dough. The bottom of the loaf may appear to be a collection of bunched ends, but it will flatten out and adhere during resting and baking. The correctly shaped final product will be smooth and cohesive. The entire process should take no more than 30 to 60 seconds."


[SIDENOTE: Okay, so I didn't have a pizza peel (it is on my list of things to get by the time I'm married), but you can make it work- either transfer the dough VERY CAREFULLY onto your baking stone by hand or slide it on by using a cornmeal covered cookie sheet.]

5. Work the dough so that it is cylinder shaped, approximately two inches in diameter. Make sure your work space is well floured. Once the dough is the correct shape and size, allow it to sit for 25 minutes. At this time, preheat your oven to 450 degrees F.

6. Place a baking stone and empty broiler tray into the oven AS IT IS PREHEATING. Put the baking stone in the middle of the oven, and place the broiler pan below it, on another rack.

7. Once the dough is finished 'sitting,' use a pastry brush and brush water onto the top of it, so that you can cut diagonal slits on the top of the dough using a serrated knife (I found this a touch difficult to do, but try your best).

8. Once the oven is ready to go, CAREFULLY put the dough onto the baking stone. Right after you put the dough onto the baking stone, put a cup of warm water into the broiler tray so that it steams. Quickly shut the door so that the steam stays inside of the oven.

9. Bake the bread for 25 minutes, or until it is golden brown and firm to the touch. Once it is finished baking, place it on a rack to cool. Once it is cool, it is ready to slice and enjoy!


Homemade Rolls!
Also courtesy: Artisan Bread in Five Minutes a Day


The next day, I had enough dough left over to make individual rolls for lunch! There are minor differences to the recipe above.

The dough only needs to be shaped in a ball. It must sit on a cornmealed surface again (either a pizza peel or cookie sheet) for 30 minutes. Place whole wheat flour on top of the dough as it sits. Use the serrated knife again to make the slits (the difference with the baguettes in this section of the recipe is that traditional baguettes do not have flour on top of the bread, so water is used instead). Preheat the oven to 450 degrees again with the baking stone and broiler tray in the same places as noted for the baguette recipe above. Bake for 30 minutes, or until golden brown and firm to the touch.


Enjoy!! It is truly delicious!!!!


jennyloh's picture
jennyloh

My attempt of french dimpled rolls last night , I would say turn out ok.  But I felt that I had to proof longer,  this is one thing I can't seem to get it right. The dough is a little dense, or is the roll suppose to be like that??

I went into a bakery to buy their rolls just to compare,  there's lots more holes,  the rolls felt much lighter.  As for the taste,  it was a little more salty than what I normally like,  I'd probably reduce it.  

For more details,  see attached.  

http://sites.google.com/site/jlohcook/home/breadmaking/french-dimpled-rolls

French Dimpled Rolls


French Dimpled Rolls - Baked

utahcpalady's picture
utahcpalady

Now, before finding TFL I thought I knew a lot about bread baking, not so when you consider artisan style breads and sourdough starter.  I am a food storage fanatic, have 4 children and haven't bought bread for probably5-6 years.  Other than the occasional loaf during tax season (I am a cpa).  So, this is the recipe that I use.  I buy my white wheat from Montana Milling (high protien content) and grind it in my ultramill wheat grinder.  Now, I am sure you could just buy wheat flour at the store, provided it has a good high protien content.  Even though I feel I buy the best white wheat out there, I still add VWG.

Here is my recipe. This was before I knew about weighing my ingredients.

2 cups warm water (110-120deg)

2 T sugar

1 T active dry yeast 

dissolve together,

then add

1 T salt, dissolve. 

Then add 3 1/2 cups wheat flour and

1/2 cup gluten,

mix all together (I use my kitchen aid for this), let rise for 45 minutes

Then mix together (I use a 2 cup pyrex)

2/3 cup warm water,

1/2 cup brown sugar,

3-4 T safflower oil (you can use other types of oil, but this has a nutty taste that i like). 

Take oil mixture and add to the yeast/flour mixture, slowly in the kitchen aid (it has a tendency to slosh out if you do it fast),

then mix in 1 egg. 

Add 3 1/2 cups of wheat flour, let knead in KitchenAid until a nice dough ball forms.  Let rise 45 minutes. 

Punch down and divide into 3 loaves, put in greased loaf pans (I use stoneware pans from PampChef) and let rise for 90 minutes or so.  Bake for 27 minutes at 350 degrees. 

It is a perfect sandwich loaf. Even for peanut butter.

I am trying to adapt this recipe to my starter, haven't been entirely successful yet, as I need to propagate my starter to whole wheat, whereas I currently have a rye and a white starter going.

Stephanie Brim's picture
Stephanie Brim

I actually put this together, meaning to for a while, after dmsnyder mentioned Suas's whole wheat. This is my first try at a truly 100% whole wheat bread and both Adam, my husband, and I think it's a keeper, but with one change: it needs more honey.

Soaker

  • 200g whole wheat flour
  • 115g white whole wheat flour
  • 35g gluten flour
  • 260g milk

Biga

  • 200g whole wheat flour
  • 150g water
  • 5g instant yeast

Final Dough

  • all of the soaker
  • all of the biga
  • 50g butter
  • 55g honey (we think that 80g would have been better)
  • 12g salt
  • 25g milk

Method:

Put soaker ingredients together in a bowl and thoroughly combine. Set aside. Put biga ingredients together in a bowl and thoroughly combine. Place plastic wrap over both bowls and let alone for an hour or so. Mine went for a little over since I was feeding Alexander at the time.

To mix the final dough, break both the soaker and biga up into small pieces and place into the bowl of a stand mixer. Add all other ingredients and mix on low until everything is incorporated into the dough, then medium-low for 3-4 minutes until the dough no longer sticks to the sides of the bowl. Place in a bowl for bulk ferment.

During bulk ferment I did 2 letter stretch and folds. I don't really think I needed to as the dough seemed to be very elastic, but I wanted to be sure. Allow to double after the second stretch and fold if you decide to do it. Overall, the dough got a 2 hour ferment.

Cut into two pieces and shape into loaves. This worked for 1 loaf sandwich bread and about 4 rolls. Baked at 350 degrees for about 30 minutes, then went down to 325 for 10 minutes. I took the rolls out before turning the temperature down.

This is soft, light, and perfect for sandwiches. Both my husband and I like the fact that it isn't too heavy, yet it's 100% whole wheat. Considering the fact that none of my projects have been going completely right lately, this success (and one other that I'll mention on my other blog once I've figured it out *without* it being a slight accident) makes me feel good again.

Now I think I can tackle David's San Joaquin Sourdough. ;)

kathunter's picture
kathunter

I'm very new at this artisan bread making but I'm very determined to do it right.

I've been trying to make a seed culture using the recipe in Peter Reinhart's ARTISAN BREADS EVERY DAY.  For the first batch I used all rye flour and pineapple juice.  It bubbled, barely, at one stage, but never quite bubbled like the recipe said it should and it never double in size.  I did go ahead to the second stage - Mother Starter.  But it was incredibly sticky and smelled nasty.  It was like sticky putty that did not thing with water. I went ahead and put it in the refrigerator as instructed.  It's still there, 4 days later. I'm not sure if it's OK to use.

I started a second seed culter same as above.  It looked like it would progress nicely until I got to phase 3.  Again, it's not increasing in size and the only bubbles are on the bottom that I can see through the glass bowl.  I put it in the oven with no heat but out of cold drafts. Well, my husband accidentally turned the oven on for dinner prep, and well, I think I cooked the starter before turning it into bread.  Should I discard that? 

I just started a third seed culture using white bread flour and water as instructed by Peter Reinhart's above mentioned book.  Any tips to make sure this one progresses as it should?

Should I discard the first two?

Thanks!

Kathleen

droidman's picture
droidman

Barm
150 g Bob's Red Mill light rye
150 g water
75 g white starter @ 75% hydration

Dough
305 g barm
610 g water
915 g flour
22 g salt
3 g caraway seeds

Barm allowed to rise 5 hours. It was wetter than take 1, but I decided to just go with it and see what happened.

Dough very soft and sticky. Miserable to work with, but I persisted. Kneaded for 10 minutes or so.

Initial fermentation in greased bowl for 5 hours.

Proofed in two bannetons for somewhere between 2 and 3 hours (I know, I know: I should keep notes).

Baked in 500 degree oven (my oven sucks, so it's more like 425-450) with steam pan on stone for 30 minutes.

The resulting bread had a lot of holes in it, like a Ciabatta. Next time around, I think I'll up the flour a little bit to compensate for the wetness of the light rye barm. Or maybe just up the amount of rye flour in the barm.

Flavorwise, this is much better than take 1. The caraway impact is much lighter, which allows the sourdough to shine through.

Light Rye Sourdough Take 2

Now, if I could just figure out how to take crumb shots that don't look like the bread is all wet...

Doc Tracy's picture
Doc Tracy

Please let me know if you don't get your spreadsheet as requested. I sent out all requests and one was returned undeliverable. I'm not sure who's it was as I deleted messages while I was sending. Sounds like those who have tried it so far say it's working properly.

I would post the attachment here but I have no idea how to do that.

Tracy

The Roadside Pie King's picture
The Roadside Pi...

I don't want to hijack Kathleen's thread any further so I will Blog about my first attempt at at sourdough starter.

It's day four about 4hours before I was scheduled to discard all but 1/4 cup and start feeding 1/4 cup water & 1/4 cup A.P. flour. Two TFL members who's advice I respect felt that the starter had already peaked so I fed Slow Moe early. On a whim I used the discard in a formula for white bread I have been making regularly. We will see how it turns out. Here is Slow Moe two hours after his first white flour feeding He is growing nicely! I will give him a stir before bed and feed him tomorrow.

 I checked on slow Moe at around 7:00P.M. Last night To my surprise the bubbles were gone and he went completely flat. Oh my! I gave him a stir he smelled pretty much the same. Not a bad smell at all but hard for me to describe. I gave him another stir at 10:00P.M. At 8:00A.M. this morning There was no change, smell was not unpleasant. No activity at all the mixture looked very thin. I decided to go on my gut and feed slow Moe again. Happy right after his second white four & water feeding Slow Moe was bubbling once again. I was so perplexed that slow Moe was inactive I did not take any photos. Here he is at 10:20A.M. today. That's my boy!

DAY 5

DAY 5 TOP

Here is aside by side crumb shot of the bead I made using the discard from Slow Moe before his first white flour feeding, and whats left of a bread I made Sunday. I used the exact same procedure on both. Except I used only 1/2 teaspoon of yeast on the slow Moe bread. After setting aside 1/4 cup of slow Moe I weighed the rest at 64grams. I assumed a 100% hydration so I add 32g less water and 32grams less flour in the finale dough. You can see that the Slow Moe bread has a more open crumb. Nice! I would not expect a very open crumb this being a very low hydration dough. I can not say for sure if it was Slow Moe that made the difference, But I can not say it was not.

 New entry 4:00PM 01-20-10

I was busy most of the afternoon today, work sometimes gets in the way of my hobbies. Slow Moe looks like he needs a feeding. Very liquidity and not as many bubbles. discard all but a 1/4 cup and fed a 1/4 cup flour and a 1/4 cup spring water. At the next feeding in 8hours I am going to use grams instead of volume. I am going to a three times a day feeding. Seems to me Moe is going though his meals quite fast!

 Here's a photo before his 4P.M. feeding.


New Entry 01-21-10 Day six

Last night at 11:00 P.M. It looked to me like slow Moe had peaked again, and began to reseed. Remember This is my first try at this so I have no idea how it should smell or look like I am going on my gut. Moe had a nice smell but I could not put my finger on it. So I asked my wife to take a whiff. It took a min. to convince her then she did. She said right away it smelt like beer. This made me very happy. OK so now I took about 58 grams of Mow mixed with 58grams of water and 58 grams of flour. Mini help! right after I mixed it up it lost that nice smell. It just had a faint smell of flour. I checked in on Slow Moe before I went to bed some small bubbles he had  no smell. Boo Hoo. So now Moe is a lot thicker I was using 120% Hydration without knowing it. ( Thanks Mini) I think I may have slowed the process down with my enthusiasm. Its been 12 hours now and there are bubbles but not near as much as yesterday and still no nice aroma. I am going to stir him once or twice till tonight then feed him in another 12hours.

Here's what he looks like today

Doc Tracy's picture
Doc Tracy

My wonderful engineering husband was watching me do calculations by hand yesterday. He does everything on the computer.  Anyway, he was kind enough to write a small program on an excel spreadsheet that does my calculations for me. I can share it with anyone that would like, if you'd like to send me a message for a request. It's so simple! You can input the total amount of either dough or flour that you want and the percent of the different ingredients, the calculator will fill in the number of grams for each ingredient for you.

Say you have the baker's percentage for something out of Hamelman's Bread, which gives you the percentage and for some crazy reason has the metric for "36" loaves, US measurements and  volumes for the home baker and still gives me the amount for "3" loaves which is too much. I want to bake only one loaf. So,  I fill in the amount of dough, say for sake of this exercise 1,000 grams. Fill in the percentages of each ingredient and I know exactly how much I need, in grams to use. It is so slick!

No more conversion charts for me!

breadbakingbassplayer's picture
breadbakingbass...

If your starter is over fermented... Don't mix the final dough with it...  This happened to me again this morning...  I proceeded to mix the final dough with the overfermented starter...  The dough never came together and remained a sticky mess...  Yuk!


I should have just tossed out the starter and started over and not wasted 2kg more of flour...

Pages

Subscribe to RSS - blogs