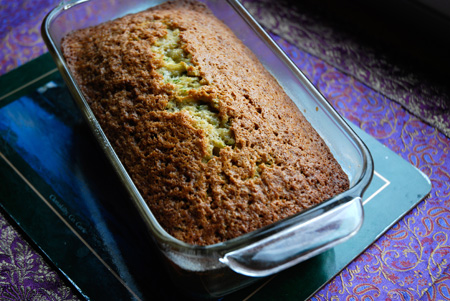
The Fresh Loaf

A Community of Amateur Bakers and Artisan Bread Enthusiasts.

Blogs

Yippee's picture
Yippee

Decades ago, my elementary school teacher Miss Yeung wrote down 'Simplicity is Beauty' in my graduation autograph book.  Even though I knew every word in this phrase, it was too complicated for a 6th grader who was then indulging in Hello Kitty and Melody dolls to fully appreciate the profound meanings behind it and I haven't given it much thought since. Today, the same phrase just dawned on me when I completed Mini Oven's 100% rye. Isn't this bread a true reflection of the message my teacher was trying to convey years ago?  It's a simple loaf made with Mini's magic ratio. The moist, airy, glossy, and flavorful crumb is the beauty I've witnessed and experienced. 'Yummy' would be an understatement to describe her bread. In order to appreciate the combination of the complexity of flavors and the spongy-yet-substantive texture, you've got to try it yourself!

Last time, I was uncertain what my relationship with rye would be when I made the 90% rye loaf.  Remember, we're Asians and we did not grow up with and are not even familiar with rye breads.  In fact, my kids had refused to eat rye bread again after trying a terrible sourdough rye loaf from a famous local boulangerie. Hear this:  "We have a personal grudge against rye bread!!! We won't eat it again!!!" That's how bad it was but that has changed. This time, these 100% rye loaves have received accolades from my entire family and we're in love with them!  I sincerely thank Mini Oven for her time and generosity in sharing 'trade secrets' unconditionally and it has made my first 100% rye experience very successful and enjoyable.

The details of procedures are discussed in Mini's blog.  I doubled her formula and adapted to a 3-bulid, 50% hydration firm starter. A summary of my formula is as follows:


The specifications of the flour I used are as follows:

Approximately, slightly more than half of the dough I prepared went into an 8x4x4 Pullman pan, which was filled to about 1" below the rim. Next time this amount should be reduced to make a perfect Pullman loaf.  The remaining dough went into a greased Pyrex bowl.  Fermentation took place at 80F for 8 hours.  


I removed my baking stone and replaced it with a sheet pan prior to baking.  These loaves were covered and went in the oven when it was cold. They remained covered until 15 minutes after the oven had reached 410F. Then the probe of a thermometer was inserted in one of the loaves and baking continued until internal temperature registered 205F. 


This time I didn't forget about my rye breads in the oven.  They were sliced 36 hours later.


Here are some pictures:

http://www.flickr.com/photos/41705172@N04/sets/72157623703922158/show/


ehanner's picture
ehanner

Intrigued by the beautiful Baguette's that Sam Fromartz has been baking, I continue to plod along, improving my skills at baking this simple(?) bread. The original post on his blog can be found here.

I'm actually trying to see if I can taste and see an improvement in the bread when using some original French T55 flour sent to me by a very kind friend a while back. This is Organic T55 from Biocoop and reported to be very good flour. My new go to AP flour is from Dakota Maid. I like the colors I get and the flavors of the grain. After the side by side with the T55, I'm wondering about the amount of malted barley they add. The crust seems to color much more quickly. I used the same formula and method for both flours to arrive at these results. Both breads were flavorful and exhibited good qualities. Not the same but both very good.

Eric


T55 Baguette has a nice lighter golden color. The flavor didn't suffer in comparison to the DM flour which was much darker from the same bake time.

Crust detail on the T55. You can see the more golden color, even through the heavy handed additional flour I dusted over the dough prior to baking.

This is the Dakota Maid crumb. Very translucent and a nice crisp crust.

mountaineer cookie company's picture
mountaineer coo...


Alright as promised, here is the instructions for my Bagels.  I don't do the whole percentage thing, I am a by feel baker, so my flour measurements aren't set in stone.  First thing ya want to do is preheat your oven to 450 degrees.


1 1/2 cups water

1 1/2 tsp. sea salt

2 tsp. reg. instant yeast (not quick rise)

1 1/2 tsp. sugar

1 1/2 tsp. Barley malt syrup 

1 T. canola oil


Wisk above ingredients together till yeast is desolved  


Then kneed in 4 cups high gluten flour (I use king Arthur Sir Lancelot flour)  Use more or less, dough must be stiff.  I kneed dough in my Kitchen aid only till it comes together, then transfer it to the table where I kneed for about a minute then cover with plastic wrap for ten mins and kneed again, here is a before and after picture of my kneeding methods.  I kneed almost all my doughs this way, much easier on the wrist.

Before

After

Next shape into 4 and a 1/4 oz balls, it should make 8.  Then insert a small rolling pin or your finger and make a whole in the center and stretch into bagel like shape. see pictures.

Spray parparchment lined pan with pam.  Let sit for around 20 mins.  Meanwhile get your water ready

12 cups Water in a covered electric  skillet.

Large blob of malt syrup, sorry I don't measure this stuff, it's too sticky :)  Here is a picture of what I call a blob.

After bagels have proofed for 20 mins boil for 1 min. each side (do not start timing until water returns to a boil)  I do 6 at a time because I make about 4 times this size of recipe, but you could boil 4 at a time.  

Drain and add toppings at this point, try to work quickly in order to gain back shrinkage after boiling.  Place bagels on the same parchment lined pan the proofed on.  I suppose at this point you could bake them on a stone, I don't.  Bake them in a 450 degree oven for around 15 mins, more or less depending on how you like your crust.  Here is a picture of the finished product.

seseme

Asiago cheese (My Favorite)

I'm sure you can figure out the rest,  Happy Baking!!


ilan's picture
ilan

Hi 

Baguette is one of my favorite breads. For long sandwiches, with a full meal or just eat fresh with butter. One of the things I like about the Baguettes that I buy from the market is the very crisp crust and a very soft interior. It cannot be eaten without making a mess. But in this case, I really don’t care.

So, in the past, I made long roles using the same dough I used for bread: 3 cups of flour, 1.5 cups of liquid (2/3 parts milk), 1.5-2 teaspoons of yeasts, 1 teaspoon of salt 1 teaspoon of sugar, mix, kneed, rise, shape and bake. It was very good as roles, but the crust was different – softer. This is not a Baguette... but it took it as a a base for my experiments (a mistake, but i learned a lot back then)

I converted all the milk from the recipe to water and tried again. The crust was harder but I could not get the desired crunch.

Next I added steam in the first 10 minutes. Got a good progress with the crunch but something was missing.

Added more water - got a very soft interior with bigger holes. Still not what I looked for. 

So, I did some reading and came up to French dough recipe. Of course, how it eluded me… French bread is done with French dough, duh.

There I came across the preferment for the first time. The recipe I found included total of 3 1/4 cups of flour and 1 1/2 cups of water (now it looks too dry) and of course, no sugar.

It goes like this:

Preferment (15 hours in advance)

-       1 cups flour

-       2/3 cups of water

-       1/3 teaspoon yeast

The Dough:

-       2 1/4 cups flour

-       1 3/4 teaspoon yeast

-       3/4 cup of water

-       1 ¾ teaspoon of salt


After mixing the preferment with the rest of the ingredients and receiving a unified mass, i let it rest for 20 minutes, then kneaded it for about 10 minutes more. I let it rise for another 90 minutes, shaped it and let it rise for another 70 minutes before baking

I placed a pot of boiling water in the oven and let it continue to boil there before I entered the Baguettes inside and removed it 10 minutes after.

I admit, I didn’t fold the dough, it was not sticky so I skipped it. The dough itself was more slick then I was used to and stickier even though the amount of water was lower. 

Here are the results:


It was excellent, and all 3 got eaten the very day with help of my wife's sister and her boyfriend which is good sign for a baker/cook that he is doing something right.

After reading the tips for better French bread, I think I will try another batch (or 10) of these. I love the tenth tip - Practice!, and what comes after :)


Until the next post

Ilan

AnnieT's picture
AnnieT

Twice a week I spend time with children from my grandaughter's third grade class, listening to them read. Their teacher is a friend and loves to get a loaf now and again, and she asked if I would take some bread for the children and tell them about sourdough. Always eager to spread the word I decided to use some of my "discard" bread. I made a huge batch in my trusty Bosch and baked up three pan loaves for the neighbors and two large braids for the class. I brushed the tops with eggwhite and water and sprinkled on  raw sugar. The dough included about a quart of discard, oats, dried milk, potato flakes, sugar and lots of raisins, and I did spike it with about 1T instant yeast. Teacher's loaf was my usual sourdough boule which I baked this morning. I also took a small amount of starter and fed it before I left the house so that we could check on its growth. I gave my little spiel and asked the children for name suggestions for teacher's new pet, the starter, and they came up with some creative ones. Then it was time to eat, and apart from some of them them taking me seriously when I said the raisins were dead flies they loved it. Only a couple of the girls said their grandmothers make bread and most of them seemed amazed that I had actually made these loaves. Next time I'm planning to make the chocolate faces, A.

thespencers06's picture
thespencers06

thespencers06's picture
thespencers06

So I can't give you a recipe becuase this was kinda fly by the seat of my pants. I let my hands tell me when the dough was right and I didn't measure or weigh anything. It was kind of an accident. I made some whole wheat sourdough starter build for some whole hweat sourdough bread and left it fermenting in the fridge too long. So I decided to bust out the yeast and make a loaf of whole wheat yeast bread instead. My husnand really liked this whole grain honey wheat his mom had the other day so I went for an oatmeal honey wheat. Came out beautifully. Should make great breakfast bread and it's got a magnificant honey flavor with just a hint of cinnamon in there(which is barely distinguishable-I think I only taste it because I know it's in there)very happy with my loaf. trying to upload pics....not working out but will keep trying

Sedlmaierin's picture
Sedlmaierin

As some might have seen from my plea for help yesterday, the baking of this Miche did not go according to plan. It being only my third attempt at Miche making I was a bit freaked-I had looked forward to this bread so much!

The bread gods above must have been looking upon my endeavor kindly,though, because I do think it turned out just great!

Here are the points in which I deviated from the orginial recipe from the book "Bread":

-I used mature rye starter as my jumping off point for the levain

-the flour I used was Whole Foods whole wheat , from which I removed the biggest bran particles by sifting

-I built the levain over the course of abt. 20 hours at two different temperatures-one feeding it at 7pm ,leaving it to ferment in my oven with cracked open door and then at 7am out on the counter top

-Due to unforeseen schedule upheaval I had to bulk ferment,shape and then retard in fridge for about 2.5 hours. I was amazed at how far along the dough was when I took it out of the fridge! Wow! I thought I would leave it at room temp for about 2 hours, but after half an hour I hurried to pre-heat the oven and feared it might end up being overproofed.It had good oven spring and I think I just barely made it timing wise.

-I left it in the turned off oven for about 10 minutes

I expected the dough to be a lot harder to manage than it was- I assume that the flour I used really soaked up a lot of water, because it was way easier to handle than the Gerard Rubaud miche(or maybe I am just getting used to it-I LOVE S&Fs)

This is also the first time I tried my hand at stenciling-definitely to be improved greatly! And since I had the shaped loaf in a bowl on a flour dusted towel, the stencil ended up not really sticking,etc. To be continued..........

The aroma of the baking bread was tantalizing and I was really glad it was so late when it came out of the oven, because that was the only reason I was able to refrain from cutting into it right then and there!

Needless to say we all have had some of it for breakfast and it is so delicious! I marvel at how the little flecks of bran are suspended in translucent sheaths of dough(an awkward description, I know)It has a really nice and crunchy crust, it feels light on the tongue but has real great depth of flavor and only a hint of sourness.Definitely a keeper to be made again and again!

Here are some pictures:


boule's picture
boule

I am about halfway with my earth oven being built from Kiko Denzer's book. I also have the Alan Scott book, but decided on an earth oven as the reuse of material appeals to me. Many friends are highly sceptical about building with clay.

It took quite a while to scrounge for the material as I wanted to buy as little as possible. The rocks for the foundation I found in the garden and then I filled it with building rubble from a nearby restaurant that burnt down (hope that does not predict disaster with the oven). The gravel I found on an open lot where someone dumped it. The wine bottles are all from our own consumption over quite a while :).

Carting rubble and live load

Every little bit of compaction helps

The hearth should be on a nice level once finished as the oven is being built on a terrace.

Chief designer

First insulation

The sawdust I had to buy in the end and it cost about $4. The bag it came in was almost as expensive.

I realised that the front part needed some work and then happened upon some nice flat rocks. The next photo shows an improvement where the tongue will be.

Heat retaining slab under hearth

I am now ready to bring the level up with a sawdust and clay mix around the slab. That will be followed with a thin layer of sand bedding for the fire bricks.

I finished the first layer all by myself and that was not a good idea. Some friends would have made it easier, but I was in a hurry and nobody was available on that sunny day. After two weeks of sitting underneath the sheet in pouring rain, I started a small fire. As you can see the clay was still quite moist. I wanted to see if the fire would burn before finishing with an insulation layer and the rest.

Finished first layer

The fire burnt very nicely and started to dry out the clay.

I let it burn for quite a while. The next day the oven looked dry, except for the bottom part where it was still moist. So I started another fire and made it nice and big. Oh, the horror: it cracked! I suppose that is what you get for being impatient.

The CRACK

The crack then spread over the dome. I am hoping that it is not too serious, since it does not seem to have cracked right through. That means I cannot see through the cracks.

I am planning to patch it up with some sloppy clay, but I would appreciate any tips here.

BTW, we cooked a chicken in the oven four hours after the fire died down. It went in for 2 1/2 hours and was beautifully soft. Because it was so late in the process, I had to brown the chicken in the electric oven.

Now it is August and the process took much longer than anticipated. At least I think it is finished and I cannot wait for it to dry out.

Arch

So I added a chimney and a brick arch. If I had to do it again, I am sure the arch would be better.

Cladding

Some time later a friend helped me to add the insulation layer of clay slip and wood shavings. Here it is almost finished.

Jubba the Hut

The past weekend I finished the oven. Guess who did not read the book again and forgot to chop the straw. Now I have a hairy oven. Unfortunately we are away this weekend, so I cannot try it out. Hopefully there is no rain the weekend after that, so I can fire it up proper and see what happens. Will post some pictures if it works out.

breadbakingbassplayer's picture
breadbakingbass...

Hey All,

Just wanted to share with my my bake from last night.  Pain au Sarrasin, or Buckwheat Bread.  I think they turned out pretty nice.  I'll use slightly less salt next time, but I'm pretty happy with the result.  Enjoy!

Tim

Ingredients:

600g - AP

250g - BF

100g - Organic Buckwheat Groats (freshly milled)

50g - Organic Rye Berries (freshly milled)

150g - Stiff Sourdough Starter (60% hydration from fridge)

630g - Water

22g - Kosher Salt (will use 20g (2%) next time for 1000g of total flour)

1/2 tsp - Active Dry Yeast

1804g - Total Dough Yield

Instructions:
6:50pm - Measure out all ingredients, grind buckwheat and rye berries.

6:55pm - Mix all ingredients in large mixing bowl with wooden spoon.  When combined into rough dough, knead by hand and plastic scraper until combined.  Do not add any extra flour when kneading.  if sticking to hands, wet hands with some water.  Cover and let rest for 30 mins.

7:25pm - Knead 2 minutes by hand, rest, covered.

8:30pm - Turn dough, cover, let rest.

9:30pm - Divide into 4 equal pieces, preshape, cover and let rest.

9:45pm - Final shape into batards, place on couche seam side up, proof.  Place 2 baking stones in oven on 2 levels along with steam pan, preheat to 550F with convection.

10:45pm - Place 1/2 cup of water into steam pan.  Turn loaves out onto peel, slash, place in oven directly on stone.  When last loaf is in, place an additional cup of water into steam pan, close door, turn down to 460F no convection, bake for 15 minutes.  Rotate, turn down to 430F, bake for another 15 minutes.  Loaves are done when the internal temp reaches 210F.  Cool completely before cutting and eating.

 Submitted to Yeastspotting on 3/23/10.


Pages

Subscribe to RSS - blogs