The Fresh Loaf

A Community of Amateur Bakers and Artisan Bread Enthusiasts.

Blogs

thespencers06's picture
thespencers06

So I can't give you a recipe becuase this was kinda fly by the seat of my pants. I let my hands tell me when the dough was right and I didn't measure or weigh anything. It was kind of an accident. I made some whole wheat sourdough starter build for some whole hweat sourdough bread and left it fermenting in the fridge too long. So I decided to bust out the yeast and make a loaf of whole wheat yeast bread instead. My husnand really liked this whole grain honey wheat his mom had the other day so I went for an oatmeal honey wheat. Came out beautifully. Should make great breakfast bread and it's got a magnificant honey flavor with just a hint of cinnamon in there(which is barely distinguishable-I think I only taste it because I know it's in there)very happy with my loaf. trying to upload pics....not working out but will keep trying

Sedlmaierin's picture
Sedlmaierin

As some might have seen from my plea for help yesterday, the baking of this Miche did not go according to plan. It being only my third attempt at Miche making I was a bit freaked-I had looked forward to this bread so much!

The bread gods above must have been looking upon my endeavor kindly,though, because I do think it turned out just great!

Here are the points in which I deviated from the orginial recipe from the book "Bread":

-I used mature rye starter as my jumping off point for the levain

-the flour I used was Whole Foods whole wheat , from which I removed the biggest bran particles by sifting

-I built the levain over the course of abt. 20 hours at two different temperatures-one feeding it at 7pm ,leaving it to ferment in my oven with cracked open door and then at 7am out on the counter top

-Due to unforeseen schedule upheaval I had to bulk ferment,shape and then retard in fridge for about 2.5 hours. I was amazed at how far along the dough was when I took it out of the fridge! Wow! I thought I would leave it at room temp for about 2 hours, but after half an hour I hurried to pre-heat the oven and feared it might end up being overproofed.It had good oven spring and I think I just barely made it timing wise.

-I left it in the turned off oven for about 10 minutes

I expected the dough to be a lot harder to manage than it was- I assume that the flour I used really soaked up a lot of water, because it was way easier to handle than the Gerard Rubaud miche(or maybe I am just getting used to it-I LOVE S&Fs)

This is also the first time I tried my hand at stenciling-definitely to be improved greatly! And since I had the shaped loaf in a bowl on a flour dusted towel, the stencil ended up not really sticking,etc. To be continued..........

The aroma of the baking bread was tantalizing and I was really glad it was so late when it came out of the oven, because that was the only reason I was able to refrain from cutting into it right then and there!

Needless to say we all have had some of it for breakfast and it is so delicious! I marvel at how the little flecks of bran are suspended in translucent sheaths of dough(an awkward description, I know)It has a really nice and crunchy crust, it feels light on the tongue but has real great depth of flavor and only a hint of sourness.Definitely a keeper to be made again and again!

Here are some pictures:


boule's picture
boule

I am about halfway with my earth oven being built from Kiko Denzer's book. I also have the Alan Scott book, but decided on an earth oven as the reuse of material appeals to me. Many friends are highly sceptical about building with clay.

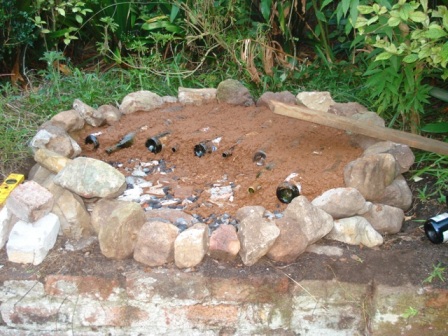
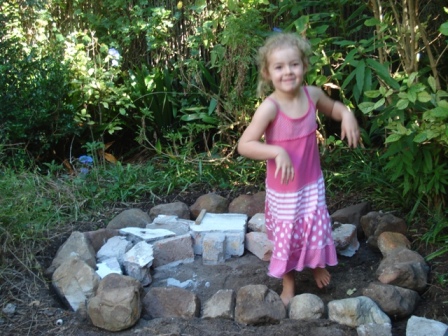
It took quite a while to scrounge for the material as I wanted to buy as little as possible. The rocks for the foundation I found in the garden and then I filled it with building rubble from a nearby restaurant that burnt down (hope that does not predict disaster with the oven). The gravel I found on an open lot where someone dumped it. The wine bottles are all from our own consumption over quite a while :).
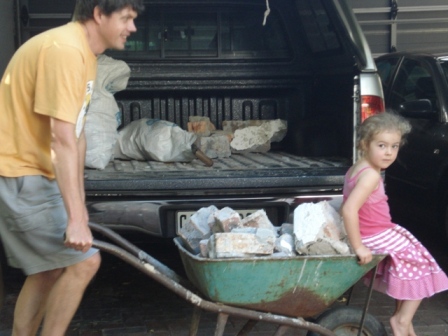
Carting rubble and live load

Every little bit of compaction helps

The hearth should be on a nice level once finished as the oven is being built on a terrace.
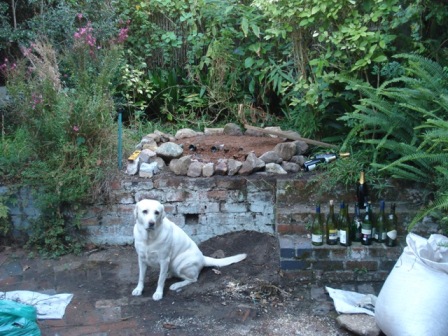
Chief designer

First insulation

The sawdust I had to buy in the end and it cost about $4. The bag it came in was almost as expensive.

I realised that the front part needed some work and then happened upon some nice flat rocks. The next photo shows an improvement where the tongue will be.
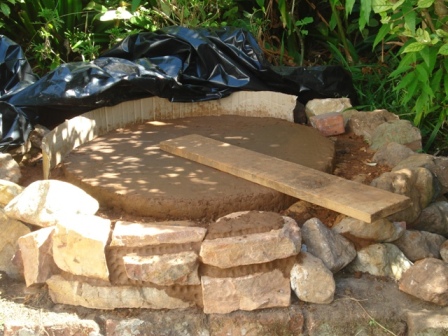
Heat retaining slab under hearth

I am now ready to bring the level up with a sawdust and clay mix around the slab. That will be followed with a thin layer of sand bedding for the fire bricks.

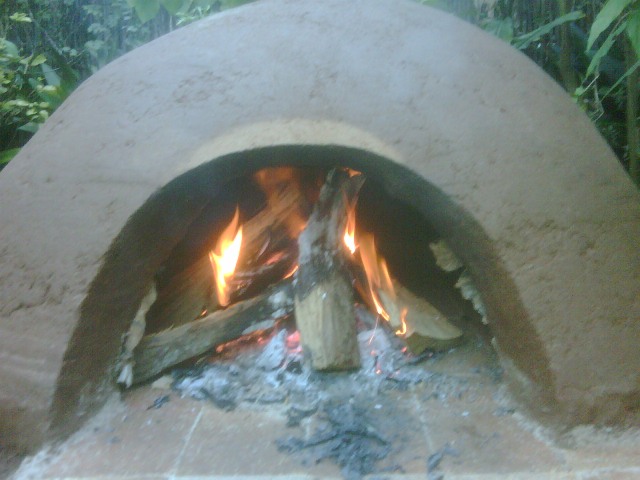
I finished the first layer all by myself and that was not a good idea. Some friends would have made it easier, but I was in a hurry and nobody was available on that sunny day. After two weeks of sitting underneath the sheet in pouring rain, I started a small fire. As you can see the clay was still quite moist. I wanted to see if the fire would burn before finishing with an insulation layer and the rest.
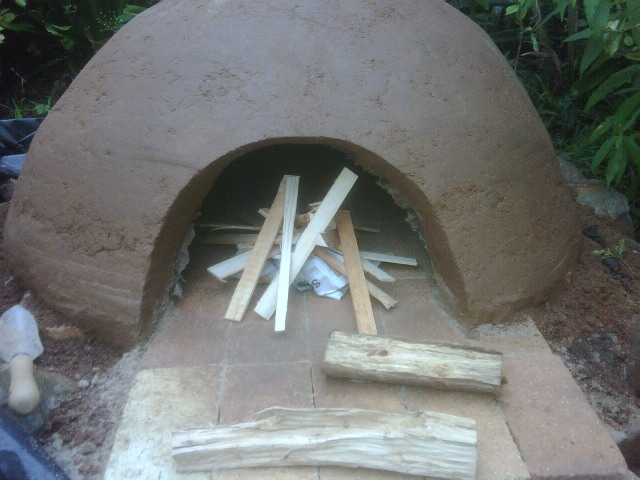
Finished first layer

The fire burnt very nicely and started to dry out the clay.

I let it burn for quite a while. The next day the oven looked dry, except for the bottom part where it was still moist. So I started another fire and made it nice and big. Oh, the horror: it cracked! I suppose that is what you get for being impatient.
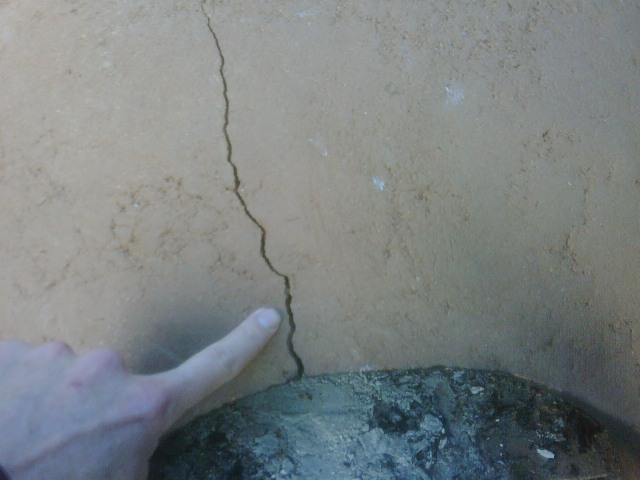
The CRACK

The crack then spread over the dome. I am hoping that it is not too serious, since it does not seem to have cracked right through. That means I cannot see through the cracks.

I am planning to patch it up with some sloppy clay, but I would appreciate any tips here.

BTW, we cooked a chicken in the oven four hours after the fire died down. It went in for 2 1/2 hours and was beautifully soft. Because it was so late in the process, I had to brown the chicken in the electric oven.

Now it is August and the process took much longer than anticipated. At least I think it is finished and I cannot wait for it to dry out.
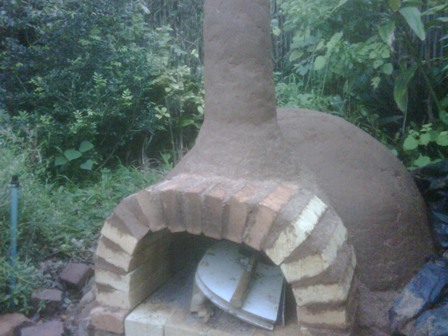
Arch

So I added a chimney and a brick arch. If I had to do it again, I am sure the arch would be better.
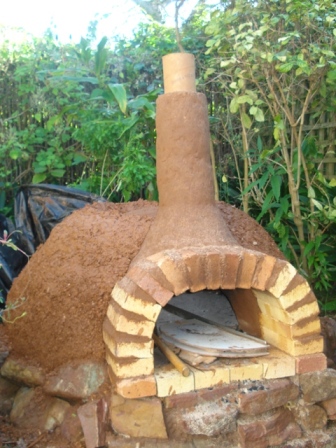
Cladding

Some time later a friend helped me to add the insulation layer of clay slip and wood shavings. Here it is almost finished.
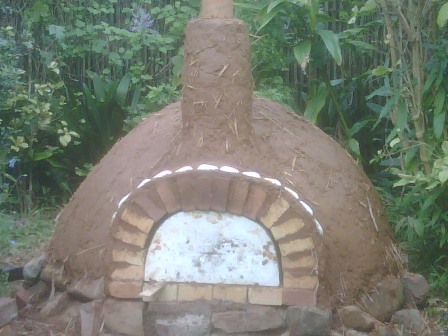
Jubba the Hut

The past weekend I finished the oven. Guess who did not read the book again and forgot to chop the straw. Now I have a hairy oven. Unfortunately we are away this weekend, so I cannot try it out. Hopefully there is no rain the weekend after that, so I can fire it up proper and see what happens. Will post some pictures if it works out.

breadbakingbassplayer's picture
breadbakingbass...

Hey All,

Just wanted to share with my my bake from last night.  Pain au Sarrasin, or Buckwheat Bread.  I think they turned out pretty nice.  I'll use slightly less salt next time, but I'm pretty happy with the result.  Enjoy!

Tim

Ingredients:

600g - AP

250g - BF

100g - Organic Buckwheat Groats (freshly milled)

50g - Organic Rye Berries (freshly milled)

150g - Stiff Sourdough Starter (60% hydration from fridge)

630g - Water

22g - Kosher Salt (will use 20g (2%) next time for 1000g of total flour)

1/2 tsp - Active Dry Yeast

1804g - Total Dough Yield

Instructions:
6:50pm - Measure out all ingredients, grind buckwheat and rye berries.

6:55pm - Mix all ingredients in large mixing bowl with wooden spoon.  When combined into rough dough, knead by hand and plastic scraper until combined.  Do not add any extra flour when kneading.  if sticking to hands, wet hands with some water.  Cover and let rest for 30 mins.

7:25pm - Knead 2 minutes by hand, rest, covered.

8:30pm - Turn dough, cover, let rest.

9:30pm - Divide into 4 equal pieces, preshape, cover and let rest.

9:45pm - Final shape into batards, place on couche seam side up, proof.  Place 2 baking stones in oven on 2 levels along with steam pan, preheat to 550F with convection.

10:45pm - Place 1/2 cup of water into steam pan.  Turn loaves out onto peel, slash, place in oven directly on stone.  When last loaf is in, place an additional cup of water into steam pan, close door, turn down to 460F no convection, bake for 15 minutes.  Rotate, turn down to 430F, bake for another 15 minutes.  Loaves are done when the internal temp reaches 210F.  Cool completely before cutting and eating.

 Submitted to Yeastspotting on 3/23/10.


Mebake's picture
Mebake

This is the first time I ever use Bread flour, i'll admit. Organic dover farm's Wtrong whole meal flour (Made of Red Hard Spring Wheat) With 12.6% Protein.


Ingredients:

SOAKER:

 - 560g Whole Meal Bread Flour

 - 420g Water

 - 18g fine Sea salt

BIGA / PREFERMENT:

 - 240g Strong White bread flour

 - 180g Water

 - 5g Instant dry yeast

Soaker was autolized for 24hrs, but i couldn't bake, so into the fridge it went for another 24 hrs.

Biga Was fermented in the fridge for 48 hours.

 Both where out 2 hours to dechill, cut into pieces, mixed, and kneaded (french kneading) until dough is silk smooth. Then fermented for 2 hours , with stretch and fold in the bowl each 1/2 hour (4 times). the dough was then preshaped, and then shaped into a boule and into a banetton for 45 minutes (should have been 1 hour at least, especially with only 5g yeast to start with).

Any way, i devised this covered baking yesterday. A pirex deep dish covered with an inverted stanless steel cookware. when the dough was ready i inverted the banetton and let the dough fall into the hot pirex with parchment, covered it , and into the oven for 30 min. Last 15 minutes where without cover to evenly brown.


Khalid


davidg618's picture
davidg618

I've made old-fashioned ginger beer, and root beer using champagne yeast, but I'd never heard of bacterially fermented soda. Does anyone on the TFL make it? If so, can you point me at your favorite websites, or recipes. I want to try this, especially when peaches from our northern neighbor, Georgia, ripen.

David G.

davidg618's picture
davidg618

A few of you may recall a short thread I posted last week describing, with photos, the difference between upward oven spring, and overall expansiion of two loaves made from the same batch of dough, baked coincedentally, wherein the only differences were the slashing patterns used, the loaves positions on the baking stone, and one loaf was loaded approximately one minute, or less after the first.

Today I baked two boules of sourdough, made from the same formula as last week, and, of course, from one batch. I did everything as close as possible to what I did last week. I did use a different starter, but that shouldn't and doesn't effect the outcome.

I made two changes: 1) I loaded the loaves simultaneously, and 2) I slashed the same pattern on both loaves.

The concerns voiced last week were what other things might cause the dramatic difference in oven spring? Uneven oven heat distribution? The first loaf "robbing" heat from the baking stone? uneven steam distribution?

Based on what I experienced today I think last weeks differences were due, for the most part, to the slashing pattern difference. The only slight difference I think today's loaves experienced were minor differences in the slashings' depths and lengths, and I believe the skin on the slightly smaller loaf was drawn tighter than the other loaf. I'm still working on my shaping and slashing skills, but I did the best I could.

Here's the photos, including the before loading pics asked for. I'm satisfied my oven and steaming method are both working fine. I welcome any comments.

David G.

Doc Tracy's picture
Doc Tracy

I've been seeing some comments about Hamelman's Multigrain SD with a rye SD starter and how good it is. I think I've gone past this recipe in the book a few times because of the high % of high protein flour. I decided to bake it today but with a lot of changes. Cut home formula in half

1.Replaced all high protein flour with whole wheat flour +4tbsps of vital wheat gluten

2. Replaced sunflower seeds with millet

3. Replaced rye chops with rye berries (I just haven't found rye chops anywhere and don't have a mill yet)

4. Added spices-dry onion, caraway and fennel, plus poppy seeds on top

5. Autolysed for a total of one hour and added a bit of extra water at 30 minutes to accomodate the flour change

Very curious to see how this turned out, I put it in the oven in two loaf pans, spritz the top of each with a spray of water and covered with aluminum foil. I baked 10 minutes covered  and then 20 minutes uncovered, brought them out at 205 degrees. (oven first at "hot" then "between 350 and Hot" in the RV oven).

After cooling, I sliced into this lovely, brown bread. What a wonderful surprise! It was soft with a lovely texture. Incredibly light! Who would have guessed? Multigrain, whole wheat/rye with a light, soft texture? Amazing!

Here's a picture of my pastrami sandwich with fresh arugula from the garden. I sure wish the arugula wasn't bolting. I hate to see the end of arugula and lettuce season. But, with the end of arugula comes tomatoes, peppers and eggplants.

Doughtagnan's picture
Doughtagnan

As the girlfriend  is a big fan of Granary bread (c) I tried a "normal" dried yeasted loaf, which though tasted proper granaryesque, it did not have much oven spring and was therefore a pretty unimpressive specimin and certainly not worthy of posting on these august pages (especially if the brilliant Shao-Ping has just posted some absolute blinders!) So, as my sourdough always comes out consistantly i've given the old Granary the full SD  treatment with my Rye starter. It's just out of the oven but I think it'll be worth getting some bacon lined up for brekky tomorrow - no crumbshot till then.  I just used my regular SD recipe from The River Cottage Baking book - briefly  250g Hovis Granary (c) flour 350ml water, 50ish grams starter mixed and left overnight, then a further 300g Hovis Granary (c) flour splash of olive oil and twist of salt, kneaded and deflated 3 times shaped/proofed for 2 plus hrs then baked from cold in cast iron at max (250c fan) for 40mins covered 10 uncovered (lowered to 200c fan) makes a boule/mini-miche of around 800 grams.

Cheers Steve


 And this morning, as promised the compulsory crumbshot after some slices were cut for a bacon sarnie!

reyesron's picture
reyesron

Never been to a bread festival so I drove 400 miles to Asheville Friday night.  Its actually 350 miles away, but I took a wrong turn around Lynchburg's new bypass, and went 25 miles before I realized I was on an unfamiliar road.  I went there really to see the Peter Reinhart demonstration and almost couldn't get a ticket, even though I got to the festival a half hour before it started.  The price of a ticket was to buy a loaf of bread from an artisan, and you would receive one free.  The maker of my bread didn't have any, but searched the whole place and found me one.  The festival itself consisted of about a dozen bakers set up outside the Greenlife Grocery.  It was a beautiful day and the bread I purchased, a baguette, and an Asiago/rosemary ciabatta was really good.  I went into the grocery to look around, and in the flour section, I saw that King Arthur flours sold for close to $7 for a 5 lb bag.  In my area, its around 4.50 and I bought some on sale last week for 3.69.  Later on, as I drove around Asheville, I went into another store and found KA flours for 7.20 for a 5 lb. bag.  Sticker shock!  All in all Asheville was a really nice town. 

The ticket I had for Peter Reinhart showed as 2:30.  I mistakenly thought there was one at 1:00 so I thought I would try to get into it.  When I got there, however, I was told that he only had one demonstration, and it was scheduled for 2:30.  The student/chef was nice enough to direct to a demonstration that had just started, being put on by Lionel Vatinet, of La Farm Bakery.  It was an amazing surprise.  Lionel's demonstration was about handling dough, and forming different loaves.  He was using a French country bread recipe for his demonstration, and gave us all a copy of the recipe.  He only baked one loaf in demonstration of the use of a La Cloche clay baker as his energy was directed towards dough technique.  I did not go to Asheville thinking I would learn as much as I did so I felt incredibly satisfied.  La Farm has a website, and if you don't know of Lionel, you're missing out on a true talent.  He seems young, but he's been baking bread for 30 years, and bread is his specialty.  On the other hand, with the Fresh Loaf group, I might be the last one to learn of him, but if not, go to their site and check him out.  I really can't say enough about his demonstration or his expertise.  Great bread makers have a manual dexterity and a oneness with dough I can only admire.

Peter Reinhart was in his room earlier than 2:30, signing his books, and setting up.  Most of his prep work was done earlier, and most of his bread was baked in an adjoining room.  He is a wonderful teacher and I think that was largely the purpose of his demonstration, talking about flour, and the mystery and chemistry of harnessing its flavor.  He did bake us some Chocolate Babka for tasting and it was quite marvelous and he demonstrated its creation for us.  As soon as my oven is repaired, that will be the first thing I bake.  If Peter was alloted three or four hours for his demonstration, it probably wouldn't have been enough.  There was so much he wanted to cover, and really, so much that he did.  I enjoy a nice long road trip, and I thoroughly enjoyed this one.   

Pages

Subscribe to RSS - blogs