The Fresh Loaf

A Community of Amateur Bakers and Artisan Bread Enthusiasts.

Daniel Leader

baybakin's picture
baybakin

Oakland sourdough:

This is the basic sourdough that I keep around the house. Nearly every sourdough bread that I do is an edit on this basic recipe, which is sort of a combination of Daniel Leader's Pain de campagne and Chad Robertson's Country Bread.

Ingredients:

310g Sourdough Starter (130% hydration)
250g Water
440g Good quality unbleached AP/Bread Flour
60g Whole Grain Flour (I use whatever I have, WW/Rye/Spelt, etc)
12g salt (I use course grey sea salt)
(50g boiling water)

Method:

In a large bowl, mix sourdough with water and flours until a shaggy dough forms. Let autolysis.

Measure out salt into a small bowl, pour boiling water over the salt to dissolve it. let the salt water come to room temp.

After 45 mins mix the salt water into the dough. (I do this all by hand within the bowl, ala tartine)

S&F the dough a few more times over the course of the rising time (about 2-4 hours, depending on the temp of the house). At this time I either retard the dough in the fridge (on a weekday, so I can go to work), or proceed to pre-shape.

Pre-shape the dough into a round (If removing from fridge, let dough reach room temp before pre-shape).  Let pre-shaped dough bench rest for 15 mins, then shape into a round and place in a cast-iron dutch oven to rise.

30 mins before bread is proofed pre-heat oven to 500F.  Place lid on DO and put into pre-heated oven.  Bake for 20 mins covered.  Remove lid, turn down to 450F and bake for 15 mins.

Take bread out of DO (carefully) and let cool on a rack. Enjoy!


The pictured bread is cracked wheat/White Whole Wheat as the whole grain part.

hanseata's picture
hanseata

The second bread on my "Equal Opportunity Baking" list (http://www.thefreshloaf.com/node/26944/fair-baking-my-equal-opportunity-pledge) got its place near the top because of my curiosity.

In the past I had read several comments on the many errata in Leader's books, and, therefore, decided not to buy it. But Christmas came, and, being blessed with three daughters (2 step and 1 own), I found several baking books under the tree, among them "Local Breads".

With my fair baking pledge in mind, I searched for the errata posts in TFL again, and saw Mini's (MiniOven) comment on a translation error, a mixup between the German term for caraway = Kümmel (a typical German bread spice) and cumin = Kreuzkümmel (a spice used in Indian and Middle Eastern dishes). Both taste totally different, and cumin has no part in traditional German cuisine.

I looked at the German bread section in the book, and found that Mini was right. Somebody had posted Sharon Burns-Leaders' contact address, and I emailed her about Mini's and mine observation. She answered me promptly:

"Thanks for the correction! Since it was pointed out it seems quite silly that we never questioned it! I do try to answer all of the queries from readers personally myself,  though reading through some of the posts on The Fresh Loaf was, I have to admit, a bit frightening.  We did work very hard on that book and I personally tested every recipe so the personal and passionate comments were a little hard to hear when they were critical, however, I am amazed, as always, at the dedicated and talented bakers that are out there!"

That was a very gracious answer, and I decided to cut Leader's book some slack, and find out for myself how his recipes are working. Because I like breads with walnuts, I chose a variation of his Whole Wheat Sourdough Miche, French Walnut Bread.

I have a lively 75% hydration starter in my fridge, so I didn't have to make a levain from the scratch. Leader's stiff levain contains a mix of all-purpose and whole wheat flour, so I started with feeding my whole wheat mother starter with AP flour, adjusting the water to make the stiffer levain.

Since I had decided to give my new KA 600 Pro a chance, I mixed the dough with it,  again regretting my jump at Amazon's "Black Monday" bait, when the bowl started wobbling and would have jumped out of the holders if it wasn't held down with brutal force.

Long experience with nut additions told me not to wait until the dough had fully formed (it's a real big pain to work the nuts in at this stage - I really don't know why all baking books, from Reinhart to Hamelman insist on doing that!), so I fed them slowly to the dough while kneading.

I basically retard all my doughs, so I did the same with the French Walnut Bread, placing it in the refrigerator after an hour of rising, and a brief kneading. The dough was, as expected, a bit sticky, but not too difficult to handle.

Overnight the dough had almost doubled, and, after it came to room temperature, behaved exactly as it should. Instead of steaming, with ice cubes I used a steam pan and boiling water - why lower the oven temperature unnecessarily?

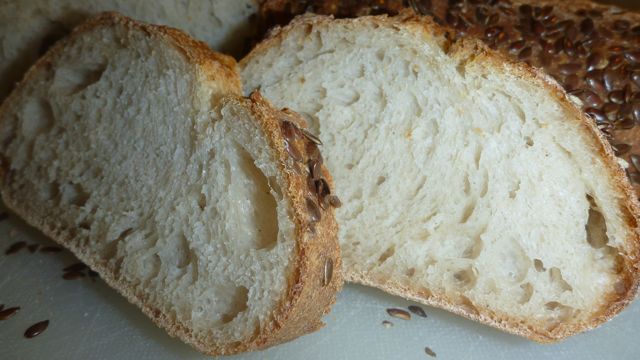
The result was a good tasting bread, with the typical purple-ish color (walnut "dye") and a nice airy crumb.

Next time I might just use S & F as in Peter Reinhart's "Artisan Bread Every Day", instead of a long, slow knead.


CaptainBatard's picture
CaptainBatard

Pierre Nury’s Rustic Light Rye or Who Stole My Bubbles


Now I think it’s time to roll up my sleeves and dive into this rustic Bougnat from Daniel Leader’s Local Breads. This is another bread from the prestigious Meilleur Ouvrier de France award winner Pierre Nury who hails from the Auvergne region of France. The only characteristics of this bread that actually resembles a French style, is the stiff levain that is used — and, of course, its award winner baker!   All the other nuances I have gotten accustomed to in making French bread, the tight shaping, timing of the rises, scoring of the loaves… have been thrown out the window.

I have to admit to being a little intimidated when reading the description of this French rustic rye, a loaf that looks quite a bit like Italian ciabatta…especially the author’s caveat that “the high proportion of water in this dough makes it difficult to knead by hand.”  But I was not going to let a little wet dough scare me off.  It actually felt good to get loose, and play with some slack dough! While things are being turned upside down with this recipe, I might as well throw something else into the mix (no pun intended) and continue my experimentation with the autolyse process.  Until now I have not been adding the levain to the initial mix of the flour and water. After reading Teresa’s second experiment in the autolyse process, I thought it could only give the dough a better structure, stronger development and maybe make it easier to incorporate the stiff levain into such wet dough. The hand mixing was a little sloppy to start…but after a short time the dough developed into a silky, smooth wet dough…and passed the window pane test with flying colors.  The rest of the process went along smoothly with no other real predicaments… so after a couple of folds and a rise, it went into the regenerator for its long, slow overnight ferment.

The next day I was eager to see what became of the dough… but I thought I’d give it the full twelve hours before I looked in.  So, the hour approached, the timer went off for the moment of truth and I opened the refrigerator; I could not believe my eyes! The once little boule…had more than quadrupled in size, had reached the top of the bowl and was filled with lots of big gas bubbles. I gently turned out the dough, divided it and slipped it into the hot steamy oven. I really thought I had hit this one on the head!  But this was not to be the case. The bread had a great creamy crumb, a subtle, slightly sour rye taste, a chewy crumb with a nice mouth feel and crackling crust … but where were those “long glossy tunnels” described by the author?  I am not really sure what happened to all the gas pocket so evident when I turned it out…was the gluten structure not developed enough?…was it over proofed?… was it the Type 130 rye flour that I used?…. or maybe the Type 65 with its gluten additive was not strong enough to hold the gas?  I have a sneaking suspicion that it was the coarse, heavy rye flour might have cut the glutens and causing the “long glossy tunnels” to collapse.  The jury is still out on this one.

If you made it through to the end of this post…congratulations and thanks for reading!  Now…seriously…Do you have any ideas on who stole my bubbles?  Please leave me a comment. I would be very interested to hear your thoughts.

To see more pictures and recipe come to Weekendloafer.com

Thanks.....Captain Batard

CaptainBatard's picture
CaptainBatard

The Auvergne Crown or Couronne shaped loaf, typically made from yeasted white bread dough, can be seen in almost every boulangerie throughout France. When I go to my local boulangerie it is displayed on the rack in the typical round shape along with an epi cut. What separates this Auvergne Crown from all the others is the use of the traditional firm French sourdough, levain, and a long slow rise that gives the wheat time to develop its full potential.  Although this is a simple white dough, this thick crusted bread has an unexpected flavor and quality.  I found the best way to eat this is to just tear off a piece…it exposes a crumb that is riddled with many different sized holes....

To read the full post come and visit Weekendloafer.com 

dmsnyder's picture
dmsnyder

Franko's recent blog about his project to bake Pane tipo di Altamura (Pane di Altamura...my ongoing project) reminded me that this bread had gotten lost on my “to bake list.” I have baked a number of breads with semolina and a couple with durum (finely milled durum flour) my favorite of which has been Tom Cat's Semolina Filone from Maggie Glezer's "Artisan Breads".  However, I've never before baked an 100% durum bread. My reading about the Pane di Altamura and Franko's blog inspired me to attempt this bread, finally.

I have three books with formula's for Pane tipo di Altamura: Carol Field's “The Italian Baker,” Franko Galli's “The Il Fornaio Baking Book” and Daniel Leader's “Local Breads.” The first two use a yeasted biga and additional commercial yeast. They also use a mix of bread flour and semolina. Leader's formula uses a biga started with yoghurt and semolina flour. Leader's formula also differs from the other two in specifying a higher dough hydration. Based on my bias in favor of wild yeast and my past positive experiences with breads from Leader's book, I based my formula on his.

I deviated from Leader's formula and method in a number of ways which I will describe. I converted my stock starter to a durum biga and did not use yoghurt. The major compromise was that I only fed my starter once with durum flour. I had planned on three refreshments before the final mix, but the weather forecast is for temperatures over 105ºF for the rest of the weekend. Since it is only expected to get to a chilly 98ºF today, it seemed prudent to bump up the baking schedule and try to avoid using the oven when it's 105 or 107ºF. So, what's described is what I actually did, with notes indicating significant deviations from Leader.

Semolina biga

Wt.

Baker's %

Active sourdough starter

50 g

71

Fancy durum flour

70 g

100

Water

57 g

81

Total

177 g

252

  1. Disperse the starter in the water. Add the flour and mix thoroughly.

  2. Ferment at room temperature for 12-14 hours.

Notes

1. Ideally, one would add one or two additional builds to convert the biga to 100% durum.

2. Leader's formula for the final dough calls for 200 g of semolina biga, but his formula for the biga produces only 177 g. If you follow Leader's formula, you need to build more biga than this.

Final dough

Wt.

Baker's %

Semolina biga

170 g

34

Fancy durum flour

500 g

100

Water

350 g

70

Salt

15 g

3

Total

1035 g

207

Notes

  1. Leader's formula calls for 200 g of biga. I was only able to use 170 g. Given the very warm kitchen temperature today, using less starter is probably reasonable.

  2. Accounting for the flour and water in the biga, the final dough hydration is actually 71%.

  3. Leader specifies 3% salt in his formula without indicating why this bread has more salt than the usual 2%. Note that, if you calculate the baker's percentage of salt accounting for the flour in the biga, 15 g is actually 2.6% of the total flour

Method

  1. Mix the final refreshment of the biga 8-12 hours before the final dough mix and ferment it at room temperature.

  2. In the bowl of a stand mixer, disperse the biga in the water. Add the flour and mix with the paddle for 1 minute.

  3. Cover the bowl and autolyse for 20 minutes. (Note: Leader does not call for an autolyse, and, as far as I can tell, this is not used in Altamura.)

  4. Add the salt, and mix with the dough hook at Speed 3 for 5 minutes. The dough should be smooth and pass the window pane test. (Note: Leader says to mix at Speed 4 for 10-12 minutes. However, my dough was very smooth and passed the window pane test after 5 minutes at Speed 3. Perhaps this was a benefit of the autolyse.)

  5. Transfer the dough to a lightly oiled 2 qt container.

  6. Ferment with the bowl tightly covered for 3-4 hours or until the dough has doubled in volume. Stretch and fold in the bowl at 30 and 60 minutes. (Note: Leader does not call for the S&F's.)

  7. Transfer the dough to a lightly floured board. Shape into a boule.

  8. Dust the boule with semolina flour and place it in the center of a clean, dry kitchen towel dusted with semolina. Bring the corners of the towel to the center and tie them, “to make a snug bundle.” (Note: Leader describes this procedure being used in the Altamura bakery he visited and by the village women who brought their own dough to the bakery for baking. However, the videos I've seen of Altamura bakeries in action show the loaves being proofed en couche.)

  9. Proof the loaf at room temperature until it “balloons inside the kitchen towel” - 1-1/2 to 2 hours. The loaf is ready to bake when an indentation made by poking a finger into it springs back slowly. (Note: My loaf was proofed for 90 minutes in a 78ºF kitchen. The surface of the loaf was quite dry at the end of proofing. I imagine this contributes to the famously chaotic blooming of the folded loaf during baking.)

  10. About an hour before baking, preheat the oven to 500ºF with a baking stone and steaming apparatus in place.

  11. Transfer the loaf to a lightly floured board.

  12. Stretch the loaf into a rectangle about 6 x 16 inches, with a narrow side nearest you. Fold the near edge all the way up to meet the top edge, and seal the seam. Now, bring the folded near edge 3/4 of the way up towards the far edge, and seal the seam all the way around so the lip of the far part of the loaf is flattened. The loaf should now be shaped as a half-circle. (Note: An alternative, shape, which is also traditional, called a “priest's hat” is made by cutting a very deep cross into the boule with a bench knife and pulling the corners well apart. The opening is then dusted with semolina flour to keep it from sealing during oven spring.)

  13. Transfer the loaf to a peel dusted with semolina flour and dust the surface of the loaf with flour.

  14. Turn the oven temperature down to 400ºF. Transfer the loaf to the baking stone . Steam the oven lightly.

  15. Bake for 40 to 50 minutes until the loaf is “mahogany-colored all over and golden where it splits open.” (I removed my steaming pan after 15 minutes and switched to convection bake at 375ºF for the remainder of the bake.)

  16. Transfer the loaf to a cooling rack and cool for at least 1 hour before slicing.

    Initial mix before autolyse

    Dough mixed, ready for bulk fermentation

Pre-shaped boule, ready for proofing


Proofing 

Proofed and ready for the final shaping

Dough stretched out. First step in final shaping.

Shaped loaf, ready to bake

Pane tipo di Altamura

Pane tipo di Altamura crumb

Pane tipo di Altamura crumb close-up

The aroma and flavor of the bread are most remarkable for a prominent sourdough tang. The flavor otherwise is very nice, but I cannot identify distinctive flavors I would associate with durum, as opposed to other wheat flours. The crust is chewy over the fat part of the loaf but quite crisp over the flatter part.

David

Submitted to YeastSpotting

jennyloh's picture
jennyloh

I've been out of action for a while because my MacBook crash,  I couldn't manage my photos without my Mac,  and therefore have been busy baking, cooking,  taking pictures but not updating.


I just got back to Shanghai from Chinese New Year Holiday.  With another 2 days before work starts,  I have time on my hand to bake.  My son requested for his all time favorite - Olive Bread.  I decided to go with Daniel Leader's Local Bread - Fresh Herb Twist Recipe.  I like it because its simple,  yet,  the taste is good.  I've baked this bread twice before,  with dried herbs and with fresh herbs.  We decided the dried herbs taste better.  The taste of the fresh herbs was over empowering the bread taste.


This time,  I doubled the recipe so that I can make one with Herb and another one with Olives.


Herb and Olive Bread


It is indeed,  1 dough,  2 flavours - For the Herb Bread,  I split into 2 dough and did a twist,  For the Olive Bread,  I kept it in a Brotform.  Each of the Bread weights about 920g.

I did notice that somehow,  with this bread,  according to the book,  I baked it at 220-230 degrees celsius,  425 F,  40 minutes,  somehow,  the lower part of the bread remains a little more most.  Why is that so?  

A few things that has been going through my mind as I cut the bread:  I've got my baking stone,  heated up properly.  Perhaps the temperature is not hot enough?  I've baked 10 minutes longer than the required time of 30 minutes,  timing should be alright.....

Well, any advice will be appreciated.


www.foodforthoughts.jlohcook.com

DonD's picture
DonD


In my last post, I wrote about the classic Pane Casareccio di Genzano that I had made for the first time using the formulation in Daniel Leader's 'Local Breads' book. I was pleased with the result so this past weekend I decided to try the Whole Wheat version of the same bread.

For the Biga Naturale, I used my white flour liquid levain with KA Bread Flour. For the dough, I used 50% KA Bread Flour, 44% BRM White Whole Wheat Flour and 6% BRM Dark Rye Flour. This is a high hydration dough and by my calculation, the final dough was a whopping 80% although I was surprised at how malleable it was. I did not follow the intensive mix recommended by Leader but instead used a 30 minutes Autolyse followed by gentle kneading with a dough hook and room temperature fermentation with 4 sets of stretch and fold in the bowl and one final full stretch and fold on the bench.

I shaped and proofed in a lined banneton for 1 hour before baking at 450 degrees F with steam for 15 minutes and 20 minutes at 400 degrees F without steam on convection.

The loaf had good oven spring but not as spectacular as the white flour version. Because of the elevated hydration, the scoring cuts were not very pronounced.

The crust was a rich amber color and the top was coated with browned shavings of wheat bran. It was medium thick and had nice crunchiness.

The crumb was cream color with translucent gelatinization and irregular air holes and was tender with just a touch of chewiness. The taste was bolder and more rustic than the white wheat version with a slight bitterness from the toasted bran. The crumb had less sweetness but more whole grain taste and just a slight hint of tanginess from the levain. All in all a very satisfying and comforting bread but not as elegant as its more refined version.

Happy Baking!

Don

DonD's picture
DonD

Background:

For the past 15 years, my wife Barbara and I and our best friends Jeff and Barbara have marked our annual rite of Spring with a visit to Barboursville Vineyards in Virginia as guests of Luca Paschina, the General Manager and Winemaker of the Estate which is owned by a consortium of Italian wineries based in Tuscany and headed by Gianni Zonin, the patriarch of the Zonin Family. The vineyards and winery are situated on the grounds surrounding the old estate of Governor Barbour where winemaking was first introduced by Thomas Jefferson. This Celebration of Spring is marked by an annual Morel Dinner that the Winery and its Restaurant 'Palladio' organizes usually the first Saturday in May. As longtime wild mushroom foragers, we are responsible for a morel talk and slide show as an introduction to the all morel dinner paired with various wines from Barboursville Vineyards. But the highlight of the weekend has always been the informal Friday evening before the main event get-together with Luca, his wife Patty and children and assorted friends from near and far.

 Entrance to Barboursville Vineyards

 Barboursville Vineyards

Al Fresco Dinner:

This past Friday, we took off from work early and drove down to Luca's house just in time for an Al Fresco dinner in his backyard with his family, his assistant winemaker Daniele, Domenico Zonin (eldest son of Gianni) and Christophe, a visiting French Wine Consultant. In anticipation of this get-together, the day before, I had baked a Pane Casareccio di Renzano loaf from Daniel Leader's 'Local Bread' to go with a whole Prociutto ham made from the leg of a pig named 'Spike' that was raised for a caterer friend and that I had cured for almost two years. The weather was gorgeous, the fellowship was excellent, the morels were plentiful, the wines were flowing and the prociutto and bread were not bad either.

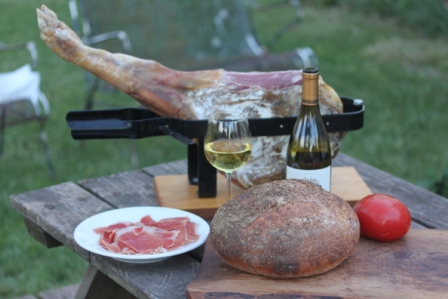
 Pane di Genzano w/ Prociutto and Tomato

 Fresh Pasta w/ Sauteed Morels 

Pane di Genzano:

I followed Leader's list of ingredients and proportions exactly but downsized the loaf to a manageable 500 gms total of KA Bread Flour. I modified the procedure to include a 30 minute autolyse and a light 4 minute kneading with a dough hook on low speed followed by a 2 1/2 hour fermentation with stretch and fold in the bowl every 30 mins. I shaped the dough into a boule and proofed it in a banneton for 1 hour before scoring and baking. I baked it at 450 degrees F with steam for 1 hour and at 400 degrees on convection without steam for 25 mins. The loaf snapped, crackled and popped when removed from the oven and the crust developed nice cracks and remained crunchy until the next day. The oven spring was tremendous and the crumb was tender and open. The dark crust was nutty and the crumb flavor was sweet and complex with no trace of sourness. I read that this bread would last for several day without staling but I would never find out because the loaf was gone in no time thanks in no small measure to Luca's kids.

 Crackly Crust

 Tender Crumb

The Main Event:

We capped the weekend festivities with the Saturday evening Dinner in the Banquet Room of the Winery. The dinner which is always sold-out was a 5 course dinner featuring Yellow Morels from Michigan and Black Morels from Oregon paired with a selection of wines from Barboursville.

 Frisee and Grilled Asparagus Salad w/ Pancetta and Roasted Morels

 Braised Pork Belly w/ Cauliflower Gratin and Glazed Morels

I cannot wait until next year...

Happy Baking (and Eating)!

Don

Pages

Subscribe to RSS - Daniel Leader