The Fresh Loaf

A Community of Amateur Bakers and Artisan Bread Enthusiasts.

Recent Blog Entries

txfarmer's picture
txfarmer

I received my copy of the new "Tartine Bread Book" last week, flipping through the book, I was struck by two things: 1. I want Chad Robertson's life (especially the part about living in the French hills with artisan bakers/cheese makers/farmers, living and doing what he loves along the coastline of beautiful Northern CA, oh yeah, let's not forget the part where he and his friend surf in the morning and bake in the afternoon!); 2. I have been making those 36 hour sourdough baguettes with high hydration, no kneading but S&F, long fermentation, and Chad Roberton's method is very similar in these aspects.

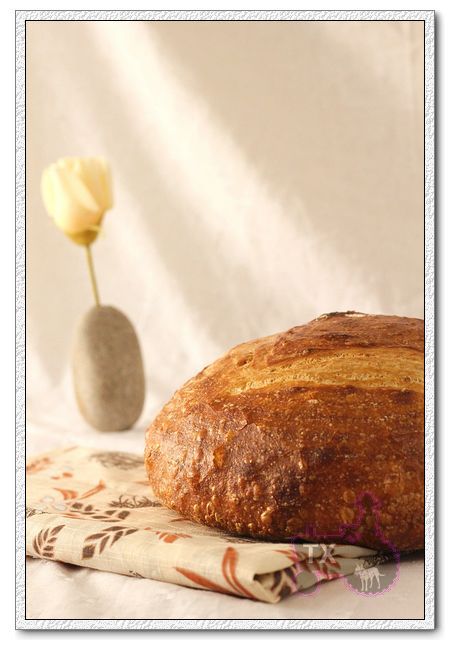
I made his basic country loaf this past weekend with great result. The formula and procedure have been well documented in detail here, and the following are my "study notes":

1. He is after a bread with balanced flavor without too much sourness (I guess his French study is showing), so he ues a levain (a.k.a.  sourdough preferment, sourdough poolish) that's very young. In fact, he says to use it when it has JUST started to float in water, only expanded 20% in volume. He accomplishes that by adding a lot of water and flour to a very small amount of starter (100%), and leave it overnight at a very cool temperature (65F). This is dfferent from the usual practice of using the levain when it has reached the peak volume.

2. He use a very small amount of levain in the main dough: 200g of levain at 100% in 1000g of flour, which means only 9.1% of the total flour is in the levain.

3. He uses relatively warm water to mix the main dough, and the bulk rise temp is pretty warm too (78F to 82F), which counter-balance point 1 and 2 above, to speed up the bulk rise somewhat

4. At the end of bulk rise, he only aims for a 20% to 30% volume increase in his main dough. That takes 3 to 4 hours at the warm-ish temp he describled in the basic flow, but can also be modified according to preference. For instance, lower the water temp to 65F, and keep the dough at 60F, the bulk rise could take 10 to 12 hours, a convenient overnight schedule. (Food for thought: I often wonder how much bulk rise a dough really needs. I know it needs some to build up basic strength and falvor, but I have seen and tried a variety of fermentation schedules, some put more time in bulk rise less in proofing, some do the opposite. Of couse each can be successful, IF it satsify some basic rules, and each would produce breads with different flavors. My conclusion so far is that different style of breads would prefer different fermentation schedule. For instance, the book mentions an example where a pan bread that would have support thoughout proofing and baking could have a very short bulk rise since the dough needs less strength, while a free form loaf may require longer bulk rise. In addition, I think a fuller bulk rise would change the crumb structure too.)

5. The dough is very wet. He says the basic formula is 75% hydration, but he's not counting the 100% levain, it's actually 77%+, wetter than my usual baguette dough. I used all the water (two addition, the last 50g is added after autolyse), the dough felt silky and easy to handle - yes, it's wet and sticky, but I have been making very wet baguettes every week, so I am used to the "wet glob" kind of dough. The "let time and fermentation do their job" method works well here again, don't be freaked out by the initial puddle of mess, give it a couple of hours and some S&F, you will see how it will turn into a beautiful silky cohensive "puddle".

6. After I posted about the 36 hour baguettes, some have asked me about how to S&F such a wet dough. As I mentioned in that thread, I simply take the dough out, hold it in my hands, left hand strentching out, then fold back. Repeat with right hand. Put back in the container. The key is to have the container and hands well oiled. When I do that with my baguette dough, it was easy, and quick, and efficient. However, when I tried to do that with this dough, I immediately realized that it's not the best way - because the dough is much larger. My baguette dough has 500g of flour, this one has 1100g, and I have small hands. If I try to do the same thing with this dough, it would try to slip off, so I had to dig my fingers into the dough a bit to grab on, which hurts the dough. So I changed to Chad's method describled in the book: folding the dough in the container. My point is that it's not important to known how exactly a S&F is done, it's important to know the principle. YOu need to stretch out and fold the dough back GENTLY. Once - in a way that's most convenient for you.

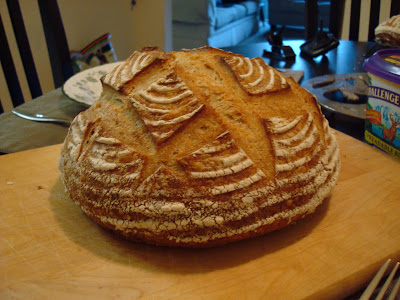
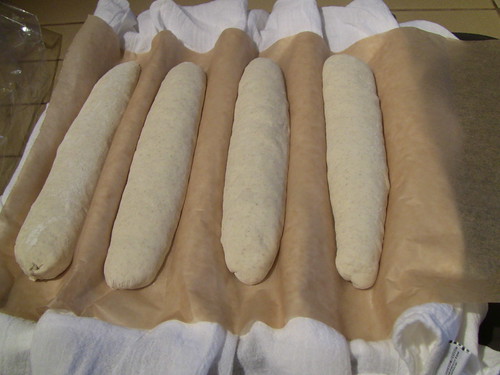
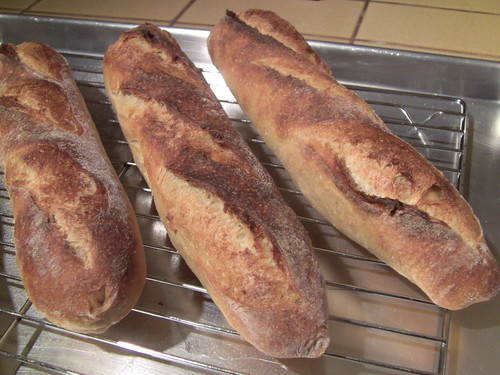
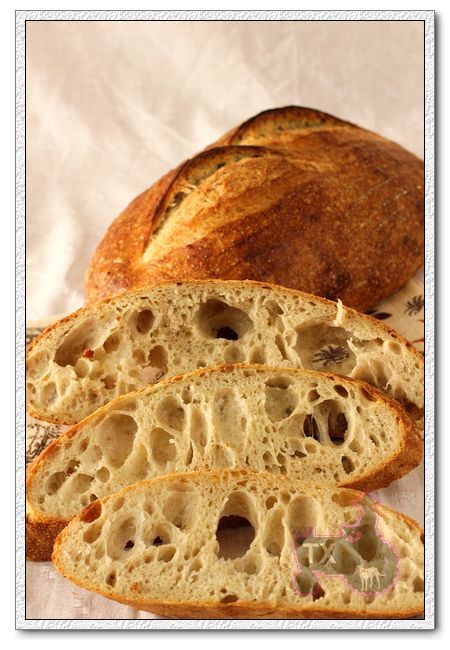
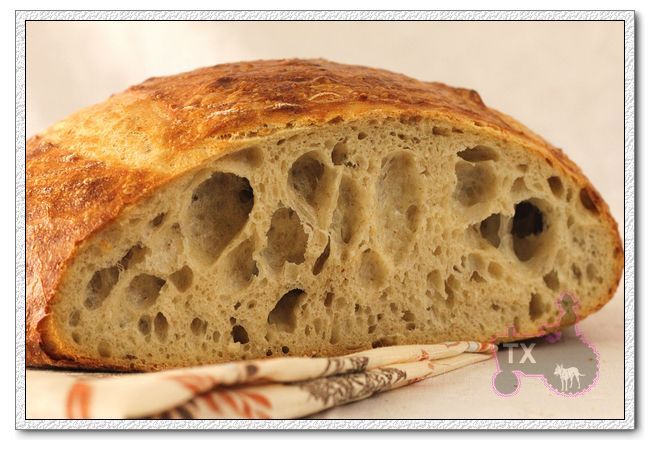
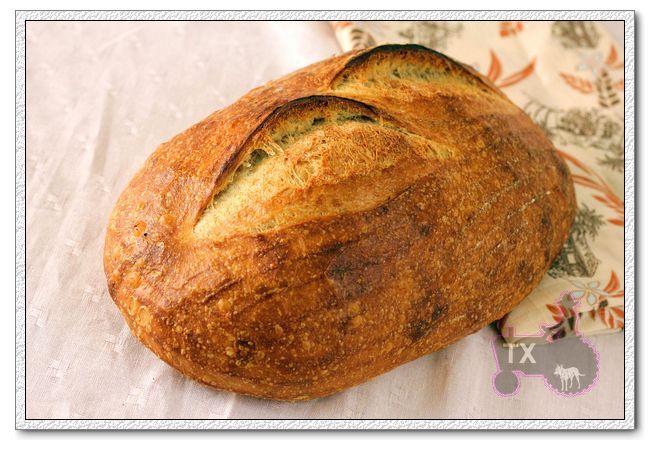
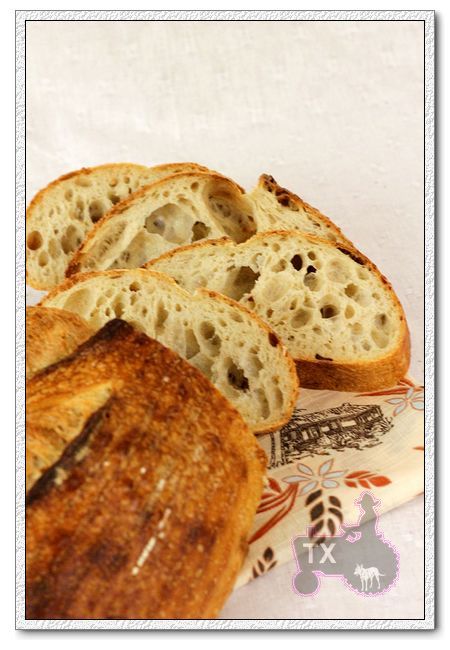
7. With such a wet dough, it's the best to make simple shapes. I made a boule and a batard, both have very open crumb, but the boule has more and larger holes, because it was handled less during shaping. (Who's up for shaping this dough into baguettes? I can't get the thought out of my head, there's something wrong with me! The funny thing is that Chad's baguette formula has LESS water than this country loaf.)

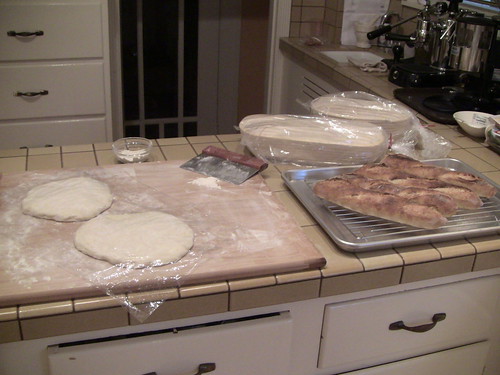
8. I retarded the shaped dough overnight at 40F, put them at room temp for another hour the 2nd morning to finish proofing, then baked. The book says I can proof and bake on the same day of bulk rise, but I never seem to have that much time in one day, and I like the flavor better after a long proof.

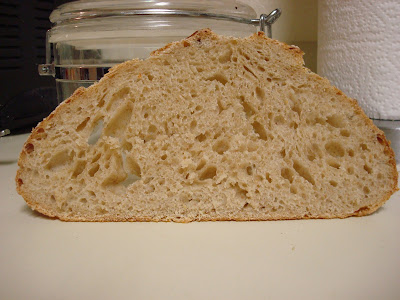
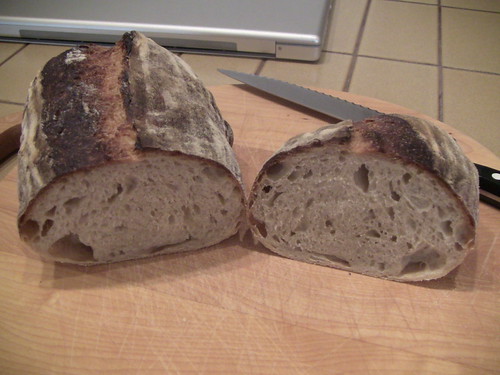
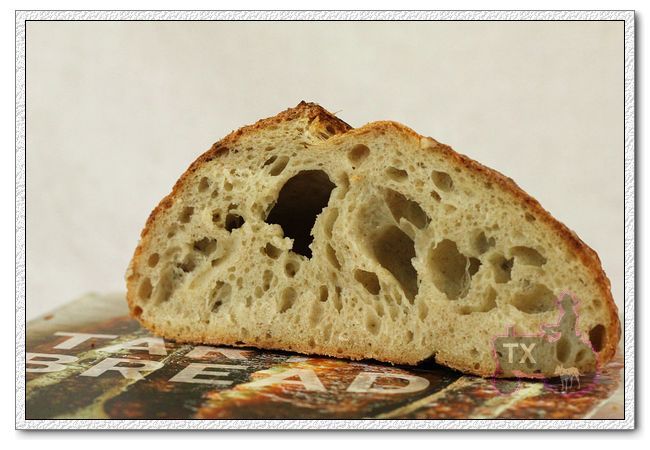
9. The crumb is VERY open, to the point that it's hard to slice. Especially the boule, which has a large crosssection and the crispy crust is thin, I think I need an electric slicer to cut through those airholes cleanly, now I know why hole-y baguettes are shaped long and thin, so there's more crust support and easier to cut!

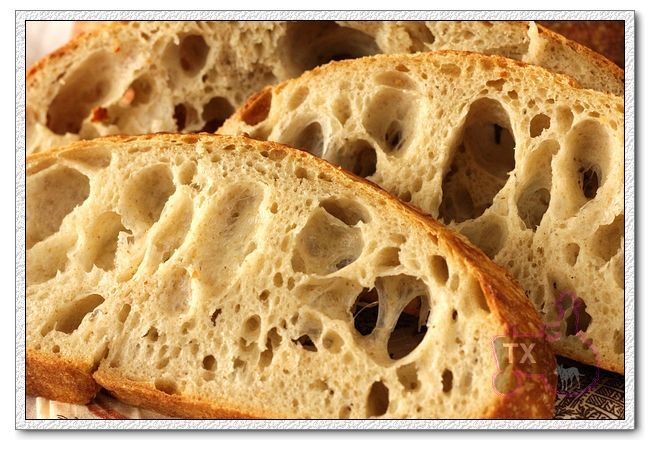
10. The book ueses a cast iron dutch oven set to bake the bread in, I don't have such things, so I baked them on my stone with steam. I can see how they spreaded out a bit on the stone in the first few minutes, but then quickly sprung up beautifully to give great volume. However, I can see how a vessel with limited space can contain the shape even better to give a higher/rounder shape. Next time I may try a higher baking temp for the first few minutes.

11. The flavor is sensational. Very moist, cool crumb, matched well with crackling thin crust. What struck me the most is the sweetness. Even after a night of retarding, there's barely any sourness, but the sweetness of the wheat is very apparent. My husband and I both loved it.

Next up: I want to try the WW loaf in the book, even MORE water!


Submitting this to Yeastspotting.


Kingudaroad's picture
Kingudaroad

After reading this article by Dmsnyder, I decided to give Pat(proth5)'s formula a go. This formula bases the opening of the crumb solely on technique, instead of higher hydration. By the way, I would love to read the initial post by Proth5, if anyone can find it and share the link. I was not able to find it via search. 


Here is the suggested formula...


...................................................................................................


This is for two loaves at a finished weight of 10.5 oz each

.75 oz starter

1.12 oz flour

1.12 oz water 

Mix and let ripen (8-10 hours) 

Bread

All of the levain build

10.95 oz all purpose flour

.25 oz salt

6.6 oz water 

Dough temperature 76F 

Mix to shaggy mass (Yes! Put the preferment in the autolyse!) – let rest 30 mins

Fold with plastic scraper  (30 strokes) – repeat 3 more times at 30 min intervals 

Bulk ferment at 76F for 1.5 hours – fold

Bulk ferment at 76F 2 hours

Preshape lightly but firmly, rest 15 mins

Shape.  Proof 1 hour or so

Slash

Bake with steam at 500F for about 20 mins

...........................................................................................

My starter was very ripe with a big pile of soapy looking bubbles on top and a wonderful smell. That really adds to the flavor of this bread. 

I only did 20 bowl scraper folds on the second to last folds and 15 on the very last one.  I also differed slightly on the final proof. I preshaped and rested 30 minutes then shaped and proofed for only 30 minutes.

The loaves sprang to life in the oven with really nice grigne and certainly acceptable open crumb. I think I can improve the results on another attempt.

Sorry for the poor quality pic...

Thanks to Dmsnyder and proth5 for the formula and technique.

Keith  


Ryan Sandler's picture
Ryan Sandler

Inspired by dmsnyder's post about Hamelman's Vermont Sourdough with Increased Whole Grain, and is recommendation of it to those seeking "a more sour sourdough" (sign me up!), I decided to make that my Sunday bake.  Friday morning I refreshed my firm starter, and changed some of it to a 125% liquid starter, then made the preferment levain friday night, and was all ready to mix the dough Saturday morning.

What I did not realize, at first anyway, is that the amounts of ingredients in my printing of Bread are horribly, horribly wrong. The dangers of not consulting Hamelman's errata before making a new formula, I guess.  The percentages, as given in the book, are supposed to be 85% bread flour, 15% whole rye, 65% water, 1.9% salt, with 20% of the total flour prefermented in the liquid levain, and is supposed to be based on 2lbs of flour.  If you follow the home-baker amounts, however, you'd end up with 70% bread flour, 30% rye, 3.8% salt and a ridiculous 30% water, based on 1 lb of flour.  If figured this out in stages.

It was pretty easy to figure out something was wrong when I did the initial mix and had a 4.8 oz. of water in 16 oz. of flour.  Doesn't make much of a dough, funnily enough :P.  So I add some more water to bring it up to 65% hydration.  But something seemed off.  The dough seemed kinda pasty.  At this point it occurred to me to check the math on the rye percentage.  I wasn't really wanting to deal with a 30% rye bread so I improvised, threw in more bread flour and water to make the bread to make 2lbs of flour with 65% hydration.

But then I only had 10% of the flour prefermented, and only half as much levain as the formula needed.  Improvisation again! I still had about 4oz of firm starter in the fridge from the day before, so I threw about 3 oz in when I added the salt (the formula is made with an autolyze.

I ended up bulk fermenting for much longer than the 2.5 hours Hamelman calls for, more like 4 hours, and even then it seemed pretty sluggish.  But I eventually went ahead and shaped two big loaves, placed them in brotforms and retarded overnight.  I baked them this morning and...drumroll...


It actually worked!  Great crumb, pleasant flavor.  Not overly sour, but I imagine that will change when I have some for breakfast tomorrow.  I got so much oven spring on the boule that I was sure there was just a single giant hole at the top and nothing else.  I was pleasantly surprised, to say the least!

amolitor's picture
amolitor


My wife likes oatmeal and things made with oatmeal, so she requested a bread made with oatmeal. This is the result:

bouillie

  • 1/4 cup oatmeal (would have used more, but that's all we had)
  • 1/4 Bob's Red Mill 7 grain hot cereal
  • 1/4 cup barley flour
  • 1 cup boiling water

Mix, let stand overnight, covered.

poolish

  • 1/8 tsp rapid rise yeast (it's what we have -- I'd prefer 1/4 tsp regular dried yeast)
  • 1 cup bread flour
  • 1 cup warm water

Proof yeast in water, mix in flour thoroughly. Let stand overnight, covered.

In the morning:

Proof 1/8 tsp yeast (rapid rise, I'd use 1/4 tsp dried yeast if I had it) in about 2 T warm water.

Sprinkle 1 T salt on the bouillie (I will use 2 tsp next time, see notes below) and mix, then add poolish and yeast mixture above to bouillie and mix. Mix in flour until it looks like the right hydration (I was aiming for 66 percent or thereabouts -- but see notes below!). I was assuming this would come out to 1 1/2 cups or so, but it was somewhat less, perhaps 3/4 cup, before things started to look like the sort of moist dough I wanted. Autolyse thirty minutes, then knead for moderate dough development. During kneading, something began to give water back -- the dough rapidly turned into a very moist dough, and felt like 70 to 75 percent hydration. I kneaded it wet for a time, just to see what would happen (if something suddenly gace BACK a bunch of water, I didn't want to panic, add a bunch more flour, and then have whatever it was suck the water up again!). I wound up adding 1/4 to 1/2 cup more flour in towards the end of kneading.

Bulk rise 2 hours with S&F every hour. Retard in fridge for a couple of hours, this was purely for scheduling reasons. Warm for an hour, S&F, warm another 30 minutes, form a boule. Proof until ready.

Bake at 450 for 20 minutes, reduce heat to 425 for 25 minutes. The result:


The flavor is wonderful. The crumb is a sort of alarming grey, but that's just the oatmeal. You can't feel the 7-grain cereal (which is a hearty cracked grain thing) but you can see it in there. I was looking for a more open crumb, but I probably wound up overworking it in my struggles with apparent hydration. As you can see it was a trifle underproofed (frankly, it may still have been cool from the fridge inside) and my scoring.. sucks.

When I do it again:

  • less salt, 2 tsp not 1 T as indicated. The flavor is wonderful, and also salty!
  • more flour initially (in the mixing pre-autolyse)

It seems as if the whole grains absorbed more liquid than I expected, which is partly why I wound up oversalting. Also, I can't do arithmetic well. Anyways. ALSO I think that when I started to knead the oatmeal started to give up the water it had soaked up, so my apparent hydration shot up (i.e. it started feeling REALLY WET). The lesson here is to mix it to quite firm in the bowl, I'm going to try for more of a 55 percent hydration "feel" in the bowl, a firm American Bread kind of feel, then autolyze, and then knead. I am hoping that the oatmeal (or whatever it was) will give up water again, and bring me back to my nice moist dough for the bulk rise.

I think I will also proof my second yeast (the yeast that goes into the dough mixture in the morning) in 1/4 cup warm water, to allow for more bread flour to be mixed in to hit my target hydration. I wanted a somewhat larger loaf than I got, since the whole grains soaked up more water than I expected. I'd really like to get that 1 1/2 cups of bread flour into the dough, and I simply need more water than I had. So, the next version of this recipe I will be using uses the bouillie and poolish as above, and:

Proof 1/8 tsp rapid rise yeast (or 1/4 tsp regular dry yeast) in 1/4 cup warm water. Sprinkle 2 tsp salt onto the bouillie and mix, then mix in the poolish and the proofed yeast. Next, mix in flour to get a firm dough (approx 1 1/2 cups). Autolyse 30 minutes, knead to moderate development. Bulk rise 2-3 hours with S&F hourly. Retard a couple of hours in the fridge (or not, as you like, really). Warm to room temp with hourly S&F for a couple hours, shape, proof, bake as above!


amolitor's picture
amolitor

This is my FIRST EVER purchase of equipment specifically for breadmaking. I am very excited:


25c each. They work great!


breadsong's picture
breadsong

Hello, Here are my impressions of IBIE, attending as a "tourist" and non-professional. I was able to attend at the end of Tuesday and some of Wednesday and am overflowing with enthusiasm for the whole experience!

Thanks to proth5 for the exceptional day-by-day reporting on IBIE 2010, and to Sam Fromartz for his comments and photos:
http://www.thefreshloaf.com/blog/proth5
http://www.thefreshloaf.com/node/19889/pictures-team-usa-lesaffre-competition

This exhibition was BIG and mainly focused on professional bakery installations, but I was happy to find lots of interesting things for a home baker like myself. I wouldn't hesitate to attend one of these exhibitions again!

Upon arrival, I headed straight for the SFBI booth, where one of the SFBI instructors, Miyuki, was in action carefully measuring ingredients and preparing to mix, and others were loading the deck ovens. I'd never seen a deck oven up close before - how they loaded and steamed! A thing of beauty! (My eyes may have misted over for a moment or two). There lots of breads on display, and some for tasting - I tasted Ethiopian teff for the first time, delicious (dark brown bread on the left, in the bottom right picture below). Mr. Suas was within arm's reach but I was too shy to talk to him but did get to chat with others there.

Next up was the BBGA booth, where I overcame my shyness to shamelessly plug the virtues of Vancouver, BC or Seattle, WA as great locations for Guild classes (much closer to home for me!).  By the time I found out about IBIE, the workshops I was interested in were sold out - but the lady at the BBGA booth said more spots had been opened up (a measure of luck for me in Vegas, to be sure!!!). I rushed back to registration to sign up for Ciril Hitz's Breakfast Breads and Pastries seminar the next morning.
There was another BBGA baking area where one of the Team USA members, Mr. Michael Zakowski, was serving up tastings of rye breads made by Mr. Hamelman himself. I regret that I didn't know Mr. Zakowski was competing for Team USA (I didn't get a chance to read the competition program until today), or I would have congratulated him on his achievement in the Lesaffre competition. I did talk to him for a few minutes about the Amazingly-Good (and I mean Amazingly-Good) 40%-rye-with-walnuts bread Mr. Hamelman made that I got to sample (a bread master like Mr. Zakowski having to listen to comments of mine such as "Really? You mean I'm actually eating bread made by Jeffrey Hamelman?!").
Total tourist.
Michael advised that Mr. Hamelman was on the exhibition floor, and not too long after that Mr. Hamelman walked past me and I got the chance to introduce myself and tell him how much I loved his book and the opportunity to taste his bread!!! Here's a picture of the Amazingly-Good bread!:

BBGA also had book signings, and I got the opportunity to meet Eric Kastel, whose book I just purchased. I was so happy I'd actually made some of his breads and was able to talk to him in person about them!!! Mr. Kastel graciously autographed and gave me the display book cover he had set up for his book signing.

Well, that was Day 1. Huge. I never thought in a million years I'd get a chance to meet such great talents in the bread world.

The next morning Ciril Hitz presented "Breakfast Breads & Pastries: An Artisan Approach". The writeup by proth5 on this seminar was spot on.
The seminar was an incredible learning opportunity for me, to be able to hear firsthand about these doughs from a baker of such calibre.
I didn't have either of Mr. Hitz's books and was able to purchase both that day (kindly autographed of course! :^) ). 
The seminar was so informative - Mr. Hitz covered laminated and enriched doughs, ingredients, mixers (on friction factor: "Heat is not your friend in any of these doughs"), freezing, mixing, gluten development, preferments, hydration percentage, preparing butter and dough for lamination and the lamination process, his recommended sequence of events for controlling dough and butter temperature ("Work the dough colder than 64F"), tips for shaping, filling and proofing, and baking. I look forward to reading his books while referring to the notes I took and putting it all together when baking!!!

I enjoyed Mr. Hitz's teaching style, and his voice of experience combined with photos and video. Some other things he suggested were:
- Laminating with compound butters, sweet or savory, for varied flavors.
- For those of us without sheeters!, and to maximize evenness in the lamination, Mr. Hitz recommended creating a very even butter block (even suggesting you could weld up an aluminum butter block frame for rolling! Now that's an idea!), trimming the ends of the dough trifold to expose the butter so the trifold is very rectangular before elongating the dough, to be very gentle with the folds and don't create tension, and to do every layer the same way (direction of rolling and turns).
- For adding inclusions to enriched doughs, to add them after proper gluten development is attained so the dough membrane coats the inclusions. This helps proper distribution of inclusions in the dough, so shaped pieces have even distribution of inclusions for consistent heights when proofing, and also protect the inclusions from being exposed and burning during the bake. For wet inclusions, to roll the dough thin, spread inclusions over and jelly roll to distribute the inclusions, to maintain a clean dough state.

What a morning!!!

I toured around the Coupe Louis Lesaffre competition area and took some pictures of the pieces but in my haste in capturing images didn't capture every country's artistic piece, and in some cases missed the country's name in the shot:

As a Canadian, I hope you'll forgive me for wanting to put Canada's picture first, although Team USA is the very worthy team moving on!!!

Here is Team USA:
 

Argentina:

Brazil:

Peru:


Chile, Costa Rica, or Mexico???


I am very grateful for the opportunities to meet the bakers, industry and association representatives and vendors, who were also very generous with samples and other goodies, and distribution/supply information. I left the exhibition hall loaded down with all sorts of good stuff, nut flours especially, and was also grateful for the opportunity to buy some things from exhibitors. And special thanks too to Lesaffre, for giving me a precious brick of SAF Gold osmotolerant yeast. With the knowledge gained from Ciril Hitz, and some good yeast...I can't wait to get my hands in some sweet dough.

Regards, breadsong


wassisname's picture
wassisname

 This loaf is my grudging acceptance of the fact that everything can't always be about me - not even bread.  My daughter goes weak in the knees at the sight of square, squishy supermarket white bread.  The stuff gives me the screaming heebie-jeebies.  I won't buy it, not even for her.  But, instead of digging in my heels and inspiring a whole-grain backlash I decided to expand my horizons a bit. 

I settled on the pain au levain from Leader's Local Breads.  This is the first time I've used white flour in my bread so I was a little outside my comfort zone.  Fortunately, the recipe is spot-on, and I got a nice loaf on the first try.  I added an overnight proof for timing's sake and made one larger loaf instead of the two smaller loaves that the recipe calls for, but otherwise I went by the book. 

And my daughter likes it.  Whew!  Of course, this means I have to save some for her... I'm not sure I have that much will-power.

Marcus

GSnyde's picture
GSnyde

With Brother David and Sister Susan visiting from the Great San Joaquin, I had to bake San Joaquin Sourdough, and I had to bake it good!  I made a double batch of dough to try Mini-Baguettes along with a couple Batards.  The process was uneventful (sorry, no Stupid Novice Baker Tricks this time).

After reading lots of descriptions and looking at several instructional videos, my first attempt at shaping Mini-Baguettes went pretty well.

IMG_1624

My scoring technique improves a bit each time and my new baking stone gives good spring (thanks, Stan).

IMG_1628

For a medium-hydration dough, the crumb was pretty holey.

IMG_1641

It was a big baking day.  Baguettes cooling, Batards proofing, pizza dough resting for its next stretch.  Pretty good production for a one-oven kitchen.

IMG_1635

David seemed to enjoy the Baguette, but perhaps not as much as the Pizza and Pinot Grigio.

IMG_1650

The Batards were proofed in my brand new bannetons.  Though not as gorgeous as the best our family produces, I'm easily pleased with Batards that look like Batards.  The crust was crunchy and the crumb was nice and moist.

IMG_1646

IMG_1657

And one could get lost in the holes.

IMG_1659

Tonight, before dinner out, we'll have more bread and cheese and wine.  I'm expecting few complaints.

Glenn


breitbaker's picture
breitbaker

Give this a try for a comforting Sunday Supper...and enjoy using all those crusty loaf ends to soak up the smoky juices!

http://www.brightbakes.wordpress.com

Love,

Cathy B. @ brightbakes

jennyloh's picture
jennyloh

I had some fun creating bread that was filled with chocolate.   Adapted from Reinhart's Soft Sandwich Bread in Artisan Breads Every Day.  It turned out a little dry,  but overall, I like the chocolaty taste.  


Chocolate Bread2


Read the detailed blog here.


Pages

Subscribe to Recent Blog Entries