The Fresh Loaf

A Community of Amateur Bakers and Artisan Bread Enthusiasts.

Recent Blog Entries

breadbakingbassplayer's picture
breadbakingbass...


There was a period of time where my brother and I were buying each other different salts for fun…  He went to Hawaii one time and brought me back a small bag of  Alaea Sea Salt (Hawaiian Red Salt).  Time passes, I buy him some other salt…  Then he goes to Hawaii again to visit a friend of his, and she sends him back to the mainland with 3 more bags of the stuff, which he gives me…  So now, after a few years, I still have tons of the stuff, so what better idea to get rid of some of it by trying some in bread… 

Interesting stuff.  It contains a small amount of harvested reddish Hawaiian clay.  You can reference this website: http://www.saltworks.us/alaea.html for more info.  The salt has an interesting clay/mineral taste to it.

I decided to make a simple pain au levain and try the stuff out… 

Ingredients:
900g AP (King Arthur)
50g WW (King Arthur)
50g Rye Flour (Mix of Hodgson Mill and Arrowhead Mills Organic)
250g Liquid Levain @ 100% Hydration
660g Water
26g Alaea Sea Salt
1936g Approx Dough Yield

Method:
10/4/10
7:00pm - Feed storage starter 100g AP and 100g water.  Starter should double in 2-3 hrs.
10:00pm - Weigh out all ingredients, grind the salt with a mortar and pestle.
10:15pm - In a large mixing bowl, add in the following order, liquid levain,  water, flours, salt.  Mix with rubber spatula until a rough dough forms, then with wet hands squish dough until there are no dry lumps.  This should take about 3 minutes.  Place bowl in large plastic bag, rest.
11:00pm - Turn dough, cover and let rest.
11:30pm - Lightly oil a large plastic container (4L).  Turn dough (stretch and fold in bowl), place in plastic tub, place in refrigerator.  Go to bed.

10/5/10
8:45am - Take dough out of refrigerator, turn dough in container, cover, return to refrigerator.  Go to work.

6:15pm - Divide dough into 2 equal pieces (975g), preshape into boule.  Let rest 15 minutes seam side down.
6:30pm - Final shape, let proof in floured linen lined bannetons seam side up.  Place bannetons in plastic bag to prevent drying.
8:45pm - Arrange baking stone and steam pan (loaf pan with lava rocks.  Fill halfway with water).  Preheat oven to 500F with convection.
9:30pm - Turn off convection.  Turn boules out onto a lightly floured peel, slash as desired, place into oven directly onto stone.  When last loaf is in the oven, close door.  Turn down to 450F.  Bake for 50 minutes.  Remove steam pan 15 minutes into bake.  Rotate loaves halfway through bake.  At end of bake, check internal temperature and weight.  Should be between 205F to 210F, and weight approx 15% less.  Return loaves to off oven for another 10 minutes.  Let loaves cool overnight before cutting and eating…

Notes:  I should have let the boules proof for 3 1/2 to 4 hours.

10/6/10
8:45am - Cut, take picture of crumb, eat...

Sent to Susan @ Yeastspotting on 10/6/10

espinocm's picture
espinocm

This was my bread project last weekend. I really enjoyed making it and it was delicious! I slightly modified the recipe found here. I didn’t do the sponge; I added the sponge measurements to the dough ingredients and halved it. Next time I will omit the red pepper from the herb & cheese mixture (the following includes the adjustment). Here is what I did:

Dough:

2 ½ tsp. Fleischmann's RapidRise yeast

3 - 4 ¼ cups all purpose flour

1 tsp fine sea salt

1 tsp black pepper

1 Tbsp Italian seasoning

1 ½ tsp garlic powder

½ tsp crushed red pepper

1 Tbsp parmesan cheese, grated

1 Tbsp plus 1 ½ tsp olive oil

¾ - 1 ½ cup water (3/4 didn’t seem like enough. I ended up adding 1 ½ but it was a little too much, next time will try 1 cup)

Mix together yeast and water in a stand mixer bowl. Let set for 5 minutes. Add remaining ingredients (starting with 3 cups of flour) and mix on low speed until combined. Add more flour as needed until dough is soft and slightly sticky. Knead on medium-low speed for 5 minutes. Let rise 1 ½ - 2 hours or until doubled in size.

Herb and Cheese Mixture:

1 cup mixed cheeses (I used Asiago, Parmesan, Romano and Provolone. Truth be known, it was probably more than a cup because the more cheese the better, right? :-)

¼ cup parsley, chopped (I used a combination of fresh and dried)

½ large onion, chopped

2 ½ cloves garlic, minced

¼ cup sundried tomatoes, chopped

1 Tbsp plus 1 ½ tsp Italian seasoning

½ tsp garlic powder

1 ½ tsp black pepper

1 tsp sea salt

1 ½ tsp dried oregano

1 Tbsp pesto

1 ½ tsp truffle oil

1 Tbsp olive oil

Combine all ingredients in a bowl. Mix well, breaking up any chunks.

Assemble and Bake:

Lightly sprayed Bundt pan with non-stick spray (probably not necessary since it’s a non-stick pan and you do drizzle olive oil over the top which runs down the sides)

The original recipe states to roll out the dough but I just stretched the dough out a little on a floured surface and cut into equal pieces with scissors. I covered the pieces with herb & cheese mixture, rolled into balls and put in pan until all the dough was used.

Let rise for 1 hour.

Preheat oven to 400 degrees during last 30 minutes of rise.

Drizzle tops with olive oil. Bake for 25-35 minutes or until browned and crispy on the outside.


breitbaker's picture
breitbaker

http://www.brightbakes.wordpress.com

The latest bake...I used an overnight starter with a pinch of SD, then finished off the dough the next day. Nothing complicated, but this sure was tasty!

Love,

cathy b. @ brightbakes

tgamblr's picture
tgamblr

I have been attempting to begin a sourdough starter. I have tried a few methods from the internet as well as the guru Reinhart's, and the old man Clavel's method. I have been successful up until day three, then nothing. I have gotten my starter to the point of bubbling and regular feedings, but as soon as I take half to replace the new barm the whole thing separates into goo and hooch and goes slack. I have tried to "wake" the starter with small amounts of flour and water. I have even tried cider vinegar, but to no avail. I can't seem to keep the starter alive.

What am I doing wrong?   

I have begun the process in mason jars, mixing bowls, and tupperware. I have used rye flour and whole wheat. I have experimented with different amounts of flour and water. I have put the starters in different places: cool countertop to warm and dark cabinets (over the fridge). I used a metal whisk once, but I only use plastic or wood to stir.

I thought it was my water, but I don't think so. Like I said, I can get it bubbling, but after the first or second feeding it looses momentum. I am determined to get this...any suggestions?


Thanks.

tssaweber's picture
tssaweber

To give my old KitchenAid a break I normally prepare two smaller batches of dough in a row, instead of one large batch. Unfortunately I forgot to account for the flour of the sourdough starter and adjust the flour of the first batch accordingly. No problem lets adjust the water with the second batch. What a stupid idea!! But with the slap and fold method of Bertinet (http://www.gourmet.com/magazine/video/2008/03/bertinet_sweetdough) I was able to get myself out of trouble and the result was pretty good. But let the pictures talk:  

Everything is looking good the starter is doing its work

What a mess

Ok a little more work than planed but the dough is coming together

And I begin to like it again

Perfect.....

And the result, it smells and tastes so good.....

BNLeuck's picture
BNLeuck


Procrastinator's Sandwich Bread: Take 2

Continued from Procrastinator's Sandwich Bread.

So, while I was impressed with the taste and texture of the previous PSB, I still don't like the idea of all white bread. I grew up on white bread; my mother bought sandwich loaves from the grocery store like most busy moms, especially since she had little talent in yeasted baking, and my grandfather's specialty was potato bread. And while tasty, and surely better than the store-bought loaves, it still wasn't any paragon of nutrition. It took me a long time to like the taste of whole grains, but now I seemed to have flipped the other way... I don't really like white bread. I'll tolerate it, but I prefer whole grain.

And to make it even more difficult, I don't really like wheat -- at least, by itself. I find it bitter, and frankly, I don't do bitter. But I love rye, and barley, and corn, and oats, and... well, you get the picture. I actually really like white wheat, because of its less-bitter taste, but it's much harder to find for a good price. Red wheat is plentiful and cheap, so I just find it easier to mix it with other grains, or sweeten it, etc. Even white wheat has a bold flavor, though. You notice it right away. This isn't a bad thing, but it isn't what I wanted in this bread. I wanted subtle, behind-the-scenes flavor. The kind that makes you go, "Hmm, what is this? This is different. This is good."

So I chose barley. Mild, slightly sweet, and a perfect backdrop for the flax already in the recipe. This time, I chose to use only 1 cup of barley flour and 4 cups of bread flour. I need to know the threshold of the bread, when it goes from just enough whole grains to too much. I intend to gradually step up the amount of barley flour I use until I find it negatively affects the texture, flavor, and/or ease of use of the bread. I don't want to have to coddle this bread because it has whole grains. If I have to coddle it, I won't make it regularly. And that sort of defeats the purpose, doesn't it?

I show the recipe below for one loaf, though I doubled it this time around and made two loaves. Honestly, this dough is so easy to handle even by hand, I would make massive batches at once, but I only have one oven and two loaf pans. I'm sure if you scaled this out and made a baker's dozen it wouldn't be much more work than it is for one. I scaled back the yeast some this time, to see if it still rose quickly -- I noted little difference in rise times but a big difference in taste. Also, I used half buttermilk, half 1% milk this time around, and sprinkled with barley flakes instead of the 7-grain cereal. Very tasty! Though the barley flakes like to fall off some...

Procrastinator's Sandwich Bread: Barley Edition


  • .25c butter
  • 1c 1% milk
  • 1c reduced fat buttermilk
  • 2tbsp granulated sugar
  • 2tsp kosher salt
  • 4c bread flour
  • 1c barley flour
  • 1tbsp instant yeast
  • 2tbsp vital wheat gluten
  • 2tbsp ground flax seed
  • more milk for brushing
  • 1-2tbsp barley flakes (or topping of choice)


  1. Melt butter in microwave in a large measuring cup or bowl. (1 min on HIGH for me.)
  2. Add milk and heat to lukewarm. (1 more min on HIGH for me.)
  3. Add sugar and salt and stir to dissolve.
  4. Combine flours, yeast, gluten, and flax in a large bowl/the bowl of a stand mixer.
  5. Add liquid and mix to "shaggy mass" stage.
  6. Knead by hand or mixer until elastic. Dough will NOT clean bowl or form a ball; this is fine.
  7. Let rise until double, about 35 mins.
  8. Shape into a loaf, and put in greased 9x5in pan.
  9. Preheat oven to 350F; let dough rise 25-30 mins.
  10. Brush with milk and sprinkle barley flakes on top, then score loaf as desired. (I always do mine diagonally, corner to corner.)
  11. Bake for 25 mins uncovered, with steam, then cover with foil and bake another 20-35 mins, until internal temp is 190F.
Pictures to come tomorrow, when I un-lazy enough to upload them to my computer. LOL


txfarmer's picture
txfarmer

I received my copy of the new "Tartine Bread Book" last week, flipping through the book, I was struck by two things: 1. I want Chad Robertson's life (especially the part about living in the French hills with artisan bakers/cheese makers/farmers, living and doing what he loves along the coastline of beautiful Northern CA, oh yeah, let's not forget the part where he and his friend surf in the morning and bake in the afternoon!); 2. I have been making those 36 hour sourdough baguettes with high hydration, no kneading but S&F, long fermentation, and Chad Roberton's method is very similar in these aspects.

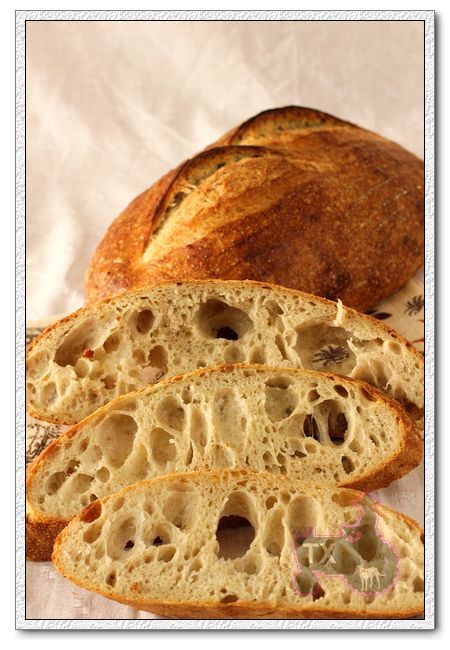
I made his basic country loaf this past weekend with great result. The formula and procedure have been well documented in detail here, and the following are my "study notes":

1. He is after a bread with balanced flavor without too much sourness (I guess his French study is showing), so he ues a levain (a.k.a.  sourdough preferment, sourdough poolish) that's very young. In fact, he says to use it when it has JUST started to float in water, only expanded 20% in volume. He accomplishes that by adding a lot of water and flour to a very small amount of starter (100%), and leave it overnight at a very cool temperature (65F). This is dfferent from the usual practice of using the levain when it has reached the peak volume.

2. He use a very small amount of levain in the main dough: 200g of levain at 100% in 1000g of flour, which means only 9.1% of the total flour is in the levain.

3. He uses relatively warm water to mix the main dough, and the bulk rise temp is pretty warm too (78F to 82F), which counter-balance point 1 and 2 above, to speed up the bulk rise somewhat

4. At the end of bulk rise, he only aims for a 20% to 30% volume increase in his main dough. That takes 3 to 4 hours at the warm-ish temp he describled in the basic flow, but can also be modified according to preference. For instance, lower the water temp to 65F, and keep the dough at 60F, the bulk rise could take 10 to 12 hours, a convenient overnight schedule. (Food for thought: I often wonder how much bulk rise a dough really needs. I know it needs some to build up basic strength and falvor, but I have seen and tried a variety of fermentation schedules, some put more time in bulk rise less in proofing, some do the opposite. Of couse each can be successful, IF it satsify some basic rules, and each would produce breads with different flavors. My conclusion so far is that different style of breads would prefer different fermentation schedule. For instance, the book mentions an example where a pan bread that would have support thoughout proofing and baking could have a very short bulk rise since the dough needs less strength, while a free form loaf may require longer bulk rise. In addition, I think a fuller bulk rise would change the crumb structure too.)
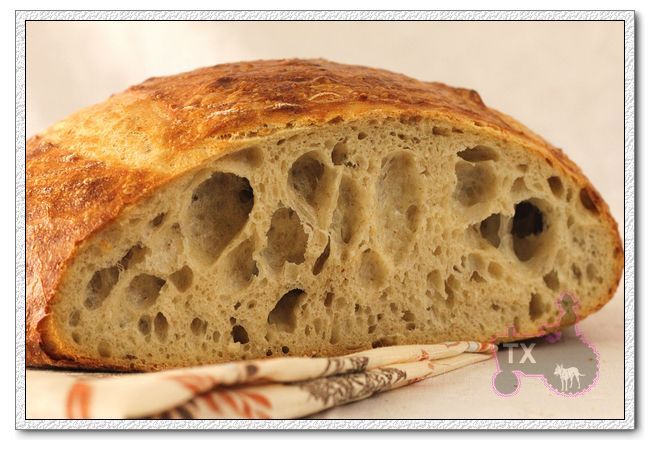
5. The dough is very wet. He says the basic formula is 75% hydration, but he's not counting the 100% levain, it's actually 77%+, wetter than my usual baguette dough. I used all the water (two addition, the last 50g is added after autolyse), the dough felt silky and easy to handle - yes, it's wet and sticky, but I have been making very wet baguettes every week, so I am used to the "wet glob" kind of dough. The "let time and fermentation do their job" method works well here again, don't be freaked out by the initial puddle of mess, give it a couple of hours and some S&F, you will see how it will turn into a beautiful silky cohensive "puddle".

6. After I posted about the 36 hour baguettes, some have asked me about how to S&F such a wet dough. As I mentioned in that thread, I simply take the dough out, hold it in my hands, left hand strentching out, then fold back. Repeat with right hand. Put back in the container. The key is to have the container and hands well oiled. When I do that with my baguette dough, it was easy, and quick, and efficient. However, when I tried to do that with this dough, I immediately realized that it's not the best way - because the dough is much larger. My baguette dough has 500g of flour, this one has 1100g, and I have small hands. If I try to do the same thing with this dough, it would try to slip off, so I had to dig my fingers into the dough a bit to grab on, which hurts the dough. So I changed to Chad's method describled in the book: folding the dough in the container. My point is that it's not important to known how exactly a S&F is done, it's important to know the principle. YOu need to stretch out and fold the dough back GENTLY. Once - in a way that's most convenient for you.

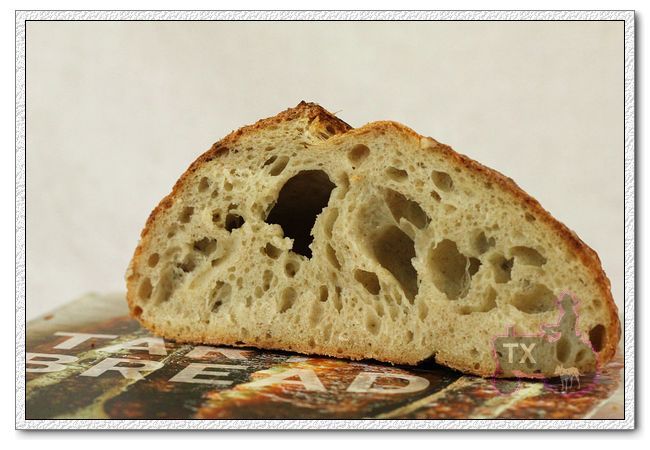
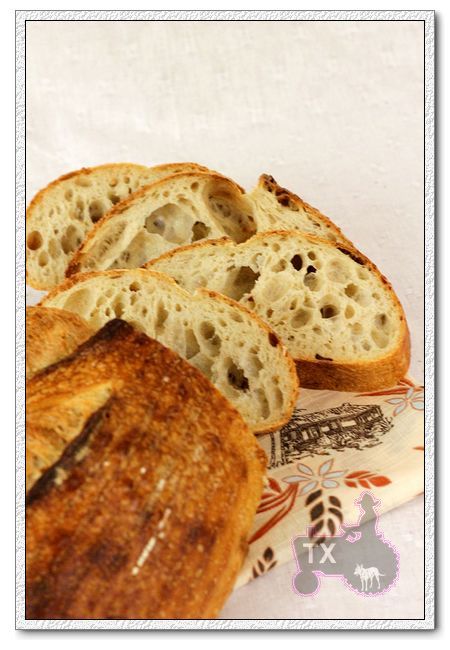
7. With such a wet dough, it's the best to make simple shapes. I made a boule and a batard, both have very open crumb, but the boule has more and larger holes, because it was handled less during shaping. (Who's up for shaping this dough into baguettes? I can't get the thought out of my head, there's something wrong with me! The funny thing is that Chad's baguette formula has LESS water than this country loaf.)
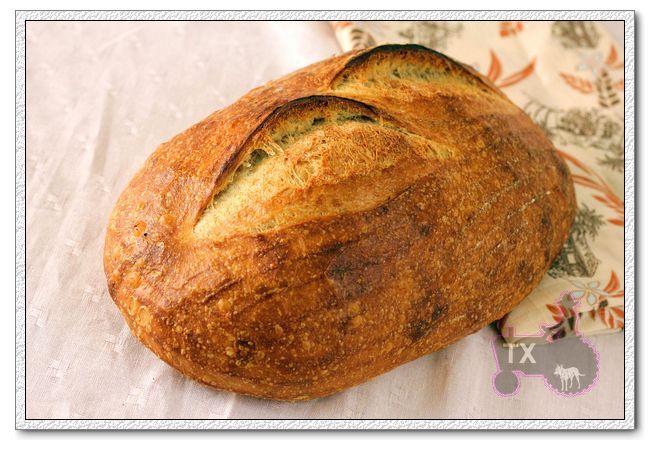
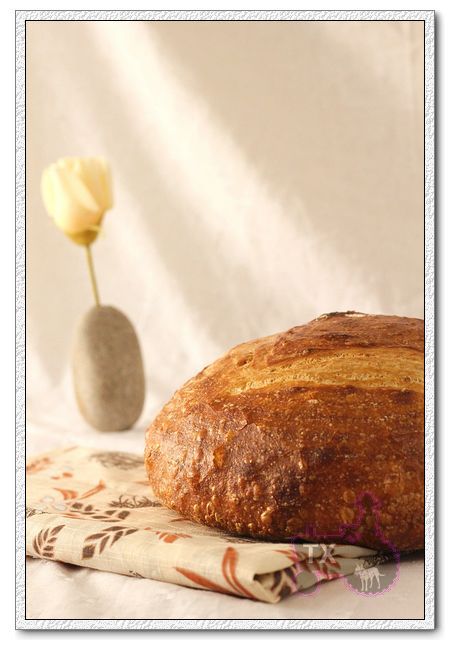
8. I retarded the shaped dough overnight at 40F, put them at room temp for another hour the 2nd morning to finish proofing, then baked. The book says I can proof and bake on the same day of bulk rise, but I never seem to have that much time in one day, and I like the flavor better after a long proof.

9. The crumb is VERY open, to the point that it's hard to slice. Especially the boule, which has a large crosssection and the crispy crust is thin, I think I need an electric slicer to cut through those airholes cleanly, now I know why hole-y baguettes are shaped long and thin, so there's more crust support and easier to cut!
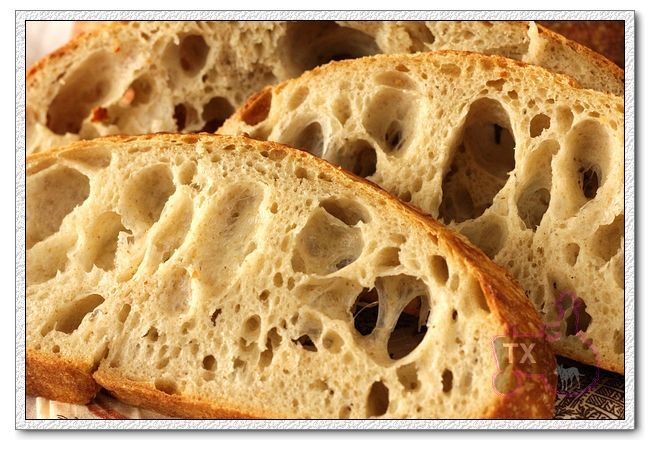
10. The book ueses a cast iron dutch oven set to bake the bread in, I don't have such things, so I baked them on my stone with steam. I can see how they spreaded out a bit on the stone in the first few minutes, but then quickly sprung up beautifully to give great volume. However, I can see how a vessel with limited space can contain the shape even better to give a higher/rounder shape. Next time I may try a higher baking temp for the first few minutes.

11. The flavor is sensational. Very moist, cool crumb, matched well with crackling thin crust. What struck me the most is the sweetness. Even after a night of retarding, there's barely any sourness, but the sweetness of the wheat is very apparent. My husband and I both loved it.
Next up: I want to try the WW loaf in the book, even MORE water!
 

Submitting this to Yeastspotting.


Kingudaroad's picture
Kingudaroad

After reading this article by Dmsnyder, I decided to give Pat(proth5)'s formula a go. This formula bases the opening of the crumb solely on technique, instead of higher hydration. By the way, I would love to read the initial post by Proth5, if anyone can find it and share the link. I was not able to find it via search. 


Here is the suggested formula...


...................................................................................................


This is for two loaves at a finished weight of 10.5 oz each

.75 oz starter

1.12 oz flour

1.12 oz water 

Mix and let ripen (8-10 hours) 

Bread

All of the levain build

10.95 oz all purpose flour

.25 oz salt

6.6 oz water 

Dough temperature 76F 

Mix to shaggy mass (Yes! Put the preferment in the autolyse!) – let rest 30 mins

Fold with plastic scraper  (30 strokes) – repeat 3 more times at 30 min intervals 

Bulk ferment at 76F for 1.5 hours – fold

Bulk ferment at 76F 2 hours

Preshape lightly but firmly, rest 15 mins

Shape.  Proof 1 hour or so

Slash

Bake with steam at 500F for about 20 mins

...........................................................................................

My starter was very ripe with a big pile of soapy looking bubbles on top and a wonderful smell. That really adds to the flavor of this bread. 

I only did 20 bowl scraper folds on the second to last folds and 15 on the very last one.  I also differed slightly on the final proof. I preshaped and rested 30 minutes then shaped and proofed for only 30 minutes.

The loaves sprang to life in the oven with really nice grigne and certainly acceptable open crumb. I think I can improve the results on another attempt.

Sorry for the poor quality pic...

Thanks to Dmsnyder and proth5 for the formula and technique.

Keith  


Ryan Sandler's picture
Ryan Sandler

Inspired by dmsnyder's post about Hamelman's Vermont Sourdough with Increased Whole Grain, and is recommendation of it to those seeking "a more sour sourdough" (sign me up!), I decided to make that my Sunday bake.  Friday morning I refreshed my firm starter, and changed some of it to a 125% liquid starter, then made the preferment levain friday night, and was all ready to mix the dough Saturday morning.

What I did not realize, at first anyway, is that the amounts of ingredients in my printing of Bread are horribly, horribly wrong. The dangers of not consulting Hamelman's errata before making a new formula, I guess.  The percentages, as given in the book, are supposed to be 85% bread flour, 15% whole rye, 65% water, 1.9% salt, with 20% of the total flour prefermented in the liquid levain, and is supposed to be based on 2lbs of flour.  If you follow the home-baker amounts, however, you'd end up with 70% bread flour, 30% rye, 3.8% salt and a ridiculous 30% water, based on 1 lb of flour.  If figured this out in stages.

It was pretty easy to figure out something was wrong when I did the initial mix and had a 4.8 oz. of water in 16 oz. of flour.  Doesn't make much of a dough, funnily enough :P.  So I add some more water to bring it up to 65% hydration.  But something seemed off.  The dough seemed kinda pasty.  At this point it occurred to me to check the math on the rye percentage.  I wasn't really wanting to deal with a 30% rye bread so I improvised, threw in more bread flour and water to make the bread to make 2lbs of flour with 65% hydration.

But then I only had 10% of the flour prefermented, and only half as much levain as the formula needed.  Improvisation again! I still had about 4oz of firm starter in the fridge from the day before, so I threw about 3 oz in when I added the salt (the formula is made with an autolyze.

I ended up bulk fermenting for much longer than the 2.5 hours Hamelman calls for, more like 4 hours, and even then it seemed pretty sluggish.  But I eventually went ahead and shaped two big loaves, placed them in brotforms and retarded overnight.  I baked them this morning and...drumroll...


It actually worked!  Great crumb, pleasant flavor.  Not overly sour, but I imagine that will change when I have some for breakfast tomorrow.  I got so much oven spring on the boule that I was sure there was just a single giant hole at the top and nothing else.  I was pleasantly surprised, to say the least!

amolitor's picture
amolitor


My wife likes oatmeal and things made with oatmeal, so she requested a bread made with oatmeal. This is the result:

bouillie

  • 1/4 cup oatmeal (would have used more, but that's all we had)
  • 1/4 Bob's Red Mill 7 grain hot cereal
  • 1/4 cup barley flour
  • 1 cup boiling water

Mix, let stand overnight, covered.

poolish

  • 1/8 tsp rapid rise yeast (it's what we have -- I'd prefer 1/4 tsp regular dried yeast)
  • 1 cup bread flour
  • 1 cup warm water

Proof yeast in water, mix in flour thoroughly. Let stand overnight, covered.

In the morning:

Proof 1/8 tsp yeast (rapid rise, I'd use 1/4 tsp dried yeast if I had it) in about 2 T warm water.

Sprinkle 1 T salt on the bouillie (I will use 2 tsp next time, see notes below) and mix, then add poolish and yeast mixture above to bouillie and mix. Mix in flour until it looks like the right hydration (I was aiming for 66 percent or thereabouts -- but see notes below!). I was assuming this would come out to 1 1/2 cups or so, but it was somewhat less, perhaps 3/4 cup, before things started to look like the sort of moist dough I wanted. Autolyse thirty minutes, then knead for moderate dough development. During kneading, something began to give water back -- the dough rapidly turned into a very moist dough, and felt like 70 to 75 percent hydration. I kneaded it wet for a time, just to see what would happen (if something suddenly gace BACK a bunch of water, I didn't want to panic, add a bunch more flour, and then have whatever it was suck the water up again!). I wound up adding 1/4 to 1/2 cup more flour in towards the end of kneading.

Bulk rise 2 hours with S&F every hour. Retard in fridge for a couple of hours, this was purely for scheduling reasons. Warm for an hour, S&F, warm another 30 minutes, form a boule. Proof until ready.

Bake at 450 for 20 minutes, reduce heat to 425 for 25 minutes. The result:


The flavor is wonderful. The crumb is a sort of alarming grey, but that's just the oatmeal. You can't feel the 7-grain cereal (which is a hearty cracked grain thing) but you can see it in there. I was looking for a more open crumb, but I probably wound up overworking it in my struggles with apparent hydration. As you can see it was a trifle underproofed (frankly, it may still have been cool from the fridge inside) and my scoring.. sucks.

When I do it again:

  • less salt, 2 tsp not 1 T as indicated. The flavor is wonderful, and also salty!
  • more flour initially (in the mixing pre-autolyse)

It seems as if the whole grains absorbed more liquid than I expected, which is partly why I wound up oversalting. Also, I can't do arithmetic well. Anyways. ALSO I think that when I started to knead the oatmeal started to give up the water it had soaked up, so my apparent hydration shot up (i.e. it started feeling REALLY WET). The lesson here is to mix it to quite firm in the bowl, I'm going to try for more of a 55 percent hydration "feel" in the bowl, a firm American Bread kind of feel, then autolyze, and then knead. I am hoping that the oatmeal (or whatever it was) will give up water again, and bring me back to my nice moist dough for the bulk rise.

I think I will also proof my second yeast (the yeast that goes into the dough mixture in the morning) in 1/4 cup warm water, to allow for more bread flour to be mixed in to hit my target hydration. I wanted a somewhat larger loaf than I got, since the whole grains soaked up more water than I expected. I'd really like to get that 1 1/2 cups of bread flour into the dough, and I simply need more water than I had. So, the next version of this recipe I will be using uses the bouillie and poolish as above, and:

Proof 1/8 tsp rapid rise yeast (or 1/4 tsp regular dry yeast) in 1/4 cup warm water. Sprinkle 2 tsp salt onto the bouillie and mix, then mix in the poolish and the proofed yeast. Next, mix in flour to get a firm dough (approx 1 1/2 cups). Autolyse 30 minutes, knead to moderate development. Bulk rise 2-3 hours with S&F hourly. Retard a couple of hours in the fridge (or not, as you like, really). Warm to room temp with hourly S&F for a couple hours, shape, proof, bake as above!


Pages

Subscribe to Recent Blog Entries