The Fresh Loaf

A Community of Amateur Bakers and Artisan Bread Enthusiasts.

Recent Blog Entries

BurntMyFingers's picture
BurntMyFingers

I've been cooking Chad Robertson's Basic Country Bread for awhile with great success. Last week I was in San Francisco and decided to get a loaf of the real thing for comparison. This is not an experience for the faint of heart: you have to order 72 hours in advance, and it is literally impossible to find parking in the neighborhood at 5 pm which is the appointed time to pick up your loaf.

But, I persisted. And was surprised to discover the loaf currently offered out of the bakery is quite different than the recipe in the book--with a darker and moister crumb, and distinctively more sour.

I brought the loaf back to New York with me and after a bit of fiddling think I'm pretty close--actually as close as I'm going to get considering the differences in flours between East and West Coast. (I used KAF)

Here are the two loaves with Chad's on the right (what remained of a huge miche):

And here's a close up of the crumb (again, mine is on the left, theirs on the right)

I like the variation better and will be making it from now on. Here are the differences:

800 grams bread flour and 200 grams whole wheat flour (vs 900/100 in the recipe)

80% hydration (vs 75% in the recipe)

retarded 14 hours in refrig at 39 degrees F to increase sourness (and match the sourness of the loaf I purchased at the bakery).

lumos's picture
lumos

….Gosh, been really busy last few weeks and haven’t been able to post or blog for at all. A few people gave me PM/email messages, concerned about my absence (Thank you! :)), so thought I’d better re-appear once before Christmas just to prove I’m still alive and baking!

 So, here’s my last blog in 2011…..Seeded sourdough bagels.


 The formula is very similar to my regular basic sourdough WW bagels that I blogged about which seems like zillion years ago, only with added seeds and reduced WW. The procedure is exactly the same, except for spread & fold method, introduced by Eric, instead of kneading, which is so easy and works like a magic, especially for seeded dough = no need to chase around escaped seeds during kneading! (Thank you, Eric!) 


**************************************************************************************************


★Please note that I've been making this without added yeast as in original recipe lately.  It needs longer fermentaion, obviously, and the crumb is somewhat denser, but choice is yours! :) ★


Sourdough bagels with Mixed Seeds

 Levain …. Fed twice during 24 hr period before use with 120g high-gluten flour (see below) and 80g water (1st feed = 40g flour + 25g water,  2nd feed = 80g flour + 55g water)


 Main Dough

  High-Gluten Flour   470g (I use Watirose’s Canadian Very Strong White Flour)

  WW bread flour  100g

  Mixed Seeds   110g

  Non-diastatic malt powder   12g

  Sugar   14g

  Skimmed milk powder  2~3 tbls

  Wheatgerm   1~2 tbls

  Instant active dry yeast   1/4 tsp  optional (see Note above)

  Salt   12g

  Water  320g


Mix all the ingredients, leave for 30 mins.  ‘Spread & fold’ a la Eric-style (the link above) 3 times every 30~40 minutes.  Pre-shape → shape and place them on baking sheets (six per sheet), cover and cold retard in the fridge for 12 – 18 hrs to develop flavour.


  Just FYAI,  this is how I proof and boil bagel. (Note : those pictures are of the other batch of sourdough WW bagels with reduced WW which I baked during my absence, before seeded ones, but haven’t been managed to blog due to lack of time….)

A bit difficult to see, but I place thin strips of reusable baking sheet and sprinkle semolina under bagels…..


……which makew picking up fragile, proofed dough and putting them into boiling water gently so much easier.


A large, deep roasting pan is my trusted friend for boiling bagels, six at a time, which is ideal for my routine of baking 12 bagels at a time…..boil first six, 1 min a side → fish them out to drain on a tea towel while I put next six into the boiling water → load the first six into the oven → fish the second batch out, drain and into the oven. Switch the fan on for even temperature.

 Bake for 18 – 20 minutes @ 200C. (Take the first batch out after 18 – 20 minutes, move the second batch to the higher shelf, switch off the fan and bake another 2 minutes or so.)


…..and this is how they come out. (the photos miraculously change to those of seeded bagels! :p)


 ***************************************************************************************************


 Thank you so much for all your wonderful bready info, advices, help and  friendship in 2011 and

Very best wishes for merry Christmas and happy baking in 2012, too! 


Mebake's picture
Mebake

As i browsed through Laurel's Cookbook for Wholegrain Breads, i came across a recipe that utilizes Dates! and i live in a region where Dates in most forms are abundant all year round. The recipe calls for Pitted dates, that must be simmered first, and the resultant cooled goo is to be added to the dough. I had some date paste (used for confectionary, and pastry), and used it instead, so its not technically Golden Date Bread. I also added poolish to the recipe, and adjusted the formula accordingly. This bread, is a 100% Whole Wheat enriched bread, that is leavened by commercial yeast.


The Dough was quite thirsty, due to all the fiber, and was mixed longer for proper development.


The dough received two deflations, prior to preshaping. Final proofing was tricky, as i had

Pointers to the final fermentation time. Seems i underproofed slightly.


Today morning, i've had a few slices for breakfast. WOW! the first morsel struck me with its date-sweetness. The sweetness is very pleasent, and dates really lend a well bodied flavor. The bread is packed with fiber, from both wheat and dates. No bitterness of wholewheat was evident. The crumb is smooth and soft, not dense, and the crust is tender.

Very Recommended.

proth5's picture
proth5

My old waffle iron was handed down to me from my grandmother.  As the one or two of you who read my posts know, I am no spring chicken.  Neither is the waffle iron – which is roughly my mother’s age.

Just as with human beings, appliances seem to have a lifespan.  When sometime last year half of one of the two waffles produced by this venerable piece of equipment never got beyond a pale yellow and parts that should not have gotten warm became ominously hot, I decided that honorable retirement was the best thing for the trusty old waffle iron and began to cast about for one more fit for active duty.

I found one – I did all the standard “interweb” searching and this one was highly rated – except it was advertised as a “Belgian Waffle Iron” but reviewers said that the waffles were really a bit on the thin side for “Belgian” waffles.  I thought that would be perfect.  It was – sort of.  The recipe (found on these pages, thanks SylviaH) that I had for sourdough waffles wasn’t quite up to the increased thickness.

And it was bit sour for my tastes, I thought.

And not quite light enough.

With a head slap to my forehead, I reminded myself that 2011 was all about formula development and that perhaps I had it in my grasp to revise the (already delicious) formula to my specific tastes.

Also, if truth be told, I’ve been doing some Supply Chain consulting for the company that distributes OXO products.  You know “Good Grips” – the angled measuring cups, etc. In the vast confluence of unlikely events that makes up my life, I was chatting with one of the folks about my desire to own a hand cranked egg beater, their new egg beater and how cool it looked and somehow, one happened to come into my possession. I promised that I would give it a workout and report back.  A new waffle formula seemed to be just the thing.

I get all misty about waffles around the Solstice because my father really loves them. My mother can’t make them (that talent skipped a generation) and the only time he gets them is when I make the journey halfway across the continent to make them for him – usually at this time of year.  Unfortunately, the little hobby that supports my household and what seems to be an ever growing assortment of hangers on sometimes has its extraordinary demands and I will not be making waffles on the East Coast until sometime in 2012.

So for your enjoyment, I give you my jazzed up waffle formula.  I always have plenty of sourdough discard hanging about the house, but it’s worth saving up some.

As with so many of my breads as of late I use two “pre ferments.” I’m told by someone I respect (and admire!) that this is over elaborate, but since I’ve made this switch people (some of whom don’t even know me) are going seriously crazy over my breads, so, well, too bad, I say, too bad.

First pre ferment

4.5 oz 100% hydration sourdough discard

6 oz 11.5% protein flour (this is King Arthur All Purpose flour, but ringing in my ears is “All purpose? What does that mean?  You are beyond that.  You speak in protein percentages now!” Must – obey –voice!)

4 oz unsalted butter melted and cooled

8 oz milk

1 tsp sea salt

2 TBS non diastatic malt (or brown sugar)

Mix (with an eggbeater if you have one) and allow to mature overnight.

Second pre ferment

2.25 oz 11.5% protein flour

2.25 oz water

Pinch of instant yeast

Mix and allow to mature overnight

Additional ingredients

2 eggs, separated

¼ tsp baking soda

When pre ferments are matured (the next morning…)

Pre-heat the waffle iron at the appropriate time...

Beat the egg whites until stiff peaks form (I’ll mention that an egg beater comes in handy here…)

Mix together the two pre ferments, the egg yolks, and the baking soda (can also be done with an eggbeater.)

Fold in the egg whites. Don’t use the eggbeater for this.

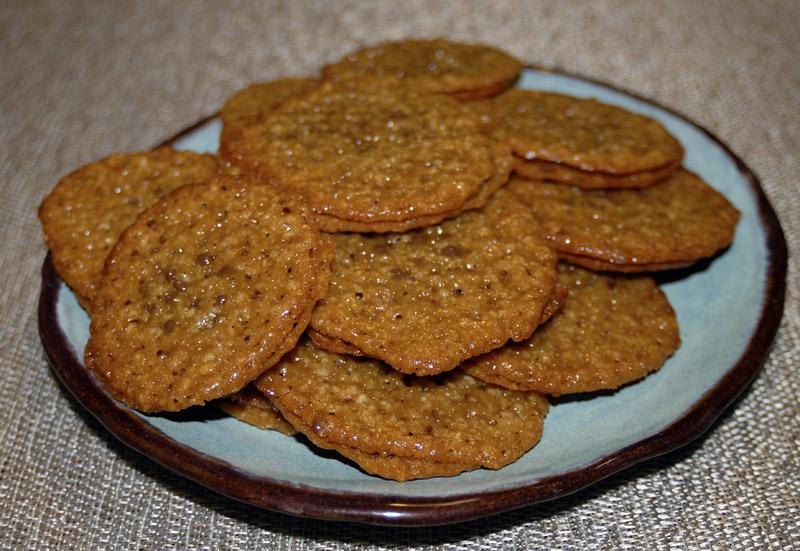
Bake per your waffle iron’s directions and your tastes.


Just a few more minutes than the earlier version – delish!

So, realizing what a privilege it is to get to make waffles for your family – be sure to make a special breakfast (or dinner) over the next couple of weeks.

My best wishes for whatever brings light into this dark time of the year go out to you all!

DougMathis's picture
DougMathis

Hi,

Has anyone come across a whole wheat bread recipe using molasses and honey? If so, has anyone ever substituted the honey with more molasses? or Has anyone a recipe that uses only molasses?


Thanks,

Doug

DougMathis's picture
DougMathis

I have been working with my sourdough starter for a few years. I began with a recipe using the starter and commercial yeast. This year I got adventurous and decided to only us wild yeast for my sourdough bread. I worked with a few recipes without much luck then I decided to take a few tips, hints, and prcedures and use what I alreadty knew and came up with a recipe that I thought had been tweaked and "perfected". I made 3-4 batches of breaqd with this recipe and each adn every loaf came out beautiful. Since the last successful baking I have ran into dough that won't become fully elastic thus during the long rising time the top or crsut if you will begins to tear apart just at the top. I have kneaded and kneaded and made sure I had ample enough flour for the mixing stage. I have kneaded for a total of 30 minutes or more with resting time in between each kneading which last for about 10 minutes and the rest period generally lasts for about 10 minutes. The bread not only looks unappealing when it dos this but the tesxture on the inside is not light and fluffy and sorta dense like quick bread. Below is the recipe I use:

1 cup starter

2 tsp. sugar

1 cup flour

1 cup hot water (100-110 degrees)


Mix together in a bowl and cover with a
towel overnight.


1/3 cup oil

1/3 cup sugar

1 tsp. salt

3-4 cups flour


Mix together until you have firm dough. Knead on
floured surface until dough is elastic. 22-32 minutes, kneading in increments
and resting for 10 minutes between each kneading. Rise at least 3-4 hours or
until doubled in bulk.


Any help or tips is greatly appreciated.


Thanks


Doug


davidg618's picture
davidg618

Haven't been posting anything lately because we've been busy baking gifts for friends and family. Been sticking to the things I know well: my "go to" sourdough, tried and true biscotti, and Grandma's Welsh cakes. The last of the sixteen mailings of bread and cookies went out the door today. Now it's time to turn to the community cookie swap--we're the only ones who also share bread. Today I baked five loaves of sourdough: two 1-1/2 lb. loaves to restock our bread-empty freezer, and three 1 lb. loaves to share.

I recently purchased a Kitchenaid 600 Pro--6 qt., spiral dough hook. So far, I'm delighted with it. Mixed 6.6 lb (3kg) of 68% hydrated dough today with no difficulty; motor didn't even get warm.  Since my small oven can only accommodate two 1-1/2 lb. loaves, or three 1 lb. loaves at a time, I retarded half the dough an additional two-and-a-half hours while the first loaves proofed and baked. Worked out with ease, and I see no significant difference among the loaves.

Happy Holidays to all,

David G

awloescher's picture
awloescher

About two months ago, I decided I wanted to try baking bread.  I began perusing allrecipes.com, a site I have begun using quite extensively since I really began cooking a lot a half year ago.  I found a recipe for "Amish White Bread", and as it had good reviews, I decided to try it, just for a sandwhich bread.  It went very well, considering the fact that I hadn't really taken much time to learn about bread baking.  After the bread had undergone its first rise, I discovered that the outside of the risen dough was a little dry.  After it had proofed, the outside of the dough was again just a little dried out.  I formed the two loaves, popped them in the oven, and had to take them out about ten minutes prior to the end of the prescribed baking time. 

The two problems I encountered came from me allowing the dough to dry out, I believe.  The loaves both had an enormous crack along the side and top, and as I found out when cutting and eating, there was a little portion inside each loaf that was not quite done. 

Now, these didn't prove to be too big of problems, however.  My wife LOVED the bread, despite the very small vein of almost-baked dough.   As for the cracks, although they were more accidental and pronounced than the natural cracking that (often purposely) occurs from the oven spring, they weren't a big deal.

Needless to say, I was hooked, and had to learn more about this (then) mysterious process of baking.  So the next day I went to the local bookstore, bought their only book on bread baking (The Art of Baking), and checked out two books from the library (Daily Bread and Peter Reinhart's Whole Grain Breads).  Within about a week I had read through all three, and here I am...baking away! :)


PiPs's picture
PiPs

As the holiday season rapidly approaches I decided to squeeze in what’s likely to be my last ‘real’ rye bake of the year before concentrating on the light and sweet Christmas goodies.

Andy’s fascinating and instructive posts on Borodinsky, Auerman Formulas and other high rye breads have kept me fascinated and entertained while perched in a bus to and fro from work. At first I found the list of ingredients overwhelming and that was before even fully digesting the multi-stage processes … I was going to have to be present and pay attention, plus top it off with a little planning. This was even more apparent with the amount of time needed to translate this formula to the blog …

I settled upon Andy’s Borodinsky – The Auerman Formula [or thereabouts anyway] but tweaked it slightly … um … quite a bit - sorry Andy :)


Altus and coriander (I love to chew on the altus crusts)

The dark ryes I have baked up until now have been a one stage process with a rye sour built and fermented before being added to the final ingredients. This formula is a tad more involved and uses a three stage process. A rye sour is built and fermented. With the sour fermenting, a scald of boiling water, flour, and other ingredients is produced. The sour and scald are then combined into a sponge which is fermented further until it is mixed with the remaining ingredients for the final shaping, proving and baking.

I deviated/strayed from Andy’s formula in a few ways. Firstly I have altus which I planned on adding to both the sour build and scald. Instead of the red malt asked for in the formula I used roasted rye malt that I had produced earlier in the week. It is richly coloured flour with a bright sweet roasted flavour and was bound to add some flavour to the finished loaf.

I kept the overall hydration level the same, but altered the hydration of the sour and scald builds to allow for a small amount of water to autolyse the wheat flour used in the final paste. This is a tip I received from minioven that allows the gluten in the wheat flour to develop before being mixed into the final paste. Finally, I sifted the final addition of rye and wheat flour.


Roasted Rye Malt


Scald and sponge


Further abroad Borodinsky

Overview

Weight

% of flour

Total flour

1405g

100%

Total water

1195g

85%

Prefermented flour

702g (30% +20%)

50%

Desired dough temperature 25°C


1. Sour build – 18 hrs 24°C


Starter (Not used in final dough)

21g

1.4%

Fresh milled rye flour

421g

30%

Altus (100% rye sourdough)

50g

3.5%

Water

492g

35%

Total

963g


2. Scald


Coarsely milled rye

281g

20%

Roasted rye malt

70g

5%

Blackstrap molasses

84g

6%

Altus (100% rye sourdough)

50g

3.5%

Freshly ground coriander seed

14g

1%

Water

492g

35%

Salt

21g

1.5%

 Total

1012g


3. Sponge – four hours @ 25°C


Sour from (1.)

963g

68%

Scald from (2.)

1012g

72%

Total

1975g


4. Final paste – one hour @ 25°C


Sponge

1975g

140%

Fresh milled rye flour sifted

423g

30%

Fresh milled wheat flour sifted

210g

15%

Water

210g

15%

Total

2818g


Method

  1. 4:00pm day before, prepare the rye sour.
  2. 10:00pm day before, prepare the scald. Grind coriander seeds and combine with remaining dry ingredients. Measure the molasses into a saucepan cover with boiling water and bring to a rolling boil. Quickly stir in the dry ingredients with a wooden spoon and remove from heat and cool. Weigh scald and add further boiling water if necessary to account for evaporation.
  3. 9:00am following day, combine and mix the sour and scald and ferment a further four hours.
  4. 12:00pm combine sifted wheat and final water together and mix thoroughly with wooden spoon or whisk and allow to autolyse for one hour.
  5. 1:00pm add autolyse dough, remaining portion of sifted rye flour to the sponge and form the final paste.
  6. Shape and place into greased tins (mine were 8 x 4 x 4 Pullman) seam side down.
  7. I proved these for one hour before docking and placing into oven with lids on for 15 minutes at 270°C  then a further hour at 210°C

The final paste felt drier than the dark ryes I have baked recently – perhaps the molasses or malt flour? It was still a paste but felt it lot easier to handle. I as a little worried that the rye flour was absorbing too much water which may be a sign of excessive starch damage …

As seems to be the case with the rye breads I bake using freshly milled flours the final proof was exceptionally quick. I am hesitant to take my eyes from these breads during their final rise … the first sign of readiness and its straight into the oven … I don’t even debate myself anymore.

When pulled from the oven the bread felt soft and springy to the touch … the crust a dark brown with red hues. After cooling they were wrapped in a tea towel before storage in a plastic bag for a day … with me looking on longingly – all the time fingers crossed. I still lack confidence in my rye baking …

Finally I could slice – it was a cinch with a crust that was soft and smooth. The crumb was still moist but that will decrease over the coming days. A slice could be folded in half without breaking … did I mention it was soft?

The flavour is bright and I can pick the brightness of the coriander and tartness of the molasses. On the first day the molasses seemed stronger but by the next it had equalled out to rich round flavour. Most of all I am struck by the gentle mouth feel. It does not feel like a heavy rye bread and I look forward to the flavour developing throughout the week.

I also started playing with a rye crsipbread based on the formula in Dan Lepard’s Handmade Loaf. I omitted the commercial yeast and added some flavours inspired by his sweet rye formula – honey, ground cardomann seed, aniseed, and lemon zest. They are crunchy on the edges with a chew towards the centre. I love this combination of flavours …

All the best and best holiday wishes,
Phil

loydb's picture
loydb

These were tasty, I enjoyed the chewy butterscotch and chocolate. I have to agree that I liked them just as much without any chocolate at all. I think if I were to do it again, I'd get some orange-infused bittersweet chocolate for them - my 66% bittersweet/33% milk choc. was too sweet IMO -- I liked the Mohn bars better.

Baking Notes:

  • Panning these up required every flat cooking surface I owned. Fortunately, it was really cold and windy outside, so I could put an (empty) fresh-out-of-the-oven sheet pan on the back porch, and it was cold within 3-4 minutes.
  • I ended up adding an extra half cup of flour to get the batter out of the 'runny' stage
  • Don't put them in a sealed container for the wife to take to school, or they end up adhering to one another...


Pages

Subscribe to Recent Blog Entries