Those of you who have been following the forum have noticed the frequent posts on Bagels of all kinds. I have been experimenting with toppings and flavoring myself. Lumos has her beautiful WW bagels displayed on the front page. There has been much written about how firm/dense bagel dough is and warnings about not over heating our mixers by too large of loads or repeated batches. I decided to try Mike Avery's Sourdough Bagel recipe as written in his book "Back to Bagels" but instead of using a Kitchen Aid or my DLX mixers, I would do the entire mixing and kneading development process by hand. Mikes basic recipe includes a small amount of olive oil which makes the crumb softer and easier to chew. Of all the bread theme books I own, Back to Bagels is the very best value at $5 for the PDF form and I would say the most comprehensive book on the subject. I highly recommend the book for new and old timers alike. Mike details 8 different bagel flavors and how to prepare them. If you like blueberry bagels, spring for the $5. book and try the sourdough version. Utterly delicious!
Let me say I didn't expect to be able to easily develop the dough to a nice window pane condition, using only my hands. With all we have all learned about how time will do what we used to beat into the dough, I doubted a 56% hydration dough would stretch and fold well enough to do the job.--I was wrong. Here are the photos in evidence.
I apologize for the lengthy number of images. The idea of hand mixing and kneading bagel dough is so novel I thought some of you might like to try it. Since it is almost entirely a matter of technique, I thought the photos would answer most questions and encourage people to try this simple and gratifying process.
I'll post the recipe for these as soon as I hear back from Mike. Enjoy! Recipe now added courtesy of Mike Avery. This is just the recipe. The mixing and shaping techniques are described in detail in the book. There is a selection of other bagel recipes, each one delicious. Here is a link to the entire Bagel section which goes into much more detail about the process. It's a good read for anyone just learning about sourdough and bagels.
Eric
Sourdough Plain Bagels
These are a simple bagel, the same bagel that I featured in section 4, but with a larger batch size. This bagel is the basis for all of our bagel recipes.
Ingredients:
6 bagels 12 bagels Ingredient
230 grams 460 grams Water
8 grams 16 grams Light Olive Oil
45 grams 90 grams Sourdough Starter
450 grams 900 grams High Protein Bread Flour
10 grams 20 grams Salt
15 grams 30 grams Malt Powder
Mix the ingredients, and allow to rise about 2 hours, or until they are ready. Cut into 6 or 12, 120 gram pieces, round or roll into cigars, cover and let rest 30 minutes. Do final bagel shaping, put them on a baking sheet covered with parchment or Silpat, oil, cover, give them an hour of
floor time, and then refrigerate them for 12 to 24 hours. Boil in malted water, seed if desired, and then bake at 500F for about 15 minutes.

Mise en Place

All in the bowl, ready for the spoon.
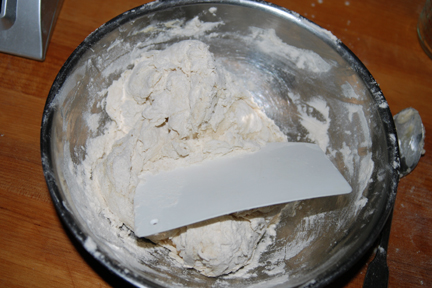
Started with a spoon and switched to the plastic spatula to incorporate this dry dough.

After a minute of scraping and turning , still some dry flour at the bottom.
This is where you could be tempted to add additional water. Fear NOT. It will eventually be fine.

It took a mere 2 minutes to get to this point. All flour is incorporated and the dough is one mass.

I hand kneaded just long enough to be sure there were no lumps of dry dough. You can see the mass is lumpy and not smooth at all.

Dough is now resting for 20 minutes covered with an expensive shopping bag.

Now rested, on to the first stretch and fold. There were 3 S&F's in 20 minute increments.

The second stretch. It teases out easily and letter folds nicely. Now getting smooth.

This is after the 3rd S&F. Dough is smooth and silky if firm. Quite impressive for a firm hand mixed dough.

I was able to tease out a nice window pane. It doesn't show well in this photo but I could see my finger through the membrane. The time since first mixing the dough is now 1 hour and 20 minutes.

All the dough is spread out on the counter ready to be divided into squares this size and shape.

Each 125g piece is flattened into a square/rectangle and tightly rolled into a log as a pre shape.

Ready to rest and roll.

Resting under plastic.

Rolled log, about to be wrapped around 3 of my fingers. Hand for scale.

Notice blunt ends are overlapped. When you roll the joint on the counter, it spreads out and becomes even or the same thickness all around the ring. (at least that's the idea)

Stretch the inside out gently or it will close up later. I usually go back and open the ring again before the fridge.

This is a half batch. Just the right amount for a small family for a couple days.
The recipe calls for 1 hour bench time after shaping and before refrigerating. The one hour is allowing the dough to warm to room temp and begin to wake the yeast. Depending on your starter, the room temp and how much gas was produced during the ferment yesterday, your bagels may or may not float test at this point. Try floating one in cool water. If it floats go ahead to the next step of boiling. If not wait another 15 to 30 minutes and try again.
Here are my first 3 bagels sitting on the bottom. They had not proofed long enough. The next 3 did float. You can see in the crumb photo that the crumb is dense and not as open as I would like. The float test will prevent this happening.

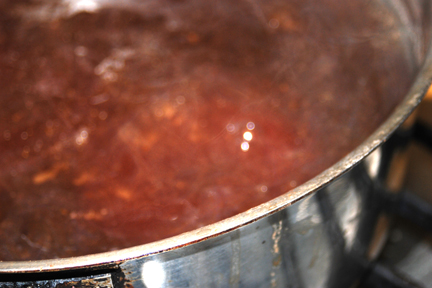
This image is out of order. I am holding a cold dough ring about to drop it into the boiling malted water.

Out of the hot and into the ice water. Still not floaters.
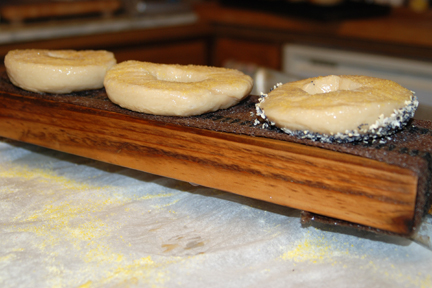
One seeded and two plain on the board, ready for baking.

Done baking. They are a little blotchy to my eye. i was trying to cook them more blond this time.

A better close up I think.

The crumb is just barely done and slightly dense. Never the less quite delicious. Next time I'll add 1 minute to the 15 minute baking time.

My breakfast this morning, plus a cup of strong, black coffee.
- ehanner's Blog
- Log in or register to post comments
Beautiful, well illustrated write up Eric, thanks!
You give those KA Baking Banter folks a run for their money with this write up ;)
Thanks cranbo. Hope you give it a try.
Eric
Great write-up and photos, Eric!
Never thought S & F was possible with stiff bagel dough. I'll try it next time I make bagels....though kneading the stiff dough for 20 minutes or so is one of my rare occasions for excersice these days. :p
Thank you for sharing. :)
lumos
Surprised me too. I thought I was in for a stretch of slap and fold.
Eric
Thank you, Eric, from a mixer-less baker! Seeing photos of all the key steps is tremendously helpful. Bakers who have the presence of mind to stop and take photos in the middle of a bake always impress the heck out of me. I'm happy enough just to remember to turn on the oven! Great work, Eric.
Marcus
It pleases me to hear from a mixer less baker. That was the point behind this effort really. Glad you find it helpful. It is a challenge to shoot photos and not coat the camera with dough/flour/seeds etc. Hope you try it.
Eric
Hi Eric,
Now that our temps are cooler bagel baking is on my to bake list for this week at my daughter's request. Seeing your's and others posted here recently remind me to 'get on it' ! Yours look delicious and I love the color of the crust.
Thanks for the idea of using S&F's with this dough. I usually use the Bosch but am familiar with Mike's method of S&F on stiffer doughs and will have to give it a go with my bagel dough.
One question:
I couldn't help but notice the sack of diastatic malt in one of your photos. My understanding of malt is that non-diastatic malt is what is used in bagel dough - or at least that is what was recommended in Whole Grain Breads.
I am curious as to why you used diastatic malt instead?
Take Care,
Janet
That is the malt product I use on Italian breads and Bagels. Other books/authors say to use diastatic malt. Honestly I haven't noticed a difference.
Eric
Eric,
I will have to pay more attention and see if I can tell a difference in the end product. I do know that the non-diastatic is generally used as a sweetener as the enzymes have been zapped by high heat.
Another experiment for me to get to work on!
Take Care,
Janet
Glad you found it useful. I think it is safe to say that any recipe can be hand mixed. It was the common wisdom of this being a hard mix that required strong arms and a long bench session if one should attempt it by hand, that drew me to try it. Not only is it not hard, it is remarkably simple. Your pasta dough example is a good one.
Eric
Eric, my first two bagel batches were mixed and kneaded by hand, and they came out good. But, avoiding the sweat and strain of bagel-kneading is a major reason I got my Bosch. It is a good work out.
Great photos. Thanks.
Glenn
Eric, my first two bagel batches were mixed and kneaded by hand, and they came out good. But, avoiding the sweat and strain of bagel-kneading is a major reason I got my Bosch. It is a good work out.
Great photos. Thanks.
Glenn
The point of my post is that it isn't necessary to kill yourself kneading. Just mix well, wait 30 minutes and do 3 S&F's 20 minutes apart. Easy Peasy.
BTW I managed to get my local grocer to get some Bubbies Kosher Dills in. They are delicious and unique but I think I prefer Nathens.
Eric
As if your previous bagel bake didn't blow us away... This looks stellar. Keep 'em coming, Eric!
Something I've always wondered about sourdough bagels, is whether one can make out any sourdough characteristics in the end product?
Thanks hansjokim. I didn't detect any noticeable tang on these. I expected the dough to be more extensible due to the natural yeasts and bacteria. There is an element of complexity in the after taste that comes from the riser though. It's very subtle.
In a note, Mike said this about how he developed the recipe. I had asked him about the oil being authentic.
I found that to be interesting. The oil does change things flavor wise.
Cheers,
Eric
You know, I was as surprised as you can imagine that it went together as nicely as it did. You have to get past that one little time period where the water is just starting to absorb and the dough ball looks dry and dusty like it will never come together. It's only a long minute but with a scraper and a little elbow grease it will become one lumpy mass. I kneaded it just briefly to be sure the dry lumps were broken up and then just let it rest. Blessed is the day I learned about the plastic scraper. I buy them by the dozen and every time someone wants to learn about baking I give them one with the lesson.
Upon reflection, I believe the lesson I learned with this is that a lot of what gets done in a mixer is unnecessary. You might use a mixer to get to that stage where the flour is just incorporated, but after that there is no need to damage the flour or add oxygen that lightens the crumb and looses flavor. You found that with your large batches of cheese bread, as did I. It IS inspirational isn't it?
Cheers,
Eric
Great looking bagels Eric, better than mine...I tripled the recipe to make 18 bagels and used more SD to get some more tang. taste was good, except some bagels were doughy in the crumb and for some odd reason, the hole closed up on them eventhouh I had a nice 2" inner ring to them after they proofed. weird.
Ray
I think with the SD riser, you need to be attentive to the bulk ferment and the float test. If the temperature is lower than 78F it will take way longer to float test than the 1 hour time. They will bake through more evenly if the dough has risen slightly.
Eric
Eric,
On my float tests, a couple of bagels floated on an angle. IE: one side floated while the other was lagging behind.
Ray
Ray,
I think that would be about right. Maybe one side was a little thicker.
Eric
Just curious, what do you think caused the blotchiness? How will you adjust for it next time?
My bagels get blotchy when I cold retard for too long. So I try not to retard more than 12-14 hrs or so these days. I've been attributing it to yeast consuming too much sugar in the dough and not enough sugar left to colour properly.
Or is it just me??? :p
lumos
Cranbo-Lumos;
Lumos may have a point about cold retarding, not sure. I think that the amount of malt syrup may have influenced the early coloring. The sugar in the malt syrup would help the color more quickly. I haven't ever seem that when using honey but then I also didn't get the same gloss.
Eric
You mean malt syrup in the dough or the boiling water?
I used powder in the dough and syrup in the water.
Eric
Same here. I sometimes add a couple of tsp of bicarbonate of soda to the boiling water; a tip I picked up in Reinhart's book. It seems to help colouring, too.
Anyway.....since I limited retarding time to max. 12-14 hrs, I don't get blotching problem so much.
Hardly any kneading at all really. Just enough to combine all of the flour, then let the clock do the hard work.
Eric
great job and well descibed. i will make them now that you showed how esay it is
albert
Please let us know how they work for you. For me, the hardest part is learning to shape them and having everything laid out in advance for the boiling and baking. It's a little production line that moves along easily if you are organized.
Eric
Hi Eric,
Speaking of shaping, I was working on some bagels last night inspired by your recipe, and I had some shaping problems. I don't think I degassed my dough completely enough; therefore the resulting bagels were a little wrinkly. When I was rolling out the little logs, it felt like there were air pockets (almost like hollow parts) in parts of the dough rope, and I'm guessing the wrinkles happen because the dough is folding itself over the internal air pockets when I roll the little log into a rope.
Just to clarify, are the little dough logs pretty firm and well de-gassed before rolling? Any other shaping tips you care to share?
Thanks
cranbo
It's funny you should mention the hollow feeling in the logs as you shape. I have also noticed that and found it weird at first. I now ignore that and forge ahead with rolling and a stretch ot wrap around 3 fingers. You would think there would be large pockets of air trapped inside but it doesn't seem so on inspection (eating). I roll slightly shorter than the length I need for the overlap and stretch as needed. I did think on this last batch that I would have been better off if I had shaped and placed them on the clean bench to rest a bit, before placing on the cornmeal dusted parchment. I always seem to be coming back to open the holes later.
Eric
Thanks Eric, that helps clarify. I was wondering if I was the only one!
Thanks for this posting, Eric. You do what we all should do--experiment and find the way you like best. There are so many variations, but it's great to see how this is done with hand kneading. I have found that, unless I make 12 bagels, the dough hook of the K/A (Pro 6) can't grab the dough and sends off a portion of it that doesn't get mixed. So, after just incorporating ingredients in the K/A, I've divided the dough in half and put it through the food processor for about 30 seconds per half and then kneaded all together by hand. But with your method, I can probably forego the K/A step (and save some bowl washing!). I also use the ice water bath after boiling (with 2 TBSP barley malt syrup in the boiling water--I use the dry malt powder in the dough) and give the dough an hour or so for bulk fermentation before shaping and refrigerating. I haven't yet made sourdough bagels but will give it a try. Thanks for all the details and the dedication!
Joyful
It was a labor of love. It's very nice to see and read the comments of those who relate to the project and find it helpful. Bagel dough seems to fall in that category where the minimum dough amount may test the motor and gears of most mixers. I think you could skip the food processor and just do it all by hand. It certainly wouldn't take any longer than cleaning the FP after 30 seconds of use. Please do post your results when you try it next.
Eric
I really appreciate your suggestions--that's real bagel wisdom! And I have been finding, as time goes by, that I knead by hand even after using the stand mixer; no tool like hands, no method beats the feel of the dough. I will definitely post next time a-round (pun intended)!
Joyful
That was a wonderfully informative post and instructions. Love the step-by-step photos ! That was a lot of work for you, and very much appreciated !
Anna
That was a rather long step by step post. I'm glad you enjoyed it and I hope you find it helpful.
Eric