The Fresh Loaf

A Community of Amateur Bakers and Artisan Bread Enthusiasts.

Most bookmarked

dabrownman's picture
dabrownman

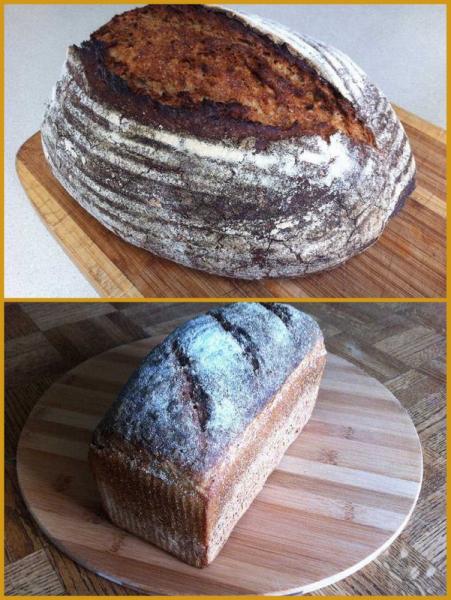
Twisted Sisters Chacon : 67% Whole Rye & Wheat with Sprouts & Seeds.

After the last white bread bake using the Pharaoh’s Mastaba, we went back to a 67% whole grain; rye and wheat bread with rye and wheat sprouts and a variety of add-ins and seeds including wheat germ, flax, coriander, pumpkin, hemp, rosemary, chia, cumin and red rye malt baked in another variation of the Chacon.

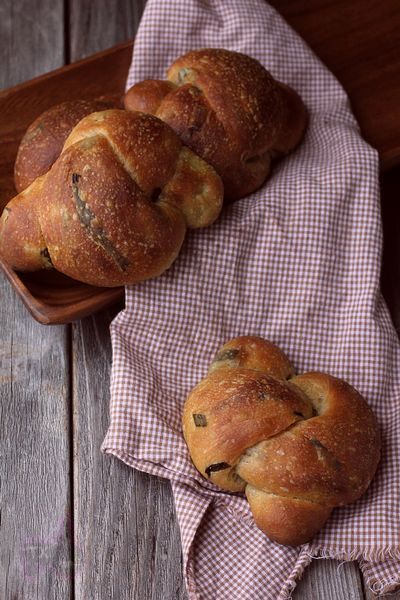
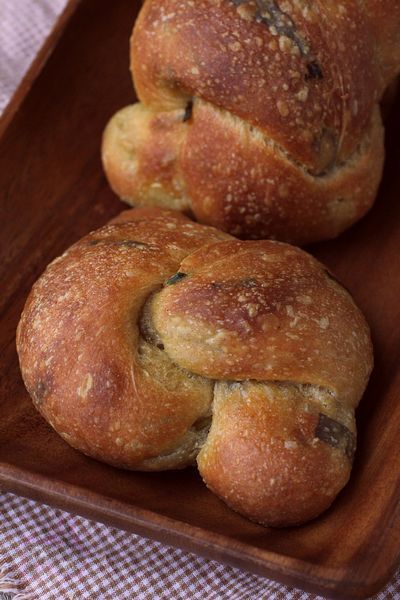
 The Chacon is quickly becoming a favorite bread shaping method.  It is a fun way to make bread with as many variations as one can conjure up and imagine.  This time we used a plain knotted roll in the middle of the basket and surrounded it with a plain two strand braid that was twisted (Twisted Sisters).  Then we added the remainder of the dough which contained all the add ins and sprouts as a disk to the top – which will become the bottom when tipped put of the basket.

This gave us a new but handsome boule shape that had no add-ins in the finish top and all the add-ins on the bottom.  It will be like having two different breads in each slice.

The Chacon came out of the basket easily and it slid into the mini oven, without slashing, just as well and onto my new ceramic tile / stone - which quickly broke when we threw water onit by accident before closing the door to steam.  No worries, the tile only cost 88 cents and I have 11 more of them.  In the back of the mini, we used Sylvia’s steaming method with a Pyrex 1 cup measure half full of water with dish rag in it.

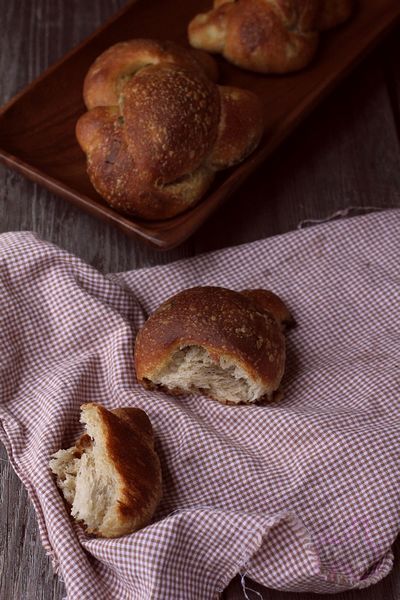
 The stone worked well and the Chacon was very brown and crunchy when it came out of the oven and it smelled wonderful too.  The boule cracked at each twist of the sister and at the knot seams.  We just love the way the Chacon cracks almost exactly where we want it to and think it should instead of willy nilly.  

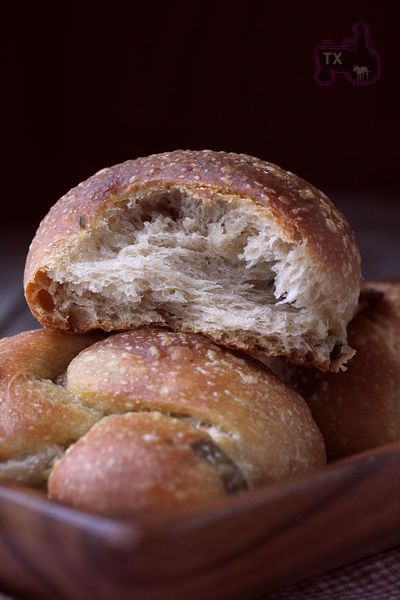
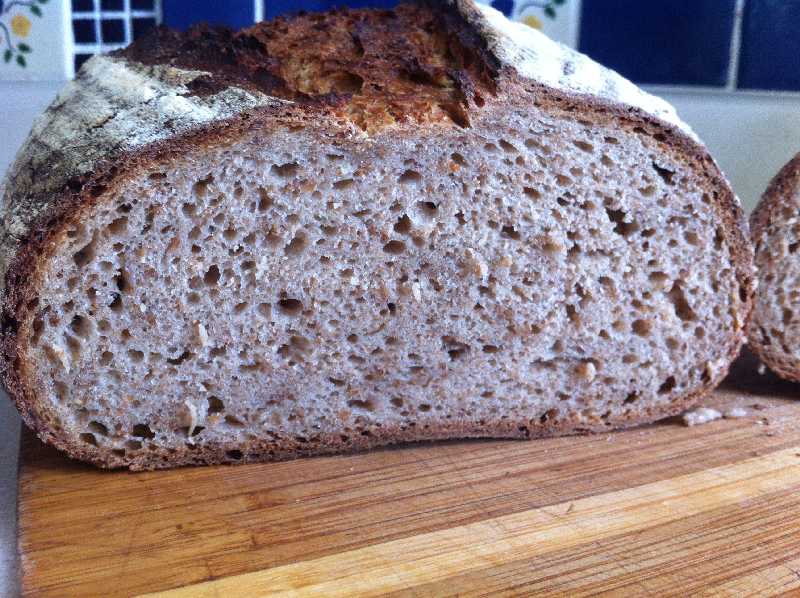
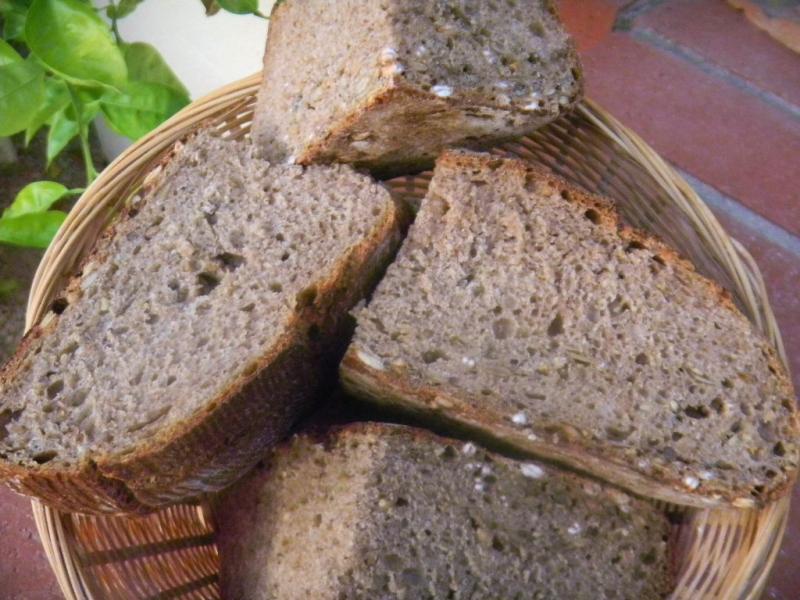
 The crumb shots and tasting will follow after the Chaon cools.  The formula and method follow the pix’s. 

 Method

The method was similar to our recent bakes with (3) - 4 hours each, 12 hour SD levain build.  This time it was not retarded overnight because we used some sliced onion in the build that made it smell more sour than normal.  The flours were autolysed with the wet and salt for 12 hours in the fridge too.  We have been adding the salt in with the autolyse recently and cannot tell any difference when we do it this way.  Forgetting to add the salt days are now over.

After soaking in water for 4 hours, we placed the seeds to be sprouted on 2 damp paper towels covered with another and wrapped in plastic on a plastic cutting board.  Half way through the 24 hour sprouting period, we re-dampened the top towel and covered it back up.  The seeds were sprouted in 24 hours. 

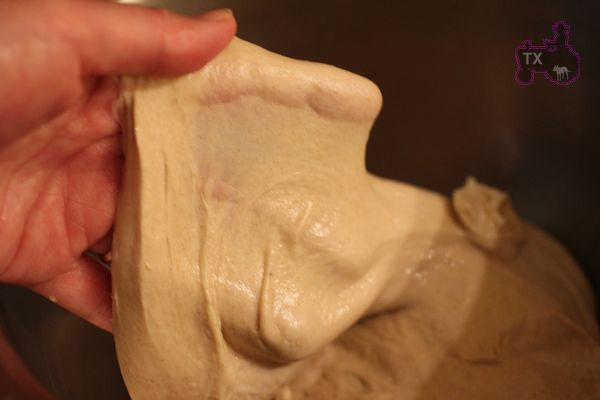
 We mixed the dough with the autolyse with the KA for 8 minutes on 2 and  2 minutes more on KA3.  The dough was then moved to an oiled, plastic covered bowl to rest for 15 minutes before doing 5 sets of S&F’s every 15 minutes on a floured work surface.  When the S&F’s were complete the dough was left to develop and ferment for 1 ½ hours before going into the fridge overnight for 8 hours.  In the morning the dough was allowed to come to room temperature over 1 ½ hours on the counter.

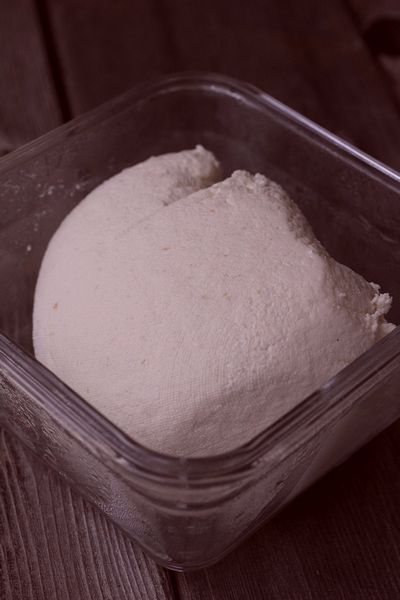
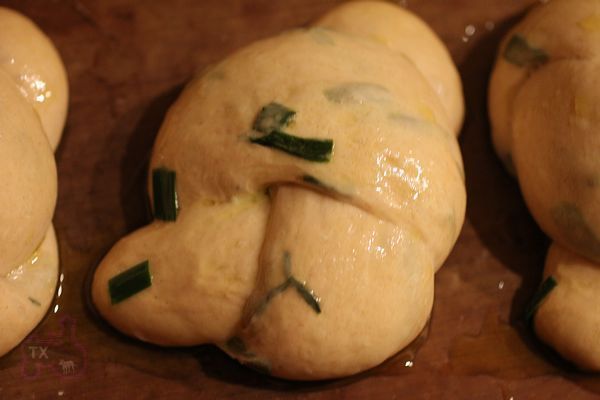
 The dough was then portioned into (3) 150 g pieces for the knotted roll and the 2 strand, ‘twisted sister’ braid.  In a rice floured basket the knotted roll went in first in the center, then the twisted sister went in around the knotted roll.  The remainder of the dough was flattened out gently and all the sprouts and add ins were incorporated.  Once the add ins were incorporated evenly, the remaining dough was shaped into a boule and allowed to rest for about 5 minutes until it had relaxed.

 It was then flattened into a disk the width of the basket and placed on top of the roll and braid to make the finished Chacon in 3 distinct sections.

 After a 2 hour proof it had passed the poke test and was ready for the mini oven stone and 12 minutes of steaming at 450 F regular bake.  The steam was then removed and the mini oven turned down to 425 F convection this time.  The Chacon was rotated 90 degrees every 5 minutes.

 After the 2nd rotation the oven was turned down to 400  F convection.  20 minutes after the steam was removed, the bread was done – 32 minutes total.  It was allowed to cool with the oven off and the door ajar for 10 more minutes before being moved to the cooling rack.

67% Whole Rye and Whole Wheat with Sprouts, Wheat Germ, Flax and Red Rye Malt.     
      
StarterBuild 1Build 2 Build 3Total%
SD Starter15100254.57%
Rye304007017.50%
WW00707017.50%
Water 40 4010.00%
Milk 3000307.50%
Total Starter75907023558.75%
      
Starter     
Hydration93.22%    
Levain % of Total25.59%    
      
Dough Flour %   
Dark Rye107.526.88%   
Potato Flakes102.50%   
Ground Flax Seed102.50%   
AP16541.25%   
WW107.526.88%   
Dough Flour400100.00%   
      
Salt82.00%   
Water33583.75%   
Dough Hydration83.75%    
      
Total Flour547.5    
Milk 30, Water 432.5472.5    
T. Dough Hydration86.30%    
Whole Grain %69.50%    
      
Hydration w/ Adds82.53%    
Total Weight1,153    
      
Add - Ins %   
Wheat Germ102.50%   
Red Rye Malt30.75%   
Hemp 20, Chia 10, Pumpkin 306015.00%   
VW Gluten123.00%   
Total8521.25%   
      
Multigrain Sprouts %   
WW205.00%   
Rye205.00%   
Total Sprouts4010.00%   
      
Coriander, Cumin & Rosemary30.75%   
whoops's picture
whoops

Sour Dough recipe questions.

HI All,

*sigh* Let me try again to submit my questions- After 30 minutes of typing and copying, somehow I lost the entire thing when I hit save!

Anyway, here I go: I have been trying to use the recipe supplied by Gold Rush in their sour dough starter packet (yes, I got frustrated and tried a store bougth starter- but I have used several different starters with this recipe)The recipe (for a 1 pound loaf) calls for: ! cup starter, 1/3 cup warm water (90-100 degrees) 1 tsp salt, 2 cups bread flour (11-13% protein), and 1/4-1/2  tsp instant yeast.

The directions (with my comments/questions in italics) are :

1. In a mixing bowl, combine all ingredients (except the optional yeast). Mix until combined. Knead dough by hand for 15 minutes or with a dough hook for 10 mniutes (or until gluten develops). I take this to mean until the dough can pass the window pane test.

2. Flatten dough, place in a large plastic bowl. Dust the dough with flour and cover with plastic wrap. Rest the dough for 6-8 hours. If using yeast add to dough at this stage. Be sure yeast is well distributed throughout the dough . so, does this mean to add the yeast AFTER the 6-8 hours, or right before you rest the dough? I have been adding it sometime during that first knead. I even went to the Gold Rush website to get clarification, and was even more confused after reading their explanation of the directions.  

3. Knead dough onto floured surface until gluten development. (does this mean it LOST the gluten development while resting the 6-8 hours?) Knead until dough is smooth, shiny, and satiny (my dough is always smooth shiny and satiny after the first round of kneading. it looses this texture when I start to knead again, and becomes very lumpy and ugly). Test for proper kneading by pressing your finger into the dough, if the dough stays indented it is developed. ( mine will stay indented, even though it is not smooth, and is lumpy)

4. Shape dough into desired shapes (rounds, loaves, rolls, baguette). Place on parchment lined sheet pan or greased pan.

5. Cover with plastic wrap and let proof for 4-5 hours (or over night in the refrigerator) until dough has doubled in size (the only time I got a second rise out of any of the attempts is when I let it proof in a VERY hot kitchen, as the AC had gone out and it was 105 degrees outside that day. It took about 6 hours, and it rose double, but looked weird, bubbly and with holes in it, though it kept its shape fine. Oddly enough, when it baked, it had no holes in it, and was very heavy and dense. )

6. With sharp knife or razor blade cut designs into the top of the bread dough. The cut enables the bread to rise evenly in the oven and for the crumb to open.

7. Preheat the oven to 475 F. Place pan with 1-2 inches of water on the bottom shelf of the oven. When water is visibly steaming, the oven is ready. Place the dough pan in the middle of the oven and reduce the heat to 425 f. Bake for 30-45 minutes.

I have used the bread flour with appropriate protein content (it was whole wheat, though) and a combination of rye and wheat in different ratios.With the WW and rye flours, I have added 1 tbsp gluten for each cup of flour I have used.  Every time, the bread has turned out very dense. no rise in the oven, and except for the last time, no rise with the proof. I have let it proof in the refrigerator over night for all but the last time, as it took so long for the first rise. The dough has doubled every time with the first rise. While all the results have been edible, and the more recent loaves have had the increasing tang (though not quite yet to my preference)  , the crumb is not what I would like, and the crust is tough and chewy.

So, any comments or suggestions or explanations as to why things happened (to the best of your knowledge) would be appreciated. I like this recipe because it SEEMED to simple. I am trying to do two things:

1- make a good San Francisco type sourdough with that tang. I have seen that San Joaquin Sour Dough recipe on someones blog (sorry my mind is not clear so late in the evening and I forget whose blog/recipe it was..Dave Or Dan, perhaps?)

2- make a reasonable facsimile of the German wheat/rye sourdough that I had when I was  a child in Germany. I have been able to find fairly good representations of this bread at various artisan or European bakeries, but I would love to be able to make some myself.

I have tried 2 other sourdough rye recipes, one that used its own type of "starter" ( I think you baker types call it a preferment or levain or something) and they were good enough tasting, but not quite right. They also, were very heavy and did not rise the second time.

All of the flours I use are organic. I have used King Arthur Brand od some of Bobs Red Mill and also some unbranded organic ones that I bought in bulk from my food coop. The gluten I used was from Bobs Red Mill Vital Gluten.

Thanks in advance for any help you can give!

Sandy


Franko's picture
Franko

Brotform Multi Grain Baguette

Earlier this week while rummaging around in our local cookware store looking for unfluted French tart rings I spotted this nifty looking 18" long baguette style brotform.

I've seen them online in the past, never paying them much attention for some reason, but knew as soon as I picked this one up for a closer inspection I wouldn't be leaving the store without it. The idea of a dark, crusty loaf full of mixed grains and seeds contrasting with the white pattern of the brotform immediately came to mind rather than using it for a typical white baguette. While I continued my search for the tart rings I started considering possible recipe sources to use for the loaf I had in mind, thinking I'd likely find what I was looking for in Jan Hedh's “Swedish Breads & Pastries” or possibly Dan Lepard's “The Handmade Loaf“. After finally locating the one and only straight sided tart ring in the entire store, I drove home with the new purchases and immediately started going through my baking books looking for the type of bread I'd envisioned. Dan Lepard has a good looking formula for a Sunflower bread in his book that I almost went with, but it called for a levain and I'd already decided that I wanted to use a yeasted preferment of some kind for this loaf. As is often the case I found what I was looking for in Jeffrey Hamelman's “ Bread”. The two recipes I drew inspiration from were the Five Grain Bread with Pate Fermentee and his Sunflower Seed Bread with Pate Fermentee, on pages 129 and 131 of the book. Between the two, I opted for the higher percentage of pate fermentee he uses in the Five Grain Bread, swapped out the malt syrup used in his Sunflower Seed Bread for honey, and used an 80/10/10 combination of white AP flour, whole dark rye, and barley flour for the final mix.

 The percentages used in the initial formula came fairly close to giving me a workable mix, but needed a few adjustments for hydration, reflected in the formula below. The mix should be fairly slack, but not so much that developing it over the stretch and fold sessions becomes a matter of having to scrape it off the counter after the first S&F. The bread isn't as crusty as I'd hoped for, likely due to the higher percentage of honey used in the final mix, but I can live with that given the slightly sweet flavour and soft chewy texture of the crumb. For the next bake of this bread I'd like to include some of the   black currants we dehydrated last year in the mix to add a note of tart to the flavour profile. I'm sure this bread would lend itself to savoury additions such as cheese, fresh herbs or roasted onions as well. Formula and procedure included below. 

Best Wishes.

Franko

Procedure for Multi Grain Baguette with Seeds and Pate Fermentee 

  • Mix all ingredients for pate fermentee and let sit in a covered bowl for 14-16 hours @ 70F

  • Mix all ingredients for the multi grain soaker at same time as pate fermentee and leave in covered container at room temperature. 

  • Final dough:

    Mix the flours and pate fermentee with the water, adjusting for hydration if needed. Autolyse for 40 minutes. 

  • After autolyse is complete add the salt and instant yeast and mix till the dough is slightly developed. Add the grain soaker and honey and develop by either doing stretch and folds in the bowl or slap and folds on the counter until a slight windowpane can be achieved. The dough should be slightly sticky and moderately developed. 

  • Bulk ferment at 76F/24C for 90 minutes giving a full stretch and fold every 30 minutes.

  • After the last S&F round the dough to medium tight ball, cover and allow 15 -20 minutes for the dough to relax before shaping. 

  • Shape as a baguette or batard, and place seam side up in a floured brotform. 

  • Preheat the oven and baking stone to 485F/251C for 45-60 minutes prior to baking. 

  • Final rise of 45-50 minutes at 74F/23C covered with plastic sheet. 

  • Tip the loaf on to the underside of a parchment covered 18 ”/45cm long sheet pan or a peel if shaped as a batard. Score as desired, and slide loaf onto the preheated stone, with steam system in place and oven vents blocked. 

  • Bake at 485F/251C for 10 minutes, unblock the oven vents, remove the steam system and lower the heat to 465F/240C. 

  • Bake at 465F/240C for 10 minutes, rotating the loaf periodically for even colouring. Bake a further 10-15 minutes at 455F/235C or until the internal temperature is 210F/98.8C 

  • Turn the oven off, prop the door open slightly and leave the loaf in the oven for 20 minutes to cool gradually. 

  • Wrap the loaf in linen and place on a wire rack for 4-5 hours before slicing. 

  • NOTES: The bake times are based on a 680 gram loaf. Longer bake times will be needed for larger loaves. For transferring the loaf to the oven I recommend using parchment paper to avoid any likely sticking. The dough is soft and difficult to handle in a baguette shape. After the first 10 minutes of baking the parchment can be removed easily from beneath the loaf.

    Link to full sheet [HERE]


giyad's picture
giyad

Do I need to use bakers percentages or can I just multiply the recipe with the number of batches I want to make?

Hello,

I'm using a recipe that calls for:

  • 2.5 cups for bread flour
  • 1 cup of cake flour
  • 1 tablespoon of sugar
  • 1 tablespoon of vegetable oil
  • 2 teaspoons of salt
  • 1 teaspoon of yeast
  • 1.25 cups of water

Now, this recipe makes me 4-6 balls of dough (depending on the size I want them to be), but I want to make around 30 dough balls.  Should I just multiply that recipe by 5 for each ingredient, or do I use bakers percentages? 

I've read very mixed answers online, but I find it pointless for there to be a formula if you can simply multiply by how much you want to make... although i guess you can be more accurate if bakers percentages, like I can make a batch that produces 31 balls of dough instead of 30.

I guess the thing I'm most worried about is the yeast.

  • 71.5% bread flour
  • 28.5% cake flour
  • 1.8% sugar
  • 1.8% vegetable oil
  • 1.2% salt
  • 0.6% yeast
  • 35.7% water
dabrownman's picture
dabrownman

Buckwheat 60% Multi-grain YW / SD Bread with Walnuts, Sage, Flax, Wheat Germ, Apples, Prunes and Groats

After baking my first variation of sweetbird’s Buckwheat SD and Apple Bread here:

http://www.thefreshloaf.com/node/28081/dabrownman-butchers-sweetbird%E2%80%99s-lovely-buckwheat-apple-and-apple-cider-buckwheat-groat-br

I thought we would give it another go, since we butchered her lovely bread and also made an evil face with the boule,  by removing the hard cider and replacing it with the juice used to re-hydrate the dried apples and prunes and combining it with Phil's Sage and Walnut Rye.

 We added prunes, walnuts, a walnut oil paste, sage, chia, flax seed and wheat germ.  The buckwheat groats remained and were used with the apples and prunes as decoration for the loaf and well as add ins.

 The bread is 60% whole grain consisting of buckwheat, durum atta, rye, soft white wheat, WW, WWW, semolina and AP.   The hydration was 75%

 We made this bread 2 ways; in a loaf and as the ever popular Chacon.  The top of the loaf was decorated with buckwheat groats and the apple prune filling and the Chacon was left nakedly unadorned.

Both baked up nicely in the mini oven.  The crust was dark brown and crunchy going to chewy when cooled.   The exterior of both was appealing.  The crumb was ope, light, airy, moist and soft - just like the YW and SD combo bakes tend to be every time. 


This bread tastes great with the buckwheat, fruit and walnuts coming though  well with the hint of sage.  The SD tang is muted because of the YW and hanging out in the background.  We really like this bread and glad that we did another variation of it - without the ugly face!

Method and formula follow the pix's.


Chacon wedge shot of the ctrumb.

Made a great salami sandwich with veggies and fruits for lunch.

Method

Instead of our usual 3 day method we shortened it down to 24 hours.  The mixed YW and SD levain was built over two 4 hour builds and one 2 hour build and then it was added to the 2 hour autolyse of; flours, apple /prune re-hydration juice liquid and salt.

The dried apples and prunes were reconstituted in water overnight in the fridge and the excess water was squeezed out and used for the dough liquid.  The groats were micro waved in water for 1 minute and allowed to sit for 30 minutes.  The walnut and walnut oil paste was made.

Once the autolyse was complete the levain was added and hand kneaded to mix before being allowed to rest in an plastic covered oiled bowl for 15 minutes.  6 S&F’s were done every 12 minutes.  The first 2 were performed on a floured surface and the next 4 on a lightly oiled surface.  Before the 5th S&F the dough was rolled pout into large circle about ½” thick and the walnut and sage paste, buckwheat groats, walnuts and apple / prune add ins placed on top. ¼ C of AP flour was added to the apple / prune mixture to help dry it out some more and not affect the overall hydration of the dough..

The dough was placed back into the oiled bowl and allowed to ferment and develop for 1 ½ hours before refrigerating for 6 hours.  In the morning the dough was removed from the fridge and divided in half with the Chacon half going back in the fridge for another hour while the other half of the dough was formed into a loaf and placed into a PAM sprayed Pyrex loaf pan and allowed to rise in a plastic trash bag until doubled and passing the poke test about 2 hours.

After the additional hour in the fridge, the remainder of the dough was formed into a Chacon by making a knotted roll and placing it in the center of the folded round edges of the circular Chacon.  The Chacon was formed on a cutting board so it could be inverted into the rice floured basket placed on top.  Rice flour was also used to dust the top before being inverted into the basket.

The Chacon was placed into the plastic trash bag with the loaf and allowed to rise until doubled and passing the poke test.

 The mini oven was heated to 500 F regular bake and Sylvia’s steaming method using a wash cloth and 1 C Pyrex measure ½ full of water installed on the back of the oven after being micro waved until the water boils.  We decided to slash this loaf at the last minute and then steamed it in the mini oven for 12 minutes with the temperature turned down to 450 F at the 4 minute mark.  At the 12 minute mark the steam was removed and the temperature turned down to 425 F – convection this time.

The loaf was rotated 180 degrees every 5 minutes and it was removed from the pan at the first 5 minute rotation.  At the 32 minute mark the loaf was done, reading 205 F on the inside and allowed to dry in the off oven with door ajar for 10 minutes.  The loaf was them allowed to cool on a wire rack while the mini oven was steam prepared and preheated for the Chacon in the same way as the loaf.

The Chacon was removed from the basket by inverting it onto parchment paper with the perforated top of the broiler used as a baking tray.  The decoration of buckwheat groats, apple and prune fruits was added.  The same baking method was used for the Chacon as the loaf.

Buckwheat 60% Multi-grain YW / SD Bread with Walnuts, Sage, Flax, Wheat Germ, Apples, Prunes and Groats     
      
Mixed StarterBuild 1Build 2 Build 3Total   %
SD Starter20150355.71%
Yeast Water4025107516.30%
Rye2000204.35%
AP03510459.78%
Buckwheat203005010.87%
WWW0020204.35%
Water02510357.61%
Total Starter1001305028060.87%
      
Starter     
Hydration83.61%    
Levain % of Total21.44%    
      
Dough Flour    %   
Durum Atta255.43%   
Soft White Wheat11525.00%   
Rye204.35%   
White WW204.35%   
Buckwheat 11525.00%   
AP11525.00%   
Semolina306.52%   
Potato Flakes102.17%   
Ground Flax Seed102.17%   
Dough Flour460100.00%   
Salt91.96%   
Apple/ Prune Water - Water37581.52%   
Dough Hydration81.52%    
      
Total Flour612.5    
Apple/ Prune Water - Water502.5    
T. Dough Hydration82.04%    
Whole Grain %61.63%    
      
Hydration w/ Adds75.28%    
Total Weight1,306    
      
Add - Ins    %   
Wheat Germ102.17%   
Walnut Oil 51.09%   
Prunes347.39%   
Dried Apples337.17%   
VW Gluten153.26%   
 Walnuts 25, chia 10, flax 10, 459.78%   
Total18239.57%   
      
1 tsp Dried Sage Added to Walnuit Oil and Walnut Paste  


John K.'s picture
John K.

Best Mill for Milling Soft Wheat

I am interested in purchasing a home mill for milling wheat, but I am particularly interested in purchasing a mill that will mill not only hard wheat but also soft wheat. From looking around on the internet, it appears that hand-cranked mills, even the Diamant, are not really suited to milling soft wheat, which apparently tends to clog them. I suppose that leaves me with electric mills? If so, will some electric mills mill soft wheat and some won't? Any recommendations?

I am particularly interested in soft wheat for a couple reasons. One is that the wheat grown locally is soft wheat, as our climate here in Northern Indiana is apparently not well-suited to growing hard wheat. Also, I've read Ed Wood's Classic Sourdoughs, and he seems to dispute there the very common wisdom that hard high-gluten wheat is better for bread than softer low-gluten wheat, at least for sourdough. And in fact, I tried his recipe for Whole Wheat Sourdough (on his website) using the South African culture and hard red wheat flour and it came out very dense and gluey (although I think I messed up a step and wound up kneading in extra flour at a step when the recipe calls for treating the dough "gently"). I then on my second try substituted organic whole wheat "pastry flour" for the hard wheat flour (although the culture itself I used in the recipe had been fed with hard wheat flour) and it came out much better. I'm now thinking of feeding at least one jar of the culture with soft wheat and seeing how it turns out.  

txfarmer's picture
txfarmer

Two Sourdough Ricotta Soft Bread Rolls -- making cheese at home for the first time

Sending this to Yeastspotting.

Click here for my blog index.

Who knew it's so easy to make cheese at home? Followed instruction here, honestly effortless, and ricotta tastes so much better when made fresh at home with the best ingredients.

Made quite a few things with these cheese. First an asparagus ricotta tart with homemade puff pastry:

--------------------------------------

Then a brioche-like rich sourdough bread roll, with red bean filling:

Note: makes 8 rolls
Note: total flour is 250g

-levain
starter (100%), 13g
water, 22g
bread flour 41g

1. Mix and let fermentation at room temp (73F) for 12 hours.

- Final Dough
bread flour, 128g
whole wheat flour, 75g
butter, 50g (softened)
egg, 70g
sugar, 13g
salt, 5g
ricotta, 125g
water, 60g
levain, all

1. Mix everything except for butter , knead until moderate level of gluten developement, add butter, knead until the dough is even stronger. A relatively thin windowpane can be stretched, but holes can appear.

2. Rise at room temp for 2 hours, punch down, put in fridge overnight.
3. Roll out flat, rest at room temp for one hour.
4. Roll into rectangle, smear on red bean filling, roll up, and cut into 8 portions. Put into molds.

5. Proof at room temperature until almost fully. About 5.5hours at 80F. When pressed the dough should slowly spring back a little bit.
6. Bake at 375F for 20-30min.

Soft, rich, and melt in the mouth delicious.

--------------------------------------

Lastly, some ww savory ricotta chive knots with a plainer dough.

Note: makes 9 rolls
Note: total flour is 375g

-levain
starter (100%), 20g
water, 33g
bread flour 61g

1. Mix and let fermentation at room temp (73F) for 12 hours.

- Final Dough
bread flour, 191g
whole wheat flour, 113g
egg, 105g
sugar, 11g
salt, 8g
ricotta, 75g
chopped chive, 20g
water, 109g
levain, all

- For Brushing
mix together some chopped chive, salt, and olive oil, heat then soak for at least one hour


1. Mix everything, knead until moderate level of gluten developement. A relatively thin windowpane can be stretched, but holes can appear.
2. Rise at room temp for 2 hours, punch down, put in fridge overnight.
3. Divide into 9 portions, round and rest for one hour.
4. Roll into a rope, tie a knot.
5. Proof at room temperature until almost fully. About 5.5hours at 80F. When pressed the dough should slowly spring back a little bit. Brush with the chive & oil mixture.

6. Bake at 375F for 20-30min.

Very frangrant and soft

Perfect dinner rolls

dabrownman's picture
dabrownman

Jasmine Tea, 50% Whole Multi-Grain SD & YW Durum Atta Bread with Wheat Germ, Flax and Chia Seeds

Boule and crumb.

We are continuing to discover a better method of summer baking in the Cuisinart mini oven.  This time we tried Sylvia’s steaming method by using a 1 cup Pyrex measuring  cup half full of water with a dish rag rolled up inside and microwaving it before putting it onto the preheated 500 F mini oven.

 No stone was used.  We think this steaming method is a good as covering the boule with a stainless mixing bowl and that both would be better with a stone.

 Even though the loaf was not slashed, since we managed forget to do so, I though for sure it would split somewhere but it only cracked down one side.  There wasn’t much spring - about an inch.  It browned up nicely though.  We love the color that durum brings to bread inside and out and about 50% of this bread was durum with the other 50% whole grains of various varieties with wheat germ and the flax ground.  The whole grains overpowered the yellow color of the durum with barn on the inside though.  This bread is much more about being a hearty multi-grain variety.

 The only slightly unique addition to this bread was using Vietnamese 902 Green Jasmine Tea for the liquid.  I just love Vietnamese jasmine tea and used one that is especially fragrant with jasmine blossoms. 

Boule crumb

 The crust was nicely browned and chewy after coming out of the oven very crusty.  The crumb was very moist and light and tastes very sour. It made a fine sammy and it was delicious as toast or plain.   I have noticed that, if YW and SD starters are mixed from the beginning of the levain build, the bread is less sour.  The boule sprang more than the loaf and the crumb was a little more open.

Loaf crumb

 This bread didn’t have the usual sprouts and pumpkin or sunflower seeds (since I also forgot to put the pumpkin seeds in) we like so well, but it is a very hearty and satisfying bread to munch on – until it is gone!  Formula and method follow:

Method

 The YW and SD levains were built separately this time and used 3 builds.  The first 2 builds for each were 4 hours apart and the levains were refrigerated overnight at the 8 hour mark right after the 3rd build as each had already doubled. 

 All mixing was done by hand.  The flours, ground flax seeds, wheat germ, chia seeds, salt and green tea with the salt were autolysed for 1 hour before the levains were added the next morning.   After mixing the levains in completely the dough was allowed to rest for 20 minutes.

 4 sets of S&F’s were done every 15 minutes.  The first 2 were done on a floured surface the last 2 in a well oiled, bowl.  The dough was rested in a plastic covered oiled bowl between the S & F’s.  The dough was allowed to ferment and develop on the counter for 1 ½ hours before retarding in the refrigerator for 12 hours.

 The dough doubled in the refrigerator overnight. The next morning the dough was divided in half and half returned to the refrigerator since it would be baked one hour after the first half.  The other half was allowed to come to room temperature for 1 hour and then pre-shaped into a loaf rested 10 minutes and final shaped into a loaf and placed into a Pyrex loaf tin and allowed to proof.  The other half of the dough went through the same process but shaped into a boule and placed into a rice floured basket to proof.

 After an hour and half the loaf had doubled, passed the poke test and ready to bake .  Sylvia’s steaming method was used with a wash rag heated in a half full Pyrex 1 cup measure in the microwave and the placed in the back of a 500 F preheated Cuisinart Mini Oven.  No stone was used.  The loaf was not slashed but was steamed  for 12 minutes and then the steam removed and the temperature turned down to 425 F convection this time.

 The bread was then rotated every 5 minutes until if reached 205 F internal and then was removed to the cooling rack with no extra crisping in an off oven.  After the first 5 minutes of convection baking the loaf was removed from the Pyrex loaf pan and baked directly on the rack. 

 A similar process was used for the boule except it was slashed and steamed on parchment paper on the top cover of the broiling pan for the first 12 minutes and then baked at 425 F directly on the rack.  The loaf took about 30 minutes of total baking time and the boule 3 minutes less.

50% Whole Multi Grain Durum Atta with Wheat Germ, Flax and Chia Seeds     
      
Mixed StarterBuild 1Build 2 Build 3Total%
SD Starter25100354.50%
Yeast Water503008016.00%
Rye50350858.00%
AP02530555.00%
Durum Atta0030306.00%
WW50400909.00%
Water5060011022.00%
Total Starter2252006048597.00%
      
Starter     
Hydration74.77%    
Levain % of Total33.24%    
      
Dough Flour %   
Durum Atta30060.00%   
Oats255.00%   
Dark Rye255.00%   
White WW5010.00%   
Whole Barley255.00%   
Whole Bulgar255.00%   
Potato Flakes102.00%   
Ground Flax Seed102.00%   
Whole 6 Grain Cereal306.00%   
Dough Flour500100.00%   
Salt91.80%   
Green Tea 42585.00%   
Dough Hydration85.00%    
      
Total Flour777.5    
Green Tea - 425, Water - 207.5632.5    
T. Dough Hydration81.35%    
Whole Grain %53.05%    
      
Hydration w/ Adds80.32%    
Total Weight1,459    
      
Add - Ins %   
Wheat Germ102.00%   
VW Gluten102.00%   
 Chia 20204.00%   
Total408.00%   
Franko's picture
Franko

40% Rye Remake/ Visit to Vancouver Island Grain and Milling

 Back In early May I posted on a 40% Rye http://www.thefreshloaf.com/node/28620/goo-good with a fermented soaker that I had to try and save because of miscalculating the hydration. The save was short lived unfortunately. After three days the crust became so tough from the extra flour added to the dough I couldn't eat it for fear of cracking a tooth. The formula has since been adjusted for hydration and two bakes of the bread have been done over the last few weeks with much better results than the original. The first loaf of the new mix worked out well, the dough consistency being what I expected, well hydrated but not to such an extent it was difficult to develop with a few stretch and folds. This time instead of baking it in a Pullman tin, the dough was shaped as a batard and placed in a brotform. The bread was to be part of a buffet table at my wife Marie's recent birthday party and I wanted it to look a little fancier than a regular tinned loaf. The loaf baked up nicely with a cracking crust, evenly open crumb, and well rounded flavour with a pleasant sour note from the soaker.

 One of our guests told me that she's usually not a fan of either rye bread or sourdoughs but that she enjoyed the flavour and texture of this bread more than any she'd had in the past. This was reassuring to hear and good to know that other people could enjoy it since to that point I'd been the only who'd tasted it. 

Last week we took a mini 3 day vacation out to the West Coast of Vancouver Island for a little R&R. On our way out to the coast we made a stop at Vancouver Island Grain and Milling, in the city of Port Alberni. VI Grain & Milling, a relatively new enterprise, came to my attention when Marie brought home one of their pamphlets from a local Farmer's Market. The proprietor, Wayne Smith runs the facility on his home and farm property located just a short drive from the main highway through town. At the moment the various organic grains he carries are kept in three, temperature and humidity controlled semi trailers situated near the front entrance of his property, with construction of a permanent storage facility getting under way this summer. One of the trailers has a small milling area equipped with four Nutrimills that he uses to produce retail size (2K) bags of flour for a number of health food stores here on the Island.

Wayne told me he doesn't anticipate installing a full size mill anytime soon as the investment cost and profit margin wouldn’t justify it at this point in the business, but that he'd be happy to mill whatever I needed on short notice. What a find! I asked him if he would mill up a slightly coarse rye flour for me while I was there, and a short time later Wayne presented me with 2 kilos of the best looking rye flour I think I've ever seen.

This is the flour I used in a second bake of the 40% rye. It preformed beautifully throughout the mixing, fermentation, shaping and baking, giving the bread an even better depth of flavour than the previous bake. The fermentation properties and flavour of fresh milled flour compared to pre-milled is so superior, I'm finally persuaded to invest in a flour mill for my home baking. Much as I'd prefer a stone mill similar to the type [Phil/Pips] uses, I've decided the size and cost of the impact type Nutrimill is a better fit for my storage and budget limitations right now. Once the existing stock of wheat and rye flour I already have has been used up I'll be looking forward to milling all my own flour with grains from Wayne Smith's VI Grain & Milling. 

The second bake of the 40% Rye was slightly different in that the soaker was all cracked rye instead of 50/50 cracked rye and wheat, but other than that the rest of the formula remained the same as per the previous mix. Since I've started using a fermented soaker in some of my sourdoughs I've discovered how much easier it is to fine tune the level of sour in the  loaf, rather than having to rely entirely on the levain to contribute the bread's sour component. Cracked or whole grains ferment quite slowly compared to flour, allowing for greater control over the strength of the sour flavour than I feel I have with a typical 12-18 hour levain. With the soaked grains adding texture to the loaf along with added flavour, it's proven to me to be an effective technique for enhancing the overall quality of the finished loaf.

After pulling the loaf from the oven, de-panning, and wrapping in linen, it was left to cool for 48 hours. This was difficult! I was tempted to take a slice the day after baking but I'm glad I gave it one more day. The crumb, after 48 hours had set completely, allowing for clean even slices to be taken, minus the usual residue left on the knife when I slice a rye bread after only 24 hours.

40% Rye with Fermented Soaker


Procedure:

Levain

Mix all of the flour needed for the levan with mature 100% rye starter and water and ripen at 70F/21C for 14-18 hours.

Cracked Rye and Wheat Soaker

Pour the boiling water over the two cracked grains and salt and allow to cool to ambient temperature. Add the mature 100% rye starter, mix thoroughly and ferment at 70F/21C for anywhere from 3-5 days depending on the level of sour flavour desired. Note: The amount of water needed may need to be adjusted to achieve a slightly loose consistency. The soaker is not hydration nuetral and should contribute a small amount of hydration to the final mix.

Final Mix (by hand)

Combine all the flour and water to a shaggy mass, adjusting for hydration, and autolyse for 40-60 minutes. Add the levan and incorporate thoroughly, then add the salt and honey and mix until the dough is moderately developed. Finally add the fermented soaker and continue mixing until the soaker is evenly distibuted throughout the mix. Turn the dough onto the table and use the slap and fold method until the dough is smooth and cohesive but not fully developed. DDT is 78F/25C.

Bulk ferment the dough for 60-90minutes at 78F/25C. Bulk fermentation times will vary and the dough should be monitored closley to ensure it receives adequate fermentation time.

Intermediate

Turn the dough onto the table and give it a stretch and fold. Cover the dough and rest it for 30 minutes. Shape as desired.

Final Proof and Bake

After shaping, give the dough it's final rise in a covered 78F/25C slightly moist environment for 45-60 minutes. Again it should be closely monitored, as times will vary. When the dough is slightly springy to the touch remove it from final proof to the counter allowing the skin to dry if necessary before slashing. Slash as desired and bake in a 500F/260 oven, vents blocked, with steaming apparatus in place, for 15 minutes. Unblock the vent, remove the steaming apparatus and lower the temperature to 465F/240C, continuing the bake for an additionl 45-55 minutes (lowering the temperature if needed to 450F/232C) until the internal temperature reaches 210F/98.8 . Cool on a rack for 24-48 hours, wrapped in linen, before slicing.  


The flavour is noticeably better than the previous bake, which I credit to the fresh milled rye flour from V.I. Grain & Milling used in the mix and certainly one the best flours I've had the pleasure of working with.


Cheers,

Franko

rcbaughn's picture
rcbaughn

Pretzel Roll/Bun Success

Well I finally overcame my fear of poaching dough and decided to give pretzel hamburger buns a chance. I used Alton Brown's recipe for Soft Pretzels since it seemed to contain most of the elements needed for a good hamburger bun. Strong yet slightly giving and able to hold up to the torrent of juice from the patty. (My patties are 65/35 home ground beef, insanely fatty and delicious!) It is a bit unnerving moving the buns to the baking soda water, so I decided to just sacrifice the parchment and cut it out below each bun so that I didn't deflate them. I was surprised that the outside of the poached dough was so leathery and thought I had ruined them, but after baking the skin got super tight and held onto the salt great. I didn't have pretzel salt, but I did have Celtic light grey sea salt that was pretty course, and it stuck great with the egg wash and since it is a VERY moist salt. Crunches in the mouth well too without being overly salty. Any tips on making pretzel rolls that you have found would be amazing since I plan on making these alot more in the future! 

BTW, can you pretzel any dough? I thought about poaching my regular brioche burger buns but didn't know if that would turn out acceptable. Thanks again! -Cory

Pages