
Beginner Baguettes - Take II

Adventures in Baby Steam and Razor Blades!
Recipe: Txfarmer's practice baguettes
Results of Take I - My beginner baguettes
I did some more research based on dabrownman's and greenbriel's advice from last week to see what I could tweak with scoring and steam. And thanks to alfonso, I did compare my weighing 17 times on my scale to the volume recommended by the yeast converter and I did end up really close, like grains close so I don't think my yeast level was off.
I made a full batch of the Beginner Baguette recipe and did 3 different things in the baking process, keeping everything else in the process the same. I haven't changed anything with dough handling (much) yet, I wanted to see if I had the same results with a second batch of dough changing things after.
- I baked 2 baguette's like I did previously, on an aluminum air bake sheet covered with a lasagna pan. This time I eliminated the parchment paper, added a tiny spice dish with water, and preheated those prior to baking. (the first time I put those in cold with the dough) I also increased the temp to 460 as the recipe says, instead of the 450 I did last time due to the parchment paper warning.
- The bottoms cook much better with parchment paper on the aluminum surface so that was not an improvement, rather awful actually.
- I steamed for 10 minutes as the recipe stated and was surprised that this was too long with such a baby steam component - the scores did swell but they puffed and blended right back into the rest. So improvement, still adjusting.
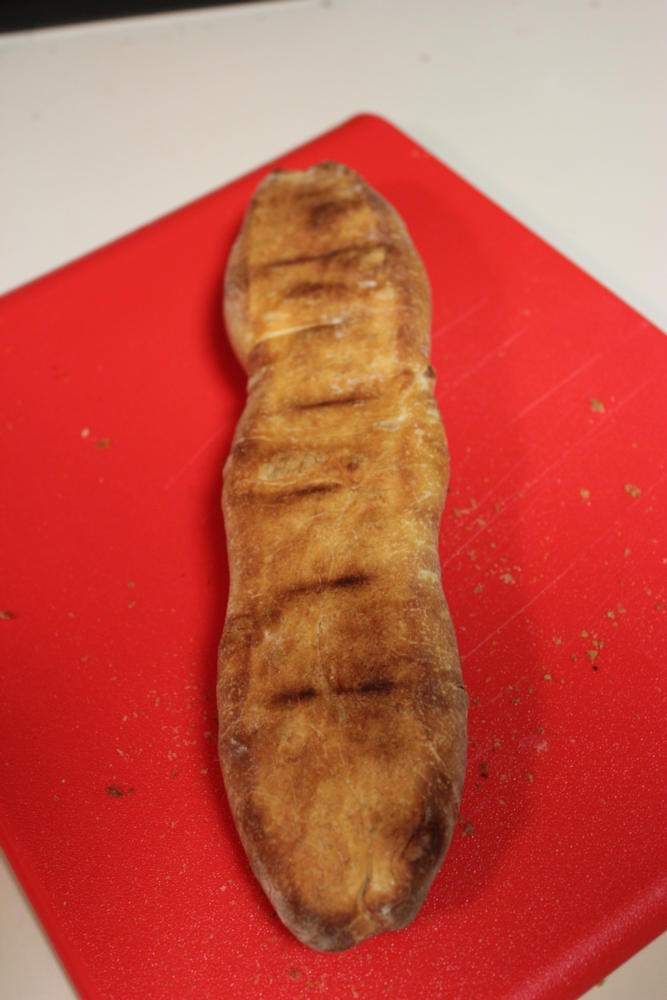
- The 460 is too high for my oven and baby steam, they crusted a little to fast and hit hard vs. crispy in spots - good to know. They bowed because my pan bowed at the higher heat.
- Crumb results are very similar to the ones from BB Take I, with a very slight improvement.
- Scored with hand held razor blade, better but not good.
- I baked one on parchment in the same manner
- First change with dough handling - I suspect that my flour is weak/lower protein count than the KAF in the recipe and that my handling is still very inexperienced so I left this loaf to proof after pre-shaping for an additional 45 minutes, then shaped and rested for 30 minutes while the other two were cooking. This showed distinct improvement. It still doesn't seem good, but it was noticeably better. So the question is why - gluten development, weak yeast, something I still don't know about?
- Steamed for 8 minutes - still too long
- Removed the cover and baking sheet and finished on parchment on the oven rack - Much better and this one got the crispy crackle crust and the crumb had another slight improvement.
- Scored with Cutco table knife, serrated with curved tip - this shape is good in that it allowed a better scoring motion and the sharpness broke through without too much drag on the wet dough, getting better.
- The last one I put in the refrigerator over night just wrapped up in cling wrap. Baked it today and invited Mom over for lunch. Took it out and warmed to room temperature, shaped and rested for 30 minutes. Dough was better yet, getting closer, still need more gluten development to get a tight skin surface as recommended. At least I think that is what is needed :)
- Used parchment paper, oiled - kept the paper from browning too much
- Steamed for 4 minutes and removed cover and steam - this is really close
- Left baking sheet until the 10 minute mark and removed it to finish baking on parchment on the oven rack
- This one I did at about 455 F and I got teeny tiny edges to the scores - better! This one was scored with the Cutco table knife as well.
- The crust is crazy crispy with a lot of tiny cracks and bubbles but just edging past that - I think I'm going back to 450 F next time, maybe higher for the preheat then turn it down slightly.
- The crumb still came out really well after refrigeration and the flavor was creamier if that makes sense, less crisp white bread tasting, fuller and well, better.
Batch 1


Batch 2

Batch 2 Crumb, Batch 3 Loaf
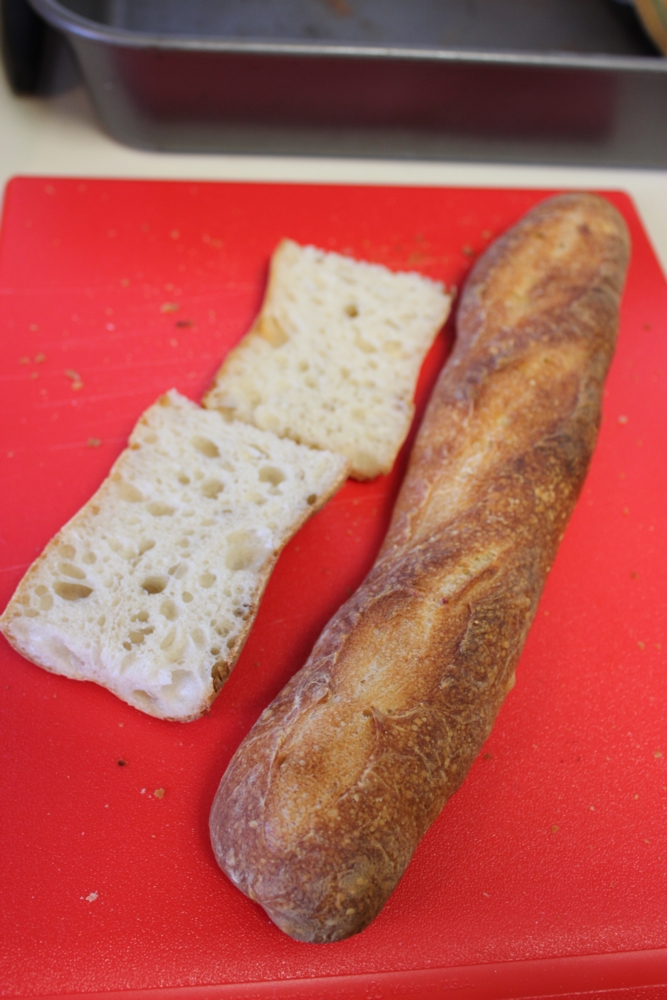
Batch 3 Crumb

With my very simplistic setup of existing items in a tiny oven and with my grandmother's voice echoing in my head "you already touched it too much!" from when she would teach me how to make country biscuits as a child, I'm pretty geeked I'm actually making bread, and it doesn't suck lol. I cook, I don't bake so this is a whole new world.
Super basic setup to start
Really old pans and oven, tiny and old

It is kind of like lasagna though, if I'll take a week to develop the flavors from picking the right tomatoes, adding the right herbs and spices at the right time, aging it appropriately, make and dry the noodles, culture some of the cheeses, until it all comes together with smiles and sighs around the dinner table, then I guess bread is kind of quick lol. It took a long time to get it to my idea of perfection but I loved every minute. Baguettes, my new lasagna….at least they're cheaper….so far.
I'm actually going to read a bread book this week, Bread Baker's Apprentice should be in at the library soon. There is only one copy in our system so it's coming from a few counties over. The first one they had available was The New Artisan Bread in Five Minutes a Day. In my naiveté, I thought it sounded like skill development and concept sharing, terminology, the whole learning over time thing. Um, no, not what I was looking for. I want a bread journey, not a recipe book and not the cliff notes. They don't have the Ken Forkish or the Jeffrey Hamelman books that are referred to often. I may be able to get a friend in the city to check if their system has them if they are better.
So off to work on dough development. I'm thinking the next batch I will divide at the first S&F point into the 4 batches and work 1 the same way I have been as a control to compare, and then each of the other three with different degrees of change in the dough handling. Any suggestions on how to incrementally set up those batches would be awesome. The current formula is mix to shaggy mess - At 45, 90, 135min, do Stretch and Fold (S&F) - single and gently, minimal touching of crazy sticky dough. At 180min preshape, rest 25-30 min, shape, rest 30-60, bake. And her caps "AND MINIMAL TOUCHING". (see why I hear my grandmother?? :)
And then repeat with KA AP flour with a known protein count to see if my theory holds or if I'm on the wrong track completely. Hope the neighbors like baguettes….


Comments
As you know, I'm no expert, but I can tell you that with your detailed analysis and documentation, you'll be making great progress in no time.
Here are my thoughts:
The shaping in your last try looked a little better to me, but the crumb on batch one and three was was much improved in this go-around. What are you using as a reference for preshaping/shaping? The most helpful things I found were Jeffrey Hamelman's King Arthur Flour videos on youtube:
Preshaping: https://www.youtube.com/watch?v=dt6pbWYbqPE
Shaping: https://www.youtube.com/watch?v=PmxDKuGLWuE
There are many other baguette shaping demos on youtube, too.
You want to try to get them nice and straight on the peel before scoring. If you don't have a peel (I don't have one as large as I need), improvise - I'm currently using a big piece of cardboard, with a long thin strip as a flipping board!
Most of us around here bake on a baking stone when not using a dutch oven, I would think that using an airbake cookie sheet is going to do almost the opposite of a stone - they are designed to pretty much insulate the bottom of a cookie from too much heat, whereas we are trying with a baking stone to provide a very hot surface with good thermal mass to put a lot of heat into the dough very quickly. If you can't get a stone immediately, maybe a regular heavy duty baking sheet would be a better option than the airbag.
Don't be afraid of parchment in the oven. I, and several others here, routinely use parchment on a 500 degree baking stone and I haven't had a fire yet :) I think the heat recommendations are intentionally conservative, and using it makes life SO much easier.
If you are covering the baguettes as they bake, you likely don't need an additional steam dish in there. The steam in a covered bake comes from the dough. However, I would really think about trying MegaSteam and/or cast iron and boiling water methods with an uncovered bake. The issue is when the bake is covered you can't see when to remove the steam. I guess if you do enough experiments you will figure out the timing, but I'm hoping on my next bake to watch the dough like a hawk, remove the steam at the peak moment, and record the timing for future reference.
I'm pretty sure you don't want to divide the dough until you are done with all the stretch and folds and the bulk rise. According to a recent conversation with alfonso, it may affect the flavor, and I would think that doing S&F on 4 quarter sized portions of dough is going to affect the gluten development negatively (can't stretch as far to strengthen the strands), and is too big a change to be introduce when trying to gauge results.
KA AP has more protein than any other AP flour. It's basically like most other brand's bread flour. When Hamelman talks about using "bread flour" in his recipes, he actually means KA AP (he doesn't name it, but when he describes the flour, it is identical). I would definitely give it a try. Feels great to work with, and worth the extra $$ IMO.
The Bread Baker's Apprentice is a good book. I got that one first. Then Artisan Bread in 5 minutes (blah), but the Forkish was the one that brought it all together for me, and teaches in a style that I like. I've since added Hamelman's Bread, and Local Breads, both great books.
My Mum is flying back to England as I type, so the bakes are back on! I have a batch of dmsnyder's San Joaquin cold retarding in the fridge, and I'm going to run a batch of the same practice baguettes you did tomorrow. Will let you know if I learn anything new!
Keep us posted, they are getting there! Loving your experiments, it's great to have you as a member of TFL Team Baguette!
Best,
-Gabe
PS - sorry for the tome!!!
I used this video for preshaping/shaping
https://www.youtube.com/watch?v=fdNRogR10nM
I like the ones you listed, I'll try Hamelman's first method shown. I am not handling my dough anywhere near that much and definitely haven't been intentionally degassing at all - more like trying to save every bubble possible. Apparently this is counter productive.
I haven't tried any kind of peel yet, I think I have something I can use that should help. I'll figure out how this works too :)
Yep, I know the airbake sheet is quite opposite of what is desired, it was just the only thing I had. I do have a stone pan but it is round and only 12 inches x 2 inches deep, and I borrowed a stone dutch oven, which is the same as my pan but with a domed lid. I can experiment with those.
My hesitation on doing a mega steam type setup is because my oven is 23 years old and I cannot afford to possibly damage it right now. Mega steam is on the list though.
Good to know about the parchment paper! I love fire, but not in my appliances.
You are very correct on the challenges of not being able to see what is happening with a covered bake, makes me a little nuts not being able to watch the magic happening. Maybe by the time I work out some of my dough handling issues, I'll get less nervous about breaking my oven and give the whole oven steam a go. I am probably being overly cautious here like I have been with handling the dough. Some of the challenges of being such a novice.
Your comments about the impact of dividing the dough in to too small of sections is interesting. I wondered if volume played a part, one of the reasons I made a full batch of dough for the second series of bakes. I didn't notice a difference between my first attempt and my second batch of attempts in flavor except for the one that was refrigerated. That one gave me a hint of what is to come when I start working with ferments. I'll go read alfonso's post and make some notes. I think I'll still try the division with my cheap flour just for the sake of getting more experience working the dough, it seems I have been approaching that aspect with too much trepidation. I also think it would be interesting to see if it does impact the flavor. If it does, then I'll know how that works or actually doesn't work.
I did run into town tonight and picked up 3 different available flours to try as well, including the KAF AP for comparison. I also picked up some fresh yeast, the packet I had was old, I picked it up with some thought to make something when the ducks started laying and I never did. Until now.
Good to know about the BBA book, the 5 minute book might be good, I don't know enough yet for it to have made sense. I did find out that Forkish's book was just added to our system when I took the other back today. Unfortunately 3 other people found out before I did so it will be a bit of a wait. I also requested Artisan Baking by Maggie Glezer that I have seen mentioned.
I hope you had a great visit with your Mum!
Thanks for the tome, gave me a bunch of new ideas on ways to push things for new experiments to have fun with. Good luck on dmsnyder's San Joaquin's, I've bookmarked those too. Looking forward to your next batch with anticipation. And if the bakes are back on, what did you bake for your Mum?
Cheers to TFL Team Baguette, I'm keeping the benches warm!
~D
You need these pans.
These heavy duty Vollrath/Wearever 13 gauge pans will not warp. I've had mine for several years, nary a hint of impending warp-dom. Although I'm wondering why you aren't using a baking stone?
I'm not really looking to upgrade the sheet pan, I only used it because it was the only pan I have almost the size of my oven so I could try baguettes.
I didn't use a baking stone because I don't have one :) I am trying out a stone dutch oven that I borrowed and now making 10 inch baguettes with more success. You are correct, stone is better.
I'm just learning to bake bread in the last two weeks, so I may try some things that seem silly to folks that know what they are doing :) I appreciate all feedback, it really helps the learning curve.
If you have access to a backyard/patio store or the like, stop by and see if they carry unglazed (important to be unglazed) "Mexican" tiles. These are an inexpensive alternative to a baking stone. The baking stones are thicker and much heavier and also a lot more costly. So the expense of outfitting your oven with a few tiles is minimal. It will make a next step world of difference to your baking experience.
I found a picture in my album of what the tiles look like with a sheet of parchment paper on them. And baguettes baking on the paper ;-) . This is at the point where I opened the oven door to release the remaining steam.
My suggestion about parchment paper usage and dough positioning: At the halfway point in your bake - just around the time that you release the steam from the baking equation, remove the parchment paper. As thin as it is, it still acts as an insulator between the dough and the baking surface. Additionally and even more important, use this opportunity to turn your baguettes around 180 degrees, front to back and switch their positions - left to right/right to left, in the oven. Ovens don't necessarily bake evenly, with hot spots here and there, and you should make sure that you baguettes get the most opportune exposure as possible.
Pre-heated Dutch Ovens work "better" than baking bread in the open oven because they are more efficient at what they do. They are exceptional at creating the steaming environment necessary for the first half of a bake of a mass of dough. And they also create the perfect environment to cradle your dough with even heat. But they ain't worth two cents when it comes to baking a long dough like a baguette!
I can see that you are keeping an attentive log of your activity and progress, which is just great. My suggestion is to take the baby steps necessary to get comfortable with the world of handling dough and baking before taking a big forward leap. In this case slow and steady will win the race, and quell some frustration levels. Quackers to you!
alan
I agree with you and everyone else, bread is so much better with stone, at least the bread I like. The photo makes so much more sense to me on what happens in that steam phase that gives that bloom and lift off! I've so not seen that lol. And taking the tiles so close to the oven dimensions, I would have over thought that part. Interesting, and very tasty looking loaves.
I do have access to shops that should have the unglazed tiles and they are on my list with a lame as well.
Didn't think about that with the parchment paper, I'll try that next time. I do turn them, I need to more, I'm learning.
"But they ain't worth two cents when it comes to baking a long dough like a baguette!" LOL - No they aren't, but they do help with baby steps and the process learning. Not an iota of frustration here, I'm having too much fun.
The quackers sense something on the horizon and keep wanting to be outside. I've told them the weatherman said we weren't getting above freezing until the weekend but they don't believe him either ;-)
Thanks Alan! I'll become a bread baker yet!
~D
Now you just have to make enough mistakes to become a great bread baker ;-D
Great insights from Alan (in my mind the captain of TFL Team Baguette). I should have thought of the quarry tiles, and I also learned something new in the parchment removal trick.
Bake on!
-Gabe
PS, I baked for 18 months in a dutch oven before breaking out and getting into baguettes etc...