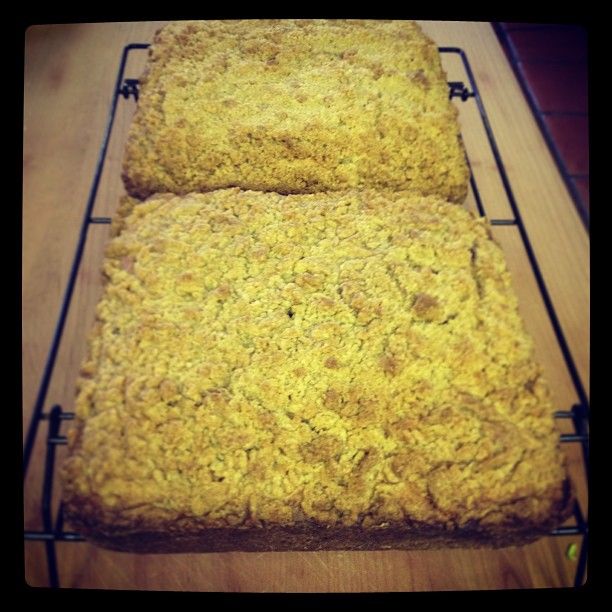
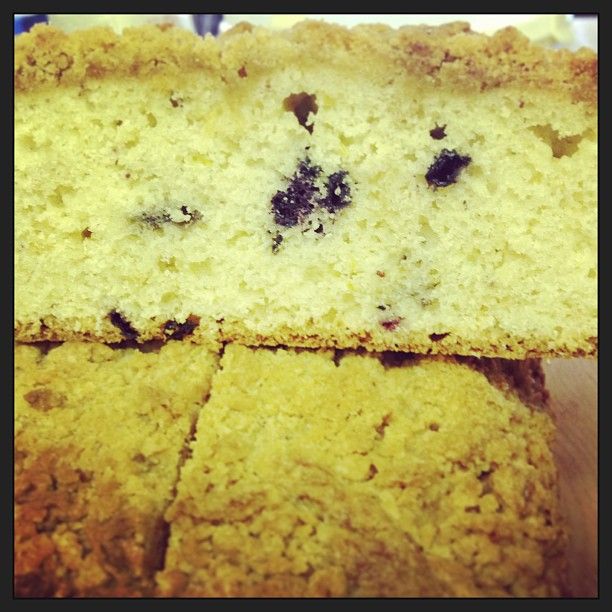
The Fresh Loaf

A Community of Amateur Bakers and Artisan Bread Enthusiasts.

Blogs

dabrownman's picture
dabrownman


Acidique's picture
Acidique

I began the process of creating my own sourdough starter yesterday.  I am using SourdoLady's wild yeast recipe.  I will be feeding it for the first time today, and I am so excited.   I had no idea it could be so easy to make my own. 

I am still a bit wary of using starter though.  I realize it replaces commercial yeast  in any recipe, but I get a bit confused by some of the directions I read in recipes.  What does it mean when they ask for a starter at a specific hydration?  And how on earth do I measure that?  Additionally, is there an easy way to convert a recipe that calls for instant yeast, or dry-active yeast, into one that uses a starter?

I still have a while before my own starter is even close to being ready, so I will be reading a lot about this until then.  I can't wait to use it!

HokeyPokey's picture
HokeyPokey

After nearly a year of silence, I am back, and what a way to come back – with a Cake!!

I think this is more of a bread site, but what the heck – cake is cake, right :)


Full recipe on my blog here

Acidique's picture
Acidique

Hello Freshloaf patrons!

I've been lurking around the website for a while now, and I have tried dozens of recipes.  I LOVE THIS PLACE.  I truley feel like I'm at home.  I have been baking my entire life.  I began baking at my grandmother's knee as soon as I could.  She taught me a lot. Unfortunately she is no longer able to bake in her own home, so I inherited her baking tools and I am determined to carry on her tradition of wonderful baking. 

I have learned so much on this site already.  It is a pleasure to have so much information available, and the creativity of the people at the Fresh Loaf is absolutely inspiring.  I am a poor college student at the moment, but I do plan on purchasing some of the books I see mentioned most often.  I also wish to sell some baked goods, but unfortunately Montana laws make it a bit difficult to do so unless I want to only sell at the Farmers' Market.  I am trying to find a commercial kitchen to rent from time to time. 

Anyway, I look forward to learning much more.  It is so nice to find others that share the same passion as I do.  

Anyway, Just wanted to say hello.  I'll be posting pictures of my baking adventures soon!

Justkneadit's picture
Justkneadit

Ok, I'm officially frustrated. My first boule turned out pretty good, thought maybe just the shaping needed some work. Since then my past two sourdough boules have gone haywire and here are the results of this weekend's bake. Looks decent from the outside but just wait..

Crumb...tight in places...

what the heck is this...That's definitely the bottom...

I follow the original recipe found here.

Changes I made were as follows:

  • 21h 10m in the fridge for the cold autolyse with a flip after 12 hours.
  • I let the dough sit in the brotform for 2 hours after shaping and before storing in the fridge for 24h 40m.
  • Let the dough proof for 8 hours.
  • Used a 1/2 cup of water for steam instead of 1 cup. All the temps were nearly the same.
So why in the world did the bottom of the freakin' loaf rise. Please some one help me out!Lane


ph_kosel's picture
ph_kosel

I had a hand at making a sourdough Limpa loaf similar to something I had at a potluck recently.  The Limpa I had at that party was very moist, around 50% rye, and flavored with molasses, fennel, caraway, anise and perhaps orange zest.  I found a recipe that may well be the same one HERE, and followed it.  I decided to bake it as a pan loaf instead of as an artisan loaf because the dough is extremely moist and (because of the high rye content) incredibly sticky.

This is probably the best of several Limpa recipes I've tried.  The seed mix and orange zest, coupled with the molasses and the tang of the sourdough, gives it a unique, rather festive flavor.  I think it might be even better with some raisins in it but I've never heard of Limpa with raisins.

These are the ingredients I used for this sourdough (there's also a yeasted version on the breadtopia site linked to above):

Water: 400 grams, 1 3/4 cups
Sourdough Starter: 70 grams, 1/3 cup
Dark Rye Flour: 245 grams, 1 3/4 cups
Unbleached Bread Flour: 245 grams, 1 3/4 cups
Molasses(full flavor, not mild): 44 grams, 2 Tbs.
Fennel Seed: 8 grams, 1 Tbs.
Anise Seed: 2 grams, 1 tsp.
Caraway Seed: 3 grams, 1 tsp.
Salt: 12 grams, 1 3/4 tsp.
Zest of 1 Orange

Here are a couple photos:

Anomalous's picture
Anomalous

I've experimented a lot with sourdoughs but this is my first 100% spelt effort. I used 60g wholemeal stoneground rye starter from the fridge to make a levain with 80g white spelt flour and 80g water and left it at room temperature for about 3 hours until it was nice and bubbly.


Then I added another 220g of white spelt and 60g water, mixed thoroughly and left covered for 15 minutes. Next, I added 5g salt and a good glug of olive oil and mixed thoroughly then put it onto an oiled worktop and did a bit of folding and stretching for about a minute and formed it into a round. I waited 15 minutes and did another minute of folding and stretching and shaping into a round, and repeated the process another couple of times before forming it into a slightly longer shape and putting it into a floured towel with its ends held together by bulldog clips to form a kind of hammock shape. 

After about four hours it seemed to have risen enough so I turned it out into my preheated combo cooker, slashed it and put it into the preheated oven at 230C. I took the lid off after 18 minutes and baked it for a further 20 minutes at the same temperature.

I'm very pleased with the result. The crumb is soft and light and the crust is very crunchy; much more so than with wheat flour. 

The starter was about 120% hydration, so the 60g that I used was probably about 27g rye and 33g water, so I think the overall hydration of the loaf, starter included, is about 64%. Next time I'll try it with a cold final proving in the fridge.


dabrownman's picture
dabrownman

This the next 23 days from September 23 to


Isand66's picture
Isand66

Mookie likes to get his way and when he wants something he lets me know it.  For example, when he wants breakfast he will knock everything he can off of my night stand until I get up and feed him.  When he wants dinner he will flop down by the door when I come home and insist on a belly rub until he is satisfied and then run to the kitchen and yell at me to feed him.

Here is my belly...what are you waiting for?

He will wait by the closet in the kitchen where the food is until he is satisfied that the can of food I have chosen meets his standard.  So I really didn't have a choice when Mookie told me he was tired of not having a bread named after him and if I didn't rectify the situation there would be serious consequences.

For this reason and this reason alone, I present to you a bread worthy of its namesake.  Mookie loves hot cocoa and he is a big potato fan as well.  This bread also has some espresso powder, pistachio oil, and assorted flours since Mookie has a sophisticated palate.

Mookie did insist on having the bread have his likeness on it, so since I don't have a cat mold I used a cookie cutter to make a bread cookie to adorn the top of the bread.  I am not sure if he approves of how it looks since it doesn't have any white in it, but he said he will overlook that if it tastes good.

I am happy to report that the bread is nice and moist and you taste the espresso powder and a hint of the hot chocolate.  The rye chops and First Clear flour along with the Oat flour and White Rye give this bread a nice earthy flavor that Mookie liked so much he refused to share it with his brother and 3 sisters.

I made 1 large boule with this recipe but you can easily make 2 smaller loaves if desired.

The total hydration of this dough is 71% which made a nice wet dough and a final moist loaf.

I used my standard 65% AP starter for this recipe.

Directions

AP Starter

227 grams AP Flour

71 grams AP Seed Starter

151 grams Water at Room Temperature (80-90 degrees F.)

Mix ingredients in a bowl until thoroughly combined.  Cover the bowl and let it sit at room temperature for around 8 hours.  The starter should almost double when ready to proceed.  You can either mix in final dough or put in refrigerator for at most 1 day before using.  If your kitchen is warmer than mine which is usually about 70-72 degrees with my air-conditioning you can proceed sooner.

Main Dough Ingredients

425 grams Refreshed AP Starter (65% hydration) from above

200 grams European Style Flour (KAF, you can substitute bread flour with a little whole wheat mixed in)

50 grams Wheat Germ

150 grams First Clear Flour (KAF)

70 grams Oat Flour (KAF)

100 grams White Rye Flour (KAF)

70 grams Rye Chops

260 grams Mashed Potatoes (I added a little Greek Yogurt to smooth it out)

14 grams espresso Powder

25 grams Pistachio Oil (You can sub Olive Oil or Vegetable Oil or any nut oil)

16 grams Seas Salt or Table Salt

350 grams Hot Chocolate (Cooled to Room temperature)

Plus 65 grams Water at Room Temperature

797 grams Total Flour

566 grams Total Liquid

71% Hydration

Procedure

Mix the flours, and rye chops with the hot chocolate  in your mixer or by hand for 1 minute. Let it rest covered in your bowl for 20-30  minutes.   Next cut the starter into small pieces and add to the flour mixture in the bowl and also add the oil, salt, potatoes and the water.  Mix for 4 minute to incorporate all the ingredients. I mixed on speed #1 for 3 minutes and speed #2 for 1 minutes.   The dough should have come together in a ball and be tacky but not too sticky.

Next take the dough out of the bowl and place it on your work surface or as in this case place it in an oiled bowl or container.  Do a stretch and fold and rest the dough uncovered for 10 minutes.  After the rest do another stretch and fold and cover the dough and let it rest for 10 minutes.  Do one more stretch and fold and put the dough into a lightly oiled bowl and let it sit at room temperature covered for 2 hours (if it is already in a bowl just make sure to cover it).   After 2 hours you can put the dough into the refrigerator for 24 hours or up to 2 days before baking.  Feel free to do some additional S & F's if you feel it is necessary.  I baked the bread about 24 hours later.

The next day (or when ready to bake) let the dough sit out at room temperature for 2  hours.

Next, form the dough into your desired shape and put them in floured bannetons, bowls or on a baking sheet and let them rise covered for 2 hours or until they pass the poke test.  Just make sure to not let them over-rise.

I saved a small piece of dough and used a cat shaped cookie cutter to create the Mookie decoration.

I let this rise covered with a towel and when ready to bake the loaves I glued it on the loaf with some water.  In hindsight I should have adhered the dough better as it kind of puffed up and looks like a handle.  Hey, I guess that could be a new concept....a built-in carry handle for your loaf of bread!

Score the loaves as desired and prepare your oven for baking with steam.

Set your oven for 500 degrees F. at least 30 minutes before ready to bake.  When ready to bake place the loaves into your on  your oven stone with steam and lower the temperature immediately to 450 degrees.    When both loaves are golden brown and reached an internal temperature of 200 degrees F. you can remove them from the oven.  Since this was one large loaf it took about 45 minutes to bake.

Let the loaves cool down for at least an 6 hours or so before eating as desired.

Be sure to visit my other blog at www.mookielovesbread.wordpress.com for all my recipes.

I put on this stupid costume so where is my treat!

Pages

Subscribe to RSS - blogs