The Fresh Loaf

A Community of Amateur Bakers and Artisan Bread Enthusiasts.

Blogs

CAphyl's picture
CAphyl

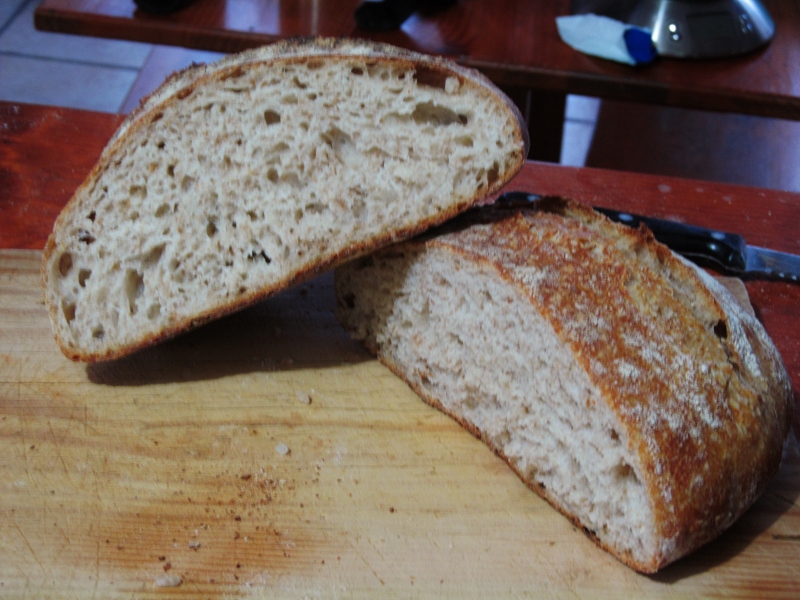
Well, I kind of screwed up today, but did my best to make up for it.  When I was making the Gluten-free Farmhouse bread earlier, i prepared too much yeast because I thought I really messed up the bread dough, but it turned out that I didn't!  As a result, I quickly found the most simple recipe for yeasted French bread and threw it together in minutes and baked it this afternoon.  It was really good!  My husband liked the crust.  I could have done a much better job on the shaping, however.  I'll do better next time.

The crumb was OK.  I always prefer to use my sourdough starter for bread, but this was a nice change.  I've included the link to the recipe below.

http://busycooks.about.com/od/yeastbreads/r/frenchbread.htm

CAphyl's picture
CAphyl

I am always looking for good gluten-free recipes, and I came across this one online by Ali and Tom of Whole Life Nutrition.  I did make a number of modifications to the recipe after the first time I made it, which I have listed below.  It is a very dense, heavy bread and uses ground chia seeds and psyllium husk as the gluten-like substances.

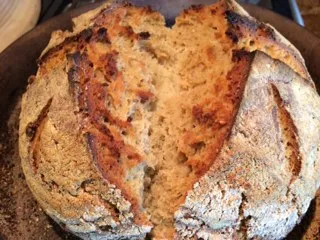
The loaf looked very good going into the oven (left) and came out well fully baked.  I found that it may take a little longer to bake than the recipe to be fully done.

The crumb is dense and heavy, but the taste of the bread is quite tasty and tangy.

Wet Ingredients:

2 ½ cups warm water (105 to 110 degrees F)

2 ¼ teaspoons active dry yeast (1 package)

1 tablespoon agave nectar (you can use maple syrup as a substitute)

2 tablespoons extra virgin olive oil

1/4 cup ground chia seeds

1/4 cup whole psyllium husks

Dry Ingredients:

1 cup teff flour

1-1/2 cup all purpose gluten-free baking flour (like Bob’s Red Mill—reserve some flour for kneading)

½ cup brown rice flour

1 cup gluten-free oat flour

1 ½ teaspoons sea salt

¼ cup flax seeds

Topping:

Olive oil spray (or olive oil)

Toasted sesame seeds

Toasted sunflower seeds

Place the warm water in a bowl or 4-cup liquid glass measure. Add the yeast and agave nectar, whisk together. Let rest for 5 to 10 minutes to activate the yeast. The mixture should get foamy or bubbly.

While the yeast is activating, mix together the dry ingredients in a large bowl.

After the yeast is activated whisk in the olive oil, ground chia seeds (it's best to grind them yourself), and psyllium husks into the water-yeast mixture. Let stand for 2 to 3 minutes (not any longer) to let the chia and psyllium release their gelatinous substances. Whisk again.


Pour the wet ingredients into the dry and mix together with a large wooden spoon until thick. Then knead the dough on a floured wooden board to fully incorporate the flour. Add more teff and all-purpose flours, a little at a time, until the dough holds together and isn’t too sticky (about ¼ to ½ cup total). Don’t add too much flour, otherwise the dough will become very dense; it should still be slightly sticky. Form dough into a ball, place back into the large bowl, and cover with a damp towel. Place in a warm spot to rise until it is doubled in size, about one hour.


After the dough has risen, place a pizza stone in your oven. Preheat the oven to 400 degrees F. Place a pan of water on the bottom rack of the oven (the one beneath the pizza stone).

Punch down the dough and turn out onto a lightly floured wooden board.  Stretch and fold the dough and then form into a round ball. Place on a square of parchment paper and score the dough with a shallow “tic-tac-toe” pattern on the top. Spray (or drizzle) with olive oil and sprinkle the seeds on top. Let rise for about 30 minutes in a warm place while the oven and stone are preheating.


Carefully lift the parchment paper with the risen loaf and place it onto the stone in the oven. Bake for about 40-45 minutes; if bottom is soft, bake for 10 more minutes. Remove from oven and let cool 30 to 60 minutes before cutting into it. The bread will be very gummy hot out of the oven.


Brokeback Cowboy's picture
Brokeback Cowboy

Being a pastry chef by trade, hazelnut is a fundamental ingredient in my repertoire. Yet it seems a bridesmaid to Walnuts in conventional bread making. While devising a baking menu for an upcoming job I decided to feature a hazelnut bread as my nut based loaf. The difficulty in using hazelnuts is that their flavor is semi subtle and must be exaggerated through other ingredients which in pastry is most commonly done with brown butter, caramel or an earthy chocolate. Both excellent choices, however I did not want a dessert/sweet bread in this case, as my true intent was to find nuttiness in the wheat itself. 

Upon reading through some TFL posts the other day(I'm particular fond of Dmsnyder & Janedo's writings,) I found myself going through the comments section on a Pain A l' Ancienne where Jane and David were having a discussion on the delusion of hazelnut flavor in long autolysed dough(You're not crazy Jane. It's there.) To me, this represented the perfect vessel to develop a hazelnut flavored bread which relies on inherent nuttiness in wheat.Once formulations were made, and the recipe followed through I was more than happy with the results. 

The recipe relies on a stiff levain (Local Breads P.111) as well as a little fresh yeast for leavening. The finished quantity of dough was enough for 2 batardes, feel free to extend the quantities using baker's percentages to your requirements (With the exception of baguettes which mostly go to friends and family, I rarely make more then one or two loaves at a time.) Another note about the recipe. I used red fife flour as it's my go-to WW however another local WW flour would be adequate in it.

Procedure:

12-14 hours before mixing final dough.

Refresh Stiff Levain

50g Levaiin 50% Hydration

50g Water 20-25dC

95g White Bread Flour

5g Red Fife Flour

Combine levain and water, stirring to a frothy consistency. Incorporate flour and knead into a rough dough. Be sure to absorb all flour. Let mature for at least 12 hours. The excess levain can be stored in fridge for up to a week. I typically refresh mine every 3 days.

Autolyse 

450g White Bread Flour

50g Red Fife Flour

400g Ice Cold Water

Combine flour and water, stirring until distributed evenly. Wrap in cling film and rest in fridge for 12 hours.

Final Dough

900g Autolyse Dough(Pre-Dough)

50g Stiff Levain

5g Fresh Yeast

10g Sea Salt

160g Hazelnuts, toasted and skinned

Totals (represented as %)

White Flour 90%

Red Fife Flour 10%

Water 80%

Stiff Levain 10%

Fresh Yeast 2.5%

Sea Salt 5%

Hazelnuts 32%

Remove autolyse flour/water mixture from fridge. Combine with stiff levain, fresh yeast. Using a kitchen aid mixer or equivalent, mix at speed 2-3 for 5 minutes. Add sea salt to dough and continue mixing for a further 7-10 minutes. Check proper dough development using a gluten test. Add toasted hazelnuts to well developed dough and mix until combined.  Rest dough in appropriate vessel for at least 20 minutes.

Bulk Ferment dough for 4-6 hours (in my kitchen the temperature currently ranges from 14-18dC which took the dough about 30 minutes longer than the expected fermentation times, however I'm quite aware that the environment I ferment in is an exception...brrr!) Within the first 2 hours of fermentation perform 4 stretch and folds. To achieve this wet hands liberally and grab one corner of the dough and fold it into the middle. Do a 1/4 turn of the dough and proceed folding until all 4 edges are in the middle. Gently flip dough and tuck excess edges (love handles?) underneath the mass. 

After bulk fermentation, remove dough from container and gently release some of the internal gases. Divide dough in half and form in to batardes. Place in WELL FLOURED couche or banneton. This is a slack dough and needs to be handle with dexterity.

Proof batardes for 1-1 1/2 hours. Pre-heat oven to 480dF. If using a baking stone, place it in the oven now.

Insert steaming vessel in to hot oven and add 1/2 cup of ice cubes. Transfer batardes to a peel and score with a straight 90 degree cut on the long axis. Place in oven.

Bake at 480dF for 15 minutes. Remove steaming vessel and turn down heat to 450dF. Bake for another 20-30 minutes, depending on your desired color.

Check doneness of  98dC. Turn off oven and leave door ajar with loaf resting on baking stone for 5-10 minutes.

Bon Appetite

Juergen Krauss's picture
Juergen Krauss

/* UPDATE: Der deutsche Text ist am Ende dieses Beitrags */

Karin (Hanseata) pointed us to a blog event that is currently on, closing on April 17:


1. Plötziade


The challenge is an interesting one.

My idea for a bread with the prescribed ingredients of this challenge
(450g bread flour, 50g wholemeal rye flour, 10g salt, any amount of water, any leavening agent, any process)was inspired by Hamelman's Vermont Sourdough and Carol Field's Pane Nero di Bolzano - a rather unlikely match.

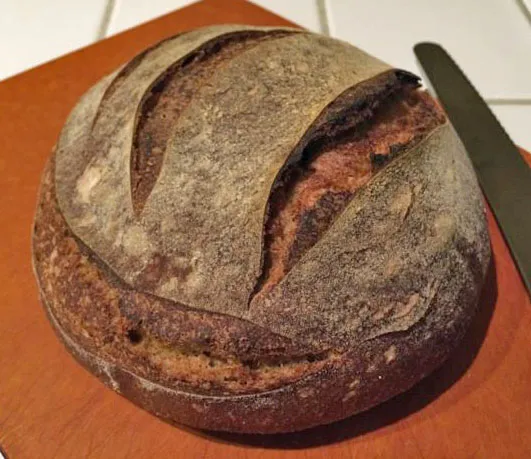
The bread looks like your typical German "Weizen-Mischbrot", but it has deeper flavour notes ranging from a pronounced tang to the unique sweetness of a yeast-rye-poolish. And the mouthfeel is quite smooth.

Here the formula (the preferments have 10% added to account for loss):

IngredientPercentWeight
Straight Formula  
Wheat Flour90450
WG Rye1050
Salt210
Yeast (Instant)0.060.3
Water68340
Yield170.06850.3
   
Rye Poolish  
WG Rye1055
Yeast0.060.3
Water20110
   
Wheat Sour  
Wheat Flour20110
Water25138
Mature Sour211
   
Final Dough  
Wheat Flour70350
WG Rye00
Salt210
Yeast (Instant)00
Water23115
Rye Poolish30.06150
Wheat Sour45225
Yield170.06850.3

Process:

Mix the preferments and let stand for about 12 hours at 23C

Mix the preferments with the remaining ingredients to some degree of gluten development - the dough is notably slack due to the high enzyme activity from the rye poolish. Remember, there are no acids to slow down the enzymes.

Bulk proof ca. 2 hours folding once after 1 hour, shape, final proof c. 1hour.

Bake in falling oven with steam (230C down to 200C) for 30 minutes (500g loaves)

Here some crumb pictures:

The fresh crumb (yes, I am impatient)

and the crumb after two days (and in different light):

I sold this bread at the pop-up market at my boy's school (the ones behind the flowers with the cross slash)
The kids loved it (I provided tasters of all products), and I think it's a very good carrier for all sorts of sweet and savoury goodies, and quite nice just with butter.

 Happy Baking,

Juergen

 ======================================================

Jürgens Brighton Sauerteig


Die inspiration zu dieser Formel lieferten zwei Rezepte

  1. Vermont Sourdough von Hamelman’s Bread
  2. Pane Nero di Bolzano von Carol Field’s Italian Baker


Als Triebmittel werden ein flüssiger Weizen-Sauerteig und ein Roggen-Poolish verwendet.


Der Weizen-Sauerteig gibt dem Brot eine saure Note, waehrend der Roggen-Poolish eher etwas susses beitraegt. Der Poolish last auch die Roggen-Enzyme frei walten, wodurch der Teig eher weich wird,  die Krume fühlt sich “glatter” an als bei vergleichbaren Broten mit Hefe oder Roggen-Sauerteig.


Ich habe dieses Brot auf einem Schul-Markt verkauft, zusammen mit Hotcrossbuns, Challah, Vollkornbrot (Hamelman) und meinem Reis-Sauerteig Brot, und es kam bei den Kids am besten an!


Jetzt zur Formel:


Zutat

Prozent

Gewicht(g)


Gesamt-Formel


WM

90

450


RM

10

50


Salz

2

10


Hefe (Instant)

0.06

0.3


Wasser

68

340


TA

170.06

850


Roggen Poolish


Enthaelt 10% überschuss 


RM

10

55


Hefe (Instant)

0.06

0.3


Wasser

20

110


Weizen-Sauer


Enthaelt 10% überschuss


WM

20

110


Wasser

25

138


Anstellgut

2

11


Teig


WM

70

350


RM

0

0


Salz

2

10


Hefe (Instant)

0

0


Wasser

23

115


Roggen Poolish

30.06

150


Weizen-Sauer

45

225


TA

170.06

850


Prozess:

  1. Bereite den Poolish und Weizen-Sauer zu und lasse sie bei ca. 23C für 12 Stunden stehen.
  2. Verknete die Vorteige und die anderen Zutaten bis sich eine maessige Gluten-Struktur zeigt.
  3. Standzeit für den Teig ca. 2 Stunden, mit einer Faltung nach einer Stunde
  4. Abwiegen und formen
  5. Stückgare etwa 1 Stunde
  6. Backen im Fallenden Ofen mit Dampf, 230C -> 200C für 30 minuten (500g Brote)


FlourChild's picture
FlourChild

Work has kept me busy and away from posting as often as I'd like, but I'm happy to be able to share this recipe. These are completely amazing cinnamon rolls. They've conquered my heart, and I don't even really like cinnamon rolls. Except these.


Tang Zhong Milk & Honey Sweet Dough 

The cornerstone of this recipe is the soft, moist and tender sweet dough. It uses honey and a roux to tenderize and hold in moisture. And the long kneading time yields a wonderfully light, ethereal texture.  

Cinnamon Rolls


 Crazy Good Cinnamon Glaze

Instead of the traditional plain powdered sugar frosting, these have a richly flavored, creamy glaze that rounds out the cinnamon with butter, vanilla, cocoa butter and coffee. While testing this recipe, my office mates repeatedly offered to lick the bowls, whisks, serving plates, you name it. 

This was a recipe I developed for Brod & Taylor for the roll-out of their new shelf kit. (If you haven't seen the shelf kit yet and would like to, it is here.)  It includes directions for the Folding Proofer with a shelf kit, but can also be made using a warm-ish (85F) proofing spot.

Yield: 12 Cinnamon Rolls (double the recipe to make 24 rolls). Make 12 rolls in two 9” (23cm) round cake pans or one 9x13" pan. Make a double recipe in two 9x13” (23x33cm) rectangular pans.

Timing: On day 1 the dough can be made, chilled, rolled and cut, then the rolls are refrigerated overnight. On day 2, pull the rolls out of the fridge about 2¼ hours before serving time, then proof and bake.

Milk & Honey Sweet Dough

 VolumeGramsOunces
Unbleached flour, 12% protein2 c spooned2508.8
Milk¾ cup (180 ml)1826.4
Instant yeast1½ tsp4.80.17
Salt¾ tsp4.50.16
Honey3 Tbs602.1
Egg yolk1 yolk150.5
Water1 Tbs150.5
Butter, very soft4 Tbs572.0

Make the Roux. Measure the flour into the bowl of a stand mixer. Add the milk to a small saucepan and whisk in 3 Tbs of the flour from the mixer bowl. (If you are weighing ingredients, put 30g/1.1oz of bread flour into the milk and 220g/7.8oz into the mixer bowl.) Heat over medium-high heat, whisking constantly, until uniformly thickened and bubbling, about 20-30 seconds after the mixture first begins to boil. Cover and chill until cool to the touch.

The butter will incorporate more easily with the dough if it is so soft that it’s gone all melty at the edges. If you have a Folding Proofer, the butter can be warmed at 85F/29C. To prepare for rising the dough, lightly oil a container and mark it at the 4-cup/1 liter level (8-cup/2 liters if making a double recipe).

Tang Zhong Sweet Dough


Mix the Dough. Add the instant yeast and salt to the flour in the mixer bowl and stir to combine. Add the water, cooled roux, honey and egg yolk. Mix on low speed until flour is moistened. Once the dough comes together it should stick to the sides of the bowl. If necessary, add 1 more tablespoon water to achieve the right consistency.

Knead Intensively for an Ethereal Texture. Raise mixer to medium-low and knead for 5 minutes. The dough should still be sticking to the sides of the bowl. Add the butter in four parts, kneading until each piece is incorporated before adding the next. Scrape down the sides of the bowl as necessary. Once all the butter is incorporated, knead for 10 more minutes on medium-low. The dough should pull away from the sides of the bowl, although it may still stick on the bottom.

Ferment the Dough. Scrape the dough into the oiled container, place in the Proofer if you are using one and allow to rise until doubled, about 75-80 minutes at 85F/29C.  

Fold and Chill. Turn the dough out onto a lightly oiled surface and stretch and fold all four sides to the middle, creating a square package. Wrap loosely and chill (a relaxed, cool dough will be less sticky and easier to roll out without adding too much flour). After 30 minutes, deflate the dough and re-wrap. Chill 30 more minutes or until it’s convenient to roll the dough, up to 24 hrs.

Cinnamon Pecan Filling

 VolumeGramsOunces
Butter, melted and cooled4 Tb572.0
Light brown sugar2 Tb271.0
Cinnamon2 tsp2 tsp2 tsp
Vanilla½ tsp½ tsp½ tsp
Egg white, cold1 white321.1
Pecans, chopped¾ cup853.0

While the Dough is Chilling, Make the Filling. Butter the bottom and sides of the pans and chop the pecans finely. Whisk together the melted butter, brown sugar, cinnamon and vanilla until well combined. Quickly whisk in the cold egg white to thicken and emulsify the mixture.


Roll and Fill the Dough. Lightly flour the top and bottom of the dough, then roll out to a 12 x 14” (30 x 36 cm) rectangle. Spread the filling over the dough, extending all the way to the edges on the short sides and leaving a small bare border on both long sides. Sprinkle the nuts over the filling. Starting from a long side, roll the dough into a log and press lightly to seal the seam. Use plain dental floss to cut the roll into 12 pieces. If using a knife to slice rolls, it may be easier if the log is chilled first. Arrange the rolls in the pan with smaller rolls in the middle. Cover and chill overnight.


Proof the Cinnamon Rolls. Set up the Proofer, if using, with plenty of water in the tray. Use the rack with the fold-out legs on the lower level to raise the pan off the warming element so that the lower level and upper level proof at the same rate. Set the thermostat to 90F/32C. Place one pan of rolls on the lower rack, off to one side. Then add the shelf supports and shelf and place the second pan on the upper level, off to the opposite side. Close the lid and allow the rolls to proof until the dough springs back slowly when the side of a roll is dented with a finger, about 90 minutes. Half way through proofing, rotate the pans 180 degrees.

Cinnamon Mocha Topping

 VolumeGramsOunces
Fine quality white chocolate barone 3oz bar or
⅔ of 4.5oz bar
853.0
Butter2 Tbs281.0
Cinnamon¼ tsp¼ tsp¼ tsp
Coffee or Espresso (brewed)1 Tbs150.5
Powdered sugar2 Tbs140.5

Preheat the Oven.  Place racks in the upper and lower thirds of the oven and preheat to 375F / 190C.

Make the Glaze.  Break or chop the white chocolate into pieces and put in a small bowl along with the coffee, cinnamon and butter. When the cinnamon rolls are fully proofed, remove them from the Proofer, then turn the thermostat up to 120F (49C). Remove the upper rack and fold up the legs on the lower rack so that it rests close to the warming element. Place the topping mixture in the center of the rack and close the lid. (Because the white chocolate is being melted with coffee and butter, it’s OK to leave the water tray in the Proofer - a little steam won’t hurt it.)  If you're not using a Proofer, melt the glaze over a double boiler or with short bursts in the microwave.

Bake the Cinnamon Rolls.  Cover each pan of rolls with aluminum foil (to seal in moisture and encourage the fullest oven spring possible) and place in the oven on the lower rack. Bake for 10 minutes, then remove the foil, rotate pans 180 degrees and place on upper rack to encourage browning. Bake 15-20 more minutes, until nicely browned and the rolls reach an internal temperature of 190F (88C).

Cool and Top the Rolls.  When the cinnamon rolls are done, remove from the oven and cool in the pan for 10 minutes. While the rolls are cooling, whisk the melted glaze ingredients until they emulsify and are thick and smooth. Add the powdered sugar and whisk until smooth. Unmold the rolls onto a serving plate and drizzle the glaze over the warm rolls.

Alternative Timing:  The rolls can be made all in one day.  After the first rise/bulk ferment, chill the dough only for the minimum time of 1 hour.  Then roll, fill and cut the rolls.  Skip the overnight time in the refrigerator and shorten the final proof to 70-75 minutes (the dough will be warm and will take less time than refrigerated dough).  All in, start these rolls 5½-6 hours before serving time.


golgi70's picture
golgi70

Well with David's strong suggestion to make this loaf after talking of the Miche in "Bread" I had to see.  I was mostly interested how this amazing loaf was mostly comprised of white flour.  I had to see.  I made 2 loaves @ 2 KG each.  I went with the original formula David mentions with just a couple small changes.  First Change was I made the Levain with all Central Milling T85 opposed to a mix of White/Wheat.  I decreased the toasted wheat germ to 2% (because I had this much on hand).  Finally I prepped a bit shy on levain so I proceeded with 11% pre-fermented flour opposed to 13% and made it up in the final dough. 

A few changes I made were adding a short 30 minute autolyse with the levain included.  I mixed using the pincer method.Then I decreased the folds down to only 2 folds @ 1 hour intervals because the dough had good strength and was lively after the second fold.  The total bulk was 3 1/2 hours

I always like to bake my cold retarded loaves from the fridge and never proof them post retarding.  The less hydration doughs do require or benefit from a 30-60 minute rest out of fridge to soften the cold skin.  I did so with these but still got a bit too much spring.  I think next time I'll let these proof for an hour or so at room temp prior to retarding and hopefully that'll hit the perfect mark.  

The toasted wheat germ is the key to this loaf.  It brings so much to this relatively simple dough.  I've just cut it after about 10 hours (couldn't resist) You can see I shoulda waited til tommorrow based on the slightly moist base.  Both loaves temped at 210 out of the oven after an hour and ten minute bake.  They lost 15% water weight through the bake.  When I did the Miche from  "Bread" the loss was around 10%.  

Tasting:  Well at first bit this bread is sweet like dessert and has a wonderful chew that brings some nice mellow lactic notes.  I'm imagining this will be fun to taste through the next few days.  

Cheers

Josh

Isand66's picture
Isand66

  This was supposed to be a high extraction whole wheat loaf but I'm having trouble milling my flour course enough to actually have much bran left to sift out.  So, instead I basically used freshly milled whole wheat and added some fresh whole rye flour along with some whole spelt and a whole bunch of caramelized onions.

Usually I would only bulk ferment the dough for around 12 hours but I ended up bulk fermenting this one for around 36 hours which caused the onions to meld together in the final dough.  In hindsight I should have folded the onions in at a later time but I wasn't originally planning on baking this one 2 days later.

I built the starter up in 2 stages starting off with my AP 66% hydration mother starter and added WW and Rye.

The final bread came out very tasty with an unbelievably moist crumb from all of the onions and the high amount of water added to the dough.

Whole Wheat with Caramelized Onions (%)


Whole Wheat with Caramelized Onions (weights)

Closeup1

Levain Directions

Step 1

Mix all the levain ingredients together  for about 1 minute and cover with plastic wrap.  Let it sit at room temperature for around 7-8 hours or until the starter has doubled.  I used my proofer set at 83 degrees and it took about 4 hours.

Step 2

Mix the flour and water with all of the levain from step 1 and let it sit at room temperature again until it is doubled.  At this point you can either use it right away or put it in the refrigerator and use it the next 1 to 2 days.

 Main Dough Procedure

Mix the flours with the main dough water for about 1 minute.  Let the rough dough sit for about 20 minutes to an hour.  Next add the levain and salt and mix on low for 3 minutes and speed #2 for another 2 minutes or by hand for about 5 minutes.   Now add the caramelized onions and mix on low for 1 minute to incorporate them completely into the dough.  You should end up with a cohesive dough that is slightly tacky but very manageable.  Remove the dough from your bowl and place it in a lightly oiled bowl or work surface and do several stretch and folds.  Let it rest covered for 10-15 minutes and then do another stretch and fold.  Let it rest another 10-15 minutes and do one additional stretch and fold.  After a total of 2 hours place your covered bowl in the refrigerator and let it rest for 12 to 24 hours.  (Since I used my proofer I only let the dough sit out for 1.5 hours before refrigerating).

When you are ready to bake remove the bowl from the refrigerator and let it set out at room temperature still covered for 1.5 to 2 hours.  Remove the dough and shape as desired.

The dough will take 1.5 to 2 hours depending on your room temperature and will only rise about 1/3 it's size at most.  Let the dough dictate when it is read to bake not the clock.

Around 45 minutes before ready to bake, pre-heat your oven to 550 degrees F. and prepare it for steam.  I have a heavy-duty baking pan on the bottom rack of my oven with 1 baking stone on above the pan and one on the top shelf.  I pour 1 cup of boiling water in the pan right after I place the dough in the oven.


Right before you are ready to put them in the oven, score as desired and then add 1 cup of boiling water to your steam pan or follow your own steam procedure.

After 5 minute lower the temperature to 450 degrees.  Bake for 35-50 minutes until the crust is nice and brown and the internal temperature of the bread is 205 degrees.

Take the bread out of the oven when done and let it cool on a bakers rack before for at least 2 hours before eating.

Crumb1

CrumbCloseup


flour-power's picture
flour-power

My second venture into bread baking, guided by The Fresh Loaf Lessons. With today's loaf I want to try:

1.Using a preferment to use less yeast and lend more flavor to the bread.

2.Venturing from machine mixing by autolyse, so I'm not "kneading the beegeebers" for 10 minutes - kneading is the one reason why I've shied away from bread baking all these years. I'm lazy.

3.Getting a feel for the slap and fold method.

4.Using a baking stone. I'm working with a darkened pizza stone, saturated with years of grease from frozen store-bought pizzas. I opened the windows and turned on the fan before preheating the oven with this stone. Baking commenced when the smoking stopped. Parchment paper was placed between the bread and the stone.

Well, I don't have a scale, yet. Here's the play by play.

Poolish, 10pm. Left covered on the counter, about 65 f.

1c whole wheat flour

1c water

1/4 t yeast

10 am, 30 minute autolyse of 2c white flour and 1/2c 2% milk, then added,

1/4 t yeast

1T white sugar

the poolish

2T melted butter, salted.

Blended together to make a sticky dough. Placed in a covered buttered bowl to rise in an 80 f oven for one hour until doubled. Slap and fold. Returned to bowl and repeat a second time. Third handling was to shape the dough on parchment and allow to rest while the oven and stone preheats to its max of 525 f. Placed a metal 9X9 pan on lower rack to hold steam water. Lowered temp to 400 to get the stone to quit smoking. Brushed watered-down egg yolk on the top of the dough and slashed top with a steak knife. Baked 20 minutes at 400 f. Loaf made a nice thud when tapped.

Though I used steam, the top, once it cooled down, seems softer than I'd hoped. Supper is still three hours away, but for now, it's a pretty little thing, deserving of a glass of wine alongside. Perhaps in the next chapter!


CeciC's picture
CeciC
Original Formula       
50% Multi-Grain Quinoa Levain       
Source       
        
Total Weight2260      
Serving2      
Weight per Serving1130      
        
Total Flour 1100     
Total Water 880     
Total Hydration 80.00%     
Multi-grain % 49.55%     
        
        
 Build 1Build 2Build 3SoakerFinal DoughAdd-InTotal
Levain       
White Starter (100%)20     20
Wholewheat Starter      0
Rye Starter      0
Yeast Water Levain (100%)      0
       20
Flour       
Extra-High Protein Flour (>14%)      0
Bread Flour45   500 545
AP Flour      0
 450005000545
Wholemeal Flour       
Wholewheat Flour45   450 495
Barley Flour    50 50
       0
 450005000545
Liquid       
Water     780 780
Milk      0
       0
Yeast Water90     90
       0
       0
       0
 900007800870
Others      0
Yeast      0
Salt    25 25
Wheat Germ      0
       0
       0
 000025025
ADD-IN      0
Cooked Quinoa     275275
 00000275275
        
Direction       
1) Autolyse 1 Hour      
Disolve Levain in warm water (withholding 30G) add flour and mixed until no dry bites Left       
2) Add Salt and remaining Water, incorporate it with Pincer Method       
3) Give 2 Stretch and Fold within the First Hour       
4) Go into the fridge for 4 hours (as I went out for yumcha)       
5) Take it out of the fridge and fold in cooked Quinoa        
6) Give it another 3 S&F       
7) Total Bulk Fermentation8 Hours      
8) Divide and let it rest for 30 min, it felt a little dry more like a 70% dough       
9) rest for 30 Mins and Shape       
10) baked Cover 30mins and uncovered for 25 Mins     

This bread is inspired by Chad - Tartine No.3 as I have some left over quinoa from the night before, I incorporated it into my bread. which is the best way to kill off any left over which my families arent very keen on. 

As I got a few thing to do that day so I have retard the dough a few times, they werent for flavor development. Here's a few pic of the loaf.


Untitled Untitled


I think it is still slightly over-proof, I shouldnt have warm up the dough

Untitled


Even though there is a slight flaw with my proof time, Im still lucky enough to achieve such oven spring n open crumb. 

Untitled

Maybe is becoz of the amount of quinoa i added, its taste is pretty apparent in this bread.


Untitled


CeciC's picture
CeciC

After reading a post by Ian writing about building a bread that calls our own, this idea strikes me and I decided I am up for this challenge. The only requirement for the challenge is following the ingridient listed in his blog 450 g (90%) 550 wheat flour 50 g (10%) rye flour 10 g (2%), salt Yeast and / or yeast Water


This is my second attempt at this bread, last week I haven’t had much luck and ended up with a over-proofed bread. This week I have a little tweak at proof schedule and so forth, and finally with something decent. Enough being said, heres the formula I used


Total Weight879      
Serving2      
Weight per Serving439.5      
        
Total Flour 500     
Total Water 379     
Total Hydration 75.80%     
Multi-grain % 10.00%     
        
        
 Build 1Build 2Build 3SoakerFinal DoughAdd-InTotal
Levain       
White Starter (100%)10     10
Wholewheat Starter      0
Rye Starter      0
Yeast Water Levain (100%)      0
       10
Flour       
Extra-High Protein Flour (>14%)      0
Bread Flour40   405 445
AP Flour      0
 400004050445
Wholemeal Flour       
Wholewheat Flour      0
Rye Flour    50 50
       0
 000050050
Liquid       
Water 40   334 374
Milk      0
Raisin Soaker Water      0
Yeast Water      0
       0
       0
       0
 400003340374
Others      0
Yeast      0
Salt    10 10
Wheat Germ      0
       0
       0
 000010010
ADD-IN      0
Sesame (1 Cup)      0
 0000000
        
        
Direction       
Final Dough Water Temp (85F) Dough Temp (79F)      
Autolyse all ingridient (except Salt and 14G of water)40Mins      
Add salt mix well with a few stretch and Fold       
S&F 6 times (@ 30 Mins interval)       
Total Bulk Fermentation @ 24C 6Hours     
Overnight Retard Proof (in Fridge) 5 Hours     
Bake - Cover30      
Bake -Uncover25      
Finished Loaf registered 212F       

I store my starter in the fridge my weekly bake, so I refresh it 2 times before I build my levain. On my baking day, feed it at 10:40:40 Starter:Flour:Water left it in room temperature before I ran off to work, came home it has double in size with sweet aroma with a slightly sour tang (Eating and tasting from the raw starter gives me the best approximation on how my bread would be, and luckily Im still alive after so many starter tasting).


I dissolved the starter in 320G of warm water mixed it with flour till its fully hydrated. It would looks like a batter instead of bread dough, It will come together eventually.


Untitled

Autolysed it for 40mins you can see the gluten is starting to form, then added salt and remaining 13g of water, mixed it using pincer method. I gave it 6 in-bowl stretch and fold every 30 mins, total bulk fermentation would be 6hours at room temp (22c). It had grown a bit around 30%, it felt light and well aerated.


Gently eased it out of the container, by flouring the side and nudged it with a rubber spatula, It should come out very nicely.


Untitled

Pre-shaped it into a rectangle, let it rest for 30mins. Then shaped it into a boule and put it in a banneton with the seams down ( I was gonna let it bloom naturally, then I realized I shaped it fairly tight).


Proof in the fridge for 6 hours, I let it warm up at room temperature for an hour, while my “dutch oven” is heating up. Inverted the dough on parchment paper and scored.


Baked covered at 240C (the max that my oven would go) for 30 Mins, then uncover fro 25 mins. It registered over 210F internal temperature.


Untitled

It sang for quite a while when its out of the oven, with nice crackie noise that we all love. It has nice open crumb, fantastic aroma, sweet and crunchy crust with chewy crumb, it’s a everyday bread that hope you all enjoy.

UntitledUntitledUntitledUntitledUntitledUntitledUntitled


its Spring time, these are some flowers found near my apartment. I am still very new to photo shooting, any comments on my photos are very welcome!!


UntitledUntitledffd1500e-e1ba-4d64-9401-df4e85b2b594

Pages

Subscribe to RSS - blogs