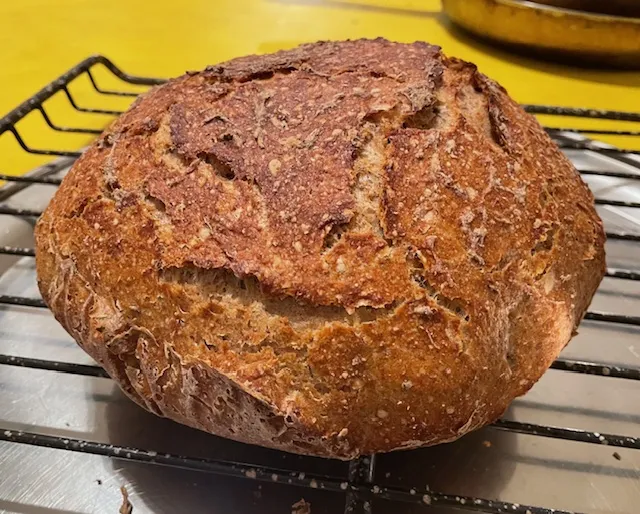
The Fresh Loaf

A Community of Amateur Bakers and Artisan Bread Enthusiasts.

Blogs

Benito's picture
Benito

I was pressed for time and was tasked with bringing bread to my family’s Thanksgiving dinner yesterday.  The previous time I made rolls with Nfld savoury I didn’t use enough to taste them as much as I would have liked.  This time the Mt Scio savoury flavour was lovely and the milk rolls were enjoyed by all.

For 13 x 9” pan 24 rolls 

egg wash: 1 yolk, 1 tbsp milk and a pinch of salt, beaten…


Cook Tangzhong mixing flour and milk constantly until it becomes a thick roux.  Let cool before adding to final dough.  Or add to cold milk and egg to cool it down.


Bring butter to room temperature or warmer.


Whisk together dry ingredients flour salt and yeast. 


To mix by hand, add the salt and yeast to the wet ingredients (milk, tangzhong and egg) to dissolve.  Next add the flour, black pepper and Nfld savoury and mix with a silicone spatula until no dry flour remains.  Rest 10-20 mins.  Next perform French folds until the dough is well developed.  Smear the blended butter/flour onto the dough and then fold to incorporate and then perform further French folds until well developed.  Form into a tight ball and place in a bowl covered with plastic or a damp cloth and place in a warm place until doubled (about 1hr 30 mins).   You can do a cold retard to bake the next day if you like.


Butter a large baking pan or line with parchment.  Punch the dough down and then divide into 12 equal portions.  Form each into tight boules.  The following is the same as what I do to shape the lobes of dough for my milk bread, except that each gets cut in half.  Roll out each boule into a square, then letterfold.  Elongate rolling each out into a long rectangle.  Do another letter fold, then roll out again much longer.  Roll the flattened dough up.  Use dental floss to cut each long roll into two small rolls, place each into the prepared pan cut side down.  Repeat until you have 24 rolls arranged 4x6 in your pan.


Place in the buttered baking pan seem side down.  Cover them and allow them to fully proof about 1 hour to 1 hour and 20-30 mins, they should pass the poke test.  If you did a cold proof it may take longer to complete final proof.


After about 30 mins of proofing time, whisk your remaining egg and milk and then brush the small boules.


About 30 mins prior to end of final proof preheat the oven to 350°F. 

Immediately prior to baking brush the dough again with the egg and milk mixture.


Bake the rolls uncovered for 30-35 minutes or until the internal temperature is at least 190F. Cover if your rolls get brown early in the baking process.


Remove the bread from the oven but not the pans, brush the tops with butter while hot, and then let cool for 10 minutes before pulling the bread from the pans. You may need to slide a butter knife down the sides of the pan to loosen the bread, but I have found parchment paper to be unnecessary, although it might make removing all the rolls from the pan without having to flip them twice easier.  Sprinkle with fleur de sel if you wish after brushing with butter. 

My index of bakes.

The Roadside Pie King's picture
The Roadside Pi...

Day#1

The natural yeast leiven, and the soaker


Day #2- have all the final dough ingredients weighted and ready. Prep the ingredients for the mechanical mixing. Mix the final dough, with the goal of achieving a soft cohesive dough ball that is slightly tacky and just about passes the window pane test. Bulk fermentation until 1 1/2 times the volume is achieved.


The final dough ingredients at the ready.

Final dough ingredients are prepped for the mixing

The dough after one minute at Bosch speed #1

After an additional two minutes at Bosch speed #2, the dough is very tacky. That being said, it just about passes the window pane test.

 Straight out of the mixer. The dough came out clean. It required only a minimumal amount of bench flour. After just two hand kneads the dough ball is gaining strength.

 After only ten or so nana style hand kneads, the dough is looking shiny, soft, and just a bit tacky.

 Bulk fermentation is initiated.

After 1:15 the dough ball is gaining volume. However, the target has not yet been achieved. Ambient temperature inside the fermentation container 78°F.

After a total of 1:45 the volume goal increase is achieved.

The dough ball is preshaped using bench resistance. Then a ten minute rest, before the final shaping.


The pre-shaped dough ball is shaped into a batard, with a nice tight skin. The shaped batard is put to proof. Oven, (preheat 550°F) and steaming apparatus are ready 

45 minutes of proofing,and the poke test reveals a slightly under proofed batard. Moving on to the end game score, and bake.


Conclusion:

Everything about this bake is wonderful.

1. The dough was surprisingly user friendly, and easy to handle. What a pleasure.

2. For all intents and purposes no adjustments were needed during any of the stages. Out of the mixer maybe 1/2 a teaspoon of flour that made its way on to the bench was used. No extra water. No wet hands needed 

3. Did I mention the oven spring? Remember, this is 100% whole wheat, with inclusions too! Amazing formula. The master formula, that only a master could develop.

3. The rich dark mahogany color is making it very hard to let this beauty cool properly. However, I will exercise restraint. 

Special thanks to Mariana, a knowledgeable, excellent baker in her own rite for pointing me to a part of whole grain breads, I otherwise would have passed up. For sure I would have went straight to the formula section.

That concludes another live play by play bake. Thanks for reading.

Your friend,

Will Falzon 


The Roadside Pie King's picture
The Roadside Pi...

The main players:

KA Sir Lancelot high gluten flour - 60%

Great River Milling dark rye flour - 40%

total hydration - 69%

Day One: The rye sour build 

Stage #1 - 6 hours

Rye mother at 100% hydration

Rye sour at 80% hydration

Rye sour build #1

The Rye sour build #2. After 5 hours at room temperature. The formula says it will be "bubbly." I attribute the lack of bubbles to the dark rye flour used verses the light rye called for. That being said the volume increase is near tripled. Now for a flavor building overnight cold ferment.

Build stage 3 - The final dough.

I add 13g of water to the mix to compensate for the dark rye.

After 12 minutes of mechanical mixing the dough is firm, and slightly tacky. Now begins the bulk fermentation to double. Approximately 1 hour.

 After 45 minutes. The dough has surpassed double. 

 The divide and pre-shape was accomplished without any additional bench flour. The pre-shaped loaves are rested for 10 Minutes.


The final shaping into one round, and one batard went well. Oven is preheating. Poof until tripled. Approximately 1 hour.


 After just about one hour the loaves are scored misted with water and popped into the oven.

 Beautiful bake.

Conclusion:

The only deviation from the formula, I expected. The two 587g loaves took no less than double the prescribed bake time. 

 The dough was super easy to handle making today's bake a pleasure. Smile...


 What can I say about this wonderful bread? The crust is thin crisp with an inviting dark color. The perfumed crumb, is soft without being to soft. Light and pillowy comes to mind. I have to say, Everything I have made from Inside the Jewish Bakery has been stellar!

The Roadside Pie King's picture
The Roadside Pi...

I found my forum post Matera bread. I share the link to preserve the record of to date one of my best bakes ever!

Matera bread

Benito's picture
Benito

I got my hands on some good stoneground whole red fife so wanted to incorporate it into my milk bread.  I haven’t used any red fife for a long while so it was due.  Because of the issues with gluten breakdown that seems to happen with red fife, I decided to use it all in the tangzhong, 20% since the gluten in the tangzhong won’t matter since it is cooked.

I had some pepitas and a handful of sunflower seeds lying around so decided to add them to this loaf.

For one 9x4x4” Pullman pan loaf.


Instructions

Levain

Mix the levain ingredients in a jar or pyrex container with space for at least 300% growth. 

Press down with your knuckles or silicone spatula to create a uniform surface and to push out air.

At a temperature of 76-78ºF, it typically takes up to 10-12 hours for this sweet stiff levain to be at peak.  For my starter I typically see 3-3.5 times increase in size at peak.  The levain will smell sweet with only a mild tang.


Tangzhong 

In a sauce pan set on medium heat, stir the milk and whole red fife flour until blended. Then cook for several minutes until well thickened, stirring regularly with a spoon or heat-resistant spatula. Let cool in the pan or, for faster results, in a new bowl.  Theoretically it should reach 65ºC (149ºF) but I don’t find I need to measure the temperature as the tangzhong gelatinizes at this temperature.  You can prepare this the night before and refrigerate it, ensure that it is covered to prevent it from drying out.


If you plan on using a stand mixer to mix this dough, set up a Bain Marie and use your stand mixer’s bowl to prepare the tangzhong.


Dough

In the bowl of a stand mixer, add the milk (consider holding back 10 g of milk and adding later if this is the first time you’re making this), egg, tangzhong, salt, sugar and levain.  Mix and then break up the levain into many smaller pieces.  Next add the flour.  I like to use my spatula to mix until there aren’t many dry areas.  Allow the flour to hydrate (fermentolyse) for 20-30 minutes.  Mix on low speed and then medium speed until moderate gluten development this may take 5-10 mins.  You may want to scrape the sides of the bowl during the first 5 minutes of mixing.  Next add room temperature butter one pat at a time.  The dough may come apart, be patient, continue to mix until it comes together before adding in more butter.  Again, knead until well incorporated.  You will want to check gluten development by windowpane during this time and stop mixing when you get a good windowpane.  You should be able to pull a good windowpane, not quite as good as a white flour because the bran will interrupt the windowpane somewhat.  Add the seeds, then mix again until they are well distributed.


On the counter, shape the dough into a tight ball, cover in the bowl and ferment for 2 - 4 hours at 82ºF.  There should be some rise visible at this stage.


You can next place the dough into the fridge to chill the dough for about 1.5 hours, this makes rolling the dough easier to shape.  Remember, if you do so the final proof will take longer.  Alternatively, you can do a cold retard in the fridge overnight, however, you may find that this increases the tang in your bread.


Prepare your pans by greasing them with butter or line with parchment paper.  


Lightly oil the top of the dough. Scrape the dough out onto a clean counter top and divide it into four. I like to weigh them to have equal sized lobes. Shape each tightly into a boule, allow to rest 5 mins. Using an oiled rolling pin roll each ball out and then letterfold. Turn 90* and using a rolling pin roll each out to at least 8”. Letterfold again from the sides so you have a long narrow dough. Then using a rolling pin, roll flatter but keeping the dough relatively narrow.  The reason to do this extra letterfold is that the shorter fatter rolls when placed in the pan will not touch the sides of the pan.  This allows the swirled ends to rise during final proof, this is only done for appearance sake and is not necessary.  Next roll each into a tight roll with some tension. Arrange the rolls of dough inside your lined pan alternating the direction of the swirls. This should allow a greater rise during proof and in the oven.


Cover and let proof for  4-6 hours at a warm temperature.  I proof at 82°F.  You will need longer than 4-6 hours if you chilled your dough for shaping. I proof until the top of the dough comes to within 1 cm of the top edge of the pan.


Preheat the oven to 350F and brush the dough with the egg-milk wash.  Just prior to baking brush with the egg-milk wash again.


Bake the loaves for 50 minutes or until the internal temperature is at least 190ºF, rotating as needed to get even browning. Shield your loaf if it gets brown early in the baking process. After 50 mins remove the bread from the pan and bake a further 10 mins by placing the loaf directly in the oven on the rack with the oven turned down to 325ºF

My index of bakes

The Roadside Pie King's picture
The Roadside Pi...

The formula:

General Mills extra fancy Durum wheat 500g - 100%

Water                                                            520g - 104%

Instant yeast.                                               2.5g  -    .5%

Kosher salt.                                                    10g -    2%

Process 

1 - Flour and water autolysis 30 minutes 

2 - combine the yeast and salt with the autolysis four

3 - Transfer into the fermentation tray. Rest for 20 minutes covered.

4 - fold the dough on to itself on all sides. Rest for 20 minutes

5 - Preform coil folds at 20 minutes. Intervals for a total of four. Reducing the number of coils preformed after each internal. As the dough builds strength.

6 - rest the now more structured dough for eighty minutes.

7 - ever so carefully dump the dough onto a well floured work surface

8 - preheat the oven to 550°F

9 - ever so carefully divide the Dough slab into four equal pieces. Place the dough on a sheet of parchment, on a Peel so they are oven ready. Rest the loaves for two  hours uncovered. 

10 - the loaves are baked two at a time on a steel/stone. After loading the first two loaves the oven temperature is dropped to 475°F. After 15 minutes, the two loaves are moved off the steel onto the middle rack for an additional 13 minutes. 

11- preheat the oven back to 550°F. For 10 minutes.

12 - repeat step ten with the other two loaves. 


Autolysis


The final dough


Rest covered

 Fold the dough on to itself on all sides. Rest covered for 20 minutes.

 Before the first coil folds

 After coil fold #1

 After the fourth set of coil folds the dough has gained a lot of strength. Now for the last rest covered,for 80 minutes.


 Using a bowl scraper the dough slab is carefully sperated from the pan. The edges are floured.

 The dough slab is carefully dropped on to the floured bench. Then the slab is ever so gently shaped into a rough rectangle.

The slab is divided in four equal pieces

Finally the four loaves are transfered to the parchment lined peels, and rested uncovered for Two hours. Before going into the piping hot oven. After the first two loaves are loaded the oven temperature is dropped to 475°F

Conclusion

While mixing the autolysis I noticed the dough had a much thicker viscosity compared to the previous high gluten white flour bake. I decided to raise the hydration slightly to match the viscosity to that of the white flour bake. Other than that, everything progress as expected. 

I submit, two shades of done. I like the dark wood oven style. Bread. 

I hope you enjoy this formula and try it out for yourselves. 

This formula is based on the work of Martin Philipe, the head baker over at King Arthur flour. His original formula, plus instructional videos can be found there. 


Ilya Flyamer's picture
Ilya Flyamer

Been a while since I posted any bakes, finally decided to do it again. Baked this mostly rye bread (about 70% whole rye and the rest bread flour) with seeds over the weekend.

Didn't measure everything very carefully, but vaguely:

200 g liquid-ish rye starter, perhaps 150% hydration or so

Preferement with the starter, and 200 g whole rye flour, 250 g warm water. Also added a few pieces of old white bread as altus - soaked it with hot water first, but seems like not long enough, some pieces didn't fully disintegrate, it seems. A a few hours at 28C until well risen and a little sour.

Final dough with about ~500 g whole rye flour, ~300 g bread flour, 150 g toasted and soaked mixed seeds (crushed linseed, pumpkin and sunflower), 14 g salt, tablespoon of malt extract, warm water until dough resembles a soft paste. Fermented around 3 hrs at 30C until well risen and shows holes on the surface. Poured into tins, smoothed the top, sprinkled sunflower seeds. Final proof at 33C until well risen. Sprinkled surface with water, baked in a hot oven(started 240C after a few min reduced to 200C) until done. When taking out sprinkled with water again, wrapped in a towel to cool down.

Surprisingly light, and has a nutty taste from the seeds.

Precaud's picture
Precaud

One of the posts that motivated me to join this group early this year was this one by troglodyte, Sourdough Bread for Bread Machines with Programmable Cycles

It wasn't so much the recipe, it was the principles/priorities by which (s)he arrived at it. Specifically, "This is a recipe of convenience... The benefit is consistent, tasty bread with a minimum of effort and time. It is sized to be suitable for a toaster or sandwiches." Very practical. What I call "daily bread". While I am experimenting and learning new techniques, I want something like this available every day.

Being "daily bread", it will most often get toasted and buttered, go well with soups and salads, and be a good receptacle for jams and the like. So this will be a pan loaf.

I have a couple more requirements. My metabolism and digestive system constantly remind me, they definitely prefer breads that are high in fiber. The more, the better. It also happens that my taste buds have always liked high-fiber grain products. I have pleasant memories of consuming massive quantities of Wheaties for breakfast as a child, with its unmistakable wheat-bran flavor. Our local coop sells bulk organic wheat bran for very reasonable $$$, so high bran content is on the priority list.

Another requirement is flexibility. I want something that can be prepared with equally-good results either in a competent bread machine, or made by hand and oven-baked.

I started with a recipe called "Double Bran" found in the Panasonic SD200 breadmaker manual. It's a pretty pedestrian recipe, with about 3/4 cup of wheat bran added to a 60/40 mix of whole-wheat and all-purpose flour for a 1.5 lb. loaf. It also had additives to make it "soft" which I'd rather not use.

This was a good starting point, with enough bran to appreciate it's contribution to taste and texture. It raised the question: How far can I take the bran content? How much of the total flour amount can be bran? The Max Bran project was underway.

Wheat bran is lightweight stuff, about 48 grams per cup by my measurement... about 1/3 the weight of wheat flours. So, despite the "Double Bran" moniker, adding 3/4 cup of it to over 3 cups of flour is quite minimal.

Over the following months, I gradually added bran while removing and rebalancing the flour and other ingredients. The dry milk and sugar were eliminated. I was experimenting with DIY "dough improver" (a small amount of gluten flour and Vit C powder) at the time, and I have continued to use it with this recipe, but it is optional. I started autolysing the flours, and then the bran as well, both of which significantly improved the flavor. This required a reduction in kneading time and an increase in mixing time to incorporate ingredients into the autolysed dough.

As of this writing I have made this bread 19 times, using 6 different bread machines, two different mixers and three different ovens. Although the oven-baked versions are slightly preferred, bread machines that mix ingredients well and bake at reasonable temperatures will produce excellent results.

Here are the recipes for roughly 1 and 1.5 pound loaves.

 Autolyse:                      1 lb           1.5 lb
                                     ------          --------
  All-Purp Flour             165g         200g
  Whole wheat Flour      83g         100g
  Wheat Bran                 83g         100g
  Bread Improver (opt)  1/4 tsp      1/3 tsp
  Water                          225mL       280mL

Additions:
  Salt                             3/4 tsp        1 tsp
  Sunflower Oil             3/4 tbsp     1 tbsp
  SAF instant yeast       3/4 tsp        1 tsp    (adjust for altitude)
  Water                           20mL        20mL    (ditto)

Manual Process:
Combine the dry autolyse ingredients. Add the water and mix for an even distribution.
Form a ball, cover, and let sit for 30 min.
Tear the dough ball into 8-10 chunks to assist mixing. Add the remaining ingredients and mix until well combined.
Knead for 5-7 minutes.
Cover and let rise at 79-85ºF 1.5 hours or until doubled.
Degass and shape into loaf pan. I used an 8.5" Calphalon pan for 1.5 lb.
Cover and proof for 50-60 min at 79-85ºF.
Bake at 375ºF for 45 min or until interior measures 200ºF.
For electric ovens with dominant top elements, cover loaf top with a foil tent after it has browned as desired.

Bread machines:
Bread machines that have programs easily adaptable to incorporating an autolyse cycle are in the minority. The ones that do will typically refer to a so-called "Rest" period near the start of the cycle. Units like the old Panasonic SD-BT65P (1.5 lb.) and SD-BT56P (1 lb.) have near-perfect programs for autolysing. They also bake at 340ºF in heavy cast breadpans, and they are my favorite choice for this bread.

For programmable machines, you can create a custom program with 5 min mix, 30 min rest, 7-10 min knead, 90 min rise, short stir/degass, 55 min rise, and 45-60 min bake. The bake length depends on the baking temperature of the machine, and the loaf size; longer time for larger loaf and/or lower temps. The Zojirushi dual paddle models and the old Breadman TR2200C are both versatile programmable machines, but their baking temps are on the low side (292ºF and 312ºF, respectively).

For most machines, you'll have to improvise autolyse using their Dough and Bake programs. Use the times given above a guide.
Mix the autolyse in Dough mode, and stop the machine when combining is done.
Let it sit for 30 minutes.
Add the other ingredients and start the Dough program again for the 2nd mix and kneading.
If the knead cycle is too long (most machines knead way too long for autolysed dough), shorten it by lifting the pan enough to disengage the paddle, let it sit that way for the remainder of the knead, then replace in on the spindle for the rest of the dough cycle.
Remove the dough and mixing paddle, degass as you prefer to, shape the dough back into the pan, proof until ready, and bake.
My favorite machines for this method are the T-fal PF311E51 aka 'ActiBread' and Cuisinart CBK200. They both bake at 388ºF, a very nice temp for this and other breads, and appreciably hotter than most machines. The attached pics are from a T-fal PF311 bake. Note the consistent browning over the entire loaf. Not many BM's can do that. (The Panasonics and T-fals do it best.)

Altitude Adjustments:
I live and bake high and dry at 7,000 feet, so if you're at or near sea level, chances are this recipe will create bran bricks. You will definitely need to increase yeast amount by 50% or more. Even more if using active dry yeast. You may not need to add any water in the second mix. And you might lower oven baking temps just a little. Water boils at 198ºF up here so I typically raise the baking temp to compensate.

If desired, bits of dried fruit, nuts, seeds, or a little honey can be added during the knead. I added diced dried apricot bits a couple weeks ago and liked it a lot. But I mostly make it plain.

This has become one of my favorite breads... my "daily bread" with strong wheaty taste. I hope you enjoy it too.

tpassin's picture
tpassin

I used the same formula as for my 50-50 Emmer bread -

https://www.thefreshloaf.com/node/72946/50-emmer-sourdough

and made rolls instead of a loaf.  The process was the same.  I portioned the dough into 4-oz (114g) pieces.  This might be a little large for a roll, and I would probably go for either 3 or 3.5 oz next time (85 - 100 g).  The dough, though a bit sticky,  was easy to shape as long as I used a little flour on my hands and the bench.  The rolls overnighted in the refrigerator on a parchment-covered cutting board, covered with a sheet of plastic wrap. There was no sign of drying out or slumping.

To get the glaze, I mixed a little water with an egg yolk and brushed on a double layer after slashing.  I have found that using an egg yolk instead of a whole egg makes for a deeper glaze, sometimes even looking like it was lacquered.

These were baked with steam on a baking steel at 450° F for 15 minutes.

The crust is softish, which is good for a roll.  The crumb and flavor are just about the same as for the linked 50% emmer loaf. 

Benito's picture
Benito

I’ve been wanting to try baking this style of bread for some time, but just couldn’t get my nerve up to trying it.  Despite its name, it seems that it is really an Asian style of bread.  I’m guessing that the Danish part of it is that it is somewhat like a danish as in the pastry.  Also, this isn’t something I could try during the heat of the summer and this week we are finally having some normal autumn weather.

To make this bread one starts by making a somewhat stiff enriched dough.  Then you make a flat square of butter that then gets sandwiched inside the dough.  This gets a series of folds resulting in 12 layers.  One has to keep the butter cold enough so that it doesn’t melt into the dough, yet when rolling it out, warm enough to roll out.

For my first attempt at this type of lamination, I’m quite pleased with the outcome.

I’ve altered the formula just a bit to fit my 4x4x9” Pullman pan from the original recipe by Chiew See of Autumn Kitchen on IG/Youtube.

To the bowl of a standmixer add milk, IDY, sugar and salt, mix to dissolve.  Add flour and mix until the dough starts to come together.  Add butter in pats until well incorporated.  Mix until moderate gluten development, it doesn’t need to reach good windowpane.  In fact, I found this dough too low hydration so added some extra milk and ended up fully hand kneading it.

Flatten the dough with a rolling pin into a rectangular shape.  Wrap with clingfilm, leaving space for dough to expand.  Ferment at 28°C for 30 mins.  Freeze the dough for 1 hour then transfer to the fridge 3°C overnight.

Fold parchment paper into 18 x 18 cm square.  Weight out 154 g butter, place it on the parchment square, joining the pieces so that it starts to fill the square.  Fold the parchment to enclose the butter.  Use your rolling pin to strike or press the butter to soften it without warming it excessively.  Roll the butter out to fill the 18x18 square using the rolling pin ensuring that the butter is uniform thickness throughout and that the butter fills right to the corners.  Refrigerate the butter overnight.

In the morning remove both the butter and the dough from the fridge.  Both the butter and the dough needs to have the same firmness before laminating them together, if the butter is harder, let it soften first. You should be able to leave an indent in the butter if you press into it.  The butter should be pliable and be lightly bent without breaking, its temperature should be between 13-15°C.  

Roll the dough into an 18x36 cm rectangle, the dough should be twice the size of the butter.  Brush off excess flour.  Place butter in the center of the dough, fold the dough to enclose the butter pinching the dough where the ends meet to seal.  Turn the dough 90* so that the open end is towards you and the closed sides are perpendicular to you.  Gently press down on the dough with the rolling pin before rolling.  Lightly dust with flour, then roll from center to the ends with firm and even strokes.  Flip the dough and continue to roll to 21x53 cm.  Trim off the uneven ends.  Brush off excess flour.

Do a double or book fold, this brings the cut ends of the dough together folding one edge to two thirds of the length then fold the other end to meet.  Next fold the dough in half.  You now have four layers.  Wrap with clingfilm and refrigerate for 30 mins.

Remove dough from the fridge, give it a few minutes if it is too hard before rolling.  Gently press down with the rolling pin.  If there are any bubbles pop with a toothpick.  With either of the open ends towards you roll the dough to about 21x53cm.  Do a lenter fold (letterfold in thirds) giving you three layers for a total of 12.  Wrap in clingfilm and refrigerate for at least 1 hour.

Prepare your pan by greasing it with butter.

Remove the dough from the fridge allowing it to soften until it is soft enough to roll.  Again using the same methods roll the dough out to slightly larger than 30x21 cm.  Trim all four sides to achieve 30x21 cm, keep the scraps for final shaping.

We will require 9 strips that are 30 cm long so mark 2.33 cm intervals on the 21 cm sides of the dough.  Cut the dough into 9 strips 2.33x30 cm.  We will be braiding three sets of 3 strips, so starting with 3 strips, stack the ends together with the center strand at the bottom and press down so that end sticks.  Braid the 3 strands so that the cut sides of the strips face up if possible.  Pinch to seal the end.  Flip it over, place ⅓ of the trimmings you kept into this underside of the braid now facing up.  Fold the two ends together and then place this into the greased pan folded side down.  Repeat with the other two sets of three strands so that there are three sets of braided dough in the pan.  The sets are placed side by side in the pan.

Ferment between 27-28°C 80-82°F until the pan is about 80% filled (3-4 hours).  30 mins prior to baking preheat the oven at 200°C or 390°F.   Egg wash the dough when preheating starts and then again immediately prior to baking.  Optional, after second egg wash sprinkle almond flakes on the top.  Place on a lined pan to bake as the dough will leak melted butter from the tin.

Bake at 200°C 390°F for 8 mins, then drop temperature to 170°C or 340°F and bake for another 25-30 mins or until golden brown.  Allow the loaf to cool prior to slicing.

After the first set of folds.

Plaiting completed and arranged in the Pullman Pan.

About 30 mins prior to baking just before the first egg/milk wash.

 My index of bakes.


Pages

Subscribe to RSS - blogs