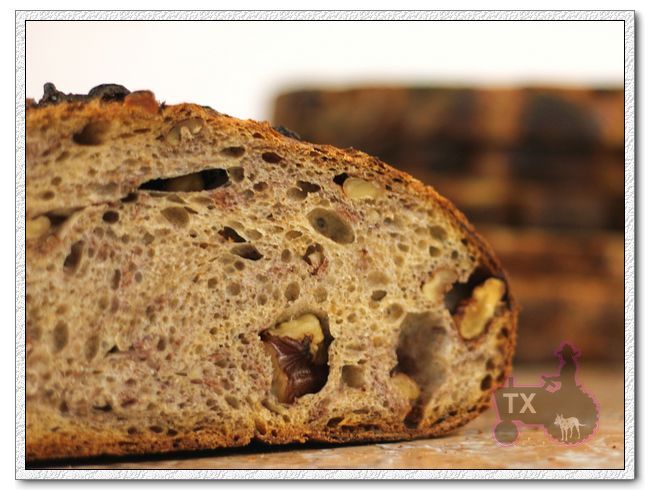
The Fresh Loaf

A Community of Amateur Bakers and Artisan Bread Enthusiasts.

Blogs

Doc Tracy's picture
Doc Tracy

I'm so excited. I just ordered a new mill. I can hardly wait to start milling my own grains. Since I bake almost exclusively with whole grains this is a big deal for me. I've been ordering my flour out of state, about once or twice a month so I figure it will pay for itself in about a year.

There is a place very close to the house that sells grains in bulk so I'm pretty set, although I don't know if they have specialty grains like spelt, durum and kamut.

Now I just need to bake a bunch of whole wheat this week to use up the month old flour that I have. I'm refreshing my starter now, going to start some of my "1-2.5-3" loaves tonight.

txfarmer's picture
txfarmer

The bagel recipe is from Nancy's Siliverton's book "Breads from the La Brea Bakery". The procedure is very similar to the one in BBA, cold rise, boil, bake, except that it uses some starter in addition to commercial yeast. I like the end product a lot, as happy as I was with the BBA ones, I find these ones are more chewy, the crumb is tighter, more like a true NY bagel. I used various toppings, my favorite one was Asiago Cheese, yum!

I used my 100% starter, and adjust water content accordingly. Also used some baking soda in the boiling water to get that shine. The following is my modified version:

water (70F), 14.5oz

instant yeast, 1.75tsp

white starter (100%), 11oz

high-gluten flour (I used Sir Lancelot), 2lbs

sugar, 2oz

salt, 1tbsp

barley malt syrup, 2tbsp

milk powder, 6tbsp

1. Mix everything until gluten is well developed

2. Rest for 10 minutes

3. divide into 4oz pieces, round and relax for 15 minutes

4. shape into bagels - I use the "connect two ends of a rope method", but some prefer the "punch and stretch a hole in the center" method. Keep the hole in the center fairly big.

5. refriderate for 12 to 24 hours.

6. take out and take one to test whether it floats in water, if so, they are fully risen and ready to be boiled, otherwise, they need more time on the counter to rise, check every 20 minutes.

7. boil in water and baking soda, 20 sec each side

8. take out and add on toppings

9. bake at 400F for 20minutes (but oven is preheated to 450F then turned down when breads are loaded).

Liking the bagels, I wanted to make some bialys as well. Used Hamelman's formula even though I see Glezer has one that's straight from Kossar, Hamelman's has lower water content, and bialy is supposed to be chewy, so I chose his instead.

Nice and chewy out of oven, full of onion aroma. The problem is that there's no salt in the onion topping, so while it smelled wonderfully onion-y, but the taste is ... not salty enough. I added a pinch of salt in the onion mixture for the 2nd batch, much better. I checked Glezer's formula, the onion topping is also saltless. I've only tasted Kossar bialy once before, I remmeber it had some salty taste, did I remember wrong? Salt or no salt, these are some yummy little rolls.

Since they are the best fresh, still warm from oven, I think it's really worthwhile to make them at home. Plus they are quite easy to make! I am not posting the recipe since it's straight from the book with no modifications. My order of dried onion is on its way, plan to make some Norm's onion rolls to compare to these.

Mebake's picture
Mebake

This is a batard i made last weekend:

Ingredients:

 - 400g freshly milled Hard White Wheat

 - 300g Water

 - 100g WholeWheat Sponge / levain / preferment (at 68% hydration)

 - 9g fine Sea Salt

-----------

800 g Final Dough at 73% Hydration

Process:

1 - Flour ,Water, and salt mixed to form a dough (SOAKER), and left 8 Hours at room temperature.

2 - Preferment / levain was prepared 2 days before. (BIGA) and stored in the refrigerator after fermenting at room temperature for 8 hours.

3 - Day of Bake, BIGA and SOAKER where cut into pieces and mixed without tearing the dough until it passes windowpane.

4- Stretch and fold gently into an envelope shape, round into a ball every 1 hour for 3 hours.

5 - Preshape, and Shape intoa Batard and place in a rice-floured couche for 45 min, preheat the oven.

6 - Poke test, Slash the loaf at an angle, load into the oven with a peel on parchment, and covered by a preheated pyrex bowl.

7 - After 15 Minutes, the bowl is removed, the stone replace by a colder one and shifted upwards to pervent burning the bottom of the loaf.

8 - After 30 minutes, switch off the oven and let the loaf in to dry out for 10 min.

Result: Chewy crumb, not dense, and very slightly moist and slightly sour.

Recommendation: Yes, But the preferment was over ripen when mixed, which is evident from the lazy yeast activity, hence: tight crumb. Next time, i'll mix it when it is just ripe.

Khalid

dmsnyder's picture
dmsnyder

A few days ago, DonD blogged about some gorgeous baguettes he baked using a combination of unconventional mixing and fermentation techniques adapted from formulas developed by Pierre Gosselin and Anis Bouabsa, both very highly regarded Parisian boulangers. His description can be found here: Baguettes a l'Ancienne with Cold Retardation

Don used both the long autolyse under refrigeration of Gosselin and the cold retarded bulk fermentation of the complete dough employed by Bouabsa. He got such wonderful results, I had to try his hybrid technique.

I had been concerned that the double cold retardation would result in a dough that had so much proteolysis as to be unmanageable. However, Don described his dough as "silky smooth." Well, my dough was sticky slack. It was all extensibility and no elasticity. Fortunately, i have worked often enough with doughs like this to know they can make the most wonderful breads, so I shaped (best I could), proofed, slashed and baked. Voilà!


Since I was already afraid I'd over-fermented the dough, I erred on the side of under-proofing. The baguettes had almost explosive oven-spring. They about doubled in volume during the bake.

The crust was crunchy. The crumb was .... Oh, my!

The flavor was very good, but not as sweet as I recall the "pure" Gosselin Pain à l'Anciènne being.

These baguettes are worth baking again with some adjustments. I would endorse Don's decrease in the amount of yeast. I'll do so next time. And I will try a slightly lower hydration level. These were 73% hydration.

Thanks, Don, for sharing this very interesting twist in baguette techniques.

David

Yolandat's picture
Yolandat

I had a choice today clean my house or bake. I opted for baking. Cleaning will have to wait until later today or tomorrow. I started to make PR bagels. It was an easy recipe to follow. I made no changes to the recipe. I found diastatic malt syrup at a local beer store and used that as the sweetener. I formed the bagels using the rope method. The first couple were a bit misshapen but got the hang of it. I put them in the fridge to retard overnight. I woke up at 3 and 5 AM but made myself wait until 6:30. I had to get up to boil and bake them to see how they turned out. I tried to wait the 15 minutes before tasting them. Oh MY these were the best bagels I have tasted! They were crunchy and chewy on the outside and soft and tasty on the inside. I will definitely be making these again...maybe later today. I made 13 4 oz bagels 

   IMG_3557.JPG

I also made Portuguese Sweet Bread. I was not quite as happy with this bread as with the bagels. The dough came together well. I didn't have any orange or lemon extract so I put a little orange and lemon zest in the dough. It gave the bread a wonderful scent. The recipe said to have the bread rise in the pan for 2 to 3 hours or until the dough fills the pans fully. I think I left them a little too long and the loaves were over proofed. They had large holes just under the crust. I didn't get any over spring. the loaves had a nice crust and you could taste the zest flavours. It is not my favourite bread. It was kind of blah.  

IMG_3555.JPG

Doc Tracy's picture
Doc Tracy

rye spelt

I had another baking day in the RV. I baked a 100% whole wheat miche. I didn't use a recipe this time. Simply modified a "1-2-3" method, making it into a my own. I used 150 grams whole wheat starter,  (100% starter) 375 grams water and 450 grams whole wheat flour. 2% salt. I mixed until it came off the sides of the mixer in the Kitchen aid. This was an incredibly stretchy dough, I guess because of the very high hydration! Certainly don't believe that whole wheat is low in gluten because it isn't true!!

I calculate the hydration of this at a whopping 85% when including the starter. Can this really be right? When doing my folds, I could literally stretch this baby about 18 inches each direction on the first set of s/folds!! It was pretty amazing. I did three sets of s/f's, 1 hour apart. Fermentation time was 10 hours, shaped and 1 hour later I baked. It actually held it's shape pretty well, only flattening slightly.

What a nutty flavor, crispy crust and incredibly open crumb for a WW loaf! Nice! I might try the same in a loaf pan and see what I get in the way of a sandwich bread next time.

The same night, I made a 75% rye, 25% spelt loaf, using Mini's favorite rye formula and my Pullman pan. Spices were dried onion, caraway and anise at a scant tablespoon each. I've found that the exact amount that Mini uses for her big pot works for my Pellman pan. How easy is that? I also found this time that it is the perfect overnight recipe, needing no shaping at all! I put it directly into the Pullman pan at 5:30 in the evening and baked at 3:30 AM. Although Mini says this will self-destruct in 8 hours mine held up for a full 10 and came out absolutely perfect. Rose to the top of the pan, held up, had a small amount of oven spring and with the spelt had a slightly milder, nuttier taste than the 100% full rye that I made a couple of weeks ago.

I'm making plans to start my Hamelman's baking challenge. I'll be starting with something from the levain chapter and something from the rye chapter. I'm waiting on an order of flour and a couple of days off in a row. Perhaps I'll start a levain tonight if I get extra motivated, we'll see.

Looking at about another month in this little camper. Starting to get some cabin fever. It's been an experience, that's for sure!

tssaweber's picture
tssaweber

Just a little sign of life to say hello and to show that I'm still happily baking, not as much as I would like too but still enjoying it very much.

The pictures show a freshly egg-washed Zopf and my spelt multigrain boule.

Thomas

Sam Fromartz's picture
Sam Fromartz

I just posted this recipe over at my blog ChewsWise, where I give much longer description. But I thought bakers here would be interested. This recipe makes two large batards or boules.

Sourdough
70 grams stiff starter
80 grams water
60 grams organic white bread flour
60 grams organic spelt flour

Flax Seed Soaker
1/2 cup (85 grams) organic flax seeds
75 grams water to barely cover the seeds

Final Dough
250 grams sourdough
Flax seed soaker
280 organic white bread flour
280 organic spelt flour
400 grams water
14 grams coarse sea salt

1. Mix starter, cover and let sit overnight (8-12 hours) at room temperature of about 75 F degrees. Pour the flax seeds into a separate bowl and just barely cover with water. 

2. Combine the starter and water in a bowl and mix it up with a wooden spoon or spatula until combined. Add the flours and using a plastic bench scraper, spoon or mixer with dough hook, mix the dough until all the lumps of flour are gone. This will take about 2 minutes. Cover and let rest for 20 minutes.

3. Add salt and mix on a slow speed, about 4 minutes. Add the flax seed soaker and using your hands or the mixer, continue mixing until the seeds are evenly distributed. 

4. Form into a ball and place in a clean, oiled bowl and cover for the first rise. Fold at 50 minute intervals. Total rise is 2.5 hours. 

5. Turn the dough out on a lightly floured counter, divide in two and form into rough batards or boules. Let rest for 15 minutes, then finish shaping the loaves. 

6. The final rise should take 90 minutes. Or, to build up the flavor of the loaf, cover the loaves then let them sit for 30 minutes before putting them in the refrigerator in a closed plastic bag. (I use Ziploc Big Bags ). Retard the loaves for 8-12 hours,.

7. Turn the oven to 460 F with a baking stone in the middle of the oven and a rimmed sheet pan on the bottom. Preheat for at least one hour. 

8. When ready to bake, slash the loaf in a square pattern with a bread knife or blade, then place in the oven on the heated stone. (Batards can be slashed lengthwise). Pour 2/3 cup of water into the sheet pan and close the door. Bake for 30 minutes. Turn down the oven to 420 F and keep baking for another 15 minutes. Check the loaf. It is done when you rasp it on the bottom with your knuckle and it makes a distinct hollow sound. If not yet done, turn down oven to 400 F and keep baking for 10 minutes. Then turn off the oven, open the door slightly and let the loaf sit for another 10 minutes. Repeat with the second loaf.


ananda's picture
ananda


DonD's Baguettes à'Ancienne with Cold Retardation

A short while ago Don posted his latest work on these techniques he has been developing recently.   You can view his most excellent work here: http://www.thefreshloaf.com/node/17415/baguettes-l039ancienne-cold-retardation  

Just over a week ago in a post which you can read here: http://www.thefreshloaf.com/node/17275/french-terms

Don clarified a technique discussed by Daniel Wing in "The Bread Builders" book he co-authored with Alan Scott, known as "Bassinage".   This seems to be a dough mixing technique whereby the dough is mixed slightly tight, but then has additional water added late in the mixing.   The consensus seemed to be that this was not a way we would enjoy mixing dough.   But Don, and David Snyder before him; see here: http://www.thefreshloaf.com/node/8524/philippe-gosselin039s-pain-%C3%A0-l039ancienne-according-peter-reinhart-interpretted-dmsnyder-m

had adopted this technique using a long cold autolyse first, then adding salt yeast, and the extra water the next day, after an overnight refrigeration period.

Well, ideally you need a mixer for this to be effective, and I mix most of my dough at home by hand.   I do have a small hand-held electric mixer which has hook attachments as an alternative to the usual whisks.   So, I mixed the dough in small batches and developed a very fine dough.   The recipe I used is identical to the one given by David Snyder as shown above; except that I use fresh yeast and not dried.   I then followed Don's method of combining the Gosselin formula with the Bouabsa method to give long autolyse, mix and part ambient ferment, chilled ferment, then final proof and bake.   For the record I used the T65 farine de tradition French flour, as described here: http://www.thefreshloaf.com/node/17118/competing-louis-lesaffre-cup and here: http://www.thefreshloaf.com/node/16151/working-french-flour at 94% and 6% Dark Rye Flour, with hydration at 71% in total, as is David's formula from Peter Reinhart.

First time round I encountered the following problem:   I used 3 times the amount of fresh yeast to David's dried, all the time thinking that 1.5% was too much!   And it was.   Also the heat rise to mix the final dough took the finished dough temperature to 20°C.   This despite the hard work I put in to make sure the autolyse temperature was a cold 5°C.   So, the dough was kicking after just 2 hours and a S&F each hour.   This first time, I had made double quantity too, so the larger bulk really was moving.

I held the dough in the fridge til evening, giving a 6 hour cold fermentation period, but then decided I had to bake it before I went to bed.   On reflection, I should have divided the dough, semi-shaped it, then put it back in the fridge overnight.   The loaves came out looking somewhat under-proved, with a long split along the side of each baguette.   I made a boule as well, and that had similar betrayal of under-proving.

A brief report back to Don and David, then underway with the second attempt.  This time I used 1.5 times the amount to convert dried to fresh yeast.   Also, a smaller dough with a final temperature of 18°C, which was much easier to manage.   It had the full 3 hours with S&F, then back into the fridge overnight.   This morning, I watched Ciril Hitz's video on YouTube, see: http://www.youtube.com/watch?v=OI-WstoakmQ

Then scaled and shaped 4 baguette pieces at just over 200g each, and set them en coûche.   The dough temperature in my warming kitchen reached 20°C, after a half hour's proof.   This was where I was still unsure how long to keep proving the dough.   This is where the beauty of long cold fermentation really comes through.   The dough is so stable, even though it is very well-matured.   I baked the first batch of 2 after 1½ hours final proof; not long enough, I soon realised.   I took an important phonecall regarding progress on my latest Food Policy assignment for my Master's Degree.   That was quite a blessing, as it held me up half an hour.   By this time the dough was becoming a little sticky, but still handled really well.   The resulting bake was very pleasing.

I made some egg mayonnaise with fresh dill, parsley and spring onion, and a salad to go with it, then took some photographs of this and the finished bread.   My wife and I ate 2 of these baguettes with the salad and eggs for our lunch straight after.   I know the crumb is not so open, although it was spot-on for translucency, and I have still to master proper cutting techniques.   The grignette I purchased has helped, but the scoring is not deep enough.   That said, the balance of crispy crust to soft tasty crumb was just right, and the bread was so fresh too.   Just a hint of rye, no pre-ferment; the first time I've really tried to work through such a formula.

Thanks again to Don and David; there is no obvious extra work involved in the longer ferment, if anything, it fits in well with a daily work pattern.

Photos shown here:


Best wishes

Andy

txfarmer's picture
txfarmer

I have done Italian Chocolate Bread using the SFBI recipe before, as well as the Nancy Silverton version recently  ( http://www.thefreshloaf.com/node/17293/nancy039s-silverton039s-chocolate-sour-cherry-bread ), they were good, so good that I want to create my own version, combining good points of both recipes, and use wild  starter only. I was warned that with this much cocoa powder and add-ins, the bread could be too dense without instant yeast, but I know several people here have successfully done 100% sourdough chocolate breads before, so I decide to give it a try. I've been playing with my 60% starter recently with good results, so that's what I used here, but I think you can use any starter successfully.


Makes 2x750g breads

-Levain Build

active 60% starter, 40g

water, 120g

bread flour, 200g


1.   mix and knead into a dough, fermentate at room temperature (24C) for 8 to 12 hours, until reaching peak volume, starting to collapse (mine rose to about 4x of original size).


-Final dough

water, 340g

Levain Build from above

cocoa powder, 50g

honey, 50g

butter, 35g, soften

bread flour, 430g

salt, 12g

prune, 150g, chopped roughly

70%bitter sweet chocolate, 150g, chopped roughly


2.   mix everything but prune and chocolate, knead until gluten is well developed

3.   flatten dough into a rectangle, scatter prune and chocolate on in, roll up, fold many times until they are evenly distributed. Try not to have too many chocolate/prune on the surface.

4.   bulk rise for 4 hours at 24C. Didn't do S&F since the dough was well developed already, and I want an even soft crumb, not an irregular holy one.

5.   divide, round, and rest for 15 minutes.

6.   shape into boule or batards. the boule was proofed for 100 minutes (I thought it would take longer, but it was definitely ready by 100min), the batard was put into fridge immediately after shaping, took out about 12 hours later, proofed for 1 hour.

7.   oven is preheated to 500F, but adjusted down to 400F after breads are loaded. bake for 50min, the first 15 with steam.


No dense crumb there! The rise during fermentation, proof and baking was more than I can hope for. I like how that little bit of honey and butter make the crumb very soft and spongy, contrast nicely with the chewy crust, chocolate and prune.

Prune goes well with chocolate, I have seen them paired together in cakes and desserts, equally tasty here. However, I am sure the bread would be tasty (but different) if I swap out prune with cherry, nuts, or even more chocolate (maybe some milk choc? or even white choc?).

Very happy with this attempt, I am sure I will bake it often for gifts and ourselves.

Pages

Subscribe to RSS - blogs