The Fresh Loaf

A Community of Amateur Bakers and Artisan Bread Enthusiasts.

Blogs

StephaniePB's picture
StephaniePB

I'm a long time home baker, and a recent convert to sourdough. I started lurking around here when I started getting into sourdough, I've learned a ton from the forums and blogs! I keep a personal blog elsewhere, but am finding I want someplace to keep track of my baking experiments. So...here I am.

I first tried sourdough baking around 10 or so years ago when I lived in NYC, and loved the results, but I think I knew at the time I still had a lot to learn about bread baking before seriously tackling sourdough. I now live in San Francisco, and find that my sourdough is often coming out too sour for my tastes. So that's my big challenge, how to make good sourdough that doesn't taste too sour when I live in the one place in the world with the dang bacteria.

I have two happy starters - one is a SF Goldrush I purchased ages ago, the other is a wild yeast starter I made here. I much prefer the wild starter, it's very irregular and can rise like crazy, which I love. The goldrush is much more like, well, commercial yeast, very even and reliable. Reliable's boring, though.

I'm in the process of converting my Goldrush to whole wheat (KA organic) right now, I'm curious what whole wheat starter will do to the final taste. I have only fed with white flour until now (KA Flour, unbleached, mostly AP for feedings, bread flour for baking), and it's fun to see how differently it's reacting with whole wheat. I always use tap water that's been sitting on my counter for 12 hrs or so, room temperature, 100% hydration. I have had terrible results with bottled water and filtered water, there's something in that tap water, I guess?

I'm hoping the goldrush will peak up later today so I can mix up a sponge tonight and bake tomorrow, but I'm not sure it will be possible. I did keep the discarded starter from this morning's feeding to use in pizza dough for tonght, though, so at least I'll get something in, even if I'm going to have to cheat with added yeast.

I also need to find my camera so I can start taking decent pictures!

AnnieT's picture
AnnieT

Or something like that. As I sat here this morning waiting for a call back from the furnace repair man who said it was fixed on Wednesday, and carefully re-piecing the quilt pieces I had painstakingly unpicked over the last few days - I had time to mull this over. If a bread recipe doesn't work out the way it should, at least the results are usually edible. I know I have continued to work with dough that any sane person would have dumped and frequently been pleasantly surprised. Quilts, on the other hand, are not so forgiving. I knew one of the fabrics in this latest quilt wasn't quite right, and yet I persisted. Did I think the quilt fairies were going to somehow make it look good? Could this be why I make "Susan's Sourdough" over and over, along with what my family and friends refer to as "The Quilt"? No surprises with either, but once in a while it would be nice to branch out.

Well, the furnace man is coming to take a look and hopefully it won't cost a fortune to fix. The new fabric looks good, and my starter is ready to go. Life goes on, A.

Sedlmaierin's picture
Sedlmaierin

Well, so here pictures of my first bake as part of the "Bread" challenge. I will have to remember to take pictures of the process in the future, and in the meantime I am apologizing that there are none this time around.

I followed the recipe pretty much as written-the only difference is that I used one tenth of the metric bulk column..so probably a bit larger dough yield. I maybe should have formed 5 baguettes instead of four.The baguettes' final proof was done in a flowered couche made from pastry cloth-then I inverted them onto a baking sheet-which made them have quite a bit of flour on their top sides. I don't know if that was the right way to do it-I had major trouble with getting them to brown, but that could also be due to the fact that I forgot to pre-heat the oven with my steam pan inside and then only added boiling water to a steam pan upon putting the bread in the oven.Scoring the charmers was a joke...........if I feel like I have ample time on my hands(and friends who want Baguettes) I will try Baguette baking again soon, since I was not too happy with the bake. They stayed very light colored, which made me not realize that they were getting way too dark on the bottom.Oh well, live and learn!The taste and texture of the bread was great,though. Very crunchy crust and really lovely,light crumb.

Here are pictures-my camera is also being highly uncooperative and it was nearly impossible to get a well-lit crumb shot close up.

bnom's picture
bnom

The problem with buying specialty flours from the bulk food section is distinquishing the bags from another in my pantry. Those little scribbles on the twist ties don't really help.  Anyway, on Sunday I thought I'd make a rye using my rye sourdough starter. It wasn't until the flour hit the water that I began to notice the greyish color. Ah, this is that buckwheat I bought.

I've never cooked with buckwheat before. The first bread shown is a buckwheat sourdough--it's quite dark, partly because of the grain and mostly because I let it go too long. Nevertheless it was a delicious bread...a perfect complement to the mushroom soup I'd made. (sorry, I didn't use a recipe or weigh my ingredients on this loaf).

Buckwheat bread with rye starter (any my curious cat Bailey):

Then Wednesday, when I reached for my sourdough starter that I had fed on Sunday, I realized that I had accidentally fed it with buckwheat nstead of the rye flour I intended.. It had a sour grassy smell and I was afraid I'd ruined a very good starter. But I decided to use the bulk of it, 300 grams, in a rye bread. I was very happy with it. It has a complex and pleasing flavor, but the buckwheat and white flours toned down the rye.

Rye bread with buckwheat starter:


davidg618's picture
davidg618

This is Challah formula from Ciril Hitz's, Baking Artisan Bread. It's tonight's dessert with cream cheese and jam, and tomorrow morning's French Toast.

David G

sortachef's picture
sortachef

Cascade Cabin Cinnamon Rolls

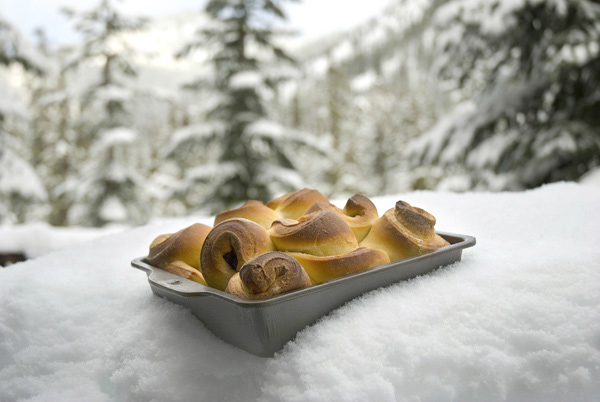
 One of my favorite things to do when I'm up overnight at our little mountain cabin is to make cinnamon rolls, with a long slow rise. I get a batch of dough going, and let it sit for a long time in a cool corner, to rise all day. Before turning in for the night I roll the dough out and shape the rolls. Sometimes I make them all the same size, and sometimes I make them look like mountain peaks, the way I've done in this recipe. They're just perfect the next morning with freshly brewed cabin coffee.

Cascade Cabin Cinnamon Rolls

Makes 8 large rolls


For the dough:

½ cup water at 100º

2 teaspoons yeast

2/3 cup milk, scalded and cooled

4 Tablespoons butter

¾ cup sugar

1 teaspoons salt

4 cups all-purpose flour

¼ cup flour for benchwork


For the filling:

2 Tablespoons butter, lightly melted

¾ cups raisins (I use golden raisins)

3 teaspoons cinnamon

2 Tablespoons sugar


Make the dough: Mix the water and yeast in a 4-quart bowl and let sit for 10 minutes to foam. Scald the milk in a small saucepan and add the butter to the milk while it's cooling. Add the ¾ cup sugar, the salt and 2 cups of flour to the yeast mixture in the bowl and, when the milk has cooled to body heat add it as well. Stir with the handle of a wooden spoon for 200 beats to make a smooth batter.

Add the other 2 cups of flour and work it into the dough to incorporate. Make a ball with the dough, scraping the sides of the bowl as necessary. Turn the dough out onto a lightly floured counter and knead for 5 minutes. Clean and dry the bowl.

Long rise: Put the dough ball into the bowl, cover with a lid or a piece of plastic wrap, and let sit in a corner to rise. Optimal temperature for this rise is 55-60º. If you can't achieve this temperature you may have to improvise by putting the dough by a doorway or on a cellar step. Let sit for 8 to 10 hours, punching down if the dough is super active.

Shape the rolls: Roll the dough into a 10" x 18" rectangle. If your cabin has no rolling pin use a wine bottle, as I do. Spread 2 Tablespoons of barely melted butter over the flattened dough.

Cut the dough into equal quarters, and then cut each quarter in half lengthwise at a 20º angle so that one end of each finished piece is 3" wide and the other 2".

Mix the raisins, cinnamon and sugar in a coffee cup and spoon equal portions along the center of each dough piece. When all the raisin mixture is distributed, roll each piece up, starting with the widest end and keeping one side flat as you roll.

Overnight rise: Arrange the somewhat unwieldy rolls in a buttered 8" square metal or glass pan. They'll want to flop some, so let them. Cover loosely with plastic wrap and let rise for 7 hours at 55º.

Bake the rolls: In the morning, let the rolls sit near the morning fire for an hour to warm up some. Preheat the oven to 425º and, once hot, put in the rolls. Bake for 10 minutes, lower the oven temperature to 350º and bake for 25-30 minutes more. If the tops get too dark, drape a piece of foil over the rolls for the last 10 minutes.

When the rolls are baked, put down your snow shovel and grab some coffee. The rolls should probably cool for 30 minutes, but I really wouldn't know - I've never been able to wait that long!

Disclaimer: These results were obtained in a mountain cabin with thin insulation and a 40-year old electric stove. Rising and baking times will vary.

For complete text and a few more photos, see original content at www.woodfiredkitchen.com

SylviaH's picture
SylviaH

These are the most delicious tasting waffles and a keeper recipe for me.  They are crispy and light with a wonderful flavor.  Very easy to make and were perfect to feed my hungry husband Mike after his very early morning bike race.  He had stayed up after working his swing shift and went directly to the race.  9 AM he was home and hungry.  I had prepared my batter that night and only had to heat the waffle iron add eggs and baking soda to the batter and wisk.  I made some poached eggs while the waffles baked.  This recipe comes from the popular BreadTopia site.  They are perfect for freezing and so easy.   I would suggest doubling the recipe if you are feeding more than 2. 


The night before:

Heat to melted and cool

4 oz. (1/2 cup - 115Gm) Unsalted Butter

8 oz. ( 1 cup - 225Gm) Milk

Add To:

9 oz. (1 cup - 225Gm) Starter - my starter was 100% hydration

1 tsp. sea salt

1 TBsp. Brown sugar

6 oz (1 1/2 cup - 170 All Purpose Flour

Mix - Thick Batter - Cover - 8 - 14 Hours

Pre-heat waffle iron 10 - 15 minutes

Uncover batter whisk in 2 large eggs and 1/4 tsp. baking soda

3- 5 minutes in iron or longer for darker waffles.  While my waffle iron pre-heated I put a large stainless steel fry pan with lid and about 2 - 3 inches of water on to come to just boiling point.

We love poached eggs..

When the waffles went into the iron I cracked my egg directly onto the counter.. ' not on edge of bowl ' no shells this way.. put it into a very small bowl with a lip and very gently slide it into the simmering hot water ' no bubbles boiling '.  I use a handled round skimmer to take them out of the water and drain..using a paper towel so absorb any extra water.  Served with poached eggs and strawberries.


            Sylvia


alabubba's picture
alabubba

and some Bagguetes.

laurale's picture
laurale

Just tried french baguettes for the first time.  All went well, except they didn't brown well.  I used King Arthur Flour recipe, which calls for a 500 oven reduced to 475 when the bread goes in.  Several blogs on the KAF website recomended starting with a 475 oven and reducing to 450, so that's what I did.  Any advice?

kdwnnc's picture
kdwnnc

I made French bread for the first time today, and it turned out great.  At least I think it turned out great; I have never had good French bread from a bakery.  The crumb was somewhat tighter than I would like, but the flavor was awesome.  The recipe calls for a total of 4-6 hours of rising at 70 degrees, but it was much, much warmer than that in the house this morning, and we were eating the bread for lunch by the time it should have been finishing its second rise.  The crust stayed nice and crisp, which was also a bonus.  The dough was rather moist and slack, so the loaves spread out a lot during the final rise, even though I tried the bunched-up kitchen towel trick.  It was a bit difficult kneading the moist dough; I have been doing more and more of my mixing by hand lately.

So my question is, what makes French bread French?  It has the same ingredients as Ciabatta, which is Italian and has a totally different flavor and texture.  Is it called French bread simply because it is made in France, or is there another reason?

Pages

Subscribe to RSS - blogs