The Fresh Loaf

A Community of Amateur Bakers and Artisan Bread Enthusiasts.

dmsnyder's blog

dmsnyder's picture
dmsnyder

100% Whole Wheat Bread from BBA

I've been admiring the whole wheat pan loaves txfarmer has shown us in recent weeks. Her use of intensive mixing to achieve a higher rise and airier crumb has particularly intrigued me. (See SD 100% WW sandwich loaf with bulgur (cracked wheat) - discovered a new favorite ingredient). When I read her blog, I decided to make the same bread. However, on further reflection, I changed my plan. I have a favorite 100% whole wheat bread – that in BBA – and I really don't like the combination of sourdough tang and whole wheat flavors. So, I decided to fiddle with Peter Reinhart's formula for 100% whole wheat bread using some of txfarmer's techniques to see if I could get a lighter-crumbed version of a bread I already know well and love. The crumb texture I have gotten with this bread is moist but rather dense and crumbly, following Reinhart's suggestions for mixing time. This is not at all unpleasant to eat, but is very different from the airier crumb txfarmer and khalid have shown.

Reinhart's formula calls for a soaker with a coarsely-ground grain and a whole wheat poolish. As usual, I used bulgur for the soaker, and I used fresh-milled whole wheat flour for the poolish. The flour in the final dough was KAF Organic Whole Wheat. The procedures described are those I used. They deviate from both Peter Reinhart's and txfarmer's in significant ways.


Soaker

Baker's %

Wt (oz)

Medium bulgur

100

4.25

Water

141

6

The day before baking, measure the bulgur into a 3 cup bowl. Pour the water over it and cover tightly. Leave at room temperature until used.


Whole Wheat Poolish

Baker's %

Wt (oz)

Whole wheat flour

100

6.75

Instant yeast

0.41

0.028 (¼ tsp)

Water

88.9

6

The day before baking, mix the poolish ingredients. Cover the bowl tightly. Allow to ferment until bubbles start to form (2-4 hours), then refrigerate.


Final dough

Baker's %

Wt (oz)

Whole wheat flour

100

9

Salt

3.7

0.33

Instant yeast

1.2

0.11 (1 tsp)

Honey

16.7

1.5

Vegetable oil (optional)

5.6

0.5

Egg, slightly beaten

18.3

1.65 (1 large)

Seeds to garnish (optional)


2 T

Soaker

114

All of above

Poolish

142

All of above


Procedure

  1. Mix the soaker and poolish, as instructed above, the night before mixing the final dough.

  2. One hour before mixing, take the poolish out of the refrigerator to warm to room temperature.

  3. Place all the ingredients in the bowl of a stand mixer.

  4. Using the paddle, mix at Speed 1until a ball forms on the paddle and the ingredients are well-mixed (1-2 minutes). Note that the dough should be quite tacky – neither dry nor sticky. Adjustments can be made by adding either water or flour during this step or during the next mixing step. (I added about 15-20 g additional water.)

  5. Let the dough rest, covered in the mixer bowl, for 20-40 minutes.

  6. Switch to the dough hook and mix at Speed 2 until a medium window pane can be made. (20-25 minutes) Note: Reinhart's instruction is to knead for 10-15 minutes, “less” if machine kneading.

  7. Transfer the dough to a lightly oiled bowl.

  8. Ferment for two hours or until the dough has doubled in volume, with a stretch and fold on the board at 60 minutes.

  9. Divide the dough into two equal pieces and form them into pan loaves.

  10. Place the dough into lightly oiled medium loaf pans and place the pans in food-grade plastic bags or cover well with a towel or plasti-crap.

  11. Proof until the loaves have almost doubled and are peaking above the rims of the pans. (About 90 minutes)

  12. Pre-heat the oven to 350ºF with a rack in the middle.

  13. Optionally, spray the loaves lightly with water and sprinkle on seeds or rolled oats.

  14. Optionally, score the loaves.

  15. Bake for 45-60 minutes. At 30 minutes, rotate the pans 180º, if necessary for even browning. The interior temperature should be at least 195ºF, and the crust should be firm on the top and on the sides of the loaves. If necessary, return the loaves to the oven and bake longer. (My loaves were done in 45 minutes.)

  16. Immediately transfer the loaves to a cooling rack.

  17. Cool thoroughly before slicing.

I noticed two significant differences in this dough, compared to my previous bakes of this bread. First, the dough was less sticky than usual. Second, the loaves achieved significantly greater volume during proofing. I attribute this to the more intensive mixing, but also the S&F which serves to further strengthen the dough but also equalized the dough temperature and redistribute the products of fermentation.

Once baked, the loaves felt much lighter than usual. When sliced, the reason was quite obvious. Rather than the cakey, somewhat crumbly crumb this bread has always had in the past, the crumb was airy and, in txfarmer's words, “shreddable.”

Crumb from a previous bake of the BBA 100% Whole Wheat Bread, made following Reinhart's mixing time instructions

Crumb of the 100% Whole Wheat Bread from BBA mixed as described above

"Shreddable"

The flavor of the bread is basically unchanged, but the mouth feel is entirely different - light and mildly chewy. I was amazed.

I'm looking forward to having toast for breakfast.

Thanks, txfarmer, for your inspiring and informative postings!

David

Submitted to YeastSpotting


dmsnyder's picture
dmsnyder


Artos - Greek Saints' Day Bread from Kassos

Artos - Greek Saints' Day Bread from Kassos crumb

“Artos” is the ancient Greek word for leavened bread. (“Psomi” is the modern Greek word.) However, “Artos” has come to refer more specifically to various enriched celebration breads, particularly those baked for Easter.

I found the recipe for this version of “Artos – Greek Saints' Day Bread” in Savory Baking from the Mediterranean, by Anissa Helou (Harper-Collins, NY, 2007). This is a lovely and quite comprehensive book. Unlike many cookbooks covering ethnic cuisines, it does not seem to be “dumbed down.” There are no ingredient substitutions, and the original techniques for mixing, fermentation, shaping and baking are given. Well, the author does give instructions for American/European home ovens, whereas many of the items in the book are authentically baked in wood-fired ovens or tandoors or the like.

Helou tells us that she found this bread while visiting the island of Kassos which is a small island at the southern end of the dodekanese chain. There, it is baked for many saints' days. It is baked at home, then taken to the church to be blessed by the priest before being cut and shared with the congregation at the end of mass.

Helou recommends this version of Artos for breakfast or tea with Greek-style yogurt and honey or with “very good butter.” She also says this bread makes delicious toast.

The recipe is similar to others I've seen for Artos in that it is spiced, but it is less enriched than most and is very simply shaped. The technique of baking in a 9 inch pan is one I've seen for other Greek breads but never tried before. Helou provides all her measurements in volume, and that's how I made the recipe.

Artos: Greek Saints' Day Bread

Ingredients

4 ½ tsp (2 packages) active dry yeast. (I used 2 tsp instant yeast.)

3 1/3 cups AP flour, plus extra for kneading and shaping.

1 ½ tsp kosher salt or sea salt.

2/3 cup sugar. (I wonder why not honey?)

1 T ground cinnamon.

1 tsp ground cloves.

2 T anise seeds (I substituted fennel seeds, not having anise seeds on hand.)

2 T EVOO, plus extra for greasing the baking dish.

1 ¼ cup of warm water.

2 T red wine.

1 ½ T white sesame seeds

1 ½ T nigella sees (optional)


Procedure

  1. If using ADY, dissolve it in ½ cup warm water and stir. (I just mixed the instant yeast with the dry ingredients.)

  2. Combine the flour, salt, sugar, cinnamon, cloves and anise seed (and instant yeast, if used) in a large bowl and make a well in the center.

  3. Add the olive oil and, with fingertips, rub the oil into the flour until well incorporated.

  4. Add the wine and water (the yeast water plus ¾ cup or, if instant yeast was used, all the 1 ¼ cups). Mix to make a sticky dough.

  5. Spread 2 T water over the surface of the dough. (I did this, but think 1 T would have been plenty.) Cover the bowl and allow to ferment for 1 hour.

  6. Grease a 9-inch round deep baking dish with olive oil. Sprinkle half the seeds over the bottom of the dish.

  7. Transfer the dough to a well-floured board. With wet hands, fold the edges of the dough to the center to make a round loaf. Wash and dry your hands, then transfer the loaf to the baking dish, seam side down. (I used one hand and a bench knife for the transfer.)

  8. Gently pat the loaf to spread it evenly in the dish. Wet your hands and spread more water over the top of the dough. Sprinkle the rest of the seeds all over the top.

  9. Cover with plasti-crap and proof until doubled in volume. (I proofed in a warmed microwave oven for 75 minutes.

  10. Pre-heat the oven to 400ºF.

  11. Uncover the bread and place in the oven (in the baking dish). Bake for 20 minutes, then turn down the oven to 350ºF and bake for another 30 minutes, or until golden brown all over.

  12. Turn the loaf onto a cooling rack and cool thoroughly.

  13. Serve when cooled or wrap in a kitchen town. It will keep up to two days.

Dough, mixed

Proofing in Pyrex baking dish

Artos, proofed and ready to bake

The bread gave off a most powerful, exotic aroma while baking and cooling. The cloves and nigella aromas were most potent, to my nose. When sliced, the crust was crisp. The crumb was soft and tender. The flavor was very spicy and very exotic. In my limited experience of spiced breads, it was closest to a French pain d'epice, but different because of the fennel and nigella flavors. I enjoyed it, but I don't think I could eat a lot of it at a time. I'm looking forward to trying it toasted and with some Greek yogurt, as recommended.

David

Submitted to YeastSpotting

dmsnyder's picture
dmsnyder


This is the “80 Percent Rye with Rye Flour Soaker” from Jeffrey Hamelman's “Bread.” It's a wonderful bread about which I've blogged before. (Sweet, Sour and Earthy: My new favorite rye bread) These loaves were made applying a number of tips and tricks contributed by a number of TFL members, and I have to say, I was pleased with the results of every tip I used. So, a big “Thank you!” to MiniO, hansjoakim, nicodvb and the other rye mavens who contributed them.

I followed the formula and methods according to Hamelman, with the following techniques added:

  1. Rather than dividing and shaping on a floured board with floured hands, I wet the board, my hands and my bench knife. I kept all of these wet, and experienced much less sticking of this very sticky dough to the everything it touched.

  2. I shaped the boules “in the air,” rather than on the board. Again, less dough sticking to the board, and I think I got a smoother loaf top without tears.

  3. I proofed the loaves in brotformen, floured as usual with a rice flour/AP mix, with the seams down. This results in the loaves opening at the seams, yielding a lovely chaotic top to the loaves and no bursting of the sides.

I am very happy with these loaves. I'll continue to use these techniques and recommend them to others struggling with high-hydration, high-percentage rye breads.

David


dmsnyder's picture
dmsnyder

Tre Franceses


“Pan Francese” simply means “French Bread” in Italian. It is a long, thin loaf that is the Italian version of a baguette. Daniel Leader has a formula in Local Breads which he titles “Italian Baguettes” and says are called “Stirato,” which means “stretched” in Italian. Michel Suas' Advanced Bread and Pastry includes a formula for “Pan Francese,” and we made this bread during the Artisan II workshop at SFBI.

The differences between Leader's and Suas' formulas are relatively minor. Leader uses a biga at 60% hydration, and the biga is 61% baker's percentage of the total dough. Leader's dough hydration is 70%. Suas' hydration is 76% - a significant difference. Suas uses a poolish (100% hydration), and the poolish is 50% baker's percentage of the total dough. Leader uses all AP flour, while Suas' formula uses 13.6% whole wheat flour, the rest being AP. Leader's mixing instructions, as usual for his high-hydration doughs, call for an intensive mix (10-12 minutes at Speed 4). Suas specifies a short mix but 2 or 3 folds during bulk fermentation. Their shaping instructions are also significantly different: In spite of pointing out that “Stirato” means “stretched,” Leader tells you to shape the loaves like you do baguettes. Suas has you simply cut long strips of dough and stretch them to shape.

Of course, there is no end to variations with breads. The Il Fornaio Baking Book, from the bakery chain of the same name, has a recipe for “Sfilatino” which they call “Italian Baguettes.” Theirs are made with a biga. They are shaped as demi-baguettes, then stretched to about 15 inches long.

The “Pan Francese” I made followed Suas' formula and method from AB&P.


Poolish

Baker's %

Wt. (oz)

AP flour

100

3 5/8

Water

100

3 5/8

Yeast (instant)

0.1

1/8 tsp

Total

200.1

7 1/8

  1. Mix all the ingredients until well-incorporated.

  2. Ferment for 12-16 hours at 65ºF.


Final dough

Baker's %

Wt. (oz)

AP flour

79.52

11 7/8

WW flour

13.48

2 3/8

Water

70

10

Yeast (instant)

0.35

¼ tsp

Salt

2

¼ oz

Malt

0.98

1/8 oz

Poolish

50.03

7 1/8

Total

223.36

2 lb


Total dough

Baker's %

Wt. (oz)

AP flour

86.4

15 1/2

WW flour

13.6

2 3/8

Water

76

13 5/8

Yeast (instant)

0.3

1/2 tsp

Salt

1.6

¼ oz

Malt

0.78

1/8 oz

Total

178.68

2 lb


Method

  1. Prepare the poolish the evening before mixing the dough.

  2. Measure all the Final dough ingredients into the bowl. (I used a KitchenAid mixer.)

  3. Mix with the paddle until ingredients are well mixed – 1-2 minutes -then switch to the hook and mix at speed 2 or 3 for about 5 minutes. There will be some gluten development, but the dough will not clear the sides of the bowl. It will be like a thickish, glutenous batter.

  4. Transfer the dough to an oiled bowl and cover tightly.

  5. Ferment for 3 hours with 2-3 stretch and folds on a well-floured board.

  6. Prepare your oven with a baking stone and your steaming apparatus of choice in place. Pre-heat the oven to 500ºF about 30 minutes before the end of fermentation.

  7. Transfer the dough to a well-floured board. De-gas the dough and stretch and pat it into a rectangle about 8 x 12 inches. Dust the top with flour.

  8. Using a bench knife, divide the dough into 3 strips. Stretch them to about 15” long and place them on a well-floured linen couch. (I suppose parchment paper would serve.). Cover with linen or a towel.

  9. Proof for 30-45 minutes.

  10. Transfer the loaves to a peel and then to the baking stone. Turn the oven down to 460ºF and steam it.

  11. Bake for 22-25 minutes.

  12. Transfer the loaves to a cooling rack. Cool for at least 30 minutes before slicing.

Francese cross section crumb

Francese longitudinal section crumb

The loaves had a thin, crisp crust that got chewy as it cooled. The crumb was very open with some chewiness. The flavor of the whole wheat was present when tasted still slightly warm. I expect it to meld by tomorrow. The flavor was similar to ciabatta, not surprisingly. The bread was nice as a chicken salad sandwich for dinner.

David

Submitted to YeastSpotting


dmsnyder's picture
dmsnyder


I made some banana breads tonight. They were delicious – better than ever before with some tweaking the baking temperature. As I was tasting it, I got to thinking about the book from which I got the recipe.

Banana Bread from Crust & Crumb

Banana Bread crumb

Peter Reinhart's Crust & Crumb was one of the first two baking books I acquired when I started baking again after a 25 year lapse. (The other was George Greenstein's Secrets of a Jewish Baker.) While my baking library now contains some two dozen books, C&C remains one of my favorites, and, as I look at it today, the reasons are clear. First, it contains a couple formulas I return to again and again – the best formula for San Francisco-style sourdough bread I know and the formula for Banana Bread.

This book was my introduction to so many basic concepts, including the orderly steps in bread baking, from mis en place to tasting, and the function of each in achieving “a loaf of bread that is rhapsodically beautiful and exceptionally delicious.” Reinhart's amalgamation of science, art, craft and philosophy, all expressed in beautiful and lucid prose, captured me. He emphasized the rigorous application of knowledge and technique but also the ultimate importance of “feel” for the dough, acquired through disciplined and reflective practice. That is the path he defined to become a “bread revolutionary.”

Crust & Crumb was published in 1998. Reinhart's introductory chapter is titled “The Bread Revolution.” It is of particular interest now, given our recent discussion of that topic. Reinhart's perspective is of special interest because of the role he has played in this phenomenon. He reviews the recent history of bread baking in America and the influences of various people and events and also delves into his personal history, albeit briefly. He concludes the book with a chapter on The Bread Baker's Guild of America and how it nurtured the young bakers who ultimately put the USA on the world bread map through victories in the Coupe du Monde, notably the second place finish in 1996 which included Craig Ponsford's winning first place in the bread division.

I love this book. Many newer books have advanced “the bread revolution” since Crust & Crumb was published, but it continues to have an unique place in my bread baking library, and I think it remains a valuable resource to anyone striving to make great bread.

Happy baking!

David


dmsnyder's picture
dmsnyder

Basic Country Bread from Tartine Bread

Basic Country Bread from Tartine Bread crumb

I made this following the recipe in the book. The whole wheat flour was freshly milled. The bread was delicious.

I always end up with a couple hundred grams of extra levain when I make the Basic Country Bread. I hate throwing it away, so, this week, I made a batch of baguettes with it. The 70% hydration dough was hand mixed and fermented for 2 hours with stretch and folds in the bowl every 30 minutes, then fermented for another 90 minutes with stretch and folds on the board at 45 and 90 minutes. I retarded the dough in bulk overnight. This afternoon, I divided the dough, pre-shaped it and let it rest for an hour. Then, the baguettes were shaped, rolled on wet paper towels then in mixed seeds and proofed en couche for 45 minutes before baking at 450ºF for 20 minutes.

Seeded baguettes

Seeded baguette crumb

The flavor was very much like the Tartine Basic Country Bread except more sour. Very nice.

David

dmsnyder's picture
dmsnyder

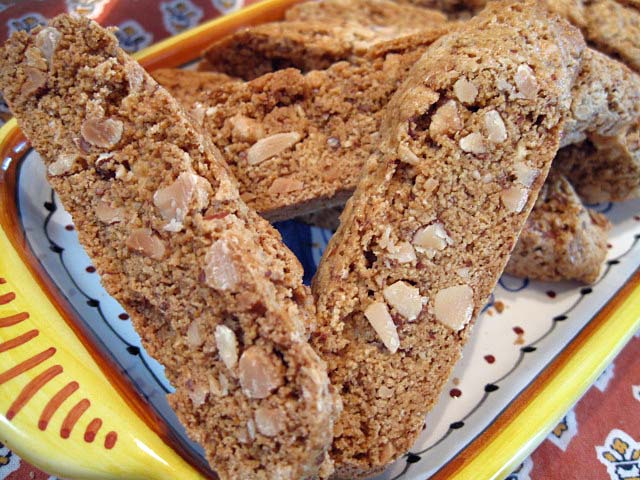
Biscotti di Greve in Chianti


Carol Field is probably best known as the author of The Italian Baker. While it was first published in 1985, twelve years after Beard on Bread, it was certainly at the leading edge of the artisan bread movement in America. It is still frequently cited as the best book on Italian baking ever published in this country. I have never seen The Italian Baker, and my searches for it found it to be out of print with used copies selling for high prices. I'm delighted to have discovered, just yesterday, that it has been revised and is currently scheduled to be released in November, 2011. (The Italian Baker, Revised: The Classic Tastes of the Italian Countryside--Its Breads, Pizza, Focaccia, Cakes, Pastries, and Cookies)

Carol Field has written several other cook books, an Italian travel book and a novel. I checked out her book, Italy in Small Bites, from the library this week. It is a book of Italian between meal snack foods, although many are considerably more substantial in both calories and nutritional value than what we think of as “snacks” in the US. Field's writing about the place of these foods in Italian culture is quite fascinating for anyone interested in food and culture. (DaisyA! If you haven't read this book, you must!) But, no more about that now.

I had the afternoon off and looked for something from Italy in Small Bites I could bake before dinnertime. I chose “Biscotti di Greve in Chianti.” I've never met a biscotto I didn't like, but my wife has a dislike of anise flavored cookies, so the type of biscotti with which I was most familiar was out. These biscotti, which Field had from a bakery in Greve are flavored with almonds, vanilla and orange zest, all of which we like. The recipe was also attractive in that it is mixed in a food processor and seemed quick and easy.

Biscotti di Greve in Chianti

Ingredients

2 cups (280 g) unbleached AP flour

1 cup sugar

1 tsp baking soda

Pinch salt

2 eggs, room temperature

1 egg yolk, room temperature

1 tsp vanilla extract

2 tsp grated orange zest

1 ½ cups dry roasted almonds

1 egg, beaten with 1 tsp water for glaze

Procedure

  1. Measure the flour, sugar, baking soda and salt into the bowl of a food processor with the metal blade and pulse to mix thoroughly.

  2. Mix the eggs, egg yolk, vanilla extract and orange zest in a two cup measuring cup.

  3. With the processor running, pour the liquids over the dry ingredients through the feed tube. Mix to a shaggy mass, not until a ball forms.

  4. Pour half the almonds into the ball and pulse a few times. Repeat with the rest of the almonds.

  5. Transfer the dough to a lightly floured board and press it into a coherent mass. (This is the hardest step. I used my hands and a bench knife to fold the dough, which started out as discrete granules of dough mixed with nut fragments, into something that stuck together after folding and pressing repeatedly.)

  6. Preheat the oven to 325ºF.

  7. Divide the dough into 2 or 3 parts and form each into a log, 2 inches across. Brush each log with the glaze. Place the logs, at least 3 inches apart, on a buttered and floured sheet pan or on sheet pan lined with parchment.

  8. Bake 25-30 minutes until light golden brown.

  9. Remove from the oven to cool, but leave the oven on.

  10. Once the logs are cool enough to handle, slice each at an angle into ¾ inch thick cookies, using a serrated knife, and lay them on a lightly buttered cookie sheet.

  11. Bake the cookies for 12-15 minutes on each side until golden.

  12. Cool (and dry) before eating (If you can. I found that snacking on the log ends during the second baking assisted with this step.)


These biscotti are very tasty. They are less sweet than most, with a nice almond flavor. The orange flavor is very subtle. I haven't tasted them yet dipped in cappuccino or in wine, but I think that's how to enjoy them best.

David


dmsnyder's picture
dmsnyder

This weekend, I returned to my roots, tweaked a new favorite and baked a new bread.

When I started baking bread again after a 25 year hiatus, my motive was to make two favorite breads I was unable to obtain locally – Jewish Sour Rye and San Francisco-style Sourdough. My initial achievement of these goals was with the Sour Rye formula from George Greenstein's Secrets of a Jewish Baker and with Peter Reinhart's Sourdough Bread from Crust & Crumb. These remain among my favorite breads.

Yesterday, I baked Greenstein's Jewish Sour Rye. The “authentic” NY-style deli bread is made with a white rye sour and first clear flour. As my taste for heartier rye breads developed, I began using whole rye flour rather than white rye and found I preferred it. For this bake, I used KAF Medium Rye though, and found it a very good.

Greenstein's recipes all use volume measurements. Some time back, I converted a couple of my favorites from his book to weights. (See Sour Rye Bread from George Greenstein's “Secrets of a Jewish Baker”) Although I'm a firm believer in weighing ingredients and do so even when feeding my stock sourdough starter, I have to confess I feed my rye sour by feel. The sour I built for this bake must have been firmer than usual or the medium rye thirstier than the BRM dark rye flour I've been using, because the dough ended up drier than usual. The effect was the cuts opened up much more than they usually do. The loaves were also under-proofed, and they had major bursting.

The flavor of this bread is wonderful. When tasted right after cooling, it was intensely sour. It was less sour on the second day. I believe I'll stick with medium rye for this bread for a while.


The miche we baked during the SFBI Artisan II workshop (This miche is a hit!)  is a new favorite. I've made it four times now, I think, each time with a different flour mix. Today, I picked up on brother Glenn's bakes using half Central Milling's “Organic Type 85” flour and half one of CM's baguette flours. I used CM “Organic Tye 85” flour to build the levain and KAF AP flour for the final dough. This results in 13% high-extraction flour and 87% white flour in the total dough. I scaled the miche to 2 kg for this bake.

I was inspired by Breadsong's scoring of her Teff miche (SFBI Teff Miche - 1.5kg) and attempted to do something similar. I bow to her superior artistry, but I'm not unhappy with my result.

SFBI Miche crumb

SFBI Miche crumb

I left the miche wrapped in baker's linen overnight before slicing. The crust remained crunchy. The crumb was moist. The aroma was quite wheaty. The flavor of the crust was dark and sweet. The crumb was moderately sour but with a complex wheaty, sweet flavor. 

Recall that all the high-extraction flour in this bread was pre-fermented. I really like the effect. The higher ash content results in more active fermentation and acid production, both of which I appreciate. The impact of the Type 85 flour on the flavor profile was greater than one might expect from its 13% presence in the total flour. In the original SFBI formula, the whole wheat flour is also in the levain, and constitutes only 3.33% of the total flour. This bread was very good made entirely with high-extraction flour, but, at least at the moment, I believe I like it best using the original formula. It's a hard call, because all the flour mixes I've used have made delicious breads.


The new bread I baked was the “Vienna Bread” with Dutch Crunch from BBA. The TFL members' bakes of this bread (Latest Bake: Dutch Crunch) really inspired me, especially the rolls, since we planned on making hamburgers for dinner.

Vienna Bread with Dutch Crunch Bâtard

Vienna Bread with Dutch Crunch Rolls

Reinhart's Vienna Bread formula makes a lovely dough, and the Dutch Crunch topping is visually striking on both larger loaves and rolls. I really had no idea how thick to apply the topping, so I “laid it on thick.” From the results, I think I got it about right.

Vienna Bread with Dutch Crunch at start of proofing

Vienna Bread with Dutch Crunch at finish of proofing

Vienna Bread crumb

As advertised, the crust is crunch and slightly sweet. The crumb is very light, delicate and tender with a lovely balanced flavor. The flavor is like brioche but much more subtle. Words like "delicate," and "finesse" come to mind. I anticipate that this will make outstanding toast and French toast. Actually, I think I could just sit down right now and eat the whole loaf as is.

So, would "delicate" and "subtle" bread be your choice for a hamburger bun? No?

Caramelized red onion with balsamic vinegar and roasted New Mexico Green Chile hamburger on Vienna Dutch Crunch roll

David


dmsnyder's picture
dmsnyder

The “Miche, Pointe-à-Callière” from Jeffrey Hamelman's Bread has been one of my favorite breads and was my favorite miche for a long time. It's been quite a while since I last baked it. Since then, I've been doing more hand mixing of doughs I formerly machine mixed. I've found a new and wonderful high-extraction flour, Central Milling's “Organic Type 85.” And last, but my no means least, I've baked miches according to the formula we used in the SFBI Artisan II workshop last December. Many TFL members have baked this marvelous miche since I posted the formula, and they know what a wonderful bread this can be.

After these months of enjoying the SFBI miche, as well as Chad Robertson's somewhat similar “Basic Country Bread” from Tartine Bread, it seemed time to revisit the “Miche, Pointe-à-Callière.” I made it using Central Milling's “Organic Type 85” flour. I followed Hamelman's formula. I altered his procedures only by mixing the dough entirely by hand.


Overall Formula

Wt.

Baker's %

High-extraction whole-wheat flour

2 lbs

100.00%

Water

1 lb, 10.2 oz

82.00%

Salt

0.6 oz

1.80%

Total

3 lb, 10.8 oz

183.80%


Levain Build

Wt.

Baker's %

High-extraction whole-wheat flour

6.4 oz

100.00%

Water

3.8 oz

60.00%

Mature culture (stiff)

1.3 oz (3 T)

20.00%

Total

11.5 oz


Final Dough

Wt.


High-extraction whole-wheat flour

1 lb, 9.6 oz


Water

1 lb, 6.4 oz


Salt

0.6 oz


Levain

10.2 oz (all less 3 T)

Total

3 lb, 10.8 oz

Procedure

  1. Make the levain about 12 hours before you want to mix the dough. Dissolve the mature culture in the water, then mix in the flour.

  2. On the day of the bake, mix the Final Dough flour and water to a shaggy mass and autolyse in a large covered bowl for 20-60 minutes.

  3. Sprinkle the salt over the dough and add the Levain in several chunks. Mix thoroughly.

  4. Transfer the dough to a clean, lightly oiled bowl and cover tightly.

  5. Ferment the dough for 150 minutes, with stretch and folds on a floured board at 50 and 100 minutes.

  6. Form the dough into a tight boule and transfer it, seam side up, to a floured banneton. Place the banneton in a large plastic bag or cover with a towel or plasti-crap. (Note: Hamelman recommends the usual pre-shaping and resting before the final shaping. I did not do this, since the dough was rather slack, and the gluten did not require “relaxing,” in my judgement.)

  7. Proof for 2-2 ½ hours.

  8. One hour before baking, pre-heat the oven to 500ºF with a baking stone and steaming apparatus in place.

  9. Transfer the miche to a peel. Score it with a single square, “tic-tac-toe” pattern or diamond pattern. Load the miche onto the baking stone.

  10. Steam the oven and turn it down to 440ºF. After 15 minutes, turn the oven down to 420ºF, and bake for about another 45 minutes.

  11. When the miche is fully baked (internal temperature is 205ºF), turn off the oven. Leave the miche on the baking stone with the oven door ajar for another 10-20 minutes to dry the crust.

  12. Transfer the miche to a cooling rack and cool thoroughly. Then wrap it in baker's linen and let it rest for at least 12 hours before slicing.

Note: All times are approximate. Watch the dough, not the clock.

Miche, Pointe-à-Callière: Profile

Miche, Pointe-à-Callière: crumb

I rested the loaf for about 18 hours before slicing. The crumb structure was similar to that pictured in “Bread,” but I think I slightly under-fermented the dough and over-proofed the loaf.The crust was chewy. The crumb was rather dense and chewy. The flavor was not really sour but was very wheaty – more intense than I recall from other bakes with this flour.

Next time I make this miche, if I hand mix it, I'll add some S&F's in the bowl during the first part of the bulk fermentation and lengthen the fermentation, hoping to increase flavor complexity.

David


dmsnyder's picture
dmsnyder

This weekend, I baked a couple of breads I have enjoyed, but both were made with variations.

I have made the 100% whole wheat bread from Peter Reinhart's Whole Grain Baking a couple of times before with fresh-milled flour (100% Whole Wheat Bread from WGB, made with fresh-milled flour). I think it makes a delicious bread. This weekend, I wanted to make it with finer-milled flour and with a whole wheat starter, rather than a yeasted "biga."

The flour was milled from hard red winter wheat using the KitchenAid grain mill attachment. I milled the berries once on a medium setting and then twice on the finest setting. The result was a fairly fine flour, but still not as fine as KAF Organic Whole Wheat flour, for example. The levain had a somewhat gritty consistency. It ripened quite a bit faster than the yeasted biga does for this bread. The dough was quite soft and very manageable, but while quite extensible, had little elasticity. It was difficult to judge the proofing because the dough never was really springy. The modest oven spring I got suggests I may have over-proofed somewhat. The crumb was quite a bit more open than I got with previous bakes of this bread. I attribute this partly to the finer-milled flour and partly to the levain.

100% Whole Wheat Sourdough Bread from WGB, made with fresh-milled flour

Loaf profile

Crumb close-up

My wife liked the flavor of this bread. It has a rather pronounced sourdough tang over a sweet, wheaty flavor. It confirmed my aversion to this combination of flavors, sadly. I will make this bread again, but I will stick to the yeasted version.

Franko's gorgeous 80% rye with rye flour soaker ( See 80% Sourdough Rye Bread- adapted from Jeffrey Hamelman's 'Bread') reminded me how much I loved this bread from Hamelman's Bread (See Sweet, Sour and Earthy: My new favorite rye bread). I had expected to make it again sooner, but got distracted by other baking projects. Franko's bake in a Pullman pan was so lovely, I thought I'd use mine, but, at the last minute, decided to bake it as one large, almost 2 kg boule.

For this bake, I omitted the instant yeast. The dough was raised by the rye sour only. Also, for this bake, I used fresh-milled rye, milled as described above.

80% Rye with Rye Flour Soaker from Hamelman's Bread, made with fresh-milled rye flour

After cooling, I wrapped the loaf in baker's linen to rest for 24 hours before slicing.

80% Rye crumb (Note: The uneven color is an artifact of the lighting.)

After unwrapping the loaf, the crust felt very hard, but it was delightfully crunchy. The crumb was soft and moist. The flavor had a nice caramelized tone from the crust. The crumb flavor was mildly sour, sweet and very earthy - just a good whole rye flavor. Delicious. I had some with dinner, without any topping. I have some cream cheese and smoked salmon to eat with this for breakfast. 

This remains my favorite high-percentage rye bread. I just love the flavor and the texture of the crumb.

David

Pages

Subscribe to RSS - dmsnyder's blog