Two breads, two very different kneading approaches
Inspiration from these boards
- Log in or register to post comments
- 14 comments
- View post
- chouette22's Blog
Inspiration from these boards
For the most part, I was pleased with the results.
The day before I baked, I made the sponge, mixed, scaled, and formed the dough into the classic baguette shape. I put in a lot effort in creating as much surface tension as I could, otherwise, the finished product could be quite flat and blob-like. I threw the shaped dough in the fridge, and forgot about it until the next morning.
Time, or the lack there of, is a major issue for home bread bakers. There is no doubt that more loaves of homemade bread would be produced if the process wasn't so time consuming. The scheduling involved with some bread recipes can be very challenging.
....
Or: My Adventures at the Back Home Bakery.
They all told me I was too old to start in any kind of professional baking. "My teacher" said it. Even the organizers of La Coupe du Monde de la Boulangerie tell me I am too old to be eligible to compete (Oh, and I don't bake that well...)
They were right.
I am only slowly progressing with Reinhart's Crust and Crumb, 'master formulas for serious breadbaking'. The universal rustic bread is now 'under control', I did add a bit more salt then the recipe mentions. After a first test, I did score the dough a bit (just a slice down the middle), it just does look better this way. The biga does notably contribute to the taste.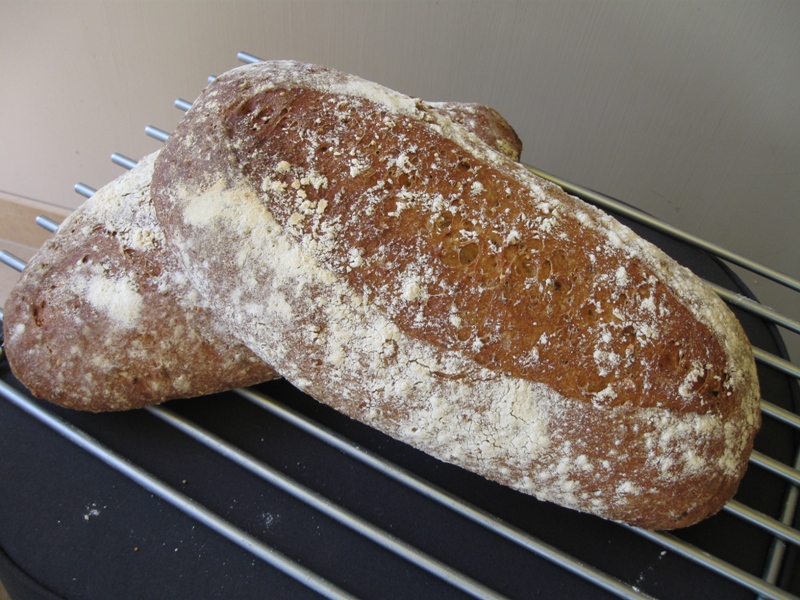
I recently rewatched an old King Arthur baking DVD and thought, well, why not try it. It was revelatory. I had gone over to weighing everything (a la Peter Reinhart) and using my Kitchen Aid (a Christmas present four years ago from my son). In the vid, Michael Dubinski measured all but the flour (OK, so he used cups). He brought the mixture from liquid to dough manually, adding only as much flour as was needed. i tried this and rediscovered why I started baking some 5 years ago (I'm an old, slow learner). What joy, watching ingredi
Here is a picture of my jury-rigged cloche. Not pretty but it works quite well.
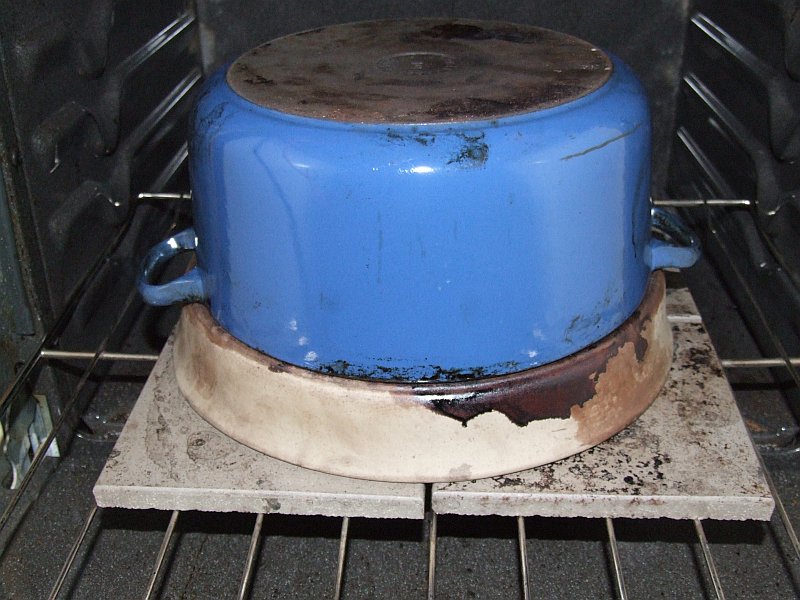
It is a La Creuset round dutch oven (enameled cast-iron, I'm not sure the size) over a Sassafras "Deep Dish Pizza and Pie Baker" (ceramic), upside-down. Someone gave me this as a gift years ago and I've hardly used it until now as I'm not a deep dish pizza fan and can't imagine baking a pie in that thing.
Hansjoakim recently showed us a Flax Seed Rye Bread he baked from a formula Jeffrey Hamelman published in Modern Baking in March, 2009.
After nearly 4 years of gluten free sourdough experimentation and observation I can now intuitively work with the never ending variations that emerge during the sourdough process. Much like people, every gluten free sourdough starter is unique. They respond to temperature, humidity, air flow, and miniscule differences in measurements.
Lately, I’ve become so adept at this kind of baking that I can “correct’ the starter or bread dough as I move through the tasks rather than dutifully following the recipe and ending up with a brick.